| Site News |
|---|
| Warning: This wiki contains spoilers. Read at your own risk! Social media: If you would like, please join our Discord server, and/or follow us on Twitter (X) or Tumblr! |
World map: Difference between revisions
Thecornerman (talk | contribs) |
Thecornerman (talk | contribs) m (Text replacement - "[[Darkling Woods (chapter)|" to "[[Darkling Woods|") |
||
| (19 intermediate revisions by 4 users not shown) | |||
| Line 2: | Line 2: | ||
The '''world map''' (Japanese: {{hl|フリーマップ|Furī mappu}} ''free map'') is a gameplay navigation system introduced in {{FE2}}. In it, as opposed to the linear and uninterrupted chapter progression in most games in the {{FES}}, the player can freely traverse the world at their own pace, fighting marauding bands of enemies which appear and visiting shops in between chapters, and starting said chapters whenever they so choose. | The '''world map''' (Japanese: {{hl|フリーマップ|Furī mappu}} ''free map'') is a gameplay navigation system introduced in {{FE2}}. In it, as opposed to the linear and uninterrupted chapter progression in most games in the {{FES}}, the player can freely traverse the world at their own pace, fighting marauding bands of enemies which appear and visiting shops in between chapters, and starting said chapters whenever they so choose. | ||
A traversable world map has appeared in ''Fire Emblem Gaiden'' and its remake {{title|Shadows of Valentia}}, {{title|The Sacred Stones}}, and {{title| | A traversable world map has appeared in ''Fire Emblem Gaiden'' and its remake {{title|Shadows of Valentia}}, {{title|The Sacred Stones}}, {{title|Awakening}}, and {{title|Engage}}. {{FE14}}, {{title|Three Houses}}, and {{title|Warriors}} each have world maps that cannot be directly traversed, but does show where selected battles are. In all other games—except for {{FE1}}—there is a world map present, but it is used only to show where the party is traveling between chapters, usually accompanied by narration. | ||
=={{FE2}} and {{FE15}}== | =={{FE2}} and {{FE15}}== | ||
| Line 10: | Line 10: | ||
A small few locations—mostly villages, castles, fortresses, and [[dungeon]]s—can be visited outside of battles, and in these the character in question can freely move around and interact with the locals. Some villages contain item exchange couriers who can send a specific item to the other character's party; however, these are limited in number and have only a finite number of uses. | A small few locations—mostly villages, castles, fortresses, and [[dungeon]]s—can be visited outside of battles, and in these the character in question can freely move around and interact with the locals. Some villages contain item exchange couriers who can send a specific item to the other character's party; however, these are limited in number and have only a finite number of uses. | ||
In ''Echoes'' specifically, a red bar also displays the in-game date, season, and year. The season and year progress as each [[Chapter|Act]] is completed, while the number for the day increments by 1 each time Alm or Celica moves from one location to the next, or enters a dungeon or village. This day number can reach up to 999. | |||
{| class="mw-collapsible mw-collapsed basic" style="padding: 3px; border-spacing: 4px; border-radius: 15px; border-width: 2px; width: 80%" | {| class="mw-collapsible mw-collapsed basic" style="padding: 3px; border-spacing: 4px; border-radius: 15px; border-width: 2px; width: 80%" | ||
| Line 19: | Line 21: | ||
|- | |- | ||
| rowspan="37" | [[File:Ss fe02 valentia ingame annotated.png]] | | rowspan="37" | [[File:Ss fe02 valentia ingame annotated.png]] | ||
! colspan="2" | [[Zofia's Call|Act 1]] | ! colspan="2" | [[Zofia's Call|Act 1]] | ||
! colspan="2" | [[The Pilgrimage|Act 2]] | ! colspan="2" | [[The Pilgrimage|Act 2]] | ||
|- | |- | ||
| style="width: 1%; color: #509aff" | 1 | | style="width: 1%; color: #509aff" | 1 | ||
| Line 77: | Line 79: | ||
| Zofia Harbor | | Zofia Harbor | ||
|- | |- | ||
! colspan="4" | [[War of Deliverance|Act 3]] | ! colspan="4" | [[War of Deliverance|Act 3]] | ||
|- | |- | ||
| style="color: #509aff" | 12 | | style="color: #509aff" | 12 | ||
| Line 133: | Line 135: | ||
| [[Temple of Mila]] | | [[Temple of Mila]] | ||
|- | |- | ||
! colspan="4" | [[Land of Sorrow (Gaiden)|Act 4]] | ! colspan="4" | [[Land of Sorrow (Gaiden)|Act 4]] | ||
|- | |- | ||
| style="color: #509aff" | 22 | | style="color: #509aff" | 22 | ||
| Line 188: | Line 190: | ||
| Rigel Castle | | Rigel Castle | ||
|- | |- | ||
! colspan="5" style="border-bottom-left-radius: 15px; border-bottom-right-radius: 15px; padding: 3px; font-size: smaller" | Note: In Act 2, {{color|#f00|#11 Zofia Harbor}} has a route connecting it to {{color|#509aff|#10 Zofia Gate}}; this route is not present in Act 1, and is removed once Act 3 begins. | ! colspan="5" style="border-bottom-left-radius: 15px; border-bottom-right-radius: 15px; padding: 3px; font-size: smaller" | Note: In Act 2, {{color|#f00|#11 Zofia Harbor}} has a route connecting it to {{color|#509aff|#10 Zofia Gate}}; this route is not present in Act 1, and is removed once Act 3 begins. | ||
|} | |} | ||
| Line 194: | Line 196: | ||
In ''The Sacred Stones'', the player navigates Eirika or Ephraim around the world map by directly selecting their destination. Unlike ''Gaiden'' or ''Awakening'', on some occasions multiple chapters will occur on the same world map location and the player is not allowed to return to the world map between each of these chapters. Some locations also offer armories or vendors to be accessed on the world map, usually selling the same items available in the matching shops in the chapter in question; additionally, after the game has been cleared and [[Creature Campaign]] mode has been entered, [[secret shop]]s can also be accessed from the world map, albeit with different stock than what was offered in the original chapters. | In ''The Sacred Stones'', the player navigates Eirika or Ephraim around the world map by directly selecting their destination. Unlike ''Gaiden'' or ''Awakening'', on some occasions multiple chapters will occur on the same world map location and the player is not allowed to return to the world map between each of these chapters. Some locations also offer armories or vendors to be accessed on the world map, usually selling the same items available in the matching shops in the chapter in question; additionally, after the game has been cleared and [[Creature Campaign]] mode has been entered, [[secret shop]]s can also be accessed from the world map, albeit with different stock than what was offered in the original chapters. | ||
After the completion of every chapter from [[It's a Trap!|Chapter 8]] onward, or after leaving the Tower of Valni or Lagdou Ruins, up to three bands of enemy [[monster]]s will randomly spawn on certain locations on the world map. Eirika and Ephraim cannot pass through any location presently occupied by a monster band, and must engage the monsters in a [[skirmish]] before they can access or pass through the location again. This will usually not impede the player's ability to travel, especially later in the game, as the world map connects numerous paths between locations and usually provides an alternative. | After the completion of every chapter from [[It's a Trap!|Chapter 8]] onward, or after leaving the Tower of Valni or Lagdou Ruins, up to three bands of enemy [[monster]]s will randomly spawn on certain locations on the world map. Eirika and Ephraim cannot pass through any location presently occupied by a monster band, and must engage the monsters in a [[skirmish]] before they can access or pass through the location again. This will usually not impede the player's ability to travel, especially later in the game, as the world map connects numerous paths between locations and usually provides an alternative. | ||
Access to the [[Tower of Valni]] is granted once Chapter 8 has been cleared. Access to the [[Lagdou Ruins]] and [[Melkaen Coast]] is granted once Chapter 19 has been cleared. | Access to the [[Tower of Valni]] is granted once Chapter 8 has been cleared. Access to the [[Lagdou Ruins]] and [[Melkaen Coast]] is granted once Chapter 19 has been cleared. | ||
{| class="mw-collapsible mw-collapsed basic" style="padding: 3px; border-spacing: 4px; border-radius: 15px; border-width: 2px; width: 89%" | {| class="mw-collapsible mw-collapsed basic" style="padding: 3px; border-spacing: 4px; border-radius: 15px; border-width: 2px; width: 89%" | ||
| Line 214: | Line 216: | ||
|- | |- | ||
! 1 | ! 1 | ||
| [[Escape!|Chapter 1]] | | [[Escape!|Chapter 1]] | ||
| Border Mulan | | Border Mulan | ||
! style="color: #70a0b8" | 10 | ! style="color: #70a0b8" | 10 | ||
| [[Revolt at Carcino|Chapter 10A]] | | [[Revolt at Carcino|Chapter 10A]] | ||
| [[ | | [[Teraz Plateau]] [[File:Is gba rotten claw.png]] | ||
! 16 | ! 16 | ||
| [[Ruled by Madness|Chapter 16]] | | [[Ruled by Madness|Chapter 16]] | ||
| [[ | | [[Renais Castle]] | ||
|- | |- | ||
! -- | ! -- | ||
| Line 227: | Line 229: | ||
| [[Frelia|Castle Frelia]] | | [[Frelia|Castle Frelia]] | ||
! style="color: #70a0b8" | 11/12 | ! style="color: #70a0b8" | 11/12 | ||
| [[Creeping Darkness|Chapter 11A]]<br>[[Village of Silence|Chapter 12A]] | | [[Creeping Darkness|Chapter 11A]]<br>[[Village of Silence|Chapter 12A]] | ||
| [[Caer Pelyn]] [[File:Is gba vulnerary.png]] | | [[Caer Pelyn]] [[File:Is gba vulnerary.png]] | ||
! 17 | ! 17 | ||
| [[River of Regrets|Chapter 17]] | | [[River of Regrets|Chapter 17]] | ||
| Narube River [[File:Is gba iron sword.png]][[File:Is gba vulnerary.png]][[File:Is gba rotten claw.png]] | | Narube River [[File:Is gba iron sword.png]][[File:Is gba vulnerary.png]][[File:Is gba rotten claw.png]] | ||
|- | |- | ||
! 2 | ! 2 | ||
| [[The Protected|Chapter 2]] | | [[The Protected|Chapter 2]] | ||
| Ide [[File:Is gba iron sword.png]] | | Ide [[File:Is gba iron sword.png]] | ||
! style="color: #70a0b8" | 13 | ! style="color: #70a0b8" | 13 | ||
| [[Hamill Canyon|Chapter 13A]] | | [[Hamill Canyon|Chapter 13A]] | ||
| Hamill Canyon [[File:Is gba rotten claw.png]] | | Hamill Canyon [[File:Is gba rotten claw.png]] | ||
! 18 | ! 18 | ||
| [[Two Faces of Evil|Chapter 18]] | | [[Two Faces of Evil|Chapter 18]] | ||
| Neleras Peak [[File:Is gba rotten claw.png]] | | Neleras Peak [[File:Is gba rotten claw.png]] | ||
|- | |- | ||
! 3 | ! 3 | ||
| [[The Bandits of Borgo|Chapter 3]] | | [[The Bandits of Borgo|Chapter 3]] | ||
| Borgo Ridge | | Borgo Ridge | ||
! style="color: #7078c0" | 9 | ! style="color: #7078c0" | 9 | ||
| [[Fort Rigwald|Chapter 9B]] | | [[Fort Rigwald|Chapter 9B]] | ||
| Fort Rigwald | | Fort Rigwald | ||
! 19 | ! 19 | ||
| [[Last Hope|Chapter 19]] | | [[Last Hope|Chapter 19]] | ||
| [[ | | [[Rausten Court]] [[File:Is gba iron sword.png]][[File:Is gba vulnerary.png]][[File:Is gba member card.png]] | ||
|- | |- | ||
! 4 | ! 4 | ||
| [[Ancient Horrors|Chapter 4]] | | [[Ancient Horrors|Chapter 4]] | ||
| [[Za'ha Woods]] [[File:Is gba rotten claw.png]] | | [[Za'ha Woods]] [[File:Is gba rotten claw.png]] | ||
! style="color: #7078c0" | 10 | ! style="color: #7078c0" | 10 | ||
| [[Turning Traitor|Chapter 10B]] | | [[Turning Traitor|Chapter 10B]] | ||
| Bethroen [[File:Is gba iron sword.png]][[File:Is gba vulnerary.png]][[File:Is gba rotten claw.png]] | | Bethroen [[File:Is gba iron sword.png]][[File:Is gba vulnerary.png]][[File:Is gba rotten claw.png]] | ||
! 20 | ! 20 | ||
| [[Darkling Woods | | [[Darkling Woods|Chapter 20]]<br>[[Sacred Stone (part 1)|Final Chapter]] | ||
| [[Darkling Woods (location)|Black Temple]] | | [[Darkling Woods (location)|Black Temple]] | ||
|- | |- | ||
! 5 | ! 5 | ||
| [[The Empire's Reach|Chapter 5]] | | [[The Empire's Reach|Chapter 5]] | ||
| Serafew [[File:Is gba iron sword.png]][[File:Is gba vulnerary.png]] | | Serafew [[File:Is gba iron sword.png]][[File:Is gba vulnerary.png]] | ||
! style="color: #7078c0" | 11/12 | ! style="color: #7078c0" | 11/12 | ||
| [[Phantom Ship|Chapter 11B]]<br>[[Landing at Taizel|Chapter 12B]] | | [[Phantom Ship|Chapter 11B]]<br>[[Landing at Taizel|Chapter 12B]] | ||
| Taizel [[File:Is gba vulnerary.png]] | | Taizel [[File:Is gba vulnerary.png]] | ||
! style="color: #ff0000" | M | ! style="color: #ff0000" | M | ||
| Line 274: | Line 276: | ||
|- | |- | ||
! 6 | ! 6 | ||
| [[Victims of War|Chapter 6]] | | [[Victims of War|Chapter 6]] | ||
| Adlas Plains [[File:Is gba rotten claw.png]] | | Adlas Plains [[File:Is gba rotten claw.png]] | ||
! style="color: #7078c0" | 13 | ! style="color: #7078c0" | 13 | ||
| [[Fluorspar's Oath|Chapter 13B]] | | [[Fluorspar's Oath|Chapter 13B]] | ||
| Za'albul Marsh [[File:Is gba rotten claw.png]] | | Za'albul Marsh [[File:Is gba rotten claw.png]] | ||
| style="color: #ff0000" | V | | style="color: #ff0000" | V | ||
| Line 283: | Line 285: | ||
|- | |- | ||
! 7/8 | ! 7/8 | ||
| [[Waterside Renvall|Chapter 7]]<br>[[It's a Trap!|Chapter 8]] | | [[Waterside Renvall|Chapter 7]]<br>[[It's a Trap!|Chapter 8]] | ||
| Renvall | | Renvall | ||
! style="color: #7078c0" | 14 | ! style="color: #7078c0" | 14 | ||
| [[Father and Son|Chapter 14B]] | | [[Father and Son|Chapter 14B]] | ||
| [[ | | [[Grado Keep]] [[File:Is gba member card.png]] | ||
! style="color: #ff0000" | L | ! style="color: #ff0000" | L | ||
| colspan="2" | [[Lagdou Ruins]] | | colspan="2" | [[Lagdou Ruins]] | ||
|- | |- | ||
! style="color: #70a0b8" | 9 | ! style="color: #70a0b8" | 9 | ||
| [[Distant Blade|Chapter 9A]] | | [[Distant Blade|Chapter 9A]] | ||
| Port Kiris [[File:Is gba iron sword.png]][[File:Is gba vulnerary.png]] | | Port Kiris [[File:Is gba iron sword.png]][[File:Is gba vulnerary.png]] | ||
! {{color|#70a0b8|14}}/15 | ! {{color|#70a0b8|14}}/15 | ||
| [[Queen of White Dunes|Chapter 14A]]<br>[[Scorched Sand|Chapter 15]] | | [[Queen of White Dunes|Chapter 14A]]<br>[[Scorched Sand|Chapter 15]] | ||
| [[ | | [[Jehanna Hall]] [[File:Is gba vulnerary.png]][[File:Is gba member card.png]] | ||
|- | |- | ||
! colspan="9" style="border-bottom-left-radius: 15px; border-bottom-right-radius: 15px; padding: 3px; font-size: smaller" | Note: Locations numbered in {{color|#70a0b8|teal}} comprise [[Eirika]]'s [[Alternate route|route]] (Route A), while locations numbered in {{color|#7078c0|steel blue}} comprise [[Ephraim]]'s route (Route B).<br>Locations listed with a [[File:Is gba rotten claw.png]] [[Rotten Claw]] icon in the chart can host [[skirmish]]es. Locations listed with an {{Item|gba|Iron Sword}} icon in the chart house an [[armory]], locations with a {{Item|gba|Vulnerary}} icon house a [[ | ! colspan="9" style="border-bottom-left-radius: 15px; border-bottom-right-radius: 15px; padding: 3px; font-size: smaller" | Note: Locations numbered in {{color|#70a0b8|teal}} comprise [[Eirika]]'s [[Alternate route|route]] (Route A), while locations numbered in {{color|#7078c0|steel blue}} comprise [[Ephraim]]'s route (Route B).<br>Locations listed with a [[File:Is gba rotten claw.png]] [[Rotten Claw]] icon in the chart can host [[skirmish]]es. Locations listed with an {{Item|gba|Iron Sword}} icon in the chart house an [[armory]], locations with a {{Item|gba|Vulnerary}} icon house a [[vendor]], and locations with a {{Item|gba|Member Card}} icon house a [[secret shop]]. | ||
|} | |} | ||
| Line 306: | Line 308: | ||
As with ''The Sacred Stones'', [[Risen]] bands periodically appear to create [[skirmish]]es, but this time the player is not forced to defeat them to enter or pass the location, although the [[armory]] cannot be accessed while a Risen group is present. On rare occasions, two groups of Risen will appear on the same map location and are fought simultaneously, rewarding the player with both a sum of [[gold]] and a rare item. Additionally, [[bonus units]] and the teams they lead will spawn on the map to be parleyed with when the [[Nintendo 3DS]] console receives a [[StreetPass]] tag, and [[SpotPass]] bonus unit teams can be summoned to the world map at any time through the Wireless menu, with a maximum of ten allowed to be on the fully unlocked map at a time. | As with ''The Sacred Stones'', [[Risen]] bands periodically appear to create [[skirmish]]es, but this time the player is not forced to defeat them to enter or pass the location, although the [[armory]] cannot be accessed while a Risen group is present. On rare occasions, two groups of Risen will appear on the same map location and are fought simultaneously, rewarding the player with both a sum of [[gold]] and a rare item. Additionally, [[bonus units]] and the teams they lead will spawn on the map to be parleyed with when the [[Nintendo 3DS]] console receives a [[StreetPass]] tag, and [[SpotPass]] bonus unit teams can be summoned to the world map at any time through the Wireless menu, with a maximum of ten allowed to be on the fully unlocked map at a time. | ||
Access to the Outrealm Gate—and by extension, all [[Downloadable content in Fire Emblem Awakening|downloadable content]]—is granted after [[Two Falchions|Chapter 4]] has been cleared. Access to the six SpotPass paralogues, marked in {{color|#FF801F|'''orange'''}}, is granted once [[To Slay a God|Chapter 25]] has been cleared and the relevant SpotPass data has been activated on the save file. | Access to the Outrealm Gate—and by extension, all [[Downloadable content in Fire Emblem Awakening|downloadable content]]—is granted after [[Two Falchions|Chapter 4]] has been cleared. Access to the six SpotPass paralogues, marked in {{color|#FF801F|'''orange'''}}, is granted once [[To Slay a God|Chapter 25]] has been cleared and the relevant SpotPass data has been activated on the save file. | ||
{| class="mw-collapsible mw-collapsed basic" style="padding: 3px; border-spacing: 4px; border-radius: 15px; border-width: 2px; width: 89%" | {| class="mw-collapsible mw-collapsed basic" style="padding: 3px; border-spacing: 4px; border-radius: 15px; border-width: 2px; width: 89%" | ||
| Line 328: | Line 330: | ||
! 16 | ! 16 | ||
| [[File:Mi fe13 the mila tree.png]] | | [[File:Mi fe13 the mila tree.png]] | ||
| [[Naga's Voice|Chapter 16]] | | [[Naga's Voice|Chapter 16]] | ||
| The Mila Tree | | The Mila Tree | ||
! style="color: #40ff3f" | 7 | ! style="color: #40ff3f" | 7 | ||
| Line 341: | Line 343: | ||
! 17 | ! 17 | ||
| [[File:Mi fe13 fort steiger.png]] | | [[File:Mi fe13 fort steiger.png]] | ||
| [[Inexorable Death|Chapter 17]] | | [[Inexorable Death|Chapter 17]] | ||
| Fort Steiger | | Fort Steiger | ||
! style="color: #40ff3f" | 8 | ! style="color: #40ff3f" | 8 | ||
| Line 350: | Line 352: | ||
! 1 | ! 1 | ||
| [[File:Mi fe13 west of ylisstol.png]] | | [[File:Mi fe13 west of ylisstol.png]] | ||
| [[Unwelcome Change|Chapter 1]] | | [[Unwelcome Change|Chapter 1]] | ||
| West of Ylisstol | | West of Ylisstol | ||
! 18 | ! 18 | ||
| [[File:Mi fe13 the demon's ingle.png]] | | [[File:Mi fe13 the demon's ingle.png]] | ||
| [[Sibling Blades|Chapter 18]] | | [[Sibling Blades|Chapter 18]] | ||
| The Demon's Ingle | | The Demon's Ingle | ||
! style="color: #40ff3f" | 9 | ! style="color: #40ff3f" | 9 | ||
| Line 363: | Line 365: | ||
! 2 | ! 2 | ||
| [[File:Mi fe13 the northroad.png]] | | [[File:Mi fe13 the northroad.png]] | ||
| [[Shepherds (chapter)|Chapter 2]] | | [[Shepherds (chapter)|Chapter 2]] | ||
| The Northroad | | The Northroad | ||
! 19 | ! 19 | ||
| [[File:Mi fe13 valm castle approach.png]] | | [[File:Mi fe13 valm castle approach.png]] | ||
| [[The Conqueror|Chapter 19]] | | [[The Conqueror|Chapter 19]] | ||
| Valm Castle Approach | | Valm Castle Approach | ||
! style="color: #40ff3f" | 10 | ! style="color: #40ff3f" | 10 | ||
| Line 376: | Line 378: | ||
! 3 | ! 3 | ||
| [[File:Mi fe13 the longfort.png]] | | [[File:Mi fe13 the longfort.png]] | ||
| [[Warrior Realm|Chapter 3]] | | [[Warrior Realm|Chapter 3]] | ||
| The Longfort | | The Longfort | ||
! 20 | ! 20 | ||
| [[File:Mi fe13 valm castle.png]] | | [[File:Mi fe13 valm castle.png]] | ||
| [[The Sword or the Knee|Chapter 20]] | | [[The Sword or the Knee|Chapter 20]] | ||
| Valm Castle | | Valm Castle | ||
! style="color: #40ff3f" | 11 | ! style="color: #40ff3f" | 11 | ||
| Line 389: | Line 391: | ||
! 4 | ! 4 | ||
| [[File:Mi fe13 arena ferox.png]] | | [[File:Mi fe13 arena ferox.png]] | ||
| [[Two Falchions|Chapter 4]] | | [[Two Falchions|Chapter 4]] | ||
| [[Arena Ferox]] | | [[Arena Ferox]] | ||
! 21 | ! 21 | ||
| [[File:Mi fe13 plegia castle.png]] | | [[File:Mi fe13 plegia castle.png]] | ||
| [[Five Gemstones|Chapter 21]] | | [[Five Gemstones|Chapter 21]] | ||
| Plegia Castle | | Plegia Castle | ||
! style="color: #40ff3f" | 12 | ! style="color: #40ff3f" | 12 | ||
| Line 402: | Line 404: | ||
! 5 | ! 5 | ||
| [[File:Mi fe13 border pass.png]] | | [[File:Mi fe13 border pass.png]] | ||
| [[The Exalt and the King|Chapter 5]] | | [[The Exalt and the King|Chapter 5]] | ||
| Border Pass | | Border Pass | ||
! 22 | ! 22 | ||
| [[File:Mi fe13 table approach.png]] | | [[File:Mi fe13 table approach.png]] | ||
| [[An Ill Presage|Chapter 22]] | | [[An Ill Presage|Chapter 22]] | ||
| Table Approach | | Table Approach | ||
! style="color: #40ff3f" | 13 | ! style="color: #40ff3f" | 13 | ||
| Line 415: | Line 417: | ||
! 6 | ! 6 | ||
| [[File:Mi fe13 ylisstol.png]] | | [[File:Mi fe13 ylisstol.png]] | ||
| [[Foreseer|Chapter 6]] | | [[Foreseer|Chapter 6]] | ||
| Ylisstol | | Ylisstol | ||
! 23 | ! 23 | ||
| [[File:Mi fe13 the dragon's table.png]] | | [[File:Mi fe13 the dragon's table.png]] | ||
| [[Invisible Ties|Chapter 23]] | | [[Invisible Ties|Chapter 23]] | ||
| [[Dragon's Table|The Dragon's Table]] | | [[Dragon's Table|The Dragon's Table]] | ||
! style="color: #40ff3f" | 14 | ! style="color: #40ff3f" | 14 | ||
| Line 428: | Line 430: | ||
! 7 | ! 7 | ||
| [[File:Mi fe13 breakneck pass.png]] | | [[File:Mi fe13 breakneck pass.png]] | ||
| [[Incursion|Chapter 7]] | | [[Incursion|Chapter 7]] | ||
| Breakneck Pass | | Breakneck Pass | ||
! 24 | ! 24 | ||
| [[File:Mi fe13 mount prism.png]] | | [[File:Mi fe13 mount prism.png]] | ||
| [[Awakening (chapter)|Chapter 24]] | | [[Awakening (chapter)|Chapter 24]] | ||
| Mount Prism | | Mount Prism | ||
! style="color: #40ff3f" | 15 | ! style="color: #40ff3f" | 15 | ||
| Line 441: | Line 443: | ||
! 8 | ! 8 | ||
| [[File:Mi fe13 border sands.png]] | | [[File:Mi fe13 border sands.png]] | ||
| [[The Grimleal|Chapter 8]] | | [[The Grimleal|Chapter 8]] | ||
| Border Sands | | Border Sands | ||
! 25 | ! 25 | ||
| [[File:Mi fe13 origin peak.png]] | | [[File:Mi fe13 origin peak.png]] | ||
| [[To Slay a God|Chapter 25]] | | [[To Slay a God|Chapter 25]] | ||
| Origin Peak | | Origin Peak | ||
! style="color: #40ff3f" | 16 | ! style="color: #40ff3f" | 16 | ||
| Line 454: | Line 456: | ||
! 9 | ! 9 | ||
| [[File:Mi fe13 plegia castle courtyard.png]] | | [[File:Mi fe13 plegia castle courtyard.png]] | ||
| [[Emmeryn (chapter)|Chapter 9]] | | [[Emmeryn (chapter)|Chapter 9]] | ||
| Plegia Castle Courtyard | | Plegia Castle Courtyard | ||
! style="color: #fe413f" | E | ! style="color: #fe413f" | E | ||
| [[File:Mi fe13 grima.png]] | | [[File:Mi fe13 grima.png]] | ||
| [[Grima (chapter)|Endgame]] | | [[Grima (chapter)|Endgame]] | ||
| [[ | | [[Grima]] | ||
! style="color: #40ff3f" | 17 | ! style="color: #40ff3f" | 17 | ||
| [[File:Mi fe13 divine dragon grounds.png]] | | [[File:Mi fe13 divine dragon grounds.png]] | ||
| Line 467: | Line 469: | ||
! 10 | ! 10 | ||
| [[File:Mi fe13 the midmire.png]] | | [[File:Mi fe13 the midmire.png]] | ||
| [[Renewal (chapter)|Chapter 10]] | | [[Renewal (chapter)|Chapter 10]] | ||
| The Midmire | | The Midmire | ||
! style="color: #40ff3f" | 1 | ! style="color: #40ff3f" | 1 | ||
| Line 480: | Line 482: | ||
! 11 | ! 11 | ||
| [[File:Mi fe13 border wastes.png]] | | [[File:Mi fe13 border wastes.png]] | ||
| [[Mad King Gangrel|Chapter 11]] | | [[Mad King Gangrel|Chapter 11]] | ||
| Border Wastes | | Border Wastes | ||
! style="color: #40ff3f" | 2 | ! style="color: #40ff3f" | 2 | ||
| Line 493: | Line 495: | ||
! 12 | ! 12 | ||
| [[File:Mi fe13 port ferox.png]] | | [[File:Mi fe13 port ferox.png]] | ||
| [[The Seacomers|Chapter 12]] | | [[The Seacomers|Chapter 12]] | ||
| Port Ferox | | Port Ferox | ||
! style="color: #40ff3f" | 3 | ! style="color: #40ff3f" | 3 | ||
| Line 506: | Line 508: | ||
! 13 | ! 13 | ||
| [[File:Mi fe13 carrion isle.png]] | | [[File:Mi fe13 carrion isle.png]] | ||
| [[Of Sacred Blood|Chapter 13]] | | [[Of Sacred Blood|Chapter 13]] | ||
| Carrion Isle | | Carrion Isle | ||
! style="color: #40ff3f" | 4 | ! style="color: #40ff3f" | 4 | ||
| Line 519: | Line 521: | ||
! 14 | ! 14 | ||
| [[File:Mi fe13 the searoad.png]] | | [[File:Mi fe13 the searoad.png]] | ||
| [[Flames on the Blue|Chapter 14]] | | [[Flames on the Blue|Chapter 14]] | ||
| The Searoad | | The Searoad | ||
! style="color: #40ff3f" | 5 | ! style="color: #40ff3f" | 5 | ||
| Line 532: | Line 534: | ||
! 15 | ! 15 | ||
| [[File:Mi fe13 valm harbor.png]] | | [[File:Mi fe13 valm harbor.png]] | ||
| [[Smoldering Resistance|Chapter 15]] | | [[Smoldering Resistance|Chapter 15]] | ||
| Valm Harbor | | Valm Harbor | ||
! style="color: #40ff3f" | 6 | ! style="color: #40ff3f" | 6 | ||
| Line 540: | Line 542: | ||
! style="color: #FF801F" | 23 | ! style="color: #FF801F" | 23 | ||
| [[File:Mi fe13 garden of giants.png]] | | [[File:Mi fe13 garden of giants.png]] | ||
| [[The Radiant Hero|Paralogue 23]] | | [[The Radiant Hero (Awakening)|Paralogue 23]] | ||
| Garden of Giants | | Garden of Giants | ||
|- | |- | ||
| Line 552: | Line 554: | ||
Much like ''Awakening'', bandits periodically appear to create [[skirmish]]es in the ''Birthright'' and ''Revelation'' campaigns. Additionally, the player can pay a fee to spawn a group of bandits when selecting a location of the map; a maximum of two groups of bandits may be present at any map location. Fighting two groups of bandits simultaneously is also more likely to reward the player with a rare item in addition to a sum of [[gold]]. | Much like ''Awakening'', bandits periodically appear to create [[skirmish]]es in the ''Birthright'' and ''Revelation'' campaigns. Additionally, the player can pay a fee to spawn a group of bandits when selecting a location of the map; a maximum of two groups of bandits may be present at any map location. Fighting two groups of bandits simultaneously is also more likely to reward the player with a rare item in addition to a sum of [[gold]]. | ||
Access to the Dragon's Gate—and by extension, all [[Downloadable content in Fire Emblem Fates|downloadable content]]—is granted after [[The Path is Yours|Chapter 6]] has been cleared. | Access to the Dragon's Gate—and by extension, all [[Downloadable content in Fire Emblem Fates|downloadable content]]—is granted after [[The Path is Yours|Chapter 6]] has been cleared. | ||
{| class="mw-collapsible mw-collapsed basic" style="padding: 3px; border-spacing: 4px; border-radius: 15px; border-width: 2px; width: 89%" | {| class="mw-collapsible mw-collapsed basic" style="padding: 3px; border-spacing: 4px; border-radius: 15px; border-width: 2px; width: 89%" | ||
| Line 570: | Line 572: | ||
|- | |- | ||
! colspan="2" | P<br>{{color|#ff0000|6}}<br>{{color|#9090a8|6}}<br>{{color|#30b8b8|6}} | ! colspan="2" | P<br>{{color|#ff0000|6}}<br>{{color|#9090a8|6}}<br>{{color|#30b8b8|6}} | ||
| [[Ties That Bind|Prologue]]<br>[[In the White Light|Chapter 6]]<br>[[Embrace the Dark|Chapter 6]]<br>[[Into the Ground|Chapter 6]] | | [[Ties That Bind|Prologue]]<br>[[In the White Light|Chapter 6]]<br>[[Embrace the Dark|Chapter 6]]<br>[[Into the Ground|Chapter 6]] | ||
| Plains of Hoshido | | Plains of Hoshido | ||
! colspan="2" | {{color|#ff0000|20}}<br>{{color|#9090a8|9}} | ! colspan="2" | {{color|#ff0000|20}}<br>{{color|#9090a8|9}} | ||
| [[Fort Dragonfall|Chapter 20]]<br>[[Another Trial|Chapter 9]] | | [[Fort Dragonfall|Chapter 20]]<br>[[Another Trial|Chapter 9]] | ||
| Fort Dragonfall | | Fort Dragonfall | ||
! style="color: #30b8b8" colspan="2" | 10 | ! style="color: #30b8b8" colspan="2" | 10 | ||
| [[Voice of a God|Chapter 10]] | | [[Voice of a God|Chapter 10]] | ||
| Town in Izumo | | Town in Izumo | ||
|- | |- | ||
! colspan="2" | 1 | ! colspan="2" | 1 | ||
| [[Nohr (chapter)|Chapter 1]] | | [[Nohr (chapter)|Chapter 1]] | ||
| Northern Fortress | | Northern Fortress | ||
! style="color: #ff0000" colspan="2" | 21 | ! style="color: #ff0000" colspan="2" | 21 | ||
| [[Burning Falls|Chapter 21]] | | [[Burning Falls|Chapter 21]] | ||
| Demon's Falls | | Demon's Falls | ||
! style="color: #30b8b8" colspan="2" | 12 | ! style="color: #30b8b8" colspan="2" | 12 | ||
| [[Frozen Sea|Chapter 12]] | | [[Frozen Sea|Chapter 12]] | ||
| At Sea | | At Sea | ||
|- | |- | ||
! colspan="2" | 2 | ! colspan="2" | 2 | ||
| [[Gift of Ganglari|Chapter 2]] | | [[Gift of Ganglari|Chapter 2]] | ||
| Castle: Reception Room | | Castle: Reception Room | ||
! style="color: #ff0000" colspan="2" | 22 | ! style="color: #ff0000" colspan="2" | 22 | ||
| [[Hidden Capital|Chapter 22]] | | [[Hidden Capital|Chapter 22]] | ||
| Windmire | | Windmire | ||
! style="color: #30b8b8" colspan="2" | 13 | ! style="color: #30b8b8" colspan="2" | 13 | ||
| [[A Lost Peace|Chapter 13]] | | [[A Lost Peace|Chapter 13]] | ||
| Destroyed Town | | Destroyed Town | ||
|- | |- | ||
! colspan="2" | 3 | ! colspan="2" | 3 | ||
| [[Journey Begins|Chapter 3]] | | [[Journey Begins|Chapter 3]] | ||
| [[Bottomless Canyon]] North | | [[Bottomless Canyon]] North | ||
! style="color: #ff0000" colspan="2" | 23 | ! style="color: #ff0000" colspan="2" | 23 | ||
| [[Camilla (chapter)|Chapter 23]] | | [[Camilla (chapter)|Chapter 23]] | ||
| Underground Passage | | Underground Passage | ||
! style="color: #30b8b8" colspan="2" | 16 | ! style="color: #30b8b8" colspan="2" | 16 | ||
| [[White Flames|Chapter 16]] | | [[White Flames|Chapter 16]] | ||
| Lava Fields | | Lava Fields | ||
|- | |- | ||
! colspan="2" | 4 | ! colspan="2" | 4 | ||
| [[Hoshido (chapter)|Chapter 4]] | | [[Hoshido (chapter)|Chapter 4]] | ||
| Valley Settlement | | Valley Settlement | ||
! style="color: #ff0000" colspan="2" | 24 | ! style="color: #ff0000" colspan="2" | 24 | ||
| [[Tears of a Dragon|Chapter 24]] | | [[Tears of a Dragon|Chapter 24]] | ||
| Castle: Training Grounds | | Castle: Training Grounds | ||
! style="color: #30b8b8" colspan="2" | 17 | ! style="color: #30b8b8" colspan="2" | 17 | ||
| [[Black Flames|Chapter 17]] | | [[Black Flames|Chapter 17]] | ||
| [[Bottomless Canyon]], South | | [[Bottomless Canyon]], South | ||
|- | |- | ||
! colspan="2" | 5 | ! colspan="2" | 5 | ||
| [[Mother|Chapter 5]] | | [[Mother|Chapter 5]] | ||
| Hoshido Capital: Plaza | | Hoshido Capital: Plaza | ||
! style="color: #ff0000" colspan="2" | 25 | ! style="color: #ff0000" colspan="2" | 25 | ||
| [[Traitor Revealed|Chapter 25]] | | [[Traitor Revealed|Chapter 25]] | ||
| Castle: Grand Staircase | | Castle: Grand Staircase | ||
! style="color: #40ff3f" colspan="2" | 1 | ! style="color: #40ff3f" colspan="2" | 1 | ||
| Line 630: | Line 632: | ||
|- | |- | ||
! colspan="2" | {{color|#ff0000|7}}<br>{{color|#9090a8|22}}<br>{{color|#30b8b8|8}} | ! colspan="2" | {{color|#ff0000|7}}<br>{{color|#9090a8|22}}<br>{{color|#30b8b8|8}} | ||
| [[A Vow Upheld|Chapter 7]]<br>[[Sakura (chapter)|Chapter 22]]<br>[[Traitor's Brand|Chapter 8]] | | [[A Vow Upheld|Chapter 7]]<br>[[Sakura (chapter)|Chapter 22]]<br>[[Traitor's Brand|Chapter 8]] | ||
| Fort Jinya | | Fort Jinya | ||
! style="color: #ff0000" colspan="2" | 26 | ! style="color: #ff0000" colspan="2" | 26 | ||
| [[Xander (chapter)|Chapter 26]] | | [[Xander (chapter)|Chapter 26]] | ||
| Castle: Combat Room | | Castle: Combat Room | ||
! style="color: #40ff3f" colspan="2" | 5 | ! style="color: #40ff3f" colspan="2" | 5 | ||
| Line 640: | Line 642: | ||
|- | |- | ||
! colspan="2" | {{color|#ff0000|8}}<br>{{color|#9090a8|20}}<br>{{color|#30b8b8|9}} | ! colspan="2" | {{color|#ff0000|8}}<br>{{color|#9090a8|20}}<br>{{color|#30b8b8|9}} | ||
| [[Fierce Winds|Chapter 8]]<br>[[Winds of Change|Chapter 20]]<br>[[Wanderer|Chapter 9]] | | [[Fierce Winds|Chapter 8]]<br>[[Winds of Change|Chapter 20]]<br>[[Wanderer|Chapter 9]] | ||
| [[Wind Tribe]] Village | | [[Wind Tribe]] Village | ||
! style="color: #ff0000" colspan="2" | 27/E | ! style="color: #ff0000" colspan="2" | 27/E | ||
| [[King Garon|Chapter 27]]<br>[[Dawn Breaks|Endgame]] | | [[King Garon|Chapter 27]]<br>[[Dawn Breaks|Endgame]] | ||
| Castle: Throne Room | | Castle: Throne Room | ||
! style="color: #40ff3f" colspan="2" | 6 | ! style="color: #40ff3f" colspan="2" | 6 | ||
| Line 650: | Line 652: | ||
|- | |- | ||
! colspan="2" | {{color|#ff0000|9}}<br>{{color|#9090a8|20}} | ! colspan="2" | {{color|#ff0000|9}}<br>{{color|#9090a8|20}} | ||
| [[Land of Gods|Chapter 9]]<br>[[Black & White|Chapter 18]] | | [[Land of Gods|Chapter 9]]<br>[[Black & White|Chapter 18]] | ||
| [[Izumo]]: Castle Interior | | [[Izumo]]: Castle Interior | ||
! colspan="2" | {{color|#9090a8|10}}<br>{{color|#30b8b8|14}} | ! colspan="2" | {{color|#9090a8|10}}<br>{{color|#30b8b8|14}} | ||
| [[Unhappy Reunion|Chapter 10]]<br>[[Orders|Chapter 14]] | | [[Unhappy Reunion|Chapter 10]]<br>[[Orders|Chapter 14]] | ||
| [[Nestra|Port Town of Dia]] | | [[Nestra|Port Town of Dia]] | ||
! style="color: #40ff3f" colspan="2" | 7 | ! style="color: #40ff3f" colspan="2" | 7 | ||
| Line 660: | Line 662: | ||
|- | |- | ||
! colspan="2" | {{color|#ff0000|10}}<br>{{color|#30b8b8|11}} | ! colspan="2" | {{color|#ff0000|10}}<br>{{color|#30b8b8|11}} | ||
| [[Ninja Village|Chapter 10]]<br>[[Mutual Enemies|Chapter 11]] | | [[Ninja Village|Chapter 10]]<br>[[Mutual Enemies|Chapter 11]] | ||
| [[Mokushu]] Forest | | [[Mokushu]] Forest | ||
! style="color: #9090a8" colspan="2" | 12 | ! style="color: #9090a8" colspan="2" | 12 | ||
| [[Bitter Intrigue|Chapter 12]] | | [[Bitter Intrigue|Chapter 12]] | ||
| Palace Macarath | | Palace Macarath | ||
! style="color: #40ff3f" colspan="2" | 9 | ! style="color: #40ff3f" colspan="2" | 9 | ||
| Line 670: | Line 672: | ||
|- | |- | ||
! style="color: #ff0000" colspan="2" | 11 | ! style="color: #ff0000" colspan="2" | 11 | ||
| [[To the Sea|Chapter 11]] | | [[To the Sea|Chapter 11]] | ||
| Sea of [[Hoshido]] | | Sea of [[Hoshido]] | ||
! style="color: #9090a8" colspan="2" | 16 | ! style="color: #9090a8" colspan="2" | 16 | ||
| [[Invasion|Chapter 16]] | | [[Invasion|Chapter 16]] | ||
| Nohrian Sea | | Nohrian Sea | ||
! style="color: #40ff3f" colspan="2" | 10 | ! style="color: #40ff3f" colspan="2" | 10 | ||
| Line 680: | Line 682: | ||
|- | |- | ||
! colspan="2" | {{color|#ff0000|12}}<br>{{color|#9090a8|14}} | ! colspan="2" | {{color|#ff0000|12}}<br>{{color|#9090a8|14}} | ||
| [[Dark Reunion|Chapter 12]]<br>[[Voice of Paradise|Chapter 14]] | | [[Dark Reunion|Chapter 12]]<br>[[Voice of Paradise|Chapter 14]] | ||
| Opera House | | Opera House | ||
! style="color: #9090a8" colspan="2" | 17 | ! style="color: #9090a8" colspan="2" | 17 | ||
| [[Den of Betrayal|Chapter 17]] | | [[Den of Betrayal|Chapter 17]] | ||
| Cave in Mokushu | | Cave in Mokushu | ||
! style="color: #40ff3f" colspan="2" | 13 | ! style="color: #40ff3f" colspan="2" | 13 | ||
| Line 690: | Line 692: | ||
|- | |- | ||
! colspan="2" | {{color|#ff0000|13}}<br>{{color|#9090a8|13}} | ! colspan="2" | {{color|#ff0000|13}}<br>{{color|#9090a8|13}} | ||
| [[Another Hope|Chapter 12]]<br>[[Uprising|Chapter 14]] | | [[Another Hope|Chapter 12]]<br>[[Uprising|Chapter 14]] | ||
| [[Cheve]] | | [[Cheve]] | ||
! style="color: #9090a8" colspan="2" | 19 | ! style="color: #9090a8" colspan="2" | 19 | ||
| [[Kitsune Lair|Chapter 19]] | | [[Kitsune Lair|Chapter 19]] | ||
| Kitsune Hamlet | | Kitsune Hamlet | ||
! style="color: #40ff3f" colspan="2" | 16 | ! style="color: #40ff3f" colspan="2" | 16 | ||
| Line 700: | Line 702: | ||
|- | |- | ||
! style="color: #ff0000" colspan="2" | 14 | ! style="color: #ff0000" colspan="2" | 14 | ||
| [[Light Scatters|Chapter 14]] | | [[Light Scatters|Chapter 14]] | ||
| Border Walls | | Border Walls | ||
! style="color: #9090a8" colspan="2" | 21 | ! style="color: #9090a8" colspan="2" | 21 | ||
| [[Eternal Stairway|Chapter 21]] | | [[Eternal Stairway|Chapter 21]] | ||
| Eternal Stairway | | Eternal Stairway | ||
! style="color: #40ff3f" colspan="2" | 21 | ! style="color: #40ff3f" colspan="2" | 21 | ||
| Line 710: | Line 712: | ||
|- | |- | ||
! style="color: #ff0000" colspan="2" | 15 | ! style="color: #ff0000" colspan="2" | 15 | ||
| [[Wolfskin Peak|Chapter 15]] | | [[Wolfskin Peak|Chapter 15]] | ||
| Mount Garou | | Mount Garou | ||
! style="color: #9090a8" colspan="2" | 23 | ! style="color: #9090a8" colspan="2" | 23 | ||
| [[Possessed|Chapter 23]] | | [[Possessed|Chapter 23]] | ||
| Great Wall of Suzanoh | | Great Wall of Suzanoh | ||
! style="color: #40ff3f" colspan="2" | 17 | ! style="color: #40ff3f" colspan="2" | 17 | ||
| Line 720: | Line 722: | ||
|- | |- | ||
! style="color: #ff0000" colspan="2" | 16 | ! style="color: #ff0000" colspan="2" | 16 | ||
| [[Pleasure Palace|Chapter 16]] | | [[Pleasure Palace|Chapter 16]] | ||
| Near Palace Macarath | | Near Palace Macarath | ||
! style="color: #9090a8" colspan="2" | 24 | ! style="color: #9090a8" colspan="2" | 24 | ||
| [[Hinoka (chapter)|Chapter 24]] | | [[Hinoka (chapter)|Chapter 24]] | ||
| Hoshidan Capital | | Hoshidan Capital | ||
! style="color: #40ff3f" colspan="2" | 22 | ! style="color: #40ff3f" colspan="2" | 22 | ||
| Line 730: | Line 732: | ||
|- | |- | ||
! colspan="2" | {{color|#ff0000|17}}<br>{{color|#9090a8|8}} | ! colspan="2" | {{color|#ff0000|17}}<br>{{color|#9090a8|8}} | ||
| [[Lost in the Ice|Chapter 17]]<br>[[Cold Reception|Chapter 8]] | | [[Lost in the Ice|Chapter 17]]<br>[[Cold Reception|Chapter 8]] | ||
| [[Ice Tribe]] Village | | [[Ice Tribe]] Village | ||
! style="color: #9090a8" colspan="2" | 25 | ! style="color: #9090a8" colspan="2" | 25 | ||
| [[Ryoma (chapter)|Chapter 25]] | | [[Ryoma (chapter)|Chapter 25]] | ||
| Shirasagi: Reception Hall | | Shirasagi: Reception Hall | ||
! style="color: #40ff3f" colspan="2" | 18 | ! style="color: #40ff3f" colspan="2" | 18 | ||
| Line 740: | Line 742: | ||
|- | |- | ||
! colspan="2" | {{color|#ff0000|18}}<br>{{color|#9090a8|7}} | ! colspan="2" | {{color|#ff0000|18}}<br>{{color|#9090a8|7}} | ||
| [[Leo (chapter)|Chapter 18]]<br>[[A Dragon's Decree|Chapter 7]] | | [[Leo (chapter)|Chapter 18]]<br>[[A Dragon's Decree|Chapter 7]] | ||
| [[Woods of the Forlorn]] | | [[Woods of the Forlorn]] | ||
! style="color: #9090a8" colspan="2" | 26 | ! style="color: #9090a8" colspan="2" | 26 | ||
| [[Treason|Chapter 26]] | | [[Treason|Chapter 26]] | ||
| Shirasagi: Foyer | | Shirasagi: Foyer | ||
! style="color: #40ff3f" colspan="2" | 19 | ! style="color: #40ff3f" colspan="2" | 19 | ||
| Line 750: | Line 752: | ||
|- | |- | ||
! colspan="2" | {{color|#ff0000|19}}<br>{{color|#9090a8|11}}<br>{{color|#30b8b8|15}} | ! colspan="2" | {{color|#ff0000|19}}<br>{{color|#9090a8|11}}<br>{{color|#30b8b8|15}} | ||
| [[Rainbow Sage (Birthright)|Chapter 19]]<br>[[Rainbow Sage (Conquest)|Chapter 11]]<br>[[Rainbow Sage (Revelation)|Chapter 15]] | | [[Rainbow Sage (Birthright chapter)|Chapter 19]]<br>[[Rainbow Sage (Conquest chapter)|Chapter 11]]<br>[[Rainbow Sage (Revelation chapter)|Chapter 15]] | ||
| [[Notre Sagesse|Sevenfold Sanctuary]] | | [[Notre Sagesse|Sevenfold Sanctuary]] | ||
! style="color: #9090a8" colspan="2" | 27/E | ! style="color: #9090a8" colspan="2" | 27/E | ||
| [[The Empty King|Chapter 27]]<br>[[Night Breaks Through|Endgame]] | | [[The Empty King|Chapter 27]]<br>[[Night Breaks Through|Endgame]] | ||
| Shirasagi: Throne Room | | Shirasagi: Throne Room | ||
! style="color: #40ff3f" colspan="2" | 20 | ! style="color: #40ff3f" colspan="2" | 20 | ||
| Line 778: | Line 780: | ||
|- | |- | ||
! colspan="2" | {{color|#9090a8|15}}<br>{{color|#30b8b8|19}} | ! colspan="2" | {{color|#9090a8|15}}<br>{{color|#30b8b8|19}} | ||
| [[The Black Pillar|Chapter 15]]<br>[[Hidden Strings|Chapter 19]] | | [[The Black Pillar|Chapter 15]]<br>[[Hidden Strings|Chapter 19]] | ||
| Abandoned Town | | Abandoned Town | ||
! style="color: #30b8b8" colspan="2" | | ! style="color: #30b8b8" colspan="2" | 23 | ||
| [[ | | [[Arete Undone|Chapter 23]] | ||
| | | Floating Bridge | ||
|- | |- | ||
! style="color: #30b8b8" colspan="2" | 7 | ! style="color: #30b8b8" colspan="2" | 7 | ||
| [[Unspeakable World|Chapter 7]] | | [[Unspeakable World|Chapter 7]] | ||
| Canyon Valley | | Canyon Valley | ||
! style="color: #30b8b8" colspan="2" | | ! style="color: #30b8b8" colspan="2" | 24 | ||
| [[ | | [[Days Lost|Chapter 24]] | ||
| | | Castle Valla: Basement | ||
|- | |- | ||
! style="color: #30b8b8" colspan="2" | 18 | ! style="color: #30b8b8" colspan="2" | 18 | ||
| [[Veiled Kingdom|Chapter 18]] | | [[Veiled Kingdom|Chapter 18]] | ||
| Floating Isle | | Floating Isle | ||
! style="color: #30b8b8" colspan="2" | | ! style="color: #30b8b8" colspan="2" | 25 | ||
| [[ | | [[Blades Drawn|Chapter 25]] | ||
| Castle Valla: | | Castle Valla: Labyrinth | ||
|- | |- | ||
! style="color: #30b8b8" colspan="2" | 20 | ! style="color: #30b8b8" colspan="2" | 20 | ||
| [[Seeds of Doubt|Chapter 20]] | | [[Seeds of Doubt|Chapter 20]] | ||
| Floating Isles | | Floating Isles | ||
! style="color: #30b8b8" colspan="2" | | ! style="color: #30b8b8" colspan="2" | 26 | ||
| [[ | | [[The Vallite King|Chapter 26]] | ||
| Castle Valla: | | Castle Valla: Throne Room | ||
|- | |- | ||
! style="color: #30b8b8" colspan="2" | 21 | ! style="color: #30b8b8" colspan="2" | 21 | ||
| [[Going Forward|Chapter 21]] | | [[Going Forward|Chapter 21]] | ||
| Cursed Ruins | | Cursed Ruins | ||
! style="color: #30b8b8" colspan="2" | 27/E | ! style="color: #30b8b8" colspan="2" | 27/E | ||
| [[Hear My Cry|Chapter | | [[Hear My Cry|Chapter 27]]<br>[[Anankos (chapter)|Endgame]] | ||
| Castle Valla Ruins | | Castle Valla Ruins | ||
|- | |||
! style="color: #30b8b8" colspan="2" | 22 | |||
| [[Memories|Chapter 22]] | |||
| Lost Forest | |||
|- | |- | ||
! colspan="12" style="border-bottom-left-radius: 15px; border-bottom-right-radius: 15px; padding: 3px" | | ! colspan="12" style="border-bottom-left-radius: 15px; border-bottom-right-radius: 15px; padding: 3px" | | ||
| Line 858: | Line 860: | ||
| [[Hidden Bravery|Paralogue 15]] | | [[Hidden Bravery|Paralogue 15]] | ||
| Swamp in a Deeprealm | | Swamp in a Deeprealm | ||
|- | |||
! colspan="12" style="border-bottom-left-radius: 15px; border-bottom-right-radius: 15px; padding: 3px" | | |||
|} | |||
=={{FE17}}== | |||
{{sectstub}} | |||
Like in ''Awakening'', the world map of ''Engage'' has the player directly navigate between locations on the world map by pointing the control stick or directional pad, rather than having to explicitly select a destination; there is also the option to press the L button at any time to be automatically taken to the location of the next main chapter. Additionally, the player may press the X button to open a Fast Travel menu that provides a list of all currently accessible locations; selecting one will instantly transport the player there. All [[paralogue]]s are exempt from the chapter order and can be challenged at any time and in any order once unlocked. | |||
[[Skirmish]]es can appear on the map, either formed from bands of [[Corrupted]], ruffians, or kingdom soldiers, and the player is not forced to defeat them to enter or pass the location. | |||
{| class="mw-collapsible mw-collapsed basic" style="padding: 3px; border-spacing: 4px; border-radius: 15px; border-width: 2px; width: 89%" | |||
! style="background: none" colspan="12" | World map of Elyos in {{FE17}} | |||
|- | |||
| style="border-radius: 15px" colspan="12" | [[File:FEE world map 02.png|900px]] | |||
|- | |||
! style="border-top-left-radius: 15px; width: 4%" | | |||
! style="width: 10%" | Chapter | |||
! style="width: 14%" | Location | |||
! style="width: 4%" | | |||
! style="width: 10%" | Chapter | |||
! style="width: 14%" | Location | |||
! style="width: 4%" | | |||
! style="width: 14%" | Chapter | |||
! style="border-top-right-radius: 15px; width: 17%" colspan="2" | Location | |||
|- | |||
! 4 | |||
| [[A Land in Bloom|Chapter 4]] | |||
| Florra Mill Town | |||
! 16 | |||
| [[Seashore Travels|Chapter 16]] | |||
| Azure Coast | |||
! style="color: #40ff3f" | 4 | |||
| [[The Lady of the Plains]] | |||
| Plains of Swift Winds | |||
|- | |||
! 5 | |||
| [[Retaking the Castle|Chapter 5]] | |||
| [[Firene|Firene Castle]] | |||
! 17 | |||
| [[Serenity in Ruin|Chapter 17]] | |||
| Florra Port | |||
! style="color: #40ff3f" | 5 | |||
| [[The Radiant Hero (Engage)|The Radiant Hero]] | |||
| Fort of Hope | |||
|- | |||
! 6 | |||
| [[The Stolen Ring|Chapter 6]] | |||
| Mountain Settlement | |||
! 18 | |||
| [[The Cold Voyage|Chapter 18]] | |||
| Route to Elusia | |||
! style="color: #40ff3f" | 6 | |||
| [[The Instructor]] | |||
| Sacred Tomb | |||
|- | |||
! 7 | |||
| [[Dark Emblem|Chapter 7]] | |||
| The Grand Crossing | |||
! 19 | |||
| [[The Kingless Castle|Chapter 19]] | |||
| Givre Port | |||
! style="color: #40ff3f" | 7 | |||
| [[The Crux of Fate]] | |||
| Crossroads of Fate | |||
|- | |||
! 8 | |||
| [[The Kingdom of Might|Chapter 8]] | |||
| [[Brodia|Brodia Castle]] | |||
! 20 | |||
| [[The Kingless Castle|Chapter 20]] | |||
| [[Elusia|Elusia Castle]] | |||
! style="color: #40ff3f" | 8 | |||
| [[The Azure Twin]] | |||
| Dark Ruins | |||
|- | |||
! 9 | |||
| [[A Clash of Forces|Chapter 9]] | |||
| Fort on the Border | |||
! 21<br>22 | |||
| [[The Return|Chapter 21]]<br>[[The Fell & the Divine|Chapter 22]] | |||
| [[Lythos|Lythos Castle]] | |||
! style="color: #40ff3f" | 9 | |||
| [[The Holy Knight]] | |||
| River of Light and Dark | |||
|- | |||
! 10 | |||
| [[The Fell Dragon Sombron|Chapter 10]] | |||
| Destinea Cathedral | |||
! 23 | |||
| [[The Four Hounds|Chapter 23]] | |||
| Lava Fields | |||
! style="color: #40ff3f" | 10 | |||
| [[The Sage Lord]] | |||
| Bridges in a Row | |||
|- | |||
! 11 | |||
| [[Retreat|Chapter 11]] | |||
| Shadowy Moor | |||
! 24 | |||
| [[Recollections|Chapter 24]] | |||
| Mountainous Region | |||
! style="color: #40ff3f" | 11 | |||
| [[The Dawn Maiden]] | |||
| Frozen Fortress | |||
|- | |||
! 12 | |||
| [[The Sentinels|Chapter 12]] | |||
| Tullah Desert | |||
! 25 | |||
| [[The Final Guardian|Chapter 25]] | |||
| [[Gradlon|Gradlon Temple]] | |||
! style="color: #40ff3f" | 12 | |||
| [[The Young Lion]] | |||
| The Binding Grounds | |||
|- | |||
! 13 | |||
| [[Heroes of the Oasis|Chapter 13]] | |||
| Oasis Village | |||
! style="color: #40ff3f" | 1 | |||
| [[Budding Talent]] | |||
| Tea-Field Village | |||
! style="color: #40ff3f" | 13 | |||
| [[The Caring Princess]] | |||
| Forgotten Shrine | |||
|- | |||
! 14 | |||
| [[The Battle for Solm|Chapter 14]] | |||
| [[Solm|Solm Palace]] | |||
! style="color: #40ff3f" | 2 | |||
| [[Mysterious Merchant]] | |||
| Bandits' Hideout | |||
! style="color: #40ff3f" | 14 | |||
| [[The Hero-King]] | |||
| The Broken Castle | |||
|- | |||
! 15 | |||
| [[Dancer in the Ruins|Chapter 15]] | |||
| Northern Fortress | |||
! style="color: #40ff3f" | 3 | |||
| [[The Exalt]] | |||
| Arena of the Gods | |||
! style="color: #40ff3f" | 15 | |||
| [[The Connector]] | |||
| Garden of Memories | |||
|- | |||
! colspan="12" style="border-bottom-left-radius: 15px; border-bottom-right-radius: 15px; padding: 3px" | | |||
|} | |||
{| class="mw-collapsible mw-collapsed basic" style="padding: 3px; border-spacing: 4px; border-radius: 15px; border-width: 2px; width: 89%" | |||
! style="background: none" colspan="12" | World map of parallel Elyos in {{FE17}} | |||
|- | |||
| style="border-radius: 15px" colspan="12" | [[File:FEE world map 05.png|900px]] | |||
|- | |||
! style="border-top-left-radius: 15px; width: 4%" colspan="2" | | |||
! style="width: 10%" | Chapter | |||
! style="width: 14%" | Location | |||
! style="width: 4%" colspan="2" | | |||
! style="width: 14%" | Chapter | |||
! style="border-top-right-radius: 15px; width: 17%" colspan="2" | Location | |||
|- | |||
! style="color: #fe017e" colspan="2" | 1 | |||
| [[Dragons from Afar|Fell Xenologue 1]] | |||
| Bracelet Altar | |||
! style="color: #fe017e" colspan="2" | 4 | |||
| [[Clash of Queens|Fell Xenologue 4]] | |||
| Frigid Forest | |||
|- | |||
! style="color: #fe017e" colspan="2" | 2 | |||
| [[Seeds of Unrest|Fell Xenologue 2]] | |||
| Verdant Garden | |||
! style="color: #fe017e" colspan="2" | 5 | |||
| [[The Fell Heir|Fell Xenologue 5]] | |||
| Desert Stronghold | |||
|- | |||
! style="color: #fe017e" colspan="2" | 3 | |||
| [[Path to War|Fell Xenologue 3]] | |||
| Royal Road | |||
! style="color: #fe017e" colspan="2" | 6 | |||
| [[Seven Bracelets|Fell Xenologue 6]] | |||
| [[Somniel|Fallen Somniel]] | |||
|- | |- | ||
! colspan="12" style="border-bottom-left-radius: 15px; border-bottom-right-radius: 15px; padding: 3px" | | ! colspan="12" style="border-bottom-left-radius: 15px; border-bottom-right-radius: 15px; padding: 3px" | | ||
| Line 881: | Line 1,063: | ||
| Unknown | | Unknown | ||
! 9 | ! 9 | ||
| [[Crown Prince Xander|Chapter 11]] | | [[Crown Prince Xander|Chapter 11]] | ||
| Dusk Castle | | Dusk Castle | ||
|- | |- | ||
| Line 888: | Line 1,070: | ||
| [[Aytolis|Aytolis Castle]] | | [[Aytolis|Aytolis Castle]] | ||
! 10 | ! 10 | ||
| [[An Orchestrated Battle|Chapter 12]] | | [[An Orchestrated Battle|Chapter 12]] | ||
| Great Plain | | Great Plain | ||
|- | |- | ||
! 2 | ! 2 | ||
| [[Home in Ruins|Chapter 1]] | | [[Home in Ruins|Chapter 1]] | ||
| [[Aytolis|Aytolis City]] | | [[Aytolis|Aytolis City]] | ||
! 3 | ! 3 | ||
| [[What Happened to Corrin|Chapter 13]] | | [[What Happened to Corrin|Chapter 13]] | ||
| [[Aytolis|Kingswood]] | | [[Aytolis|Kingswood]] | ||
|- | |- | ||
! 3 | ! 3 | ||
| [[Woodlands Encounter|Chapter 2]] | | [[Woodlands Encounter|Chapter 2]] | ||
| [[Aytolis|Kingswood]] | | [[Aytolis|Kingswood]] | ||
! 11 | ! 11 | ||
| [[Sieging the Citadel|Chapter 14]] | | [[Sieging the Citadel|Chapter 14]] | ||
| [[Gristonne|Fortified Citadel]] | | [[Gristonne|Fortified Citadel]] | ||
|- | |- | ||
! 4 | ! 4 | ||
| [[Dragon Valley Temple|Chapter 3]] | | [[Dragon Valley Temple|Chapter 3]] | ||
| [[Aytolis|Dragon Valley]] | | [[Aytolis|Dragon Valley]] | ||
! 12 | ! 12 | ||
| [[Taking the World Tree|Chapter 15]] | | [[Taking the World Tree|Chapter 15]] | ||
| [[Aytolis|The World Tree]] | | [[Aytolis|The World Tree]] | ||
|- | |- | ||
! 5 | ! 5 | ||
| [[Hero-King of the Desert|Chapter 4]] | | [[Hero-King of the Desert|Chapter 4]] | ||
| Desert Arena | | Desert Arena | ||
! 11 | ! 11 | ||
| [[The Imprisoned Prince|Chapter 16]] | | [[The Imprisoned Prince|Chapter 16]] | ||
| [[Gristonne|Fortified Citadel]] | | [[Gristonne|Fortified Citadel]] | ||
|- | |- | ||
! 4 | ! 4 | ||
| [[The Dragon's Table (Warriors)|Chapter 5]] | | [[The Dragon's Table (Warriors)|Chapter 5]] | ||
| [[Aytolis|Dragon Valley]] | | [[Aytolis|Dragon Valley]] | ||
! 1 | ! 1 | ||
| [[Royal Blood|Chapter 17]]<br>[[Chaos Dragon's Might|Chapter 18]] | | [[Royal Blood|Chapter 17]]<br>[[Chaos Dragon's Might|Chapter 18]] | ||
| [[Aytolis|Aytolis Castle]] | | [[Aytolis|Aytolis Castle]] | ||
|- | |- | ||
! 6 | ! 6 | ||
| [[Hoshidan Princess|Chapter 6]]<br>[[Hoshidan Prince|Chapter 7]] | | [[Hoshidan Princess|Chapter 6]]<br>[[Hoshidan Prince|Chapter 7]] | ||
| Desolate Gorge | | Desolate Gorge | ||
! 2 | ! 2 | ||
| [[Reclaiming Home|Chapter 19]] | | [[Reclaiming Home|Chapter 19]] | ||
| [[Aytolis|Aytolis City]] | | [[Aytolis|Aytolis City]] | ||
|- | |- | ||
! 7 | ! 7 | ||
| [[High Prince Ryoma|Chapter 8]] | | [[High Prince Ryoma|Chapter 8]] | ||
| Castle Sol | | Castle Sol | ||
! 12 | ! 12 | ||
| [[Clash at the World Tree|Chapter 20]] | | [[Clash at the World Tree|Chapter 20]] | ||
| [[Aytolis|World Tree]] | | [[Aytolis|World Tree]] | ||
|- | |- | ||
! 8 | ! 8 | ||
| [[Nohrian Princess|Chapter 9]]<br>[[Nohrian Prince|Chapter 10]] | | [[Nohrian Princess|Chapter 9]]<br>[[Nohrian Prince|Chapter 10]] | ||
| Ebony Volcano | | Ebony Volcano | ||
! 12 | ! 12 | ||
| Line 957: | Line 1,139: | ||
{{Names | {{Names | ||
|eng-name=World map | |eng-name=World map | ||
| | |jpn-name=• {{h|ワールドマップ|Wārudo mappu}}<br>• {{hover|フリーマップ|Furī mappu}}<br>• {{h|全体マップ|Zentai mappu}} | ||
| | |jpn-mean=• "World map" in English; this name is used for the free-roaming world map of ''The Sacred Stones'' and ''Engage''.<br>• Free map; this name is used for the free-roaming world map of ''Awakening''.<br>• Entire map; this term is used in a more general manner and can describe both the world maps that are seen in chapter opening narrations as well as the free-roaming world maps. This is a term used in video gaming to refer to maps that show the whole world of the game. | ||
|fren-name=Carte | |fren-name=Carte du monde | ||
|fren-mean= | |fren-mean=World map | ||
|ger-name= | |ger-name=Weltkarte | ||
|ger-mean= | |ger-mean=World map | ||
|span-name=Mapa | |span-name=Mapa | ||
|span-mean= | |span-mean=Map | ||
|ital-name= | |ital-name=Mappa del mondo | ||
|ital-mean= | |ital-mean=World map | ||
|dut-name= | |dut-name= | ||
|dut-mean= | |dut-mean= | ||
|kor-name= | |kor-name={{h|월드 맵|Woldeu maep}} | ||
|kor-mean= | |kor-mean=World map | ||
|ch-simp-name= | |ch-simp-name={{h|世界地图|Shìjiè dìtú}} | ||
|ch-simp-mean= | |ch-simp-mean=World map | ||
|ch-trad-name= | |ch-trad-name={{h|世界地圖|Shìjiè dìtú}} | ||
|ch-trad-mean= | |ch-trad-mean=World map | ||
}} | }} | ||
Latest revision as of 22:06, 28 March 2024

The world map (Japanese: フリーマップ free map) is a gameplay navigation system introduced in Fire Emblem Gaiden. In it, as opposed to the linear and uninterrupted chapter progression in most games in the Fire Emblem series, the player can freely traverse the world at their own pace, fighting marauding bands of enemies which appear and visiting shops in between chapters, and starting said chapters whenever they so choose.
A traversable world map has appeared in Fire Emblem Gaiden and its remake Shadows of Valentia, The Sacred Stones, Awakening, and Engage. Fire Emblem Fates, Three Houses, and Warriors each have world maps that cannot be directly traversed, but does show where selected battles are. In all other games—except for Fire Emblem: Shadow Dragon & the Blade of Light—there is a world map present, but it is used only to show where the party is traveling between chapters, usually accompanied by narration.
Fire Emblem Gaiden and Fire Emblem Echoes: Shadows of Valentia
In Gaiden and its remake, the player moves both Alm and Celica's parties around the world map, alternating between the two at their discretion. Movement across the world map is achieved by selecting the character, selecting the Move menu option, then picking one of the location's adjoining destinations. Uniquely in the Gaiden system, the world map itself has its own turn count, in which a turn elapses every time either Alm or Celica move, or at command by selecting the Rest menu option.
Every battle within Gaiden is technically a skirmish, with the main story mostly consisting of pre-defined skirmishes against set enemy groups posted at specific locations on the world map. In addition, more enemy groups are spawned from certain locations periodically, and will move at random around the map after a certain number of turns pass; these marauding groups can be fought on their own, and can also join up with other enemy groups (both pre-defined and marauding) and both be fought at once. Skirmishes are initiated by choosing to travel to a location with an enemy group posted on it; conversely, however, enemies can also advance on the player's location and initiate skirmishes themselves.
A small few locations—mostly villages, castles, fortresses, and dungeons—can be visited outside of battles, and in these the character in question can freely move around and interact with the locals. Some villages contain item exchange couriers who can send a specific item to the other character's party; however, these are limited in number and have only a finite number of uses.
In Echoes specifically, a red bar also displays the in-game date, season, and year. The season and year progress as each Act is completed, while the number for the day increments by 1 each time Alm or Celica moves from one location to the next, or enters a dungeon or village. This day number can reach up to 999.
| World map of Fire Emblem Gaiden | |||||||||||
|---|---|---|---|---|---|---|---|---|---|---|---|
| Map | Location (Alm's route) | Location (Celica's route) | |||||||||

|
Act 1 | Act 2 | |||||||||
| 1 | Ram Village | 1 | Priory | ||||||||
| 2 | Ram Woods | 2 | Novis Cemetery | ||||||||
| 3 | Fleecer's Forest | 3 | Novis Greatport | ||||||||
| 4 | Thieves' Shrine | 4 | Zofia Seaway 1 | ||||||||
| 5 | Ram Valley | 5 | Zofia Seaway 2 | ||||||||
| 6 | Southern Outpost | 6 | The Pirate Throne | ||||||||
| 7 | Southern Zofia 1 | 7 | Zofia Seaway 3 | ||||||||
| 8 | Southern Zofia 2 | 8 | Seabound Shrine | ||||||||
| 9 | Deliverance Hideout | 9 | Zofia Seaway 4 | ||||||||
| 10 | Zofia Gate | 10 | Zofia Seaway 5 | ||||||||
| 11 | Zofia Castle | 11 | Zofia Harbor | ||||||||
| Act 3 | |||||||||||
| 12 | North Gate | 12 | Zofian Coast | ||||||||
| 13 | Northern Zofia | 13 | Mountain Highway | ||||||||
| 14 | Zofia Forest 1 | 14 | Mountain Graveyard | ||||||||
| 15 | Forest Village | 15 | Mountain Village | ||||||||
| 16 | Forest Village | 16 | Valley Approach | ||||||||
| 17 | Desaix's Fortress | 17 | Dragon Shrine | ||||||||
| 18 | Zofia Forest 2 | 18 | Desert Stronghold | ||||||||
| 19 | Sylvan Shrine | 19 | Northern Desert | ||||||||
| 20 | Forest Northside | 20 | Southern Desert | ||||||||
| 21 | Sluice Gate | 21 | Grieth's Citadel | ||||||||
| 22 | Temple of Mila | ||||||||||
| Act 4 | |||||||||||
| 22 | Border | 23 | Dead Man's Mire | ||||||||
| 23 | Rigel Forest | 24 | Mire Boneyard | ||||||||
| 24 | Fear Mountain | 25 | Dolth's Keep | ||||||||
| 25 | Fear Mountain Shrine | 26 | Lost Treescape | ||||||||
| 26 | Nuibaba's Abode | 27 | Sage's Hamlet | ||||||||
| 27 | Rigel Plains/ |
28 | Duma's Gate | ||||||||
| 28 | Rigel Valley | 29 | The Swamps of Duma | ||||||||
| 29 | The Dragon's Maw | 30 | Duma Tower | ||||||||
| 30 | Rigel Falls | ||||||||||
| 31 | Secret Shrine | ||||||||||
| 32 | The Last Bastion | ||||||||||
| 33 | Rigel Castle | ||||||||||
| Note: In Act 2, #11 Zofia Harbor has a route connecting it to #10 Zofia Gate; this route is not present in Act 1, and is removed once Act 3 begins. | |||||||||||
Fire Emblem: The Sacred Stones
In The Sacred Stones, the player navigates Eirika or Ephraim around the world map by directly selecting their destination. Unlike Gaiden or Awakening, on some occasions multiple chapters will occur on the same world map location and the player is not allowed to return to the world map between each of these chapters. Some locations also offer armories or vendors to be accessed on the world map, usually selling the same items available in the matching shops in the chapter in question; additionally, after the game has been cleared and Creature Campaign mode has been entered, secret shops can also be accessed from the world map, albeit with different stock than what was offered in the original chapters.
After the completion of every chapter from Chapter 8 onward, or after leaving the Tower of Valni or Lagdou Ruins, up to three bands of enemy monsters will randomly spawn on certain locations on the world map. Eirika and Ephraim cannot pass through any location presently occupied by a monster band, and must engage the monsters in a skirmish before they can access or pass through the location again. This will usually not impede the player's ability to travel, especially later in the game, as the world map connects numerous paths between locations and usually provides an alternative.
Access to the Tower of Valni is granted once Chapter 8 has been cleared. Access to the Lagdou Ruins and Melkaen Coast is granted once Chapter 19 has been cleared.
| World map of Fire Emblem: The Sacred Stones | |||||||||||
|---|---|---|---|---|---|---|---|---|---|---|---|

| |||||||||||
| Chapter | Location | Chapter | Location | Chapter | Location | ||||||
| 1 | Chapter 1 | Border Mulan | 10 | Chapter 10A | Teraz Plateau |
16 | Chapter 16 | Renais Castle | |||
| -- | -- | Castle Frelia | 11/12 | Chapter 11A Chapter 12A |
Caer Pelyn |
17 | Chapter 17 | Narube River | |||
| 2 | Chapter 2 | Ide |
13 | Chapter 13A | Hamill Canyon |
18 | Chapter 18 | Neleras Peak | |||
| 3 | Chapter 3 | Borgo Ridge | 9 | Chapter 9B | Fort Rigwald | 19 | Chapter 19 | Rausten Court | |||
| 4 | Chapter 4 | Za'ha Woods |
10 | Chapter 10B | Bethroen |
20 | Chapter 20 Final Chapter |
Black Temple | |||
| 5 | Chapter 5 | Serafew |
11/12 | Chapter 11B Chapter 12B |
Taizel |
M | -- | Melkaen Coast | |||
| 6 | Chapter 6 | Adlas Plains |
13 | Chapter 13B | Za'albul Marsh |
V | Tower of Valni | ||||
| 7/8 | Chapter 7 Chapter 8 |
Renvall | 14 | Chapter 14B | Grado Keep |
L | Lagdou Ruins | ||||
| 9 | Chapter 9A | Port Kiris |
14/15 | Chapter 14A Chapter 15 |
Jehanna Hall | ||||||
| Note: Locations numbered in teal comprise Eirika's route (Route A), while locations numbered in steel blue comprise Ephraim's route (Route B). Locations listed with a | |||||||||||
Fire Emblem Awakening
In Awakening, the player directly navigates between locations on the world map by pointing the Circle Pad or directional pad, rather than having to explicitly select a destination; there is also the option to press the Start button at any time to be automatically taken to the location of the next main chapter. All paralogues are exempt from the chapter order and can be challenged at any time and in any order once unlocked. All locations on the map, save for the Outrealm Gate and the Endgame's location, house an armory which is occasionally taken over by the appearance of a traveling merchant.
As with The Sacred Stones, Risen bands periodically appear to create skirmishes, but this time the player is not forced to defeat them to enter or pass the location, although the armory cannot be accessed while a Risen group is present. On rare occasions, two groups of Risen will appear on the same map location and are fought simultaneously, rewarding the player with both a sum of gold and a rare item. Additionally, bonus units and the teams they lead will spawn on the map to be parleyed with when the Nintendo 3DS console receives a StreetPass tag, and SpotPass bonus unit teams can be summoned to the world map at any time through the Wireless menu, with a maximum of ten allowed to be on the fully unlocked map at a time.
Access to the Outrealm Gate—and by extension, all downloadable content—is granted after Chapter 4 has been cleared. Access to the six SpotPass paralogues, marked in orange, is granted once Chapter 25 has been cleared and the relevant SpotPass data has been activated on the save file.
| World map of Fire Emblem Awakening | ||||||||||||
|---|---|---|---|---|---|---|---|---|---|---|---|---|

| ||||||||||||
| Chapter | Location | Chapter | Location | Chapter | Location | |||||||
| O | Outrealm Gate | 16 | Chapter 16 | The Mila Tree | 7 | Paralogue 7 | Mila Shrine Ruins | |||||
| P | Prologue | Southtown | 17 | Chapter 17 | Fort Steiger | 8 | Paralogue 8 | Dueling Grounds | ||||
| 1 | Chapter 1 | West of Ylisstol | 18 | Chapter 18 | The Demon's Ingle | 9 | Paralogue 9 | Verdant Forest | ||||
| 2 | Chapter 2 | The Northroad | 19 | Chapter 19 | Valm Castle Approach | 10 | Paralogue 10 | Mercenary Fortress | ||||
| 3 | Chapter 3 | The Longfort | 20 | Chapter 20 | Valm Castle | 11 | Paralogue 11 | Wyvern Valley | ||||
| 4 | Chapter 4 | Arena Ferox | 21 | Chapter 21 | Plegia Castle | 12 | Paralogue 12 | The Ruins of Time | ||||
| 5 | Chapter 5 | Border Pass | 22 | Chapter 22 | Table Approach | 13 | Paralogue 13 | Law's End | ||||
| 6 | Chapter 6 | Ylisstol | 23 | Chapter 23 | The Dragon's Table | 14 | Paralogue 14 | Desert Oasis | ||||
| 7 | Chapter 7 | Breakneck Pass | 24 | Chapter 24 | Mount Prism | 15 | Paralogue 15 | Kidnapper's Keep | ||||
| 8 | Chapter 8 | Border Sands | 25 | Chapter 25 | Origin Peak | 16 | Paralogue 16 | Manor of Lost Souls | ||||
| 9 | Chapter 9 | Plegia Castle Courtyard | E | Endgame | Grima | 17 | Paralogue 17 | Divine Dragon Grounds | ||||
| 10 | Chapter 10 | The Midmire | 1 | Paralogue 1 | The Farfort | 18 | Paralogue 18 | Sea-King's Throne | ||||
| 11 | Chapter 11 | Border Wastes | 2 | Paralogue 2 | The Twins' Turf | 19 | Paralogue 19 | Conqueror's Whetstone | ||||
| 12 | Chapter 12 | Port Ferox | 3 | Paralogue 3 | Peaceful Village | 20 | Paralogue 20 | Mountain Village | ||||
| 13 | Chapter 13 | Carrion Isle | 4 | Paralogue 4 | The Twins' Hideout | 21 | Paralogue 21 | Warriors' Tomb | ||||
| 14 | Chapter 14 | The Searoad | 5 | Paralogue 5 | Sage's Hamlet | 22 | Paralogue 22 | Wellspring of Truth | ||||
| 15 | Chapter 15 | Valm Harbor | 6 | Paralogue 6 | Great Gate | 23 | Paralogue 23 | Garden of Giants | ||||
Fire Emblem Fates
This section has been marked as a stub. Please help improve the page by adding information.
The world map in Fates is more akin to a level select than a truly explorable world map. Each of the world map locations corresponds to one or more of the game's story chapters. As the player scrolls through the chapter select, the corresponding world map location is highlighted.
Much like Awakening, bandits periodically appear to create skirmishes in the Birthright and Revelation campaigns. Additionally, the player can pay a fee to spawn a group of bandits when selecting a location of the map; a maximum of two groups of bandits may be present at any map location. Fighting two groups of bandits simultaneously is also more likely to reward the player with a rare item in addition to a sum of gold.
Access to the Dragon's Gate—and by extension, all downloadable content—is granted after Chapter 6 has been cleared.
| World map of Hoshido and Nohr in Fire Emblem Fates | ||||||||||||
|---|---|---|---|---|---|---|---|---|---|---|---|---|
| File:Ss fe14 world map ingame.png | ||||||||||||
| Chapter | Location | Chapter | Location | Chapter | Location | |||||||
| P 6 6 6 |
Prologue Chapter 6 Chapter 6 Chapter 6 |
Plains of Hoshido | 20 9 |
Chapter 20 Chapter 9 |
Fort Dragonfall | 10 | Chapter 10 | Town in Izumo | ||||
| 1 | Chapter 1 | Northern Fortress | 21 | Chapter 21 | Demon's Falls | 12 | Chapter 12 | At Sea | ||||
| 2 | Chapter 2 | Castle: Reception Room | 22 | Chapter 22 | Windmire | 13 | Chapter 13 | Destroyed Town | ||||
| 3 | Chapter 3 | Bottomless Canyon North | 23 | Chapter 23 | Underground Passage | 16 | Chapter 16 | Lava Fields | ||||
| 4 | Chapter 4 | Valley Settlement | 24 | Chapter 24 | Castle: Training Grounds | 17 | Chapter 17 | Bottomless Canyon, South | ||||
| 5 | Chapter 5 | Hoshido Capital: Plaza | 25 | Chapter 25 | Castle: Grand Staircase | 1 | Paralogue 1 | Small Village | ||||
| 7 22 8 |
Chapter 7 Chapter 22 Chapter 8 |
Fort Jinya | 26 | Chapter 26 | Castle: Combat Room | 5 | Paralogue 5 | Riverside Village | ||||
| 8 20 9 |
Chapter 8 Chapter 20 Chapter 9 |
Wind Tribe Village | 27/E | Chapter 27 Endgame |
Castle: Throne Room | 6 | Paralogue 6 | Divine Dragon's Forest | ||||
| 9 20 |
Chapter 9 Chapter 18 |
Izumo: Castle Interior | 10 14 |
Chapter 10 Chapter 14 |
Port Town of Dia | 7 | Paralogue 7 | White Sands | ||||
| 10 11 |
Chapter 10 Chapter 11 |
Mokushu Forest | 12 | Chapter 12 | Palace Macarath | 9 | Paralogue 9 | Thieves' Den | ||||
| 11 | Chapter 11 | Sea of Hoshido | 16 | Chapter 16 | Nohrian Sea | 10 | Paralogue 10 | Poachers' Forest | ||||
| 12 14 |
Chapter 12 Chapter 14 |
Opera House | 17 | Chapter 17 | Cave in Mokushu | 13 | Paralogue 13 | Riverside | ||||
| 13 13 |
Chapter 12 Chapter 14 |
Cheve | 19 | Chapter 19 | Kitsune Hamlet | 16 | Paralogue 16 | Trading Town | ||||
| 14 | Chapter 14 | Border Walls | 21 | Chapter 21 | Eternal Stairway | 21 | Paralogue 21 | Walled Town | ||||
| 15 | Chapter 15 | Mount Garou | 23 | Chapter 23 | Great Wall of Suzanoh | 17 | Paralogue 17 | Isolated Village | ||||
| 16 | Chapter 16 | Near Palace Macarath | 24 | Chapter 24 | Hoshidan Capital | 22 | Paralogue 22 | Fancy Estate | ||||
| 17 8 |
Chapter 17 Chapter 8 |
Ice Tribe Village | 25 | Chapter 25 | Shirasagi: Reception Hall | 18 | Paralogue 18 | Countryside | ||||
| 18 7 |
Chapter 18 Chapter 7 |
Woods of the Forlorn | 26 | Chapter 26 | Shirasagi: Foyer | 19 | Paralogue 19 | Mountain Fort | ||||
| 19 11 15 |
Chapter 19 Chapter 11 Chapter 15 |
Sevenfold Sanctuary | 27/E | Chapter 27 Endgame |
Shirasagi: Throne Room | 20 | Paralogue 20 | Ancient City | ||||
| D | Dragon's Gate | |||||||||||
| World map of Valla in Fire Emblem Fates | |||||||||||
|---|---|---|---|---|---|---|---|---|---|---|---|

| |||||||||||
| Chapter | Location | Chapter | Location | ||||||||
| 15 19 |
Chapter 15 Chapter 19 |
Abandoned Town | 23 | Chapter 23 | Floating Bridge | ||||||
| 7 | Chapter 7 | Canyon Valley | 24 | Chapter 24 | Castle Valla: Basement | ||||||
| 18 | Chapter 18 | Floating Isle | 25 | Chapter 25 | Castle Valla: Labyrinth | ||||||
| 20 | Chapter 20 | Floating Isles | 26 | Chapter 26 | Castle Valla: Throne Room | ||||||
| 21 | Chapter 21 | Cursed Ruins | 27/E | Chapter 27 Endgame |
Castle Valla Ruins | ||||||
| 22 | Chapter 22 | Lost Forest | |||||||||
| World map of the Deeprealms in Fire Emblem Fates | |||||||||||
|---|---|---|---|---|---|---|---|---|---|---|---|
| File:Ss fe14 deeprealm portion world map.png | |||||||||||
| Chapter | Location | Chapter | Location | ||||||||
| 2 | Paralogue 2 | Town in a Deeprealm | 11 | Paralogue 11 | Wastelands | ||||||
| 3 | Paralogue 3 | Astral Sea | 12 | Paralogue 12 | Village in a Deeprealm | ||||||
| 4 | Paralogue 4 | Sanctuary in a Deeprealm | 14 | Paralogue 14 | Cemetery in a Deeprealm | ||||||
| 8 | Paralogue 8 | Deeprealm Mountain | 15 | Paralogue 15 | Swamp in a Deeprealm | ||||||
Fire Emblem Engage
This section has been marked as a stub. Please help improve the page by adding information.
Like in Awakening, the world map of Engage has the player directly navigate between locations on the world map by pointing the control stick or directional pad, rather than having to explicitly select a destination; there is also the option to press the L button at any time to be automatically taken to the location of the next main chapter. Additionally, the player may press the X button to open a Fast Travel menu that provides a list of all currently accessible locations; selecting one will instantly transport the player there. All paralogues are exempt from the chapter order and can be challenged at any time and in any order once unlocked.
Skirmishes can appear on the map, either formed from bands of Corrupted, ruffians, or kingdom soldiers, and the player is not forced to defeat them to enter or pass the location.
| World map of Elyos in Fire Emblem Engage | |||||||||||
|---|---|---|---|---|---|---|---|---|---|---|---|

| |||||||||||
| Chapter | Location | Chapter | Location | Chapter | Location | ||||||
| 4 | Chapter 4 | Florra Mill Town | 16 | Chapter 16 | Azure Coast | 4 | The Lady of the Plains | Plains of Swift Winds | |||
| 5 | Chapter 5 | Firene Castle | 17 | Chapter 17 | Florra Port | 5 | The Radiant Hero | Fort of Hope | |||
| 6 | Chapter 6 | Mountain Settlement | 18 | Chapter 18 | Route to Elusia | 6 | The Instructor | Sacred Tomb | |||
| 7 | Chapter 7 | The Grand Crossing | 19 | Chapter 19 | Givre Port | 7 | The Crux of Fate | Crossroads of Fate | |||
| 8 | Chapter 8 | Brodia Castle | 20 | Chapter 20 | Elusia Castle | 8 | The Azure Twin | Dark Ruins | |||
| 9 | Chapter 9 | Fort on the Border | 21 22 |
Chapter 21 Chapter 22 |
Lythos Castle | 9 | The Holy Knight | River of Light and Dark | |||
| 10 | Chapter 10 | Destinea Cathedral | 23 | Chapter 23 | Lava Fields | 10 | The Sage Lord | Bridges in a Row | |||
| 11 | Chapter 11 | Shadowy Moor | 24 | Chapter 24 | Mountainous Region | 11 | The Dawn Maiden | Frozen Fortress | |||
| 12 | Chapter 12 | Tullah Desert | 25 | Chapter 25 | Gradlon Temple | 12 | The Young Lion | The Binding Grounds | |||
| 13 | Chapter 13 | Oasis Village | 1 | Budding Talent | Tea-Field Village | 13 | The Caring Princess | Forgotten Shrine | |||
| 14 | Chapter 14 | Solm Palace | 2 | Mysterious Merchant | Bandits' Hideout | 14 | The Hero-King | The Broken Castle | |||
| 15 | Chapter 15 | Northern Fortress | 3 | The Exalt | Arena of the Gods | 15 | The Connector | Garden of Memories | |||
| World map of parallel Elyos in Fire Emblem Engage | |||||||||||
|---|---|---|---|---|---|---|---|---|---|---|---|

| |||||||||||
| Chapter | Location | Chapter | Location | ||||||||
| 1 | Fell Xenologue 1 | Bracelet Altar | 4 | Fell Xenologue 4 | Frigid Forest | ||||||
| 2 | Fell Xenologue 2 | Verdant Garden | 5 | Fell Xenologue 5 | Desert Stronghold | ||||||
| 3 | Fell Xenologue 3 | Royal Road | 6 | Fell Xenologue 6 | Fallen Somniel | ||||||
Fire Emblem Warriors
The world map in Fire Emblem Warriors is more akin to a level select than a truly explorable world map. Each of the 12 world map locations corresponds to one or more of the game's story chapters. As the player scrolls through the chapter select, the corresponding world map location is highlighted. The player may replay any chapter they like; skirmishes are not present. The Premonition chapter cannot be replayed.
| World map of Fire Emblem Warriors | |||||||||||
|---|---|---|---|---|---|---|---|---|---|---|---|

| |||||||||||
| Chapter | Location | Chapter | Location | ||||||||
| -- | Premonition | Unknown | 9 | Chapter 11 | Dusk Castle | ||||||
| 1 | Prologue | Aytolis Castle | 10 | Chapter 12 | Great Plain | ||||||
| 2 | Chapter 1 | Aytolis City | 3 | Chapter 13 | Kingswood | ||||||
| 3 | Chapter 2 | Kingswood | 11 | Chapter 14 | Fortified Citadel | ||||||
| 4 | Chapter 3 | Dragon Valley | 12 | Chapter 15 | The World Tree | ||||||
| 5 | Chapter 4 | Desert Arena | 11 | Chapter 16 | Fortified Citadel | ||||||
| 4 | Chapter 5 | Dragon Valley | 1 | Chapter 17 Chapter 18 |
Aytolis Castle | ||||||
| 6 | Chapter 6 Chapter 7 |
Desolate Gorge | 2 | Chapter 19 | Aytolis City | ||||||
| 7 | Chapter 8 | Castle Sol | 12 | Chapter 20 | World Tree | ||||||
| 8 | Chapter 9 Chapter 10 |
Ebony Volcano | 12 | Endgame | The Interspace* | ||||||
Etymology and other languages
| Names, etymology, and in other regions | ||
|---|---|---|
| Language | Name | Definition, etymology, and notes |
| English |
World map |
-- |
| Japanese |
• ワールドマップ |
• "World map" in English; this name is used for the free-roaming world map of The Sacred Stones and Engage. |
| Spanish |
Mapa |
Map |
| French |
Carte du monde |
World map |
| German |
Weltkarte |
World map |
| Italian |
Mappa del mondo |
World map |
| Korean |
월드 맵 |
World map |
| Simplified Chinese |
世界地图 |
World map |
| Traditional Chinese |
世界地圖 |
World map |
Gallery
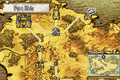
Navigating the world map in The Sacred Stones.
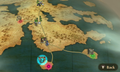
Navigating the world map in Awakening.
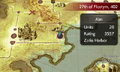
Alm navigating the world map in Echoes: Shadows of Valentia.


