| Site News |
|---|
| Warning: This wiki contains spoilers. Read at your own risk! Social media: If you would like, please join our Discord server, and/or follow us on Twitter (X) or Tumblr! |
The Grustian Expedition: Difference between revisions
Thecornerman (talk | contribs) m (Text replacement - "([Ll])evel (\d+)" to "$1evel $2") |
|||
| Line 908: | Line 908: | ||
|eng-fan-mean=• Known by this name in the original ''Mystery of the Emblem'' patch.<br>• Known by this name in the ''New Mystery of the Emblem'' patch and the 2014 revision of the ''Mystery of the Emblem'' patch. | |eng-fan-mean=• Known by this name in the original ''Mystery of the Emblem'' patch.<br>• Known by this name in the ''New Mystery of the Emblem'' patch and the 2014 revision of the ''Mystery of the Emblem'' patch. | ||
|jpn-name={{h|グルニア遠征|Gurunia ensei}} | |jpn-name={{h|グルニア遠征|Gurunia ensei}} | ||
|jpn-mean=Grunia expedition | |jpn-mean=Grunia expedition. Officially romanized as '''The Grunia Expedition''' in the [[Fire Emblem: Mystery of the Emblem (guide)|''Mystery of the Emblem'' guide]]. | ||
}} | }} | ||
Latest revision as of 10:39, 28 April 2024
| ||||||||||
|

| “ | Your highness, I understand your feelings. However, Lorenz's rebellion is a fact. First, we must see how we can help him. Basically we should listen to what the citizens have to say, so we can affirm what has happened to this country. Then your highness can talk to General Lorenz personally. | ” | — Jagen |
|---|
The Grustian Expedition (Japanese: グルニア遠征 Grunia Expedition) is the first chapter in Fire Emblem: Mystery of the Emblem Book II and New Mystery of the Emblem.
Plot
- Main articles:
The Grustian Expedition/Script and The Grustian Expedition/Conversations
Marth is sent a letter by Emperor Hardin of Archanea telling him that a large rebellion has broken out in Grust and Marth has to quell it. Since Archanea is the suzerain state over Altea, Marth is compelled to comply. Marth leaves Cain in charge of Altea and leaves for Grust.
Upon arriving, the corrupt General Lang informs Marth that they have defeated most of the rebels; the last holdout is Lorenz, who has been hiding Prince Jubelo and Princess Yuliya in order to help restore Grust. Jagen advises Marth to talk to the villagers and Lorenz in order to find out what has really been going on.
Lorenz commands Jubelo and Yuliya to flee with Ogma, who had come on the orders of King Mostyn of Talys. However, they refuse to abandon him due to his grievous wounds. Ogma decides to find another way to help, and leaves in order to kill Lang. Marth talks to Lorenz, who tells Marth that Hardin has become evil, and then commits suicide. After Marth seizes the fort, Lang arrives and informs Marth that a rebellion has erupted in Macedon and that Hardin has ordered him to rescue Minerva. He arrests Jubelo and Yuliya, despite Marth's pleas.
Chapter data
Mystery of the Emblem New Mystery of the Emblem


Character data
Mystery of the Emblem New Mystery of the Emblem
| Characters | ||||||||||||||||||||||||||||||||||||||||||||
|---|---|---|---|---|---|---|---|---|---|---|---|---|---|---|---|---|---|---|---|---|---|---|---|---|---|---|---|---|---|---|---|---|---|---|---|---|---|---|---|---|---|---|---|---|
New units
| ||||||||||||||||||||||||||||||||||||||||||||
| ||||||||||||||||||||||||||||||||||||||||||||
Required characters
| ||||||||||||||||||||||||||||||||||||||||||||

| ||||||||||||||||||||||||||||||||||||||||||||
Available characters
| ||||||||||||||||||||||||||||||||||||||||||||
      
| ||||||||||||||||||||||||||||||||||||||||||||


- Units will return even if they were defeated in the prologues, and will retain their stats and inventories.
Item data
Mystery of the Emblem New Mystery of the Emblem
Shop data
Mystery of the Emblem New Mystery of the Emblem
Enemy data
Mystery of the Emblem New Mystery of the Emblem
- Stats with a decimal can vary randomly; the decimal represents the chance for the stat to increase to the nearest integer, or otherwise be truncated.
Normal Hard Maniac Lunatic
| |||||||||||||||||||||||||||||||||||||||||||||||||||||||||||||||||||||||||||||||||||||||||||||||||||||||||||||||||||||||||||
| |||||||||||||||||||||||||||||||||||||||||||||||||||||||||||||||||||||||||||||||||||||||||||||||||||||||||||||||||||||||||||
| |||||||||||||||||||||||||||||||||||||||||||||||||||||||||||||||||||||||||||||||||||||||||||||||||||||||||||||||||||||||||||
| |||||||||||||||||||||||||||||||||||||||||||||||||||||||||||||||||||||||||||||||||||||||||||||||||||||||||||||||||||||||||||
Reinforcements
Mystery of the Emblem
- Starting turn 1, continuing until 5 have appeared; whether one appears each turn is random
- One Thief from the western cave
New Mystery of the Emblem
- The first turn of turns 2–4 when the cave is not blocked
- One Thief from the western cave
All reinforcements are halted upon the village being visited.
Boss data
- Main article:
Lorenz
Mystery of the Emblem New Mystery of the Emblem
- Stats with a decimal can vary randomly; the decimal represents the chance for the stat to increase to the nearest integer, or otherwise be truncated.

Strategy
| This section details unofficial strategies that may help with completion of the chapter. This may not work for everybody. |
At the beginning of the chapter, a few changes to your lineup occur. Caeda, Wrys, Athena, Ogma, and Cain/Est will depart the party if recruited. Any unit lost in the prologue will be returned to you for the main story, but any deaths from here on out are permanent. If you did not recruit Gordin or Draug during the prologue, they join here. Both of them are decent units, with Draug in particular having a blistering 5 personal base Speed. You are also joined by Arran, this game's Jagen archetype. He is a pre-promoted Paladin with noticeably stronger stats than anyone not named Kris or maybe Luke and immediate access to powerful classes such as Swordmaster or Dracoknight, but his growth potential is nullified by a terminal illness and he won't be able to carry you forever. Finally, you unlock reclassing, which allows you to change your units' classes and often greatly increase their potential. Draug should be moved to Cavalier to prevent him from being one-rounded. Ryan or Gordin likely should also be reclassed to Hunter for the same reason; Gordin doesn't need the reclass if he grew at least one point of Speed in the prologue. Ryan needs to have gotten four points of HP or Defense to reclass to Hunter and avoid one-shots, which he will do on average at level 5. Luke should be moved to Mercenary or Myrmidon so he can start doubling Barbarians. He will on average have the necessary Speed and bulk to move to Myrmidon if he reached level 6. Finally, Arran's best option is General, making him the only unit you have who can survive two hits from the Barbarians and allowing him to bring them down to Cecil and Marth's kill thresholds with his Silver Lance. Hero and Swordmaster are good alternatives if you want him doubling as well.
At the start of the chapter, send Marth towards the cave to collect the Bullion, and leave Luke and Arran in range of the first three Barbarians to weaken them. On turn two, move Marth onto the mountain tile below the cave, finish off the weakened Barbarians, and form a vertical wall to cover your wounded. Put your toughest unit (probably Kris) at the top of the wall; the Barbarians are stupid, and don't understand that they can tag-team a healthy unit to kill them. The Thief who spawns on turn 2 isn't any smarter, and attacks Marth from one range. Wipe out the rest of the initial wave on turn 3, and mind the northeast Hunter and Barbarian's attack range. Once they're dead, have Marth collect the Bullion and regroup with the others. Heal if you feel you need to, then pull and kill the Hunter and Barbarian one at a time. Once they're dead, the first half of the map is won. Visit the village to recruit Marisha. She's a basic healer with good Magic and Speed. Give her the Heal staff/staves Wrys left behind, have her heal up your party members, and visit the armory to sell the Bullion and buy yourself some Javelins (and a Hand Axe if Kris started as a Fighter). Then hit the save point.
Place Arran on the central fort to trigger a cutscene and aggro the remaining enemies. Make sure Marisha is close by so she can get to the front lines to heal. Once the enemies attack, bum rush them with your strongest units. Ideally, you want to kill all of the ranged units and make it so that the Barbarians can't hit anyone injured or tag team anyone. If you're having trouble, the mountain pass to the south where the Thief was allows your infantry units to outflank the chokepoint. Once you've put the enemies to the sword, the battle is won. Talk to Lorenz to avoid a fight and seize. You get a Mend staff for free, which will be helpful.
Trivia
- This map was used for testing of Fire Emblem Awakening, and later became modified and used as the map for The Dead King's Lament, a paralogue chapter.[1]
Etymology and other languages
| Names, etymology, and in other regions | ||
|---|---|---|
| Language | Name | Definition, etymology, and notes |
| English (unofficial) |
• Grunia Expedition |
• Known by this name in the original Mystery of the Emblem patch. |
| Japanese |
グルニア遠征 |
Grunia expedition. Officially romanized as The Grunia Expedition in the Mystery of the Emblem guide. |
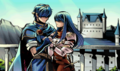
Gallery
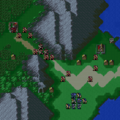
Enemy and player layout

CG image displayed during the intro for Mystery of the Emblem
CG image displayed during the intro for New Mystery of the Emblem


Notes
- ↑ 1.0 1.1 1.2 1.3 1.4 Not in New Mystery of the Emblem.
- ↑ Not in New Mystery of the Emblem if Jeorge's version of Prologue 4 was played.
- ↑ Not in New Mystery of the Emblem if Draug's version of Prologue 6 was played.
References
- ↑ "[Yes,] the map we used was actually the first stage from Fire Emblem: Monsho no Nazo. We needed something to experiment with things like different terrain types and geography before the designers started working on the new maps [for Awakening]. It wasn't used in the main story of Fire Emblem Awakening but it was used in the side story." — Genki Yokota, Official Site - Fire Emblem Awakening for Nintendo 3DS - Developer Interview - Page 2, Nintendo.com (archived by the Wayback Machine), Retrieved: June 29, 2022 (archived February 12, 2016)
| ← Assassination of the Hero-King (New Mystery of the Emblem only) • | The Grustian Expedition | • Rebellion at Macedon → |
|---|
| Fire Emblem: New Mystery of the Emblem: Heroes of Light and Shadow | ||||||||||||||||||||||||||||||||||
|---|---|---|---|---|---|---|---|---|---|---|---|---|---|---|---|---|---|---|---|---|---|---|---|---|---|---|---|---|---|---|---|---|---|---|
| ||||||||||||||||||||||||||||||||||