| Site News |
|---|
| Warning: This wiki contains spoilers. Read at your own risk! Social media: If you would like, please join our Discord server, and/or follow us on Twitter (X) or Tumblr! |
The Verge of History: Difference between revisions
m (→Character data) |
Thecornerman (talk | contribs) m (Text replacement - "([Cc])hapter (\d+)" to "$1hapter $2") |
||
| (22 intermediate revisions by 6 users not shown) | |||
| Line 6: | Line 6: | ||
|location=Southtown | |location=Southtown | ||
|new units=[[Lissa]], [[Frederick]] | |new units=[[Lissa]], [[Frederick]] | ||
|boss=[[Garrick]] | |boss=[[Garrick]] | ||
|previous=[[Invisible Ties (premonition)|Invisible Ties]] | |||
|next=[[Unwelcome Change]] | |||
}} | }} | ||
{{Quote| | {{Quote|There are better places to take a nap than on the ground, you know. Give me your hand.|Chrom}} | ||
'''The Verge of History''' is the prologue chapter in {{FE13}}. | '''The Verge of History''' (Japanese: {{hl|新たなる歴史|Aratanaru rekishi}} ''New History'') is the prologue chapter in {{FE13}}. This chapter is where the actual story of the game begins, and continues to introduce more of the game's mechanics. Completing this chapter unlocks the [[world map]] and, in the full version of the game, the ability to save while on it. | ||
This chapter is the first of two chapters that appeared in the international demo version of ''Awakening''. | This chapter is the first of two chapters that appeared in the international demo version of ''Awakening''. | ||
| Line 24: | Line 26: | ||
==Chapter data== | ==Chapter data== | ||
{{Tab | {{Tab | ||
|tab1=Normal | |tab1=Normal | ||
| Line 35: | Line 36: | ||
|enemy=5 | |enemy=5 | ||
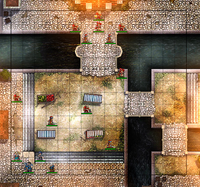
|map=[[File:Cm fe13 p.png]] | |map=[[File:Cm fe13 p.png]] | ||
|col=15 | |||
|row=14 | |||
}} | }} | ||
|content2={{ChapData | |content2={{ChapData | ||
| Line 42: | Line 45: | ||
|enemy=8 | |enemy=8 | ||
|map=[[File:Cm fe13 p h.png]] | |map=[[File:Cm fe13 p h.png]] | ||
|col=15 | |||
|row=14 | |||
}} | }} | ||
|content3={{ChapData | |content3={{ChapData | ||
| Line 49: | Line 54: | ||
|enemy=11 | |enemy=11 | ||
|map=[[File:Cm fe13 p l.png]] | |map=[[File:Cm fe13 p l.png]] | ||
|col=15 | |||
|row=14 | |||
}} | }} | ||
}} | }} | ||
===Character data=== | ===Character data=== | ||
| Line 58: | Line 63: | ||
{{ChapChars | {{ChapChars | ||
|game#=13 | |game#=13 | ||
|newunit1={{NewUnit | |newunit1={{NewUnit | ||
|name=Chrom | |name=Chrom | ||
| Line 65: | Line 69: | ||
|HP=20 | |HP=20 | ||
|lv=1 | |lv=1 | ||
|inventory={{Item|13|Falchion|link=Falchion (Archanea)}}<br>{{Item|13| | |inventory={{Item|13|Falchion|link=Falchion (Archanea)}}<br>{{Item|13|Rapier}} | ||
|recruitment method=Automatically from | |recruitment method=Automatically from turn 1 | ||
}} | }} | ||
|newunit2={{NewUnit | |newunit2={{NewUnit | ||
|name=Robin | |name=Robin | ||
|namearticle=Robin | |namearticle=Robin | ||
|portrait=[[File:Small portrait | |portrait=[[File:Small portrait robin {{#var:A}} fe13.png]] | ||
|class= | |class=Tactician | ||
|HP={{ | |HP={{h|19|16 if flaw, 24 if asset}} | ||
|lv=1 | |lv=1 | ||
|inventory={{Item|13|Bronze Sword}}<br>{{Item|13|Thunder | |inventory={{Item|13|Bronze Sword}}<br>{{Item|13|Thunder}} | ||
|recruitment method=Automatically from | |recruitment method=Automatically from turn 1 | ||
}} | }} | ||
|newunit3={{NewUnit | |newunit3={{NewUnit | ||
| Line 85: | Line 89: | ||
|lv=1 | |lv=1 | ||
|inventory={{Item|13|Heal}}<br>{{Item|13|Vulnerary}} | |inventory={{Item|13|Heal}}<br>{{Item|13|Vulnerary}} | ||
|recruitment method=Automatically from | |recruitment method=Automatically from turn 1 | ||
}} | }} | ||
|newunit4={{NewUnit | |newunit4={{NewUnit | ||
| Line 94: | Line 98: | ||
|lv=1 | |lv=1 | ||
|inventory={{Item|13|Silver Lance}} | |inventory={{Item|13|Silver Lance}} | ||
|recruitment method=Automatically from | |recruitment method=Automatically from turn 1 | ||
}} | }} | ||
}} | }} | ||
| Line 103: | Line 107: | ||
===Shop data=== | ===Shop data=== | ||
After clearing [[Warrior Realm|chapter 3]], the shop at this location will become available. | After clearing [[Warrior Realm|chapter 3]], the shop at this location will become available. | ||
{{ChapShop 3DS | {{ChapShop 3DS | ||
|armory1=Bronze Sword | |armory1=Bronze Sword | ||
| Line 114: | Line 118: | ||
|armorycost4=350 | |armorycost4=350 | ||
|armory5=Fire | |armory5=Fire | ||
|armorycost5=540 | |armorycost5=540 | ||
|location=Southtown | |location=Southtown | ||
| Line 149: | Line 152: | ||
|tab3=Lunatic(+) | |tab3=Lunatic(+) | ||
|content1={{ChapUnitHdr|type=Enemy|platform=3ds01}} | |content1={{ChapUnitHdr|type=Enemy|platform=3ds01}} | ||
{{ChapUnitCellFE13 | |||
|name=[[Garrick]] | |||
|class=Barbarian | |||
|lv=3 | |||
|#=1 | |||
|hp=20 | |||
|str=8 | |||
|mag=0 | |||
|skill=5 | |||
|spd=7 | |||
|lck=2 | |||
|def=3 | |||
|res=0 | |||
|inventory={{Item|13|Hand Axe}} | |||
}} | |||
{{ChapUnitCellFE13 | {{ChapUnitCellFE13 | ||
|name=Ruffian | |name=Ruffian | ||
| Line 180: | Line 198: | ||
|res=1 | |res=1 | ||
|mov=5 | |mov=5 | ||
|inventory={{Item|13|Wind | |inventory={{Item|13|Wind}} | ||
|notes=Immediately begins moving unprovoked. | |notes=Immediately begins moving unprovoked. | ||
}} | }} | ||
| Line 198: | Line 216: | ||
|mov=5 | |mov=5 | ||
|inventory={{Item|13|Bronze Axe}} | |inventory={{Item|13|Bronze Axe}} | ||
|last=y | |||
}} | }} | ||
{{ChapUnitFtr}} | |||
|content2={{ChapUnitHdr|type=Enemy|platform=3ds01}} | |||
{{ChapUnitCellFE13 | {{ChapUnitCellFE13 | ||
|name=[[Garrick]] | |name=[[Garrick]] | ||
| Line 204: | Line 225: | ||
|lv=3 | |lv=3 | ||
|#=1 | |#=1 | ||
|hp= | |hp=25 | ||
|str= | |str=10 | ||
|mag=0 | |mag=0 | ||
|skill= | |skill=6 | ||
|spd= | |spd=9 | ||
|lck= | |lck=3 | ||
|def=3 | |def=3 | ||
|res=0 | |res=0 | ||
|inventory={{Item|13|Hand Axe}} | |inventory={{Item|13|Hand Axe}}<br>{{Item|13|Gamble}} | ||
| | |||
}} | }} | ||
{{ChapUnitCellFE13 | {{ChapUnitCellFE13 | ||
|name=Ruffian | |name=Ruffian | ||
| Line 231: | Line 249: | ||
|res=0~1 | |res=0~1 | ||
|mov=5 | |mov=5 | ||
|inventory={{Item|13|Bronze Sword}}<br>{{Item|13|Avoid +10}}<br><small>Can have | |inventory={{Item|13|Bronze Sword}}<br>{{Item|13|Avoid +10}}<br><small>Can have 0–1 skill(s) at random</small> | ||
|notes=• The southern one immediately begins moving unprovoked.<br>• The northern two both begin moving if either of them or the nearby [[Mage]] is provoked. | |notes=• The southern one immediately begins moving unprovoked.<br>• The northern two both begin moving if either of them or the nearby [[Mage]] is provoked. | ||
}} | }} | ||
| Line 248: | Line 266: | ||
|res=1~2 | |res=1~2 | ||
|mov=5 | |mov=5 | ||
|inventory={{Item|13|Thunder | |inventory={{Item|13|Thunder}}<br>{{Item|13|Magic +2}} • {{Item|13|Focus}}<br><small>Can have 0–1 skill(s) at random</small> | ||
|notes=Begins moving if a nearby [[Myrmidon]] is provoked. | |notes=Begins moving if a nearby [[Myrmidon]] is provoked. | ||
}} | }} | ||
| Line 265: | Line 283: | ||
|res=1~2 | |res=1~2 | ||
|mov=5 | |mov=5 | ||
|inventory={{Item|13|Wind | |inventory={{Item|13|Wind}}<br>{{Item|13|Magic +2}} • {{Item|13|Focus}}<br><small>Can have 0–1 skill(s) at random</small> | ||
|notes=Immediately begins moving unprovoked. | |notes=Immediately begins moving unprovoked. | ||
}} | }} | ||
| Line 282: | Line 300: | ||
|res=0 | |res=0 | ||
|mov=5 | |mov=5 | ||
|inventory={{Item|13|Bronze Axe}}<br>{{Item|13|Gamble}}<br><small>Can have | |inventory={{Item|13|Bronze Axe}}<br>{{Item|13|Gamble}}<br><small>Can have 0–1 skill(s) at random</small> | ||
|notes=Immediately begins moving unprovoked. | |notes=Immediately begins moving unprovoked. | ||
|last=y | |||
}} | }} | ||
{{ChapUnitFtr}} | |||
|content3={{ChapUnitHdr|type=Enemy|platform=3ds01}} | |||
{{ChapUnitCellFE13 | {{ChapUnitCellFE13 | ||
|name=[[Garrick]] | |name=[[Garrick]] | ||
| Line 290: | Line 311: | ||
|lv=3 | |lv=3 | ||
|#=1 | |#=1 | ||
|hp= | |hp=34 | ||
|str= | |str=14 | ||
|mag=0 | |mag=0 | ||
|skill= | |skill=8 | ||
|spd= | |spd=12 | ||
|lck= | |lck=5 | ||
|def=3 | |def=3 | ||
|res=0 | |res=0 | ||
|inventory={{Item|13|Hand Axe}}<br>{{Item|13|Gamble}} | |inventory={{Item|13|Hand Axe}}<br>{{Item|13|Gamble}} | ||
}} | }} | ||
{{ChapUnitCellFE13 | {{ChapUnitCellFE13 | ||
|name=Ruffian | |name=Ruffian | ||
| Line 317: | Line 335: | ||
|res=2 | |res=2 | ||
|mov=5 | |mov=5 | ||
|inventory={{Item|13|Iron Sword}}<br>{{Item|13|Avoid +10}}<br><small>Can have | |inventory={{Item|13|Iron Sword}}<br>{{Item|13|Avoid +10}}<br><small>Can have 0–1 skill(s) at random.</small> | ||
|notes=• The southern two immediately begin moving unprovoked.<br>• The northern two both begin moving if either of them or a nearby [[Mage]] or [[Barbarian]] is provoked. | |notes=• The southern two immediately begin moving unprovoked.<br>• The northern two both begin moving if either of them or a nearby [[Mage]] or [[Barbarian]] is provoked. | ||
}} | }} | ||
| Line 334: | Line 352: | ||
|res=4 | |res=4 | ||
|mov=5 | |mov=5 | ||
|inventory={{Item|13|Elthunder}}<br>{{Item|13|Magic +2}} • {{Item|13|Focus}}<br><small>Can have | |inventory={{Item|13|Elthunder}}<br>{{Item|13|Magic +2}} • {{Item|13|Focus}}<br><small>Can have 0–1 skill(s) at random</small> | ||
|notes=Begins moving if a nearby [[Myrmidon]] or [[Barbarian]] is provoked. | |notes=Begins moving if a nearby [[Myrmidon]] or [[Barbarian]] is provoked. | ||
}} | }} | ||
| Line 351: | Line 369: | ||
|res=0 | |res=0 | ||
|mov=5 | |mov=5 | ||
|inventory={{Item|13|Iron Axe}}<br>{{Item|13|Gamble}}<br><small>Can have | |inventory={{Item|13|Iron Axe}}<br>{{Item|13|Gamble}}<br><small>Can have 0–1 skill(s) at random</small> | ||
|notes=• The southern two immediately begin moving unprovoked.<br>• The northern two both begin moving if either of them or a nearby [[Myrmidon]] or [[Mage]] is provoked. | |notes=• The southern two immediately begin moving unprovoked.<br>• The northern two both begin moving if either of them or a nearby [[Myrmidon]] or [[Mage]] is provoked. | ||
}} | }} | ||
| Line 368: | Line 386: | ||
|res=4 | |res=4 | ||
|mov=5 | |mov=5 | ||
|inventory={{Item|13|Elwind}}<br>{{Item|13|Magic +2}} • {{Item|13|Focus}}<br><small>Can have | |inventory={{Item|13|Elwind}}<br>{{Item|13|Magic +2}} • {{Item|13|Focus}}<br><small>Can have 0–1 skill(s) at random</small> | ||
|notes=Immediately begins moving unprovoked. | |notes=Immediately begins moving unprovoked. | ||
|last=y | |||
| | |||
}} | }} | ||
{{ChapUnitFtr}} | {{ChapUnitFtr}} | ||
| Line 455: | Line 459: | ||
==Strategy== | ==Strategy== | ||
{{ | {{strategy}} | ||
Note: | Note: these strategies were created with a female Avatar with +Spd/-Def. | ||
At the beginning of the chapter, you are given four units. Chrom is the main character. He has above-average growths in most of his stats, so he should be rather reliable. He also possesses useful supports with Vaike, Gaius, and Frederick to patch up any of his stats if they get too low. Your custom Avatar, herein referred to by their default name Robin, is the most versatile character in the game and one of your strongest units. Lissa is a rather basic healer. Frederick is the game's Oifey archetype and is critical to surviving Lunatic and Lunatic+'s early chapters with his powerful Silver Lance. | At the beginning of the chapter, you are given four units. Chrom is the main character. He has above-average growths in most of his stats, so he should be rather reliable. He also possesses useful supports with Vaike, Gaius, and Frederick to patch up any of his stats if they get too low. Your custom Avatar, herein referred to by their default name Robin, is the most versatile character in the game and one of your strongest units. Lissa is a rather basic healer. She will eventually be outshined by the other healers in the game, but for the time being she's useful. Frederick is the game's Oifey archetype and is critical to surviving Lunatic and Lunatic+'s early chapters with his powerful Silver Lance. | ||
===Normal/Hard=== | |||
This is a very straightforward tutorial level with no nasty surprises. Give Robin's Bronze Sword to Frederick; on Hard, he can use it to weaken the enemies and train his sword rank while still feeding kills to Chrom and Robin. Robin is far more effective as a caster anyway. Always keep Robin paired up in order to exploit their powerful Veteran skill. Don't do anything reckless, and this should be an easy win. | |||
===Lunatic/Lunatic+=== | |||
The usual strategy disclaimer doesn't quite do Lunatic+ ''Awakening'' justice; '''no plan will ''ever'' survive contact with the enemy''', and your ability to make things up as you go along ''will'' be tested. | |||
This chapter is a rarity in that you will only buckle to a very specific combination of skills with the given strategy. The Barbarian that attacks Frederick on turn 1 absolutely needs Luna+ and the Elwind Mage absolutely needs Vantage+ for you to fear for your safety; if the Elwind Mage also has Luna+ and Magic +2 or the southeastern Myrmidon has Vantage+ and Luna+, Frederick dies. For the first wave of enemies, pair Lissa with Robin and have Robin go as far east as possible and take a free cheap shot at the Myrmidon. Then pair Frederick with Chrom and have Frederick finish him off from the south. On enemy phase, Frederick will be attacked by a Barbarian; he must land his counterattack. On turn 2, have Robin move to Frederick's right, take Chrom, and finish off the Barbarian. Then have Frederick kill the Mage from the south. On turn 3, Robin can back up into the canal while Frederick takes Lissa around to the canal's east side. With smart positioning, Robin can engage the remaining Myrmidon and Barbarian from in the canal without fearing a counterattack, Chrom can also take cover in the canal, and Frederick and Lissa can hide behind them as their pair-up partners. Once the first wave is dead, you can heal up and step on the event tile if you wish; this strategy won't bother much with them since they're too unpredictable. | |||
When everyone has full health, move | When everyone has full health, move Robin into the northeastern canal to engage the Mage. She and Chrom can exploit the water to keep out of enemy range until you're ready to fight and have Lissa heal as necessary on the east and northeast parts of the map. Once the Mage is dead, continue moving around the canal so that Robin can chip the melee enemies to death from safety. After killing them, have Lissa heal everyone again. Once that's taken care of, all that's left is Garrick. He has no healing, so just have Robin pick him apart from two range. If all three of your characters are either adjacent to or paired up with Robin, she will receive a +10 bonus to her crit avoid; this in combination with her base Luck is enough to completely negate Garrick's 14 crit chance unless she has taken Luck as a flaw, grown Luck less than twice (unlikely, considering her 45-50% Luck growth and the judicious amount of combat she's seen), and is not paired with either Chrom or Lissa. | ||
==Trivia== | ==Trivia== | ||
| Line 474: | Line 480: | ||
{{Names | {{Names | ||
|eng-name=The Verge of History | |eng-name=The Verge of History | ||
| | |jpn-name={{h|新たなる歴史|Aratanaru rekishi}} | ||
|jpn-mean=New History | |||
| | |span-name=El origen de la historia | ||
|span-mean=The origin of history | |||
|fren-name=Éveil | |fren-name=Éveil | ||
|fren-mean=Awakening | |fren-mean=Awakening | ||
|ger-name=Ein neuer Anfang | |ger-name=Ein neuer Anfang | ||
|ger-mean=A new Beginning | |ger-mean=A new Beginning | ||
|ital-name=Uno strano risveglio | |ital-name=Uno strano risveglio | ||
|ital-mean=A strange awakening | |ital-mean=A strange awakening | ||
|por-name=A origem da história | |||
|por-mean=The origin of history; from "The Verge of History" [[Lost Lore]] event in {{FEH}}. | |||
|ch-trad-name={{h|新的歷史|Xīn de lìshǐ}} | |||
|ch-trad-mean=New history; from "The Verge of History" Lost Lore event in ''Heroes''. | |||
}} | }} | ||
| Line 492: | Line 501: | ||
{{ChapterNav | {{ChapterNav | ||
|prechapter=Invisible Ties (premonition){{!}}Invisible Ties | |prechapter=Invisible Ties (premonition){{!}}Invisible Ties | ||
|nextchapter=Unwelcome Change | |nextchapter=Unwelcome Change | ||
}} | }} | ||
{{Nav13}} | {{Nav13}} | ||
{{DEFAULTSORT:Verge of History, The}} | |||
[[Category:Chapters of Fire Emblem Awakening]] | [[Category:Chapters of Fire Emblem Awakening]] | ||
Latest revision as of 17:36, 28 March 2024
| ||||||||||
|
| “ | There are better places to take a nap than on the ground, you know. Give me your hand. | ” | — Chrom |
|---|
The Verge of History (Japanese: 新たなる歴史 New History) is the prologue chapter in Fire Emblem Awakening. This chapter is where the actual story of the game begins, and continues to introduce more of the game's mechanics. Completing this chapter unlocks the world map and, in the full version of the game, the ability to save while on it.
This chapter is the first of two chapters that appeared in the international demo version of Awakening.
Plot
- Main article:
The Verge of History/Script
A vagrant named Robin awakens in a field in Ylisse with near-complete retrograde amnesia. They are greeted by a man named Chrom, his sister Lissa, and their lieutenant Frederick, who together comprise a group known as the Shepherds. Upon learning that Robin can only recall Chrom's name and their own, Chrom offers to take them to a nearby town to get them sorted out. However, a pack of bandits raid the town. The three immediately head to the town to drive the bandits off, and Robin decides to follow and aid them. During the fight, Robin discovers an innate talent for tactics.
Afterwards, Robin's actions in protecting the town convince Chrom of their good character. Chrom offers to let Robin join the Shepherds, despite Frederick's lingering concerns about their trustworthiness. Chrom and Lissa explain that the bandits were sent by Ylisse's western neighbor, Plegia, in the hopes of inciting a war. The villagers offer to celebrate the group's valor with a toast, but Frederick insists the group return to the capital as quickly as possible.
Summary
Robin is found lying in a field with no memory. After [he/she] helps Chrom fend off a band of brigands, [he/she] is welcomed into the Shepherds as a tactician.
Chapter data
Normal Hard Lunatic
Character data
| Characters | ||||||||||||||||||||||||||||||||||||||||||||
|---|---|---|---|---|---|---|---|---|---|---|---|---|---|---|---|---|---|---|---|---|---|---|---|---|---|---|---|---|---|---|---|---|---|---|---|---|---|---|---|---|---|---|---|---|
New units
| ||||||||||||||||||||||||||||||||||||||||||||
| ||||||||||||||||||||||||||||||||||||||||||||
Available characters
| ||||||||||||||||||||||||||||||||||||||||||||
| None | ||||||||||||||||||||||||||||||||||||||||||||
Note: Chrom and Robin are technically returning characters; however, they do not make use of their default setups until this chapter.
Item data
There are no items obtained in this chapter.
Shop data
After clearing chapter 3, the shop at this location will become available.
Normal stock Possible merchant items
| Item | Price |
|---|---|
| 350 | |
| 400 | |
| 350 | |
| 350 | |
| 540 |
Event tiles
- Column 5, row 9: Southeast of an uncovered partition of red fruit
- Column 9, row 3: Two squares south, one square east of Garrick's position
Enemy data
- Stats with two figures separated by a ~ are presented as a range, representing stats that vary due to random growths. The figures to the left and right of the ~ are the stat's minimum and maximum possible values respectively.
Normal Hard Lunatic(+)
| |||||||||||||||||||||||||||||||||||||||||||||||||||||||||||||||||||||||||||||||||||||||||||||||||||||||||||||||||||||||||||
| |||||||||||||||||||||||||||||||||||||||||||||||||||||||||||||||||||||||||||||||||||||||||||||||||||||||||||||||||||||||||||
Boss data
- Main article:
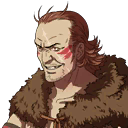
Garrick
Normal Hard Lunatic
Strategy
| This section details unofficial strategies that may help with completion of the chapter. This may not work for everybody. |
Note: these strategies were created with a female Avatar with +Spd/-Def.
At the beginning of the chapter, you are given four units. Chrom is the main character. He has above-average growths in most of his stats, so he should be rather reliable. He also possesses useful supports with Vaike, Gaius, and Frederick to patch up any of his stats if they get too low. Your custom Avatar, herein referred to by their default name Robin, is the most versatile character in the game and one of your strongest units. Lissa is a rather basic healer. She will eventually be outshined by the other healers in the game, but for the time being she's useful. Frederick is the game's Oifey archetype and is critical to surviving Lunatic and Lunatic+'s early chapters with his powerful Silver Lance.
Normal/Hard
This is a very straightforward tutorial level with no nasty surprises. Give Robin's Bronze Sword to Frederick; on Hard, he can use it to weaken the enemies and train his sword rank while still feeding kills to Chrom and Robin. Robin is far more effective as a caster anyway. Always keep Robin paired up in order to exploit their powerful Veteran skill. Don't do anything reckless, and this should be an easy win.
Lunatic/Lunatic+
The usual strategy disclaimer doesn't quite do Lunatic+ Awakening justice; no plan will ever survive contact with the enemy, and your ability to make things up as you go along will be tested.
This chapter is a rarity in that you will only buckle to a very specific combination of skills with the given strategy. The Barbarian that attacks Frederick on turn 1 absolutely needs Luna+ and the Elwind Mage absolutely needs Vantage+ for you to fear for your safety; if the Elwind Mage also has Luna+ and Magic +2 or the southeastern Myrmidon has Vantage+ and Luna+, Frederick dies. For the first wave of enemies, pair Lissa with Robin and have Robin go as far east as possible and take a free cheap shot at the Myrmidon. Then pair Frederick with Chrom and have Frederick finish him off from the south. On enemy phase, Frederick will be attacked by a Barbarian; he must land his counterattack. On turn 2, have Robin move to Frederick's right, take Chrom, and finish off the Barbarian. Then have Frederick kill the Mage from the south. On turn 3, Robin can back up into the canal while Frederick takes Lissa around to the canal's east side. With smart positioning, Robin can engage the remaining Myrmidon and Barbarian from in the canal without fearing a counterattack, Chrom can also take cover in the canal, and Frederick and Lissa can hide behind them as their pair-up partners. Once the first wave is dead, you can heal up and step on the event tile if you wish; this strategy won't bother much with them since they're too unpredictable.
When everyone has full health, move Robin into the northeastern canal to engage the Mage. She and Chrom can exploit the water to keep out of enemy range until you're ready to fight and have Lissa heal as necessary on the east and northeast parts of the map. Once the Mage is dead, continue moving around the canal so that Robin can chip the melee enemies to death from safety. After killing them, have Lissa heal everyone again. Once that's taken care of, all that's left is Garrick. He has no healing, so just have Robin pick him apart from two range. If all three of your characters are either adjacent to or paired up with Robin, she will receive a +10 bonus to her crit avoid; this in combination with her base Luck is enough to completely negate Garrick's 14 crit chance unless she has taken Luck as a flaw, grown Luck less than twice (unlikely, considering her 45-50% Luck growth and the judicious amount of combat she's seen), and is not paired with either Chrom or Lissa.
Trivia
- In the English version of the game, a minor plot hole exists when Frederick expresses suspicion over Robin immediately knowing Chrom's name despite Lissa speaking it as Robin awakens. This plot hole does not exist in the Japanese version, where Lissa instead refers to Chrom as "big brother".
Etymology and other languages
| Names, etymology, and in other regions | ||
|---|---|---|
| Language | Name | Definition, etymology, and notes |
| English |
The Verge of History |
-- |
| Japanese |
新たなる歴史 |
New History |
| Spanish |
El origen de la historia |
The origin of history |
| French |
Éveil |
Awakening |
| German |
Ein neuer Anfang |
A new Beginning |
| Italian |
Uno strano risveglio |
A strange awakening |
| Portuguese |
A origem da história |
The origin of history; from "The Verge of History" Lost Lore event in Fire Emblem Heroes. |
| Traditional Chinese |
新的歷史 |
New history; from "The Verge of History" Lost Lore event in Heroes. |
Gallery
This section has been marked as a stub. Please help improve the page by adding information.
| ← Invisible Ties • | The Verge of History | • Unwelcome Change → |
|---|

