| Site News |
|---|
| Warning: This wiki contains spoilers. Read at your own risk! Social media: If you would like, please join our Discord server, and/or follow us on X (Twitter) or Tumblr! |
New Game +: Difference between revisions
(→Tokyo Mirage Sessions ♯FE: maiko. barry, tiki lose all skills regardless) |
Eyacorkett (talk | contribs) (Added some FE8 and FE9 info) |
||
| Line 1: | Line 1: | ||
[[File:Ss fe16 ng+ byleth's journal.jpg|The menu accessed from [[Byleth]]'s journal in {{title|Three Houses}}.|thumb]] | [[File:Ss fe16 ng+ byleth's journal.jpg|The menu accessed from [[Byleth]]'s journal in {{title|Three Houses}}.|thumb]] | ||
'''New Game +''' (Japanese: {{hl|クリアデータ引き継ぎ|Kuria dēta hikitsugi}} ''clear data takeover'') is a gameplay mode in many video games which allows players to start a new game and carry over some data from a save file that had cleared the game previously. It usually does not alter the story or progression of the game, but it does allow access to many resources earlier than normal, and sometimes offers additional features or challenges. In the {{FES}}, it first appeared in the spin-off {{TMSFE}}, then was an option in {{FE16}} and {{title|Warriors: Three Hopes}}. A similar mechanic, in which the player can do a subsequent playthrough with added content using a cleared save file, was also present in {{ | '''New Game +''' (Japanese: {{hl|クリアデータ引き継ぎ|Kuria dēta hikitsugi}} ''clear data takeover'') is a gameplay mode in many video games which allows players to start a new game and carry over some data from a save file that had cleared the game previously. It usually does not alter the story or progression of the game, but it does allow access to many resources earlier than normal, and sometimes offers additional features or challenges. In the {{FES}}, it first appeared in the spin-off {{TMSFE}}, then was an option in {{FE16}} and {{title|Warriors: Three Hopes}}. A similar mechanic, in which the player can do a subsequent playthrough with added content using a cleared save file, was also present in several earlier games. | ||
=={{FE8}}== | |||
[[File:Ss fe08 super trainee.png|[[Amelia]]'s class promotion screen with the extra promotion option accessible.|thumb|right|240px]] | |||
Once the game has been completed once on both [[Eirika]] and [[Ephraim]]'s routes, [[Ross]], [[Amelia]] and [[Ewan]] gain a third [[class change|class promotion]] option; this third class has the exact same name and appearance as their initial classes, [[Journeyman]], [[Recruit]], and [[Pupil]], respectively, but has increased stats and properties akin to typical classes such as having twenty levels and requiring an item to promote. | |||
This third promotion option can promote into the character's second promoted class (such as [[Paladin]] for Amelia) or into itself again; this third and final iteration again has the same appearance as the unit's initial class but features even heightened stats, as well as a new special property, such as the ability to use [[light (magic)|light]] and [[dark (magic)|dark]] magic for Ewan's Pupil class or a 15% [[critical rate]] bonus for Amelia's Recruit class. | |||
=={{FE9}}== | |||
On a second playthrough onward, eleven characters have an additional [[Equipment]] item in their [[inventory]]. These items are all "Band" items, which increase the [[growth rate]]s of the unit that is equipping them. If the character that has the Band is a [[boss]], then the Band is a [[Inventory#Droppable items|droppable item]] that can be obtained once said boss is defeated; otherwise, the Band is usable immediately once the character possessing it is [[recruitment|recruited]]. | |||
These Bands are all exclusively obtained via this method and thus cannot be obtained on a first playthrough. | |||
{| class="cellpadding-3 basic" style="border-width: 2px; width: 70%" | |||
! style="background: none" colspan="4" | List of items | |||
|- style="color: #fff" | |||
! style="border-top-left-radius: 15px" | Item | |||
! Character | |||
! Chapter | |||
! style="border-top-right-radius: 15px" | Effects | |||
|- | |||
| {{Item|9|Paladin Band}} | |||
| [[Oscar]] | |||
| [[The Battle Begins|Chapter 1]] | |||
| | |||
{| class="cellpadding-3 chapter-table" style="border-spacing: 5px; border-width: 2px; border-radius: 5px; width: 250px; font-size: smaller" | |||
! style="border-top-left-radius: 5px; border-bottom-left-radius: 5px; width: 33%" | {{cl|{{Color2}}|HP|MHP}} | |||
| style="border-top-right-radius: 5px; border-bottom-right-radius: 5px" | +5% | |||
! style="border-top-left-radius: 5px; border-bottom-left-radius: 5px; width: 33%" | {{cl|{{Color2}}|Spd}} | |||
| style="border-top-right-radius: 5px; border-bottom-right-radius: 5px" | +5% | |||
|- | |||
! style="border-top-left-radius: 5px; border-bottom-left-radius: 5px" | {{cl|{{Color2}}|Str}} | |||
| style="border-top-right-radius: 5px; border-bottom-right-radius: 5px" | --% | |||
! style="border-top-left-radius: 5px; border-bottom-left-radius: 5px" | {{cl|{{Color2}}|Lck}} | |||
| style="border-top-right-radius: 5px; border-bottom-right-radius: 5px" | --% | |||
|- | |||
! style="border-top-left-radius: 5px; border-bottom-left-radius: 5px" | {{Cl|{{Color2}}|Mag}} | |||
| style="border-top-right-radius: 5px; border-bottom-right-radius: 5px" | --% | |||
! style="border-top-left-radius: 5px; border-bottom-left-radius: 5px" | {{Cl|{{Color2}}|Def}} | |||
| style="border-top-right-radius: 5px; border-bottom-right-radius: 5px" | --% | |||
|- | |||
! style="border-top-left-radius: 5px; border-bottom-left-radius: 5px" | {{Cl|{{Color2}}|Skl}} | |||
| style="border-top-right-radius: 5px; border-bottom-right-radius: 5px" | --% | |||
! style="border-top-left-radius: 5px; border-bottom-left-radius: 5px" | {{Cl|{{Color2}}|Res}} | |||
| style="border-top-right-radius: 5px; border-bottom-right-radius: 5px" | --% | |||
{{tableend}} | |||
|- | |||
| {{Item|9|Fighter Band}} | |||
| [[Boyd]] | |||
| [[The Battle Begins|Chapter 1]] | |||
| | |||
{| class="cellpadding-3 chapter-table" style="border-spacing: 5px; border-width: 2px; border-radius: 5px; width: 250px; font-size: smaller" | |||
! style="border-top-left-radius: 5px; border-bottom-left-radius: 5px; width: 33%" | {{cl|{{Color2}}|HP|MHP}} | |||
| style="border-top-right-radius: 5px; border-bottom-right-radius: 5px" | +5% | |||
! style="border-top-left-radius: 5px; border-bottom-left-radius: 5px; width: 33%" | {{cl|{{Color2}}|Spd}} | |||
| style="border-top-right-radius: 5px; border-bottom-right-radius: 5px" | --% | |||
|- | |||
! style="border-top-left-radius: 5px; border-bottom-left-radius: 5px" | {{cl|{{Color2}}|Str}} | |||
| style="border-top-right-radius: 5px; border-bottom-right-radius: 5px" | +5% | |||
! style="border-top-left-radius: 5px; border-bottom-left-radius: 5px" | {{cl|{{Color2}}|Lck}} | |||
| style="border-top-right-radius: 5px; border-bottom-right-radius: 5px" | --% | |||
|- | |||
! style="border-top-left-radius: 5px; border-bottom-left-radius: 5px" | {{Cl|{{Color2}}|Mag}} | |||
| style="border-top-right-radius: 5px; border-bottom-right-radius: 5px" | --% | |||
! style="border-top-left-radius: 5px; border-bottom-left-radius: 5px" | {{Cl|{{Color2}}|Def}} | |||
| style="border-top-right-radius: 5px; border-bottom-right-radius: 5px" | --% | |||
|- | |||
! style="border-top-left-radius: 5px; border-bottom-left-radius: 5px" | {{Cl|{{Color2}}|Skl}} | |||
| style="border-top-right-radius: 5px; border-bottom-right-radius: 5px" | --% | |||
! style="border-top-left-radius: 5px; border-bottom-left-radius: 5px" | {{Cl|{{Color2}}|Res}} | |||
| style="border-top-right-radius: 5px; border-bottom-right-radius: 5px" | --% | |||
{{tableend}} | |||
|- | |||
| {{Item|9|Priest Band}} | |||
| [[Rhys]] | |||
| [[Rescue (chapter)|Chapter 2]] | |||
| | |||
{| class="cellpadding-3 chapter-table" style="border-spacing: 5px; border-width: 2px; border-radius: 5px; width: 250px; font-size: smaller" | |||
! style="border-top-left-radius: 5px; border-bottom-left-radius: 5px; width: 33%" | {{cl|{{Color2}}|HP|MHP}} | |||
| style="border-top-right-radius: 5px; border-bottom-right-radius: 5px" | --% | |||
! style="border-top-left-radius: 5px; border-bottom-left-radius: 5px; width: 33%" | {{cl|{{Color2}}|Spd}} | |||
| style="border-top-right-radius: 5px; border-bottom-right-radius: 5px" | --% | |||
|- | |||
! style="border-top-left-radius: 5px; border-bottom-left-radius: 5px" | {{cl|{{Color2}}|Str}} | |||
| style="border-top-right-radius: 5px; border-bottom-right-radius: 5px" | --% | |||
! style="border-top-left-radius: 5px; border-bottom-left-radius: 5px" | {{cl|{{Color2}}|Lck}} | |||
| style="border-top-right-radius: 5px; border-bottom-right-radius: 5px" | +5% | |||
|- | |||
! style="border-top-left-radius: 5px; border-bottom-left-radius: 5px" | {{Cl|{{Color2}}|Mag}} | |||
| style="border-top-right-radius: 5px; border-bottom-right-radius: 5px" | --% | |||
! style="border-top-left-radius: 5px; border-bottom-left-radius: 5px" | {{Cl|{{Color2}}|Def}} | |||
| style="border-top-right-radius: 5px; border-bottom-right-radius: 5px" | --% | |||
|- | |||
! style="border-top-left-radius: 5px; border-bottom-left-radius: 5px" | {{Cl|{{Color2}}|Skl}} | |||
| style="border-top-right-radius: 5px; border-bottom-right-radius: 5px" | --% | |||
! style="border-top-left-radius: 5px; border-bottom-left-radius: 5px" | {{Cl|{{Color2}}|Res}} | |||
| style="border-top-right-radius: 5px; border-bottom-right-radius: 5px" | +5% | |||
{{tableend}} | |||
|- | |||
| {{Item|9|Archer Band}} | |||
| [[Shinon]] | |||
| [[Pirates Aground|Chapter 3]] | |||
| | |||
{| class="cellpadding-3 chapter-table" style="border-spacing: 5px; border-width: 2px; border-radius: 5px; width: 250px; font-size: smaller" | |||
! style="border-top-left-radius: 5px; border-bottom-left-radius: 5px; width: 33%" | {{cl|{{Color2}}|HP|MHP}} | |||
| style="border-top-right-radius: 5px; border-bottom-right-radius: 5px" | --% | |||
! style="border-top-left-radius: 5px; border-bottom-left-radius: 5px; width: 33%" | {{cl|{{Color2}}|Spd}} | |||
| style="border-top-right-radius: 5px; border-bottom-right-radius: 5px" | +5% | |||
|- | |||
! style="border-top-left-radius: 5px; border-bottom-left-radius: 5px" | {{cl|{{Color2}}|Str}} | |||
| style="border-top-right-radius: 5px; border-bottom-right-radius: 5px" | --% | |||
! style="border-top-left-radius: 5px; border-bottom-left-radius: 5px" | {{cl|{{Color2}}|Lck}} | |||
| style="border-top-right-radius: 5px; border-bottom-right-radius: 5px" | --% | |||
|- | |||
! style="border-top-left-radius: 5px; border-bottom-left-radius: 5px" | {{Cl|{{Color2}}|Mag}} | |||
| style="border-top-right-radius: 5px; border-bottom-right-radius: 5px" | --% | |||
! style="border-top-left-radius: 5px; border-bottom-left-radius: 5px" | {{Cl|{{Color2}}|Def}} | |||
| style="border-top-right-radius: 5px; border-bottom-right-radius: 5px" | --% | |||
|- | |||
! style="border-top-left-radius: 5px; border-bottom-left-radius: 5px" | {{Cl|{{Color2}}|Skl}} | |||
| style="border-top-right-radius: 5px; border-bottom-right-radius: 5px" | +5% | |||
! style="border-top-left-radius: 5px; border-bottom-left-radius: 5px" | {{Cl|{{Color2}}|Res}} | |||
| style="border-top-right-radius: 5px; border-bottom-right-radius: 5px" | --% | |||
{{tableend}} | |||
|- | |||
| {{Item|9|Knight Band}} | |||
| [[Gatrie]] | |||
| [[Pirates Aground|Chapter 3]] | |||
| | |||
{| class="cellpadding-3 chapter-table" style="border-spacing: 5px; border-width: 2px; border-radius: 5px; width: 250px; font-size: smaller" | |||
! style="border-top-left-radius: 5px; border-bottom-left-radius: 5px; width: 33%" | {{cl|{{Color2}}|HP|MHP}} | |||
| style="border-top-right-radius: 5px; border-bottom-right-radius: 5px" | --% | |||
! style="border-top-left-radius: 5px; border-bottom-left-radius: 5px; width: 33%" | {{cl|{{Color2}}|Spd}} | |||
| style="border-top-right-radius: 5px; border-bottom-right-radius: 5px" | --% | |||
|- | |||
! style="border-top-left-radius: 5px; border-bottom-left-radius: 5px" | {{cl|{{Color2}}|Str}} | |||
| style="border-top-right-radius: 5px; border-bottom-right-radius: 5px" | +5% | |||
! style="border-top-left-radius: 5px; border-bottom-left-radius: 5px" | {{cl|{{Color2}}|Lck}} | |||
| style="border-top-right-radius: 5px; border-bottom-right-radius: 5px" | --% | |||
|- | |||
! style="border-top-left-radius: 5px; border-bottom-left-radius: 5px" | {{Cl|{{Color2}}|Mag}} | |||
| style="border-top-right-radius: 5px; border-bottom-right-radius: 5px" | --% | |||
! style="border-top-left-radius: 5px; border-bottom-left-radius: 5px" | {{Cl|{{Color2}}|Def}} | |||
| style="border-top-right-radius: 5px; border-bottom-right-radius: 5px" | +5% | |||
|- | |||
! style="border-top-left-radius: 5px; border-bottom-left-radius: 5px" | {{Cl|{{Color2}}|Skl}} | |||
| style="border-top-right-radius: 5px; border-bottom-right-radius: 5px" | --% | |||
! style="border-top-left-radius: 5px; border-bottom-left-radius: 5px" | {{Cl|{{Color2}}|Res}} | |||
| style="border-top-right-radius: 5px; border-bottom-right-radius: 5px" | --% | |||
{{tableend}} | |||
|- | |||
| {{Item|9|Thief Band}} | |||
| [[Havetti]] (boss) | |||
| [[Pirates Aground|Chapter 3]] | |||
| | |||
{| class="cellpadding-3 chapter-table" style="border-spacing: 5px; border-width: 2px; border-radius: 5px; width: 250px; font-size: smaller" | |||
! style="border-top-left-radius: 5px; border-bottom-left-radius: 5px; width: 33%" | {{cl|{{Color2}}|HP|MHP}} | |||
| style="border-top-right-radius: 5px; border-bottom-right-radius: 5px" | --% | |||
! style="border-top-left-radius: 5px; border-bottom-left-radius: 5px; width: 33%" | {{cl|{{Color2}}|Spd}} | |||
| style="border-top-right-radius: 5px; border-bottom-right-radius: 5px" | +5% | |||
|- | |||
! style="border-top-left-radius: 5px; border-bottom-left-radius: 5px" | {{cl|{{Color2}}|Str}} | |||
| style="border-top-right-radius: 5px; border-bottom-right-radius: 5px" | --% | |||
! style="border-top-left-radius: 5px; border-bottom-left-radius: 5px" | {{cl|{{Color2}}|Lck}} | |||
| style="border-top-right-radius: 5px; border-bottom-right-radius: 5px" | --% | |||
|- | |||
! style="border-top-left-radius: 5px; border-bottom-left-radius: 5px" | {{Cl|{{Color2}}|Mag}} | |||
| style="border-top-right-radius: 5px; border-bottom-right-radius: 5px" | --% | |||
! style="border-top-left-radius: 5px; border-bottom-left-radius: 5px" | {{Cl|{{Color2}}|Def}} | |||
| style="border-top-right-radius: 5px; border-bottom-right-radius: 5px" | --% | |||
|- | |||
! style="border-top-left-radius: 5px; border-bottom-left-radius: 5px" | {{Cl|{{Color2}}|Skl}} | |||
| style="border-top-right-radius: 5px; border-bottom-right-radius: 5px" | +5% | |||
! style="border-top-left-radius: 5px; border-bottom-left-radius: 5px" | {{Cl|{{Color2}}|Res}} | |||
| style="border-top-right-radius: 5px; border-bottom-right-radius: 5px" | --% | |||
{{tableend}} | |||
|- | |||
| {{Item|9|Sword Band}} | |||
| [[Mia]] | |||
| [[Shades of Evil|Chapter 7]] | |||
| | |||
{| class="cellpadding-3 chapter-table" style="border-spacing: 5px; border-width: 2px; border-radius: 5px; width: 250px; font-size: smaller" | |||
! style="border-top-left-radius: 5px; border-bottom-left-radius: 5px; width: 33%" | {{cl|{{Color2}}|HP|MHP}} | |||
| style="border-top-right-radius: 5px; border-bottom-right-radius: 5px" | --% | |||
! style="border-top-left-radius: 5px; border-bottom-left-radius: 5px; width: 33%" | {{cl|{{Color2}}|Spd}} | |||
| style="border-top-right-radius: 5px; border-bottom-right-radius: 5px" | --% | |||
|- | |||
! style="border-top-left-radius: 5px; border-bottom-left-radius: 5px" | {{cl|{{Color2}}|Str}} | |||
| style="border-top-right-radius: 5px; border-bottom-right-radius: 5px" | --% | |||
! style="border-top-left-radius: 5px; border-bottom-left-radius: 5px" | {{cl|{{Color2}}|Lck}} | |||
| style="border-top-right-radius: 5px; border-bottom-right-radius: 5px" | +5% | |||
|- | |||
! style="border-top-left-radius: 5px; border-bottom-left-radius: 5px" | {{Cl|{{Color2}}|Mag}} | |||
| style="border-top-right-radius: 5px; border-bottom-right-radius: 5px" | --% | |||
! style="border-top-left-radius: 5px; border-bottom-left-radius: 5px" | {{Cl|{{Color2}}|Def}} | |||
| style="border-top-right-radius: 5px; border-bottom-right-radius: 5px" | --% | |||
|- | |||
! style="border-top-left-radius: 5px; border-bottom-left-radius: 5px" | {{Cl|{{Color2}}|Skl}} | |||
| style="border-top-right-radius: 5px; border-bottom-right-radius: 5px" | +5% | |||
! style="border-top-left-radius: 5px; border-bottom-left-radius: 5px" | {{Cl|{{Color2}}|Res}} | |||
| style="border-top-right-radius: 5px; border-bottom-right-radius: 5px" | --% | |||
{{tableend}} | |||
|- | |||
| {{Item|9|Mage Band}} | |||
| [[Balmer]] (boss) | |||
| [[Shades of Evil|Chapter 7]] | |||
| | |||
{| class="cellpadding-3 chapter-table" style="border-spacing: 5px; border-width: 2px; border-radius: 5px; width: 250px; font-size: smaller" | |||
! style="border-top-left-radius: 5px; border-bottom-left-radius: 5px; width: 33%" | {{cl|{{Color2}}|HP|MHP}} | |||
| style="border-top-right-radius: 5px; border-bottom-right-radius: 5px" | --% | |||
! style="border-top-left-radius: 5px; border-bottom-left-radius: 5px; width: 33%" | {{cl|{{Color2}}|Spd}} | |||
| style="border-top-right-radius: 5px; border-bottom-right-radius: 5px" | --% | |||
|- | |||
! style="border-top-left-radius: 5px; border-bottom-left-radius: 5px" | {{cl|{{Color2}}|Str}} | |||
| style="border-top-right-radius: 5px; border-bottom-right-radius: 5px" | --% | |||
! style="border-top-left-radius: 5px; border-bottom-left-radius: 5px" | {{cl|{{Color2}}|Lck}} | |||
| style="border-top-right-radius: 5px; border-bottom-right-radius: 5px" | --% | |||
|- | |||
! style="border-top-left-radius: 5px; border-bottom-left-radius: 5px" | {{Cl|{{Color2}}|Mag}} | |||
| style="border-top-right-radius: 5px; border-bottom-right-radius: 5px" | +10% | |||
! style="border-top-left-radius: 5px; border-bottom-left-radius: 5px" | {{Cl|{{Color2}}|Def}} | |||
| style="border-top-right-radius: 5px; border-bottom-right-radius: 5px" | --% | |||
|- | |||
! style="border-top-left-radius: 5px; border-bottom-left-radius: 5px" | {{Cl|{{Color2}}|Skl}} | |||
| style="border-top-right-radius: 5px; border-bottom-right-radius: 5px" | --% | |||
! style="border-top-left-radius: 5px; border-bottom-left-radius: 5px" | {{Cl|{{Color2}}|Res}} | |||
| style="border-top-right-radius: 5px; border-bottom-right-radius: 5px" | --% | |||
{{tableend}} | |||
|- | |||
| {{Item|9|Soldier Band}} | |||
| [[Kamura]] (boss) | |||
| [[Despair and Hope|Chapter 8]] | |||
| | |||
{| class="cellpadding-3 chapter-table" style="border-spacing: 5px; border-width: 2px; border-radius: 5px; width: 250px; font-size: smaller" | |||
! style="border-top-left-radius: 5px; border-bottom-left-radius: 5px; width: 33%" | {{cl|{{Color2}}|HP|MHP}} | |||
| style="border-top-right-radius: 5px; border-bottom-right-radius: 5px" | +5% | |||
! style="border-top-left-radius: 5px; border-bottom-left-radius: 5px; width: 33%" | {{cl|{{Color2}}|Spd}} | |||
| style="border-top-right-radius: 5px; border-bottom-right-radius: 5px" | --% | |||
|- | |||
! style="border-top-left-radius: 5px; border-bottom-left-radius: 5px" | {{cl|{{Color2}}|Str}} | |||
| style="border-top-right-radius: 5px; border-bottom-right-radius: 5px" | --% | |||
! style="border-top-left-radius: 5px; border-bottom-left-radius: 5px" | {{cl|{{Color2}}|Lck}} | |||
| style="border-top-right-radius: 5px; border-bottom-right-radius: 5px" | --% | |||
|- | |||
! style="border-top-left-radius: 5px; border-bottom-left-radius: 5px" | {{Cl|{{Color2}}|Mag}} | |||
| style="border-top-right-radius: 5px; border-bottom-right-radius: 5px" | --% | |||
! style="border-top-left-radius: 5px; border-bottom-left-radius: 5px" | {{Cl|{{Color2}}|Def}} | |||
| style="border-top-right-radius: 5px; border-bottom-right-radius: 5px" | +5% | |||
|- | |||
! style="border-top-left-radius: 5px; border-bottom-left-radius: 5px" | {{Cl|{{Color2}}|Skl}} | |||
| style="border-top-right-radius: 5px; border-bottom-right-radius: 5px" | --% | |||
! style="border-top-left-radius: 5px; border-bottom-left-radius: 5px" | {{Cl|{{Color2}}|Res}} | |||
| style="border-top-right-radius: 5px; border-bottom-right-radius: 5px" | --% | |||
{{tableend}} | |||
|- | |||
| {{Item|9|Pegasus Band}} | |||
| [[Marcia]] | |||
| [[Gallia (chapter)|Chapter 9]] | |||
| | |||
{| class="cellpadding-3 chapter-table" style="border-spacing: 5px; border-width: 2px; border-radius: 5px; width: 250px; font-size: smaller" | |||
! style="border-top-left-radius: 5px; border-bottom-left-radius: 5px; width: 33%" | {{cl|{{Color2}}|HP|MHP}} | |||
| style="border-top-right-radius: 5px; border-bottom-right-radius: 5px" | --% | |||
! style="border-top-left-radius: 5px; border-bottom-left-radius: 5px; width: 33%" | {{cl|{{Color2}}|Spd}} | |||
| style="border-top-right-radius: 5px; border-bottom-right-radius: 5px" | --% | |||
|- | |||
! style="border-top-left-radius: 5px; border-bottom-left-radius: 5px" | {{cl|{{Color2}}|Str}} | |||
| style="border-top-right-radius: 5px; border-bottom-right-radius: 5px" | --% | |||
! style="border-top-left-radius: 5px; border-bottom-left-radius: 5px" | {{cl|{{Color2}}|Lck}} | |||
| style="border-top-right-radius: 5px; border-bottom-right-radius: 5px" | +5% | |||
|- | |||
! style="border-top-left-radius: 5px; border-bottom-left-radius: 5px" | {{Cl|{{Color2}}|Mag}} | |||
| style="border-top-right-radius: 5px; border-bottom-right-radius: 5px" | --% | |||
! style="border-top-left-radius: 5px; border-bottom-left-radius: 5px" | {{Cl|{{Color2}}|Def}} | |||
| style="border-top-right-radius: 5px; border-bottom-right-radius: 5px" | --% | |||
|- | |||
! style="border-top-left-radius: 5px; border-bottom-left-radius: 5px" | {{Cl|{{Color2}}|Skl}} | |||
| style="border-top-right-radius: 5px; border-bottom-right-radius: 5px" | --% | |||
! style="border-top-left-radius: 5px; border-bottom-left-radius: 5px" | {{Cl|{{Color2}}|Res}} | |||
| style="border-top-right-radius: 5px; border-bottom-right-radius: 5px" | +5% | |||
{{tableend}} | |||
|- | |||
| style="border-bottom-left-radius: 15px" | {{Item|9|Wyvern Band}} | |||
| [[Jill]] | |||
| [[A Strange Land|Chapter 12]] | |||
| style="border-bottom-right-radius: 15px" | | |||
{| class="cellpadding-3 chapter-table" style="border-spacing: 5px; border-width: 2px; border-radius: 5px; width: 250px; font-size: smaller" | |||
! style="border-top-left-radius: 5px; border-bottom-left-radius: 5px; width: 33%" | {{cl|{{Color2}}|HP|MHP}} | |||
| style="border-top-right-radius: 5px; border-bottom-right-radius: 5px" | --% | |||
! style="border-top-left-radius: 5px; border-bottom-left-radius: 5px; width: 33%" | {{cl|{{Color2}}|Spd}} | |||
| style="border-top-right-radius: 5px; border-bottom-right-radius: 5px" | --% | |||
|- | |||
! style="border-top-left-radius: 5px; border-bottom-left-radius: 5px" | {{cl|{{Color2}}|Str}} | |||
| style="border-top-right-radius: 5px; border-bottom-right-radius: 5px" | +5% | |||
! style="border-top-left-radius: 5px; border-bottom-left-radius: 5px" | {{cl|{{Color2}}|Lck}} | |||
| style="border-top-right-radius: 5px; border-bottom-right-radius: 5px" | --% | |||
|- | |||
! style="border-top-left-radius: 5px; border-bottom-left-radius: 5px" | {{Cl|{{Color2}}|Mag}} | |||
| style="border-top-right-radius: 5px; border-bottom-right-radius: 5px" | --% | |||
! style="border-top-left-radius: 5px; border-bottom-left-radius: 5px" | {{Cl|{{Color2}}|Def}} | |||
| style="border-top-right-radius: 5px; border-bottom-right-radius: 5px" | +5% | |||
|- | |||
! style="border-top-left-radius: 5px; border-bottom-left-radius: 5px" | {{Cl|{{Color2}}|Skl}} | |||
| style="border-top-right-radius: 5px; border-bottom-right-radius: 5px" | --% | |||
! style="border-top-left-radius: 5px; border-bottom-left-radius: 5px" | {{Cl|{{Color2}}|Res}} | |||
| style="border-top-right-radius: 5px; border-bottom-right-radius: 5px" | --% | |||
{{tableend}} | |||
|} | |||
=={{FE10}}== | |||
{{sectstub}} | |||
=={{TMSFE}}== | |||
[[File:Ss tmsfe new game plus.jpg|A standard save file (top), a New Game + file (center), and a Clear Data file (bottom).|thumb|right|250px]] | |||
Upon clearing the game, the player will be prompted to save after the credits to create a Clear Data save file. By loading this file, a New Game + playthrough can be started. | Upon clearing the game, the player will be prompted to save after the credits to create a Clear Data save file. By loading this file, a New Game + playthrough can be started. | ||
| Line 37: | Line 349: | ||
Two new requests are also added in a New Game +. The first is a set of challenges presented by the Grandmaster Mirage located in Illusory Daitama. He will challenge the player to a series of fights carried out by the 6 Assistant Masters, each one located in one of the main Idolaspheres. After defeating each one, the Grandmaster himself will challenge the player. The second can be found by talking to the mirage Nieg in the Urahara Arena. After trading enough Detritus with him, he will show the player his final form, an enhanced version of the final boss known as [[M-DEUS]]. This boss is undoubtedly the hardest enemy in the entire game and requires dedicated grinding in order to even compete against him. | Two new requests are also added in a New Game +. The first is a set of challenges presented by the Grandmaster Mirage located in Illusory Daitama. He will challenge the player to a series of fights carried out by the 6 Assistant Masters, each one located in one of the main Idolaspheres. After defeating each one, the Grandmaster himself will challenge the player. The second can be found by talking to the mirage Nieg in the Urahara Arena. After trading enough Detritus with him, he will show the player his final form, an enhanced version of the final boss known as [[M-DEUS]]. This boss is undoubtedly the hardest enemy in the entire game and requires dedicated grinding in order to even compete against him. | ||
It should be noted that some achievements can only be obtained in a New Game +, namely: | It should be noted that some achievements can only be obtained in a New Game + playthrough, namely: | ||
* Completing the game a second or {{h|third|Wii U version only}} time | * Completing the game a second or {{h|third|Wii U version only}} time | ||
* Achievements related to the Legendary Arena and the two new requests | * Achievements related to the Legendary Arena and the two new requests | ||
* Achievements that require Itsuki to not be in the Main Cast{{h|*|Encore version only}} | * Achievements that require Itsuki to not be in the Main Cast{{h|*|Encore version only}} | ||
== | =={{FE16}}== | ||
[[File:Ss fe16 ng+ save file.png|A standard new game save file (above) and a New Game + file (below).|thumb|300px]] | [[File:Ss fe16 ng+ save file.png|A standard new game save file (above) and a New Game + file (below).|thumb|300px]] | ||
Upon clearing the game on any route, the player will be prompted to save after the credits and create cleared-game data; New Game + save files are also considered cleared-game saves. Cleared-game save files are marked with a sprite of [[Sothis]] and a decorated label. When starting a new game, if at least one cleared-game save file exists, the player will be given the option to start the new game in New Game + and select a cleared-game save to use the data from. The game can be cleared in New Game +, and a new cleared-game save file can be created, containing the data of the New Game + file and the previous non-New Game + file; this process can be repeated indefinitely, preserving data from every past file. | Upon clearing the game on any route, the player will be prompted to save after the credits and create cleared-game data; New Game + save files are also considered cleared-game saves. Cleared-game save files are marked with a sprite of [[Sothis]] and a decorated label. When starting a new game, if at least one cleared-game save file exists, the player will be given the option to start the new game in New Game + and select a cleared-game save to use the data from. The game can be cleared in New Game +, and a new cleared-game save file can be created, containing the data of the New Game + file and the previous non-New Game + file; this process can be repeated indefinitely, preserving data from every past file. | ||
| Line 255: | Line 568: | ||
|} | |} | ||
== | =={{FEWA2}}== | ||
{{sectstub}} | {{sectstub}} | ||
<!-- | <!-- | ||
==Trivia== | ==Trivia== | ||
Revision as of 10:36, 28 December 2022

New Game + (Japanese: クリアデータ引き継ぎ clear data takeover) is a gameplay mode in many video games which allows players to start a new game and carry over some data from a save file that had cleared the game previously. It usually does not alter the story or progression of the game, but it does allow access to many resources earlier than normal, and sometimes offers additional features or challenges. In the Fire Emblem series, it first appeared in the spin-off Tokyo Mirage Sessions ♯FE, then was an option in Fire Emblem: Three Houses and Warriors: Three Hopes. A similar mechanic, in which the player can do a subsequent playthrough with added content using a cleared save file, was also present in several earlier games.
Fire Emblem: The Sacred Stones

Once the game has been completed once on both Eirika and Ephraim's routes, Ross, Amelia and Ewan gain a third class promotion option; this third class has the exact same name and appearance as their initial classes, Journeyman, Recruit, and Pupil, respectively, but has increased stats and properties akin to typical classes such as having twenty levels and requiring an item to promote.
This third promotion option can promote into the character's second promoted class (such as Paladin for Amelia) or into itself again; this third and final iteration again has the same appearance as the unit's initial class but features even heightened stats, as well as a new special property, such as the ability to use light and dark magic for Ewan's Pupil class or a 15% critical rate bonus for Amelia's Recruit class.
Fire Emblem: Path of Radiance
On a second playthrough onward, eleven characters have an additional Equipment item in their inventory. These items are all "Band" items, which increase the growth rates of the unit that is equipping them. If the character that has the Band is a boss, then the Band is a droppable item that can be obtained once said boss is defeated; otherwise, the Band is usable immediately once the character possessing it is recruited.
These Bands are all exclusively obtained via this method and thus cannot be obtained on a first playthrough.
Fire Emblem: Radiant Dawn
This section has been marked as a stub. Please help improve the page by adding information.
Tokyo Mirage Sessions ♯FE

Upon clearing the game, the player will be prompted to save after the credits to create a Clear Data save file. By loading this file, a New Game + playthrough can be started.
The game can be cleared again in New Game +, and a new Clear Data save file can be created - this process can be repeated indefinitely. An in-use New Game + save file will be labeled as "Season #", with # indicating the current playthrough. For example, the first time a New Game + is created the file will be labeled as "Season 2"; if beaten and used again it will be "Season 3" and so on.
When first loading a clear data file, the player will be taken to the New Game + process and informed of what will carry over to the new playthrough. The data is split into two types: automatic and optional.
Automatic data will automatically carry over into the new game. This includes:
- Play records and rewards earned. Play records that require performing some action X times will also carry over their progress (example: use Dia- type skills 300 times)
- Items available in shops (normally, the available stock increases with game progress). This includes Anzu's lottery, but not Hee Ho Mart's lottery (specifically, the Master Seal must be unlocked again).
- Unlocked Costumes. Itsuki's Emblem Form and The President costumes will also be unlocked, the latter only if the true ending was reached.
- Artwork collected from Anzu
- Analysis information on previously-defeated enemies (excluding bosses' stats)
- Urahara Arena titles
- The ability to reforge Carnages (normally unlocked in chapter 4)
Optional data can be kept or reset when starting a new game. This includes:
- Current levels, as well as stat boosts from Incense
- Unlocked Carnages (mastery will be reset)
- Stage Rank and most skills (Ad-libs, Duo Arts, Special Performances not associated with a Mirage, story-critical Radiant Skills, and all of Maiko, Barry, and Tiki's skills will be lost regardless)
- Map progress
- Money and most items (Performa, Arena Coins, and story-critical Key Items will be lost regardless). Since Maiko's skill Organizational Skills cannot be kept, items in excess of normal inventory limits will be discarded.
The player will be asked for each one if they wish to import or reset it, allowing for some customization. If the player is starting a new game on the Lunatic difficulty, this step is skipped and all optional data will automatically reset.
In the Wii U version, one of Tiki's costumes will become available at the Anzu lottery, and the ability to rewatch cutscenes will be unlocked in a New Game +. Both of these features however were moved in the Encore version to be available in the first playthrough.
In the Encore version, after completing Chapter 1, the player is granted the ability to remove Itsuki from the main party. He also obtains a new Perfoma, allowing him to learn the skill Open Audition, to accommodate this.
In all versions, a new "Legendary" difficulty in the Urahara Arena will be unlocked. This difficulty awards the player with War Testament Performa at certain point thresholds, which can be used to create the strongest carnages for each character.
Two new requests are also added in a New Game +. The first is a set of challenges presented by the Grandmaster Mirage located in Illusory Daitama. He will challenge the player to a series of fights carried out by the 6 Assistant Masters, each one located in one of the main Idolaspheres. After defeating each one, the Grandmaster himself will challenge the player. The second can be found by talking to the mirage Nieg in the Urahara Arena. After trading enough Detritus with him, he will show the player his final form, an enhanced version of the final boss known as M-DEUS. This boss is undoubtedly the hardest enemy in the entire game and requires dedicated grinding in order to even compete against him.
It should be noted that some achievements can only be obtained in a New Game + playthrough, namely:
- Completing the game a second or third time
- Achievements related to the Legendary Arena and the two new requests
- Achievements that require Itsuki to not be in the Main Cast*
Fire Emblem: Three Houses

Upon clearing the game on any route, the player will be prompted to save after the credits and create cleared-game data; New Game + save files are also considered cleared-game saves. Cleared-game save files are marked with a sprite of Sothis and a decorated label. When starting a new game, if at least one cleared-game save file exists, the player will be given the option to start the new game in New Game + and select a cleared-game save to use the data from. The game can be cleared in New Game +, and a new cleared-game save file can be created, containing the data of the New Game + file and the previous non-New Game + file; this process can be repeated indefinitely, preserving data from every past file.
When starting a New Game + file, four aspects are carried over from the cleared game: accrued renown, hired battalions and their experience gains, shop inventories, and saint statue levels; play time is also carried over between files, though that has no effect on the gameplay. Additionally, renown can be spent at Byleth's journal in Garreg Mach Monastery to unlock professor levels, Byleth's support levels with other characters, and any character's skill levels and class masteries. Byleth's supports with a character can be purchased at any point after that character is introduced, provided they could normally gain support with Byleth—for example, on the Blue Lions route, Byleth's supports with Edelgard can never be purchased, but their supports with Gilbert can after Chapter 5, even during Chapter 10 when Gilbert is absent from the Monastery; a character's skill levels and class masteries can only be purchased if that character has been recruited.
In addition to content carried over between files, New Game + files have unique access to some exclusive features. Through the Unit Appearance tab in Byleth's journal, every recruited character may be set to their Part I or Part II appearance at any point in the story, and each of the house leaders—Edelgard, Dimitri, and Claude—is granted a hairstyle option, available in their Part II appearances. Crest items are granted to the player based on which route the clear data completed, the rest of which may be purchased from Byleth's journal for 1,000 points of renown each; when in a unit's inventory, a crest item will grant that unit the corresponding crest, allowing them to use Heroes' Relics without any HP penalty, activate the crest's effect at a decreased chance, use the combat art of the correlating Hero's Relic at an increased durability cost, and receive increased healing from the correlating sacred weapons. Additionally, if a Fire Emblem series amiibo is used at the amiibo Gazebo, the Holy Tomb can be accessed to obtain rare items each week. If the player talks to Sothis (or, after Chapter 10, the opposite-gendered Byleth) in the Holy Tomb, they will be granted the Sothis Shield, a team-wide Ward ability that can be used once per battle.
| Crest items | |||||
|---|---|---|---|---|---|
| Crest item | Corresponding Crest | Starting availability | |||
| Ernest | ✓ | ✓ | ✓ | ✓ | |
| Macuil | ✓ | ✓ | ✓ | ✓ | |
| Seiros | ✓ | ✓ | ✗ | ✗ | |
| Dominic | ✗ | ✗ | ✓ | ✗ | |
| Fraldarius | ✗ | ✗ | ✓ | ✗ | |
| Noa | ✓ | ✓ | ✓ | ✓ | |
| Cethleann | ✓ | ✓ | ✗ | ✗ | |
| Daphnel | ✗ | ✗ | ✓ | ✗ | |
| Blaiddyd | ✗ | ✗ | ✓ | ✗ | |
| Gloucester | ✗ | ✗ | ✗ | ✓ | |
| Goneril | ✓ | ✗ | ✗ | ✓ | |
| Cichol | ✓ | ✓ | ✗ | ✗ | |
| Aubin | ✓ | ✓ | ✓ | ✓ | |
| Gautier | ✗ | ✗ | ✓ | ✗ | |
| Indech | ✗ | ✓ | ✗ | ✗ | |
| The Beast | ✗ | ✗ | ✗ | ✓ | |
| Charon | ✓ | ✗ | ✗ | ✓ | |
| Timotheos | ✓ | ✓ | ✓ | ✓ | |
| Riegan | ✗ | ✗ | ✗ | ✓ | |
| Chevalier | ✓ | ✓ | ✓ | ✓ | |
| Lamine | ✓ | ✗ | ✓ | ✗ | |
Renown costs

Unlocking Byleth's professor levels or a unit's skill levels or class mastery through Byleth's journal costs 500 points of renown each, regardless of the level or class. Unlocking any of Byleth's supports costs 400 points, also regardless of the rank. Purchasing any crest item costs 1,000 points of renown.
In order to purchase a professor, skill, or support level, it must have been previously unlocked in the file which the New Game + file takes its data—being registered in the Support Log is not sufficient for support levels—and any previous levels must have been unlocked in the current game, though multiple professor and skill levels may be purchased at once, at a cost equal to the cost of purchasing each level individually.
Due to how support points are programmed, it is possible to purchase certain S supports without having unlocked them; if Byleth as a given gender is incapable of unlocking an S support with a particular character, their support points can increase to the threshold where it would unlock—if a pair meets that threshold in a file, that file is used as the basis for a New Game + file, and Byleth is the opposite gender than in the original file, the S support between that pair will be purchasable as if it had been unlocked.[1]
| Skill and Professor level costs | |
|---|---|
| Level | Total renown point cost |
| E+ | 500 |
| D | 1,000 |
| D+ | 1,500 |
| C | 2,000 |
| C+ | 2,500 |
| B | 3,000 |
| B+ | 3,500 |
| A | 4,000 |
| A+ | 4,500 |
Fire Emblem Warriors: Three Hopes
This section has been marked as a stub. Please help improve the page by adding information.
Etymology and other languages
| Names, etymology, and in other regions | ||
|---|---|---|
| Language | Name | Definition, etymology, and notes |
| English |
New Game + |
A term coined by Chrono Trigger to refer to the concept of starting a new game with some features from the previously cleared game.[2] |
| Japanese |
クリアデータ引き継ぎ |
Clear data takeover; similar wording is used for the option in Radiant Dawn. |
| Spanish |
Partida nueva + |
New game + |
| French |
Nouvelle partie + |
New game + |
| German |
Neues Spiel beginnen |
Begin new game |
| Italian |
Nuova partita+ |
New game+ |
| Korean |
클리어 데이터 이어받기 |
Inherit clear data |
| Simplified Chinese |
继承过关数据 |
Inherit clear data |
| Traditional Chinese |
繼承過關資料 |
Inherit clear data |
Gallery
This section has been marked as a stub. Please help improve the page by adding information.
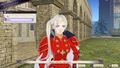
Edelgard's New Game + unique hairstyle.
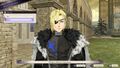
Dimitri's New Game + unique hairstyle.
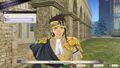
Claude's New Game + unique hairstyle.


References
- ↑ u/Jacien_V, [FE3H] Support Points Information - The point ranges, New Game Plus trickery, and Misc info., r/fireemblem, Reddit, Published: August 26, 2019, Retrieved: September 20, 2020
- ↑ "The option itself dates back decades, but the term 'New Game+' wasn't actually used until 1995's Super Nintendo RPG, Chrono Trigger." — New Game Plus (Concept), Giant Bomb, Retrieved: September 19, 2020
| Game mechanics | |||||||||||||||||||||||
|---|---|---|---|---|---|---|---|---|---|---|---|---|---|---|---|---|---|---|---|---|---|---|---|
| |||||||||||||||||||||||