| Site News |
|---|
| Warning: This wiki contains spoilers. Read at your own risk! Social media: If you would like, please join our Discord server, and/or follow us on Twitter (X) or Tumblr! |
Lefcandith Gauntlet: Difference between revisions
m (Text replacement - " ==Trivia== ==" to "<!-- ==Trivia== --> ==") |
Thecornerman (talk | contribs) (Added FE1 enemy stats; misc.) |
||
| Line 1: | Line 1: | ||
{{Chapter Infobox | {{Chapter Infobox | ||
|image=[[File:Cm fe11 7.png|200px]] | |image=[[File:Cm fe11 7.png|200px]] | ||
|location=Lefcandith Gauntlet | |location=Lefcandith Gauntlet | ||
| Line 6: | Line 5: | ||
|boss=[[Harmein]] | |boss=[[Harmein]] | ||
}} | }} | ||
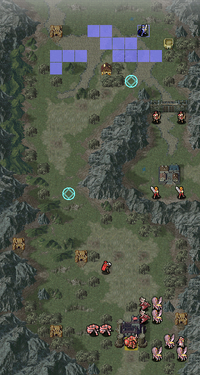
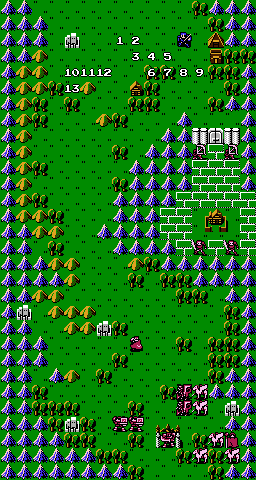
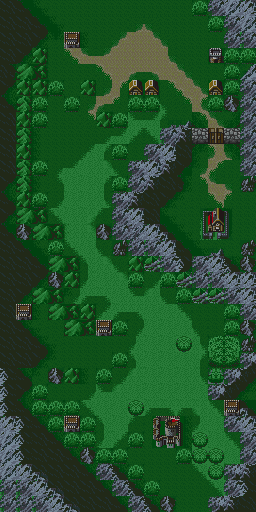
'''Lefcandith Gauntlet''' is the seventh chapter in {{FE1}} and {{FE11}} and the sixth chapter in book 1 of {{FE3}}. | |||
'''Lefcandith Gauntlet''' (Japanese: {{hl|レフカンディの罠|Refukandi no wana}} ''The Trap of Lefcandy'') is the seventh chapter in {{FE1}} and {{FE11}} and the sixth chapter in book 1 of {{FE3}}. | |||
==Plot== | ==Plot== | ||
| Line 21: | Line 21: | ||
|victory=Seize | |victory=Seize | ||
|defeat=[[Marth]] dies | |defeat=[[Marth]] dies | ||
|ally=14{{ | |ally=14{{h|+1|Upon Bantu being recruited}} | ||
|enemy=16{{ | |enemy=16{{h|+4|Reinforcements}}{{h|-4|After Minerva retreats}} | ||
|map=[[File:Cm fe01 7.png]] | |map=[[File:Cm fe01 7.png]] | ||
}} | }} | ||
| Line 28: | Line 28: | ||
|victory=Seize | |victory=Seize | ||
|defeat=[[Marth]] dies | |defeat=[[Marth]] dies | ||
|ally=15{{ | |ally=15{{h|+1|Upon Bantu being recruited}} | ||
|enemy=16{{ | |enemy=16{{h|+24|Reinforcements}}{{h|-4|After Minerva retreats}} | ||
|map=[[File:Cm fe03 b1 6.png]] | |map=[[File:Cm fe03 b1 6.png]] | ||
}} | }} | ||
| Line 35: | Line 35: | ||
|victory=Seize | |victory=Seize | ||
|defeat=[[Marth]] dies | |defeat=[[Marth]] dies | ||
|ally=14{{ | |ally=14{{h|+1|Upon Bantu being recruited}} | ||
|enemy=16{{ | |enemy=16{{h|+24|Reinforcements}}{{h|-4|After Minerva retreats}} | ||
|map=[[File:Cm fe11 7.png|256px]] | |map=[[File:Cm fe11 7.png|256px]] | ||
}} | }} | ||
| Line 173: | Line 173: | ||
{{tab | {{tab | ||
|default=3 | |default=3 | ||
|width= | |width=100% | ||
|tab1=''Shadow Dragon & the Blade of Light'' | |tab1=''Shadow Dragon & the Blade of Light'' | ||
|tab2=''Mystery of the Emblem'' | |tab2=''Mystery of the Emblem'' | ||
| Line 205: | Line 205: | ||
{{tab | {{tab | ||
|default=3 | |default=3 | ||
|width= | |width=100% | ||
|tab1=''Shadow Dragon & the Blade of Light'' | |tab1=''Shadow Dragon & the Blade of Light'' | ||
|tab2=''Mystery of the Emblem'' | |tab2=''Mystery of the Emblem'' | ||
| Line 264: | Line 264: | ||
|tab3=''Shadow Dragon'' | |tab3=''Shadow Dragon'' | ||
|tab4=''Shadow Dragon'' <small>(Hard-5)</small> | |tab4=''Shadow Dragon'' <small>(Hard-5)</small> | ||
|content1={{ | |content1={{ChapUnitHdr|type=Enemy|platform=nes01}} | ||
|platform=nes01 | {{ChapUnitCellFE1 | ||
| | |name=Grust | ||
| | |class=Knight | ||
| | |lv=3 | ||
|# | |#=2 | ||
| | |hp=19 | ||
| | |str=6 | ||
|skill=2 | |||
| | |spd=4 | ||
| | |def=12 | ||
| | |mov=5 | ||
|# | |inventory=[[Javelin]] | ||
| | |notes=Moves to attack any player unit that enters his range; moves next to the [[Terrain/Nintendo Entertainment System games#Shadow Dragon & the Blade of Light|gate]] if no one is in range. | ||
| | }} | ||
{{ChapUnitCellFE1 | |||
| | |name=Grust | ||
| | |class=Thief | ||
| | |lv=5 | ||
| | |#=1 | ||
|#3= | |hp=22 | ||
| | |str=5 | ||
|skill=3 | |||
| | |spd=11 | ||
| | |def=4 | ||
| | |mov=7 | ||
|# | |inventory=[[Iron Sword]] | ||
| | |notes=Drops a {{drop|Door Key}} upon defeat.<br>Prioritizes raiding the [[village]]. | ||
}} | |||
| | {{ChapUnitCellFE1 | ||
| | |name=Dragoon | ||
| | |class=Wyvern Knight | ||
|#5= | |classarticle=Dracoknight | ||
| | |lv=1 | ||
|#=1 | |||
| | |hp=22 | ||
| | |str=9 | ||
| | |skill=3 | ||
|# | |spd=6 | ||
| | |def=14 | ||
|mov=10 | |||
| | |inventory=[[Lance (NES)|Lance]] | ||
| | }} | ||
| | {{ChapUnitCellFE1 | ||
|# | |name=Dragoon | ||
| | |class=Pegasus Knight | ||
|lv=3 | |||
| | |#=2 | ||
| | |hp=19 | ||
| | |str=5 | ||
|# | |skill=6 | ||
| | |spd=12 | ||
| | |def=7 | ||
|mov=8 | |||
| | |inventory=[[Lance (NES)|Lance]] | ||
| | }} | ||
| | {{ChapUnitCellFE1 | ||
|# | |name=Grust | ||
| | |class=Mercenary | ||
| | |lv=1 | ||
|#=1 | |||
| | |hp=16 | ||
| | |str=4 | ||
| | |skill=8 | ||
| | |spd=10 | ||
|# | |def=5 | ||
| | |mov=7 | ||
| | |inventory=[[Steel Sword]] | ||
}} | |||
| | {{ChapUnitCellFE1 | ||
| | |name=Grust | ||
| | |class=Mercenary | ||
|# | |lv=1 | ||
| | |#=1 | ||
| | |hp=16 | ||
|str=4 | |||
| | |skill=8 | ||
| | |spd=10 | ||
| | |def=5 | ||
|#12= | |mov=7 | ||
| | |inventory=[[Iron Sword]] | ||
| | }} | ||
{{ChapUnitCellFE1 | |||
| | |name=Grust | ||
| | |class=Curate | ||
| | |lv=3 | ||
|# | |#=1 | ||
| | |hp=19 | ||
| | |str=2 | ||
|skill=2 | |||
| | |spd=2 | ||
| | |def=4 | ||
| | |mov=5 | ||
|# | |inventory=[[Heal]] | ||
| | }} | ||
| | {{ChapUnitCellFE1 | ||
| | |name=Grust | ||
| | |class=Archer | ||
| | |lv=3 | ||
| | |#=1 | ||
|# | |hp=19 | ||
| | |str=5 | ||
|skill=2 | |||
| | |spd=5 | ||
| | |def=6 | ||
| | |mov=5 | ||
|# | |inventory=[[Steel Bow]] | ||
| | |notes=Moves to attack any player unit in range; moves north of the village if no one is in range. | ||
}} | |||
| | {{ChapUnitCellFE1 | ||
| | |name=Grust | ||
| | |class=Archer | ||
|# | |lv=3 | ||
| | |#=1 | ||
|hp=19 | |||
| | |str=5 | ||
| | |skill=2 | ||
| | |spd=5 | ||
|# | |def=6 | ||
| | |mov=5 | ||
|inventory=[[Bowgun]] | |||
|notes=Moves to attack any player unit in range; moves north of the village if no one is in range. | |||
}} | |||
{{ChapUnitCellFE1 | |||
|name=[[Minerva]] | |||
|class=Wyvern Knight | |||
|classarticle=Dracoknight | |||
|lv=1 | |||
|#=1 | |||
|hp=22 | |||
|str=9 | |||
|skill=3 | |||
|spd=6 | |||
|def=14 | |||
|mov=10 | |||
|inventory=[[Silver Lance]] | |||
|notes=• Forces all attacks made by or against this unit to miss.<br>• Retreats on turn 2. | |||
}} | |||
{{ChapUnitCellFE1 | |||
|name=[[Palla]] | |||
|class=Pegasus Knight | |||
|lv=3 | |||
|#=1 | |||
|hp=19 | |||
|str=5 | |||
|skill=6 | |||
|spd=12 | |||
|def=7 | |||
|mov=8 | |||
|inventory=[[Lance (NES)|Lance]] | |||
|notes=• Forces all attacks made by or against this unit to miss.<br>• Retreats on turn 2. | |||
}} | |||
{{ChapUnitCellFE1 | |||
|name=[[Catria]] | |||
|class=Pegasus Knight | |||
|lv=3 | |||
|#=1 | |||
|hp=19 | |||
|str=5 | |||
|skill=6 | |||
|spd=12 | |||
|def=7 | |||
|mov=8 | |||
|inventory=[[Lance (NES)|Lance]] | |||
|notes=• Forces all attacks made by or against this unit to miss.<br>• Retreats on turn 2. | |||
}} | |||
{{ChapUnitCellFE1 | |||
|name=[[Est]] | |||
|class=Pegasus Knight | |||
|lv=1 | |||
|#=1 | |||
|hp=19 | |||
|str=5 | |||
|skill=6 | |||
|spd=12 | |||
|def=7 | |||
|mov=8 | |||
|inventory=[[Lance (NES)|Lance]] | |||
|notes=• Forces all attacks made by or against this unit to miss.<br>• Retreats on turn 2. | |||
}} | |||
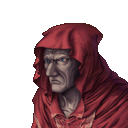
{{ChapUnitCellFE1 | |||
|name=[[Harmein]] | |||
|class=General | |||
|lv=3 | |||
|#=1 | |||
|hp=31 | |||
|str=10 | |||
|skill=2 | |||
|spd=5 | |||
|def=15 | |||
|mov=5 | |||
|inventory=[[Silver Sword]] | |||
|notes=Drops a {{drop|Silver Sword}} upon defeat.<br>Does not move; stands on a [[Terrain/Nintendo Entertainment System games#Fire Emblem: Shadow Dragon & the Blade of Light|gate]], the chapter's seize point. | |||
|last=y | |||
}} | |||
{{ChapUnitReinf|type=Enemy|platform=nes01}} | |||
{{ChapUnitCellFE1 | |||
|name=Grust | |||
|class=Cavalier | |||
|lv=3 | |||
|#=1 | |||
|hp=19 | |||
|str=6 | |||
|skill=3 | |||
|spd=7 | |||
|def=8 | |||
|mov=9 | |||
|inventory=[[Steel Sword]] | |||
}} | |||
{{ChapUnitCellFE1 | |||
|name=Grust | |||
|class=Cavalier | |||
|lv=3 | |||
|#=1 | |||
|hp=19 | |||
|str=6 | |||
|skill=3 | |||
|spd=7 | |||
|def=8 | |||
|mov=9 | |||
|inventory=[[Javelin]] | |||
}} | |||
{{ChapUnitCellFE1 | |||
|name=Grust | |||
|class=Cavalier | |||
|lv=3 | |||
|#=1 | |||
|hp=19 | |||
|str=6 | |||
|skill=3 | |||
|spd=7 | |||
|def=8 | |||
|mov=9 | |||
|inventory=[[Ridersbane]] | |||
}} | |||
{{ChapUnitCellFE1 | |||
|name=Grust | |||
|class=Cavalier | |||
|lv=3 | |||
|#=1 | |||
|hp=19 | |||
|str=6 | |||
|skill=3 | |||
|spd=7 | |||
|def=8 | |||
|mov=9 | |||
|inventory=[[Lance (NES)|Lance]] | |||
|last=y | |||
}} | }} | ||
{{ChapUnitFtr}} | |||
|content2={{ChapEnemies | |content2={{ChapEnemies | ||
|platform=snes01 | |platform=snes01 | ||
| Line 451: | Line 580: | ||
|lv11=1 | |lv11=1 | ||
|#11=1 | |#11=1 | ||
|inventory11={{Item|3|Javelin}} • {{Item|3|Iron Sword}}{{ | |inventory11={{Item|3|Javelin}} • {{Item|3|Iron Sword}}{{h|*|Can't use}} | ||
|notes11=• All attacks made by or at Minerva miss, and she will not initiate combat.<br>• Retreats on turn 2. | |notes11=• All attacks made by or at Minerva miss, and she will not initiate combat.<br>• Retreats on turn 2. | ||
|- | |- | ||
| Line 458: | Line 587: | ||
|lv12=3 | |lv12=3 | ||
|#12=1 | |#12=1 | ||
|inventory12={{Item|3|Iron Lance}} • {{Item|3|Killing Edge}}{{ | |inventory12={{Item|3|Iron Lance}} • {{Item|3|Killing Edge}}{{h|*|Can't use}} | ||
|notes12=• All attacks made by or at Catria miss, and she will not initiate combat.<br>• Retreats on turn 2. | |notes12=• All attacks made by or at Catria miss, and she will not initiate combat.<br>• Retreats on turn 2. | ||
|- | |- | ||
| Line 472: | Line 601: | ||
|lv14=3 | |lv14=3 | ||
|#14=1 | |#14=1 | ||
|inventory14={{Item|3|Iron Lance}} • {{Item|3|Armorslayer}}{{ | |inventory14={{Item|3|Iron Lance}} • {{Item|3|Armorslayer}}{{h|*|Can't use}} | ||
|notes14=• All attacks made by or at Est miss, and she will not initiate combat.<br>• Retreats on turn 2. | |notes14=• All attacks made by or at Est miss, and she will not initiate combat.<br>• Retreats on turn 2. | ||
|- | |- | ||
| Line 750: | Line 879: | ||
**1 [[Cavalier]] with a [[Javelin]] from the lower left southern fort | **1 [[Cavalier]] with a [[Javelin]] from the lower left southern fort | ||
**1 [[Cavalier]] with a [[Ridersbane]] from the upper left four southern fort | **1 [[Cavalier]] with a [[Ridersbane]] from the upper left four southern fort | ||
**1 [[Cavalier]] with an [[Iron Lance]]{{ | **1 [[Cavalier]] with an [[Iron Lance]]{{h|*|Lower difficulties}}/[[Steel Lance]]{{h|*|Higher difficulties}} from the lower right southern fort | ||
*One turn after reaching the 12th row, and after the first two sets of reinforcements have already spawned, for 4 turns | *One turn after reaching the 12th row, and after the first two sets of reinforcements have already spawned, for 4 turns | ||
**1 [[Cavalier]] with a [[Steel Sword]] from the upper southern fort | **1 [[Cavalier]] with a [[Steel Sword]] from the upper southern fort | ||
**1 [[Cavalier]] with a [[Javelin]] from the lower left southern fort | **1 [[Cavalier]] with a [[Javelin]] from the lower left southern fort | ||
**1 [[Cavalier]] with a [[Ridersbane]] from the upper left four southern fort | **1 [[Cavalier]] with a [[Ridersbane]] from the upper left four southern fort | ||
**1 [[Cavalier]] with an [[Iron Lance]]{{ | **1 [[Cavalier]] with an [[Iron Lance]]{{h|*|Lower difficulties}}/[[Steel Lance]]{{h|*|Higher difficulties}} from the lower right southern fort | ||
===Boss data=== | ===Boss data=== | ||
| Line 855: | Line 984: | ||
{{Names | {{Names | ||
|eng-name=Lefcandith Gauntlet | |eng-name=Lefcandith Gauntlet | ||
|jap-name={{h|レフカンディの罠|Refukandi no wana}} | |||
|jap-name={{ | |||
|jap-mean=The Trap of Lefcandy | |jap-mean=The Trap of Lefcandy | ||
|span-name=Trampa en Lefcandith | |span-name=Trampa en Lefcandith | ||
|span-mean=Trap in Lefcandith | |span-mean=Trap in Lefcandith | ||
|fren-name=Le fort de Lefcandith | |fren-name=Le fort de Lefcandith | ||
|fren-mean=The fort of Lefcandith | |fren-mean=The fort of Lefcandith | ||
|ger-name=Falle bei Lefcandith | |ger-name=Falle bei Lefcandith | ||
|ger-mean=Trap near Lefcandith; abbreviated in the save menu as | |ger-mean=Trap near Lefcandith; abbreviated in the save menu as '''{{lang|de|Falle b. Lefcandith}}'''. | ||
|ital-name=Imboscata a Lefcandith | |ital-name=Imboscata a Lefcandith | ||
|ital-mean=Ambush at Lefcandith | |ital-mean=Ambush at Lefcandith | ||
| Line 879: | Line 1,007: | ||
|prechapter=Fire Emblem (Shadow Dragon){{!}}Fire Emblem | |prechapter=Fire Emblem (Shadow Dragon){{!}}Fire Emblem | ||
|prealternate=In War's Grip | |prealternate=In War's Grip | ||
|nextchapter=Port Warren | |nextchapter=Port Warren | ||
}} | }} | ||
Revision as of 19:20, 26 May 2021
| ||||||
|
Lefcandith Gauntlet (Japanese: レフカンディの罠 The Trap of Lefcandy) is the seventh chapter in Fire Emblem: Shadow Dragon & the Blade of Light and Fire Emblem: Shadow Dragon and the sixth chapter in book 1 of Fire Emblem: Mystery of the Emblem.
Plot
- Main article:
Lefcandith Gauntlet/Script
With Aurelis liberated, Marth sets out for Archanea. In order to reach the capital, he must traverse the Lefcandith Gauntlet, a mountain pass guarded by Grust's soldiers and the Macedonian Whitewings, led personally by Princess Minerva. Minerva and the Grustian general Harmein get into a brief argument about Harmein's tactics, and Harmein forces her into compliance by threatening harm to her sister Maria just as the battle starts. Midway through, Minerva gets fed up with Harmein and abandons him, allowing Marth to defeat and kill him. During the battle, Marth also encounters a friendly manakete named Bantu, who warns him that he can only challenge Medeus with the power of the divine dragon Tiki and joins his cause. After the battle, Malledus lectures Marth on the history of the manaketes and reminds him that the entire resistance against Dolhr rides on him.
Chapter data
Shadow Dragon & the Blade of Light Mystery of the Emblem Shadow Dragon
| ||||||
|
| |||||
| Victory: Seize | Player | Enemy | ||||
|---|---|---|---|---|---|---|
| Defeat: Marth dies | 14+1 | 16+24-4 | ||||
| ||||||
Character data
Shadow Dragon & the Blade of Light Mystery of the Emblem Shadow Dragon
Item data
Shadow Dragon & the Blade of Light Mystery of the Emblem Shadow Dragon
| |||||||||
|
Shop data
Shadow Dragon & the Blade of Light Mystery of the Emblem Shadow Dragon
Swords Lances Axes Bows Tomes Staves Items Secret
| Name | Cost | |
|---|---|---|
| Iron Sword | 400 | |
| Steel Sword | 875 |
Enemy data
Shadow Dragon & the Blade of Light Mystery of the Emblem Shadow Dragon Shadow Dragon (Hard-5)
| ||||||||||||||||||||||||||||||||||||||||||||||||||||||||||||||||||||||||||||||||||||||||||||||||||||||||||||||||
| ||||||||||||||||||||||||||||||||||||||||||||||||||||||||||||||||||||||||||||||||||||||||||||||||||||||||||||||||
| ||||||||||||||||||||||||||||||||||||||||||||||||||||||||||||||||||||||||||||||||||||||||||||||||||||||||||||||||
|
Reinforcements
Shadow Dragon & the Blade of Light
- Turn 13
- 4 Cavaliers from the southern forts
Mystery of the Emblem
- On the first Enemy Phase after reaching the 7th row from the bottom (the row below the large cluster of forests; does not activate if entered by Warp), continuing until 6 of each have appeared.
- Note: All reinforcements are halted when Harmein is defeated.
Shadow Dragon
- For 2 turns after reaching the 12th row from the bottom (two rows below the second save point)
- 1 Cavalier with a Steel Sword from the upper southern fort
- 1 Cavalier with a Javelin from the lower left southern fort
- 1 Cavalier with a Ridersbane from the upper left four southern fort
- 1 Cavalier with an Iron Lance*/Steel Lance* from the lower right southern fort
- One turn after reaching the 12th row, and after the first two sets of reinforcements have already spawned, for 4 turns
- 1 Cavalier with a Steel Sword from the upper southern fort
- 1 Cavalier with a Javelin from the lower left southern fort
- 1 Cavalier with a Ridersbane from the upper left four southern fort
- 1 Cavalier with an Iron Lance*/Steel Lance* from the lower right southern fort
Boss data
- Main article:
Harmein
Shadow Dragon & the Blade of Light Mystery of the Emblem Shadow Dragon
Normal Hard-5
|
|
| |||||||||||||||||||||||||||||||||||||||||||
Strategy
| This section details unofficial strategies that may help with completion of the chapter. This may not work for everybody. |
If you have room in your party, you may wish to reclass Jagen into a Dracoknight and deploy him (if he's dead, Wendell works too). This allows you to block off some enemy reinforcements with ease.
Start by holding position and letting the enemy Pegasus Knights and Dracoknights charge you. Have your bowmen and Merric wreck them. Note that Minerva and the Whitewings will not attack you; they will just hang around aimlessly and retreat on turn 6. Defeating them here will not prevent you from recruiting them later, and defeating Minerva will cause all of the surviving Whitewings to immediately retreat. Also make sure to pick off the Thief before he reaches the village. Once those guys are dead, you can use the first save point. Afterwards, wipe out the four guys near the eastern village (watch out for the right Archer - he's packing a Longbow!) and visit. You get Bantu, a Manakete. He wields that Firestone you got back in chapter 5. Bantu is a decent tank for a couple of chapters, but his growths are worse than Jagen's. His true value lies in the fact that he recruits Tiki, who will two-shot the final boss under all circumstances. Place Jagen 10 spaces above the southeastern fort and approach the second save point. DO NOT cross it until you are ready.
Once you're ready, move Jagen onto the eastern fort (where the Steel Lance Cavalier spawns), move Caeda onto the western fort (where the Ridersbane spawns), and move Barst onto the central fort (where the Steel Sword spawns) and have him equip his Hand Axe. This blocks off three reinforcements easy-peasy and allows Barst to fight just the Javelin guys. Once these guys are dead, enter the range of the Knights to trigger two more Javelin guys. Once these guys are dead, you can waste Harmein and seize afterwards.
Etymology and other languages
| Names, etymology, and in other regions | ||
|---|---|---|
| Language | Name | Definition, etymology, and notes |
| English |
Lefcandith Gauntlet |
-- |
| Spanish |
Trampa en Lefcandith |
Trap in Lefcandith |
| French |
Le fort de Lefcandith |
The fort of Lefcandith |
| German |
Falle bei Lefcandith |
Trap near Lefcandith; abbreviated in the save menu as Falle b. Lefcandith. |
| Italian |
Imboscata a Lefcandith |
Ambush at Lefcandith |
Gallery
This section has been marked as a stub. Please help improve the page by adding information.
CG image displayed during the intro for Shadow Dragon
References
| ← Fire Emblem • ← In War's Grip • |
Lefcandith Gauntlet | • Port Warren → |
|---|
| Fire Emblem: Mystery of the Emblem | ||||||||||||||||||||||||||||||||||||||
|---|---|---|---|---|---|---|---|---|---|---|---|---|---|---|---|---|---|---|---|---|---|---|---|---|---|---|---|---|---|---|---|---|---|---|---|---|---|---|
| ||||||||||||||||||||||||||||||||||||||
| Fire Emblem: Shadow Dragon | ||||||||||||||||||||
|---|---|---|---|---|---|---|---|---|---|---|---|---|---|---|---|---|---|---|---|---|
|


