|
|
| Line 566: |
Line 566: |
| ==Strategy== | | ==Strategy== |
| {{strategy}} | | {{strategy}} |
| There are three big things to note when challenging this map. First is the turn limit. 25 turns is pretty forgiving as long as you don't squander it, but don't dally too much. Second are the chests on either side of the map. Enemies drop enough Chest Keys to unlock them both, so you shouldn't have any problems unlocking them. If you really want to be a cheapskate, though, Ashe comes with Locktouch as a personal skill (under the name Lockpick) and his services can be borrowed for the month for any players not part of the Blue Lions. Third is the scary Death Knight hanging around the center of the map. The good news is that he'll just sit there and mind his own business unless you actively pick a fight with him. The bad news is that he is easily capable of slaughtering anyone in your party not lucky enough to dodge him. If you really want to get that Dark Seal he's carrying, he's not invincible, but you need to take extreme care not to get yourself killed. Lysithea trivializes this if she has B Reason and Dark Spikes Τ. You should also bring several Seiros Archers with you, since their gambit Fusillade hits from two range. Alternately, if you grinded a bit in the previous chapter or two, you could just bring a Thief along and steal the Dark Seal from him. | | There are three big things to note when challenging this map. First is the turn limit. 25 turns is pretty forgiving as long as you don't squander it, but don't dally too much. Second are the chests on either side of the map. Enemies drop enough Chest Keys to unlock them both, so you shouldn't have any problems unlocking them. If you really want to be a cheapskate, though, Ashe comes with Locktouch as a personal skill (under the name Lockpick) and his services can be borrowed for the month for any players not part of the Blue Lions. Third is the scary Death Knight hanging around the center of the map. The bad news is that he is easily capable of slaughtering anyone in your party not lucky enough to dodge him. The good news is that he'll just sit there and mind his own business unless you actively pick a fight with him. The really bad news on Maddening is that he actually will hunt you down if get in his range. If you really want to get that Dark Seal he's carrying, he's not invincible, but you need to take extreme care not to get yourself killed. He has 14/15/17 attack speed, so you need 11/12/14 attack speed in order to avoid being doubled by him. You should also bring several Seiros Archers with you, since their gambit Fusillade hits from two range. Lysithea trivializes defeating him if she has B Reason and Dark Spikes Τ. Alternately, if you grinded a bit in the previous chapter or two, you could just bring a Thief along and steal the Dark Seal from him. |
|
| |
|
| Start by splitting your team up into three groups and make your way up the left, right, and center. Do not engage the Death Knight even if you plan on getting the Dark Seal. We'll save him for the end of the map. On turn 7, a trio of mages will show up at the bottom end of the map. You shouldn't have too much trouble bopping these louts on the head. Given that the enemy again refuses to swarm, a basic grasp of tactics is all that you need to clean out the enemies and reach the top half of the map at a decent clip. If you're not interested in the Death Knight or simply want to use a Thief to steal the Dark Seal, you've pretty much won the map. If you want to beat up the Death Knight, throw all of your strongest gambits at him and clock him with Knightkneeler. If you can't do enough damage, you may need to risk one of his counterattacks. Attack from the avoid tiles surrounding him and pray he misses one of his attacks and doesn't get a critical hit. If you have Dark Spikes Τ, Lysithea will splatter him across the pavement. | | Start by splitting your team up into three groups and make your way up the left, right, and center. Do not engage the Death Knight even if you plan on getting the Dark Seal. We'll save him for the end of the map. On turn 7, a trio of mages will show up at the bottom end of the map. You shouldn't have too much trouble bopping these louts on the head. Given that the enemy again refuses to swarm, a basic grasp of tactics is all that you need to clean out the enemies and reach the top half of the map at a decent clip. If you're not interested in the Death Knight or simply want to use a Thief to steal the Dark Seal, you've pretty much won the map. If you want to beat up the Death Knight, throw all of your strongest gambits at him and clock him with Knightkneeler. If you can't do enough damage, you may need to risk one of his counterattacks. Attack from the avoid tiles surrounding him and pray he misses one of his attacks and doesn't get a critical hit. If you have Dark Spikes Τ, Lysithea will splatter him across the pavement. |
| Assault at the Rite of Rebirth
|
|
|
|
|
|
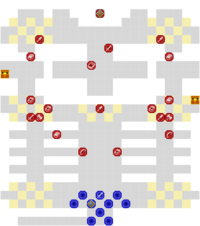
Assault at the Rite of Rebirth (Japanese: 女神再誕の儀襲撃戦 Raid of the Rite of the Goddess's Resurrection) is the main battle map of the fourth chapter in Fire Emblem: Three Houses. In this map, Byleth and their students stop Western Church assailants from infiltrating the Holy Mausoleum.
Map data
|
|
|
|
|
| Victory: Defeat the boss Dark Mage
|
Player
|
Partner
|
Other
|
Enemy
|
Third
|
| Defeat: Byleth or Edelgard*/Dimitri*/Claude* dies*, the player's army is routed*, or 25 turns pass
|
10
|
{{{partner}}}
|
{{{other}}}
|
20+3
|
{{{third}}}
|
|
|
|
|
|
|
|
|
|
| Victory: Defeat the boss Dark Mage
|
Player
|
Partner
|
Other
|
Enemy
|
Third
|
| Defeat: Byleth or Edelgard*/Dimitri*/Claude* dies*, the player's army is routed*, or 25 turns pass
|
10
|
{{{partner}}}
|
{{{other}}}
|
26+3
|
{{{third}}}
|
|
|
|
|
Character data
Black Eagles Blue Lions Golden Deer
Item data
Enemy data
Reinforcements
- At the start of player phase 7
- 1 Dark Mage from south of ally starting positions
- 2 Mages from south of ally starting positions
Boss data
|
|
|
|
|
|
|
Skill Levels

|

|

|

|

|

|

|

|

|

|

|
Ma
|
| E
|
E
|
E
|
E
|
E
|
C
|
E
|
E
|
E
|
E
|
E
|

|
|
|
|
|
|
|
|
|
|
Skill Levels
|
|
|
|
|
|
|
|
|
|
|
|
Ma
|
| E
|
E
|
E
|
E
|
E
|
C
|
E
|
E
|
E
|
E
|
E
|
|
|
|
|
|
|
|
|
|
|
Skill Levels
|
|
|
|
|
|
|
|
|
|
|
|
Ma
|
| E
|
E
|
E
|
E
|
E
|
C
|
E
|
E
|
E
|
E
|
E
|
|
|
|
- Main article: Death Knight
|
|
|
|
|
| Combat arts
|
Spells
|
Battalion
|
| --
|
--
|
--
|
|
Skill Levels
|
|
|
|
|
|
|
|
|
|
|
|
Ma
|
| B
|
A
|
C+
|
D
|
C+
|
D
|
E
|
C
|
E
|
A
|
E
|
|
|
|
|
|
|
|
|
| Combat arts
|
Spells
|
Battalion
|
| --
|
--
|
--
|
|
Skill Levels
|
|
|
|
|
|
|
|
|
|
|
|
Ma
|
| B
|
A
|
C+
|
D
|
C+
|
D
|
E
|
C
|
E
|
A
|
E
|
|
|
|
|
|
|
|
|
| Combat arts
|
Spells
|
Battalion
|
| --
|
--
|
--
|
|
Skill Levels
|
|
|
|
|
|
|
|
|
|
|
|
Ma
|
| B
|
A
|
C+
|
D
|
C+
|
D
|
E
|
C
|
E
|
A
|
E
|
|
|
|
Strategy
| This section details unofficial strategies that may help with completion of the chapter. This may not work for everybody.
|
There are three big things to note when challenging this map. First is the turn limit. 25 turns is pretty forgiving as long as you don't squander it, but don't dally too much. Second are the chests on either side of the map. Enemies drop enough Chest Keys to unlock them both, so you shouldn't have any problems unlocking them. If you really want to be a cheapskate, though, Ashe comes with Locktouch as a personal skill (under the name Lockpick) and his services can be borrowed for the month for any players not part of the Blue Lions. Third is the scary Death Knight hanging around the center of the map. The bad news is that he is easily capable of slaughtering anyone in your party not lucky enough to dodge him. The good news is that he'll just sit there and mind his own business unless you actively pick a fight with him. The really bad news on Maddening is that he actually will hunt you down if get in his range. If you really want to get that Dark Seal he's carrying, he's not invincible, but you need to take extreme care not to get yourself killed. He has 14/15/17 attack speed, so you need 11/12/14 attack speed in order to avoid being doubled by him. You should also bring several Seiros Archers with you, since their gambit Fusillade hits from two range. Lysithea trivializes defeating him if she has B Reason and Dark Spikes Τ. Alternately, if you grinded a bit in the previous chapter or two, you could just bring a Thief along and steal the Dark Seal from him.
Start by splitting your team up into three groups and make your way up the left, right, and center. Do not engage the Death Knight even if you plan on getting the Dark Seal. We'll save him for the end of the map. On turn 7, a trio of mages will show up at the bottom end of the map. You shouldn't have too much trouble bopping these louts on the head. Given that the enemy again refuses to swarm, a basic grasp of tactics is all that you need to clean out the enemies and reach the top half of the map at a decent clip. If you're not interested in the Death Knight or simply want to use a Thief to steal the Dark Seal, you've pretty much won the map. If you want to beat up the Death Knight, throw all of your strongest gambits at him and clock him with Knightkneeler. If you can't do enough damage, you may need to risk one of his counterattacks. Attack from the avoid tiles surrounding him and pray he misses one of his attacks and doesn't get a critical hit. If you have Dark Spikes Τ, Lysithea will splatter him across the pavement.
Trivia
Etymology and other languages
| Names, etymology, and in other regions
|
| Language
|
Name
|
Definition, etymology, and notes
|
| English
|
Assault at the Rite of Rebirth
|
--
|
|
|
Gallery
This section has been marked as a stub. Please help improve the page by adding information.


