| Site News |
|---|
| Warning: This wiki contains spoilers. Read at your own risk! Social media: If you would like, please join our Discord server, and/or follow us on Twitter (X) or Tumblr! |
Beyond Escape/The Great Bridge Coup: Difference between revisions
Thecornerman (talk | contribs) (Filled out etymology) |
Thecornerman (talk | contribs) m (Text replacement - "[Cc]hapter (\d+)" to "Chapter $1") |
||
| (29 intermediate revisions by 7 users not shown) | |||
| Line 1: | Line 1: | ||
{{Chapter Infobox | {{Chapter Infobox | ||
|title=The Great Bridge Coup | |title=The Great Bridge Coup | ||
|image=[[File:Cm fe16cf 13.png|200px]] | |image=[[File:Cm fe16cf 13.png|200px]] | ||
|location=Great Bridge of Myrddin | |location=Great Bridge of Myrddin | ||
|boss=[[Judith]] | |boss=[[Judith]] | ||
|previous=[[Outset of a Power Struggle/The Battle of Garreg Mach|The Battle of Garreg Mach]] | |||
|next=[[Capturing Derdriu]] | |||
}} | }} | ||
'''The Great Bridge Coup''' (Japanese: {{ | |||
'''The Great Bridge Coup''' (Japanese: {{hl|ミルディン大橋の戦い|Mirudin-daigyō no tatakai}} ''Battle of the Great Bridge of Myrddin'') is the main battle map of the thirteenth chapter of the Crimson Flower route in {{FE16}}. In this map, the [[Adrestia|Adrestian Empire]] mounts an attack to seize the strategic location of the Great Bridge of Myrddin. | |||
==Beginning log== | |||
The Black Eagle Strike Force has an unexpected encounter with someone thought to have died years prior. Amidst the joy, your forces prepare to invade Alliance territory. | |||
==Map data== | ==Map data== | ||
| Line 14: | Line 20: | ||
|content1={{ChapData | |content1={{ChapData | ||
|victory=Defeat [[Judith]] | |victory=Defeat [[Judith]] | ||
|defeat=[[Byleth]] or [[Edelgard]] dies{{ | |defeat=[[Byleth]] or [[Edelgard]] dies{{h|*|Classic mode}}, the player's army is routed{{h|*|Casual mode}}, or [[Judith]] escapes | ||
|ally= | |ally=2–11 | ||
|enemy=22{{ | |enemy=22{{h|+7|Reinforcements}} | ||
|map=[[File:Cm fe16cf 13.png|200px]] | |map=[[File:Cm fe16cf 13.png|200px]] | ||
|col=29 | |||
|row=20 | |||
}} | }} | ||
|content2={{ChapData | |content2={{ChapData | ||
|victory=Defeat [[Judith]] | |victory=Defeat [[Judith]] | ||
|defeat=[[Byleth]] or [[Edelgard]] dies{{ | |defeat=[[Byleth]] or [[Edelgard]] dies{{h|*|Classic mode}}, the player's army is routed{{h|*|Casual mode}}, or [[Judith]] escapes | ||
|ally= | |ally=2–11 | ||
|enemy=25{{ | |enemy=25{{h|+11|Reinforcements}} | ||
|map=[[File:Cm fe16cf 13 h.png|200px]] | |map=[[File:Cm fe16cf 13 h.png|200px]] | ||
|col=29 | |||
|row=20 | |||
}} | }} | ||
|content3={{ChapData | |content3={{ChapData | ||
|victory=Defeat [[Judith]] | |victory=Defeat [[Judith]] | ||
|defeat=[[Byleth]] or [[Edelgard]] dies{{ | |defeat=[[Byleth]] or [[Edelgard]] dies{{h|*|Classic mode}}, the player's army is routed{{h|*|Casual mode}}, or [[Judith]] escapes | ||
|ally= | |ally=2–11 | ||
|enemy=31{{ | |enemy=31{{h|+13|Reinforcements}} | ||
|map=[[File:Cm fe16cf 13 m.png|200px]] | |map=[[File:Cm fe16cf 13 m.png|200px]] | ||
|col=29 | |||
|row=20 | |||
}} | }} | ||
}} | }} | ||
| Line 39: | Line 51: | ||
{{ChapChars | {{ChapChars | ||
|game#=16 | |game#=16 | ||
| | |forced1=byleth {{#var:A}} 02 | ||
|forced1article=Byleth | |||
| | |forced2=edelgard 02 | ||
| | |forced2article=Edelgard | ||
| | |return1=hubert 02 | ||
| | |return1article=Hubert | ||
| | |return2=ferdinand 02 | ||
| | |return2article=Ferdinand | ||
| | |return3=linhardt 02 | ||
| | |return3article=Linhardt | ||
| | |return4=caspar 02 | ||
| | |return4article=Caspar | ||
| | |return5=bernadetta 02 | ||
| | |return5article=Bernadetta | ||
| | |return6=dorothea 02 | ||
| | |return6article=Dorothea | ||
| | |return7=petra 02 | ||
| | |return7article=Petra | ||
| | |return8=felix 02 | ||
| | |return8article=Felix | ||
| | |return9=ashe 02 | ||
| | |return9article=Ashe | ||
| | |return10=sylvain 02 | ||
| | |return10article=Sylvain | ||
| | |return11=mercedes 02 | ||
| | |return11article=Mercedes | ||
| | |return12=annette 02 | ||
| | |return12article=Annette | ||
| | |return13=ingrid 02 | ||
| | |return13article=Ingrid | ||
| | |return14=lorenz 02 | ||
| | |return14article=Lorenz (Three Houses) | ||
| | |return15=raphael 02 | ||
| | |return15article=Raphael | ||
| | |return16=ignatz 02 | ||
| | |return16article=Ignatz | ||
| | |return17=lysithea 02 | ||
| | |return17article=Lysithea | ||
| | |return18=marianne 02 | ||
| | |return18article=Marianne | ||
| | |return19=leonie 02 | ||
| | |return19article=Leonie | ||
| | |return20=constance 04 | ||
| | |return20article=Constance | ||
| | |return21=balthus 02 | ||
| | |return21article=Balthus | ||
| | |return22=hapi 02 | ||
| | |return22article=Hapi | ||
| | |return23=yuri 02 | ||
| | |return23article=Yuri | ||
| | |return24=anna | ||
| | |return24article=Anna/Three Houses | ||
| | |return25=shamir | ||
| | |return26=hanneman | ||
| | |return27=manuela | ||
| | |return28=alois | ||
| | |return29=jeritza 02 | ||
| | |return29article=Jeritza | ||
}} | }} | ||
| Line 102: | Line 114: | ||
{{ChapItems | {{ChapItems | ||
|platform=ns01 | |platform=ns01 | ||
|item1=Brave Bow | |item1=Hexlock Shield | ||
| | |item1image=shield | ||
| | |obtain1=Dropped by [[Judith]] | ||
|item2=Brave Bow | |||
|item2image=bow | |||
|obtain2=Dropped by [[Ignatz]]{{h|*|If he was not recruited}}/enemy [[Sniper]]{{h|*|If Ignatz was recruited}} | |||
|item3=Goddess Icon | |item3=Goddess Icon | ||
|item3image=stat booster | |item3image=stat booster | ||
| Line 116: | Line 128: | ||
|item5=Vulnerary | |item5=Vulnerary | ||
|item5image=potion | |item5image=potion | ||
|obtain5=Steal from [[Ignatz]]{{ | |obtain5=Steal from [[Ignatz]]{{h|*|If he was not recruited}} | ||
|itemlast=Vulnerary | |itemlast=Vulnerary | ||
|itemlastimage=potion | |itemlastimage=potion | ||
|obtainlast=Steal from [[Leonie]]{{ | |obtainlast=Steal from [[Leonie]]{{h|*|If she was not recruited}}/enemy [[Paladin]]{{h|*|If Leonie was recruited}} (reinforcement) | ||
}} | }} | ||
| Line 128: | Line 140: | ||
|tab2=Hard | |tab2=Hard | ||
|tab3=Maddening | |tab3=Maddening | ||
|content1={{ | |content1={{ChapUnitHdr|type=Enemy|platform=ns01}} | ||
|platform=ns01 | {{ChapUnitCellFE16 | ||
| | |name=[[Judith]] | ||
| | |class=Lord | ||
| | |version=female | ||
|#1= | |lv=29 | ||
| | |#=1 | ||
| | |hp=48 | ||
| | |str=19 | ||
| | |mag=13 | ||
| | |dex=16 | ||
| | |spd=20 | ||
| | |lck=13 | ||
|def=17 | |||
|res=10 | |||
|cha=21{{h|+1|Granted by Daphnel Duelists}} | |||
|mov=6 | |||
|inventory={{Item|16|Rapier|image=sword}} • {{Item|16|Hexlock Shield|image=shield|type=drop}}<br>{{Item|16|General|link=General (ability)}} • {{Item|16|Charm}} • {{Item|16|Sword Prowess Lv 5}} • {{Item|16|Authority Lv 5}} • {{Item|16|Death Blow}} • {{Item|16|Seal Defense}} • {{Item|16|Avo +10}}<br>{{Item|16|Daphnel Duelists|image=battalion infantry}} Lv 5: {{Item|16|Onslaught|image=gambit}} | |||
|notes=Immobile until [[Leonie]]{{h|*|If she was not recruited}}/the Alliance General [[Paladin]]{{h|*|If Leonie was recruited}} is defeated, at which point she and all remaining non-reinforcement enemies begin escaping via the northeast. | |||
}} | |||
{{ChapUnitCellFE16 | |||
|name=[[Ignatz]] | |||
| | |class=Sniper | ||
| | |version=ignatz | ||
| | |lv=28 | ||
|#=1 | |||
|hp=39 | |||
|str=18 | |||
|mag=9 | |||
| | |dex=30 | ||
| | |spd=17 | ||
| | |lck=22 | ||
| | |def=12 | ||
| | |res=11 | ||
| | |cha=8{{h|+5|Granted by Victor Private Military}} | ||
| | |mov=5 | ||
|inventory={{Item|16|Brave Bow|image=bow|type=drop}} • {{Item|16|Vulnerary|image=potion}}<br>{{Item|16|Watchful Eye|image=hit +20}} • {{Item|16|Bowfaire}} • {{Item|16|Bowrange +1}} • {{Item|16|Bow Prowess Lv 4}} • {{Item|16|Bow Avo +20}} • {{Item|16|Seal Speed}}<br>{{Item|16|Victor Private Military|image=battalion infantry silver}} Lv 5: {{Item|16|Assembly|image=gambit}} | |||
|notes=• Begins moving if the eastern [[Fortress Knight]] is provoked.<br>• Replaced by an Alliance General Sniper if he was recruited. | |||
}} | |||
{{ChapUnitCellFE16 | |||
|name=Alliance General | |||
|class=Sniper | |||
|lv=28 | |||
| | |#=1 | ||
|hp=39 | |||
| | |str=18 | ||
| | |mag=9 | ||
| | |dex=30 | ||
|# | |spd=16 | ||
| | |lck=22 | ||
| | |def=12 | ||
|res=8 | |||
| | |cha=8{{h|+7|Granted by Alliance Guard}} | ||
| | |mov=5 | ||
|inventory={{Item|16|Brave Bow|image=bow|type=drop}}<br>{{Item|16|Bowfaire}} • {{Item|16|Bowrange +1}} • {{Item|16|Bow Prowess Lv 4}} • {{Item|16|Bow Avo +20}} • {{Item|16|Seal Speed}}<br>{{Item|16|Alliance Guard|image=battalion infantry silver}} Lv 5: {{Item|16|Poison Tactic|image=gambit}} | |||
|notes=• Begins moving if the eastern [[Fortress Knight]] is provoked.<br>• Replaces Ignatz if he was recruited. | |||
}} | |||
| | {{ChapUnitCellFE16 | ||
| | |name=Alliance Soldier | ||
| | |class=Archer | ||
| | |lv=27 | ||
| | |#=2 | ||
| | |hp=30 | ||
| | |str=15 | ||
|mag=10 | |||
| | |dex=15 | ||
| | |spd=14 | ||
| | |lck=10 | ||
| | |def=8 | ||
|res=4 | |||
|cha=12 | |||
| | |mov=5 | ||
| | |inventory={{Item|16|Steel Bow|image=bow}}<br>{{Item|16|Bowrange +1}} | ||
| | |notes=• The southern one begins moving if the nearby Archer or [[Armored Knight]] is provoked.<br>• The northern one begins moving if the nearby Archer or [[Warrior]] is provoked. | ||
| | }} | ||
| | {{ChapUnitCellFE16 | ||
| | |name=Alliance Soldier | ||
| | |class=Archer | ||
|version=female | |||
| | |lv=27 | ||
| | |#=2 | ||
| | |hp=30 | ||
| | |str=15 | ||
| | |mag=10 | ||
| | |dex=15 | ||
| | |spd=14 | ||
| | |lck=10 | ||
| | |def=8 | ||
| | |res=4 | ||
| | |cha=12 | ||
| | |mov=5 | ||
| | |inventory={{Item|16|Steel Bow|image=bow}}<br>{{Item|16|Bowrange +1}} | ||
| | |notes=• The southern one begins moving if the nearby Archer or [[Armored Knight]] is provoked.<br>• The northern one begins moving if the nearby Archer or [[Warrior]] is provoked. | ||
| | }} | ||
| | {{ChapUnitCellFE16 | ||
| | |name=Alliance Soldier | ||
| | |class=Armored Knight | ||
| | |lv=27 | ||
| | |#=1 | ||
| | |hp=36 | ||
|str=15 | |||
|mag=10 | |||
|dex=10 | |||
|spd=4 | |||
|lck=8 | |||
|def=22 | |||
|res=3 | |||
| | |cha=12{{h|+3|Granted by Alliance Armored Co.}} | ||
|mov=4 | |||
| | |inventory={{Item|16|Silver Axe|image=axe}}<br>{{Item|16|Alliance Armored Co.|image=battalion armored}} Lv 4: {{Item|16|Disturbance|image=gambit}} | ||
| | |notes=Begins moving if an adjacent [[Archer]] is provoked. | ||
|# | }} | ||
| | {{ChapUnitCellFE16 | ||
| | |name=Alliance Soldier | ||
|class=Fortress Knight | |||
| | |lv=27 | ||
| | |#=1 | ||
| | |hp=46 | ||
| | |str=17 | ||
| | |mag=10 | ||
| | |dex=12 | ||
|spd=2 | |||
|lck=10 | |||
|def=31 | |||
|res=7 | |||
|cha=12{{h|+3|Granted by Alliance Armored Co.}} | |||
|mov=4 | |||
|inventory={{Item|16|Silver Axe|image=axe}}<br>{{Item|16|Axefaire}} • {{Item|16|Weight -5}}<br>{{Item|16|Alliance Armored Co.|image=battalion armored}} Lv 4: {{Item|16|Disturbance|image=gambit}} | |||
|notes=Begins moving if the adjacent [[Grappler]] is provoked. | |||
}} | |||
{{ChapUnitCellFE16 | |||
|name=Alliance Soldier | |||
|class=Fortress Knight | |||
|lv=27 | |||
|#=2 | |||
|hp=46 | |||
|str=17 | |||
|mag=10 | |||
|dex=12 | |||
|spd=2 | |||
|lck=10 | |||
|def=31 | |||
|res=7 | |||
|cha=12 | |||
|mov=4 | |||
|inventory={{Item|16|Silver Axe|image=axe}}<br>{{Item|16|Axefaire}} • {{Item|16|Weight -5}} | |||
|notes=• The western one begins moving if the nearby [[Grappler]] is provoked.<br>• The eastern one begins moving if [[Ignatz]]{{h|*|If he was not recruited}}/the Alliance General [[Sniper]]{{h|*|If Ignatz was recruited}} is provoked. | |||
}} | |||
{{ChapUnitCellFE16 | |||
|name=Alliance Soldier | |||
|class=Warrior | |||
|lv=27 | |||
|#=1 | |||
|hp=44 | |||
|str=22 | |||
|mag=10 | |||
|dex=12 | |||
|spd=15 | |||
|lck=11 | |||
|def=15 | |||
|res=8 | |||
|cha=12{{h|+1|Granted by Alliance Infantry}} | |||
|mov=5 | |||
|inventory={{Item|16|Silver Axe|image=axe}}<br>{{Item|16|Axefaire}} • {{Item|16|Axe Crit +10}}<br>{{Item|16|Alliance Infantry|image=battalion infantry}} Lv 4: {{Item|16|Lure|image=gambit}} | |||
|notes=Begins moving if an adjacent [[Archer]] is provoked. | |||
}} | |||
{{ChapUnitCellFE16 | |||
|name=Alliance Soldier | |||
|class=Grappler | |||
|lv=27 | |||
|#=1 | |||
|hp=43 | |||
|str=18 | |||
|mag=10 | |||
|dex=15 | |||
|spd=17 | |||
|lck=10 | |||
|def=15 | |||
|res=6 | |||
|cha=12{{h|+1|Granted by Alliance Infantry}} | |||
|mov=6 | |||
|inventory={{Item|16|Steel Gauntlets|image=brawling}} • {{Item|16|Unarmed|image=brawling}}<br>{{Item|16|Fistfaire}} • {{Item|16|Unarmed Combat}}<br>{{Item|16|Alliance Infantry|image=battalion infantry}} Lv 4: {{Item|16|Lure|image=gambit}} | |||
|notes=Begins moving if the adjacent [[Fortress Knight]] is provoked. | |||
}} | |||
{{ChapUnitCellFE16 | |||
|name=Alliance Soldier | |||
|class=Brawler | |||
|lv=27 | |||
|#=5 | |||
|hp=36 | |||
|str=15 | |||
|mag=7 | |||
|dex=15 | |||
|spd=21 | |||
|lck=8 | |||
|def=10 | |||
|res=3 | |||
|cha=12 | |||
|mov=5 | |||
|inventory={{Item|16|Silver Gauntlets|image=brawling}} • {{Item|16|Unarmed|image=brawling}}<br>{{Item|16|Unarmed Combat}} | |||
|notes=• The southeastern two both begin moving if either is provoked.<br>• The far eastern one begins moving if the nearby [[Grappler]] is provoked. | |||
}} | |||
{{ChapUnitCellFE16 | |||
|name=Alliance Soldier | |||
|class=Cavalier | |||
|lv=27 | |||
|#=3 | |||
|hp=34 | |||
|str=17 | |||
|mag=10 | |||
|dex=12 | |||
|spd=13 | |||
|lck=8 | |||
|def=13 | |||
|res=4 | |||
|cha=12 | |||
|mov=7 | |||
|inventory={{Item|16|Silver Lance|image=lance}}<br>{{Item|16|Canto}} | |||
}} | |||
{{ChapUnitCellFE16 | |||
|name=Alliance Soldier | |||
|class=Grappler | |||
|lv=27 | |||
|#=2 | |||
|hp=43 | |||
|str=18 | |||
|mag=10 | |||
|dex=15 | |||
|spd=17 | |||
|lck=10 | |||
|def=15 | |||
|res=6 | |||
|cha=12 | |||
|mov=6 | |||
|inventory={{Item|16|Steel Gauntlets|image=brawling}} • {{Item|16|Unarmed|image=brawling}}<br>{{Item|16|Fistfaire}} • {{Item|16|Unarmed Combat}} | |||
|notes=• The western one begins moving if the nearby [[Fortress Knight]] is provoked.<br>• The eastern one begins moving if the nearby [[Brawler]] is provoked. | |||
|last=y | |||
}} | |||
{{ChapUnitReinf|type=Enemy|platform=ns01}} | |||
{{ChapUnitCellFE16 | |||
|name=[[Leonie]] | |||
|class=Paladin | |||
|version=leonie | |||
|lv=28 | |||
|#=1 | |||
|hp=46 | |||
|str=22 | |||
|mag=8 | |||
|dex=22 | |||
|spd=20 | |||
|lck=14 | |||
|def=25 | |||
|res=10 | |||
|cha=15{{h|+5|Granted by Sauin Militia}} | |||
|mov=8 | |||
|inventory={{Item|16|Silver Lance|image=lance}} • {{Item|16|Vulnerary|image=potion}}<br>{{Item|16|Rivalry}} • {{Item|16|Canto}} • {{Item|16|Lancefaire}} • {{Item|16|Terrain Resistance}} • {{Item|16|Lance Prowess Lv 4}} • {{Item|16|Desperation}} • {{Item|16|Defiant Str}}<br>{{Item|16|Sauin Militia|image=battalion infantry silver}} Lv 5: {{Item|16|Poisoned Arrows|image=gambit}} | |||
|notes=Replaced by an Alliance General Paladin if she was recruited. | |||
}} | |||
{{ChapUnitCellFE16 | |||
|name=Alliance General | |||
|class=Paladin | |||
|lv=28 | |||
|#=1 | |||
|hp=46 | |||
|str=19 | |||
|mag=8 | |||
|dex=22 | |||
|spd=17 | |||
|lck=14 | |||
|def=19 | |||
|res=10 | |||
|cha=15{{h|+3|Granted by Alliance Cavalry}} | |||
|mov=8 | |||
|inventory={{Item|16|Silver Lance|image=lance}}<br>{{Item|16|Canto}} • {{Item|16|Lancefaire}} • {{Item|16|Terrain Resistance}} • {{Item|16|Lance Prowess Lv 4}} • {{Item|16|Desperation}} • {{Item|16|Defiant Str}}<br>{{Item|16|Alliance Cavalry|image=battalion cavalry}} Lv 5: {{Item|16|Assault Troop|image=gambit}} | |||
|notes=Replaces Leonie if she was recruited. | |||
}} | |||
{{ChapUnitCellFE16 | |||
|name=Alliance Soldier | |||
|class=Wyvern Rider | |||
|lv=27 | |||
|#=1 | |||
|hp=39 | |||
|str=21 | |||
|mag=9 | |||
|dex=13 | |||
|spd=17 | |||
|lck=10 | |||
|def=19 | |||
|res=8 | |||
|cha=12 | |||
|mov=7 | |||
|inventory={{Item|16|Steel Axe|image=axe}}<br>{{Item|16|Canto}} • {{Item|16|Axefaire}} | |||
}} | |||
{{ChapUnitCellFE16 | |||
|name=Alliance Soldier | |||
|class=Sniper | |||
|version=female | |||
|lv=27 | |||
|#=2 | |||
|hp=35 | |||
|str=18 | |||
|mag=10 | |||
|dex=23 | |||
|spd=14 | |||
|lck=13 | |||
|def=13 | |||
|res=8 | |||
|cha=12 | |||
|mov=5 | |||
|inventory={{Item|16|Steel Bow|image=bow}}<br>{{Item|16|Bowfaire}} • {{Item|16|Bowrange +1}} | |||
}} | |||
{{ChapUnitCellFE16 | |||
|name=[[Acheron]] | |||
|class=Cavalier | |||
|lv=28 | |||
|#=1 | |||
|hp=38 | |||
|str=16 | |||
|mag=13 | |||
|dex=12 | |||
|spd=9 | |||
|lck=13 | |||
|def=11 | |||
|res=8 | |||
|cha=10{{h|+3|Granted by Alliance Cavalry}} | |||
|mov=7 | |||
|inventory={{Item|16|Silver Lance|image=lance}}<br>{{Item|16|Poison Strike}} • {{Item|16|Canto}} • {{Item|16|Lance Prowess Lv 3}} • {{Item|16|Poison|link=Poison (ability)}} • {{Item|16|Pass}} | |||
|notes=Leaves the map if [[Leonie]]{{h|*|If she was not recruited}}/the Alliance General [[Paladin]]{{h|*|If Leonie was recruited}} is defeated. | |||
}} | |||
{{ChapUnitCellFE16 | |||
|name=Alliance Soldier | |||
|class=Cavalier | |||
|lv=27 | |||
|#=2 | |||
|hp=34 | |||
|str=17 | |||
|mag=10 | |||
|dex=12 | |||
|spd=13 | |||
|lck=8 | |||
|def=13 | |||
|res=4 | |||
|cha=12 | |||
|mov=7 | |||
|inventory={{Item|16|Iron Lance|image=lance}}<br>{{Item|16|Canto}} | |||
|notes=Leaves the map if [[Leonie]]{{h|*|If she was not recruited}}/the Alliance General [[Paladin]]{{h|*|If Leonie was recruited}} is defeated. | |||
|last=y | |||
}} | |||
{{ChapUnitFtr}} | |||
|content2={{ChapUnitHdr|type=Enemy|platform=ns01}} | |||
{{ChapUnitCellFE16 | |||
|name=[[Judith]] | |||
|class=Lord | |||
|version=female | |||
|lv=30 | |||
|#=1 | |||
|hp=53 | |||
|str=24 | |||
|mag=18 | |||
|dex=21 | |||
|spd=25 | |||
|lck=17 | |||
|def=22 | |||
|res=14 | |||
|cha=26{{h|+1|Granted by Daphnel Duelists}} | |||
|mov=6 | |||
|inventory={{Item|16|Rapier|image=sword}} • {{Item|16|Hexlock Shield|image=shield|type=drop}}<br>{{Item|16|General|link=General (ability)}} • {{Item|16|Charm}} • {{Item|16|Sword Prowess Lv 5}} • {{Item|16|Authority Lv 5}} • {{Item|16|Death Blow}} • {{Item|16|Seal Defense}} • {{Item|16|Avo +10}}<br>{{Item|16|Daphnel Duelists|image=battalion infantry}} Lv 5: {{Item|16|Onslaught|image=gambit}} | |||
|notes=Immobile until [[Leonie]]{{h|*|If she was not recruited}}/the Alliance General [[Paladin]]{{h|*|If Leonie was recruited}} is defeated, at which point she and all remaining non-reinforcement enemies begin escaping via the northeast. | |||
}} | |||
{{ChapUnitCellFE16 | |||
|name=[[Ignatz]] | |||
|class=Sniper | |||
|version=ignatz | |||
|lv=29 | |||
|#=1 | |||
|hp=43 | |||
|str=23 | |||
|mag=13 | |||
|dex=34 | |||
|spd=22 | |||
|lck=26 | |||
|def=17 | |||
|res=16 | |||
|cha=12{{h|+5|Granted by Victor Private Military}} | |||
|mov=5 | |||
|inventory={{Item|16|Brave Bow|image=bow|type=drop}} • {{Item|16|Vulnerary|image=potion}}<br>{{Item|16|Watchful Eye|image=hit +20}} • {{Item|16|Bowfaire}} • {{Item|16|Bowrange +1}} • {{Item|16|Bow Prowess Lv 4}} • {{Item|16|Bow Avo +20}} • {{Item|16|Seal Speed}}<br>{{Item|16|Victor Private Military|image=battalion infantry silver}} Lv 5: {{Item|16|Assembly|image=gambit}} | |||
|notes=• Begins moving if the eastern [[Fortress Knight]] is provoked.<br>• Replaced by an Alliance General Sniper if he was recruited. | |||
}} | |||
{{ChapUnitCellFE16 | |||
|name=Alliance General | |||
|class=Sniper | |||
|lv=29 | |||
|#=1 | |||
|hp=43 | |||
|str=21 | |||
|mag=13 | |||
|dex=34 | |||
|spd=21 | |||
|lck=26 | |||
|def=16 | |||
|res=11 | |||
|cha=12{{h|+7|Granted by Alliance Guard}} | |||
|mov=5 | |||
|inventory={{Item|16|Brave Bow|image=bow|type=drop}}<br>{{Item|16|Bowfaire}} • {{Item|16|Bowrange +1}} • {{Item|16|Bow Prowess Lv 4}} • {{Item|16|Bow Avo +20}} • {{Item|16|Seal Speed}}<br>{{Item|16|Alliance Guard|image=battalion infantry silver}} Lv 5: {{Item|16|Poison Tactic|image=gambit}} | |||
|notes=• Begins moving if the eastern [[Fortress Knight]] is provoked.<br>• Replaces Ignatz if he was recruited. | |||
}} | |||
{{ChapUnitCellFE16 | |||
|name=Alliance Soldier | |||
|class=Archer | |||
|lv=28 | |||
|#=2 | |||
|hp=34 | |||
|str=19 | |||
|mag=14 | |||
|dex=19 | |||
|spd=19 | |||
|lck=12 | |||
|def=12 | |||
|res=7 | |||
|cha=16 | |||
|mov=5 | |||
|inventory={{Item|16|Steel Bow|image=bow}}<br>{{Item|16|Bowrange +1}} • {{Item|16|Bow Prowess Lv 2}} | |||
|notes=• The southern one begins moving if the nearby Archer or [[Armored Knight]] is provoked.<br>• The northern one begins moving if the nearby Archer or [[Warrior]] is provoked. | |||
}} | |||
{{ChapUnitCellFE16 | |||
|name=Alliance Soldier | |||
|class=Archer | |||
|version=female | |||
|lv=28 | |||
|#=2 | |||
|hp=34 | |||
|str=19 | |||
|mag=14 | |||
|dex=19 | |||
|spd=19 | |||
|lck=12 | |||
|def=12 | |||
|res=7 | |||
|cha=16 | |||
|mov=5 | |||
|inventory={{Item|16|Steel Bow|image=bow}}<br>{{Item|16|Bowrange +1}} • {{Item|16|Bow Prowess Lv 2}} | |||
|notes=• The southern one begins moving if the nearby Archer or [[Armored Knight]] is provoked.<br>• The northern one begins moving if the nearby Archer or [[Warrior]] is provoked. | |||
}} | |||
{{ChapUnitCellFE16 | |||
|name=Alliance Soldier | |||
|class=Armored Knight | |||
|lv=28 | |||
|#=1 | |||
|hp=40 | |||
|str=19 | |||
|mag=14 | |||
|dex=14 | |||
|spd=8 | |||
|lck=8 | |||
|def=25 | |||
|res=3 | |||
|cha=16{{h|+3|Granted by Alliance Armored Co.}} | |||
|mov=4 | |||
|inventory={{Item|16|Silver Axe|image=axe}}<br>{{Item|16|Axe Prowess Lv 2}}<br>{{Item|16|Alliance Armored Co.|image=battalion armored}} Lv 4: {{Item|16|Disturbance|image=gambit}} | |||
|notes=Begins moving if an adjacent [[Archer]] is provoked. | |||
}} | |||
{{ChapUnitCellFE16 | |||
|name=Alliance Soldier | |||
|class=Fortress Knight | |||
|lv=28 | |||
|#=1 | |||
|hp=50 | |||
|str=21 | |||
|mag=14 | |||
|dex=14 | |||
|spd=4 | |||
|lck=10 | |||
|def=31 | |||
|res=7 | |||
|cha=16{{h|+3|Granted by Alliance Armored Co.}} | |||
|mov=4 | |||
|inventory={{Item|16|Silver Axe|image=axe}}<br>{{Item|16|Axefaire}} • {{Item|16|Weight -5}} • {{Item|16|Axe Prowess Lv 3}}<br>{{Item|16|Alliance Armored Co.|image=battalion armored}} Lv 4: {{Item|16|Disturbance|image=gambit}} | |||
|notes=Begins moving if the adjacent [[Grappler]] is provoked. | |||
}} | |||
{{ChapUnitCellFE16 | |||
|name=Alliance Soldier | |||
|class=Fortress Knight | |||
|lv=28 | |||
|#=2 | |||
|hp=50 | |||
|str=21 | |||
|mag=14 | |||
|dex=14 | |||
|spd=4 | |||
|lck=10 | |||
|def=31 | |||
|res=7 | |||
|cha=16 | |||
|mov=4 | |||
|inventory={{Item|16|Silver Axe|image=axe}}<br>{{Item|16|Axefaire}} • {{Item|16|Weight -5}} • {{Item|16|Axe Prowess Lv 3}} | |||
|notes=• The western one begins moving if the nearby [[Grappler]] is provoked.<br>• The eastern one begins moving if [[Ignatz]]{{h|*|If he was not recruited}}/the Alliance General [[Sniper]]{{h|*|If Ignatz was recruited}} is provoked. | |||
}} | |||
{{ChapUnitCellFE16 | |||
|name=Alliance Soldier | |||
|class=Warrior | |||
|lv=28 | |||
|#=1 | |||
|hp=48 | |||
|str=26 | |||
|mag=14 | |||
|dex=14 | |||
|spd=20 | |||
|lck=11 | |||
|def=20 | |||
|res=8 | |||
|cha=16{{h|+1|Granted by Alliance Infantry}} | |||
|mov=5 | |||
|inventory={{Item|16|Silver Axe|image=axe}}<br>{{Item|16|Axefaire}} • {{Item|16|Axe Crit +10}} • {{Item|16|Axe Prowess Lv 3}}<br>{{Item|16|Alliance Infantry|image=battalion infantry}} Lv 4: {{Item|16|Lure|image=gambit}} | |||
|notes=Begins moving if an adjacent [[Archer]] is provoked. | |||
}} | |||
{{ChapUnitCellFE16 | |||
|name=Alliance Soldier | |||
|class=Brawler | |||
|lv=28 | |||
|#=7 | |||
|hp=41 | |||
|str=19 | |||
|mag=1 | |||
|dex=19 | |||
|spd=26 | |||
|lck=8 | |||
|def=14 | |||
|res=3 | |||
|cha=16 | |||
|mov=5 | |||
|inventory={{Item|16|Silver Gauntlets|image=brawling}} • {{Item|16|Unarmed|image=brawling}}<br>{{Item|16|Unarmed Combat}} • {{Item|16|Brawling Prowess Lv 2}} | |||
|notes=• The western ones begin moving if their respective nearby [[Warrior]] or [[Cavalier]] is provoked.<br>• The southeastern two both begin moving if either is provoked.<br>• The far eastern one begins moving if the nearby [[Grappler]] is provoked. | |||
}} | |||
{{ChapUnitCellFE16 | |||
|name=Alliance Soldier | |||
|class=Grappler | |||
|lv=28 | |||
|#=1 | |||
|hp=47 | |||
|str=21 | |||
|mag=14 | |||
|dex=17 | |||
|spd=22 | |||
|lck=10 | |||
|def=20 | |||
|res=6 | |||
|cha=16{{h|+1|Granted by Alliance Infantry}} | |||
|mov=6 | |||
|inventory={{Item|16|Steel Gauntlets|image=brawling}} • {{Item|16|Unarmed|image=brawling}}<br>{{Item|16|Fistfaire}} • {{Item|16|Unarmed Combat}} • {{Item|16|Brawling Prowess Lv 3}}<br>{{Item|16|Alliance Infantry|image=battalion infantry}} Lv 4: {{Item|16|Lure|image=gambit}} | |||
|notes=Begins moving if the adjacent [[Fortress Knight]] is provoked. | |||
}} | |||
{{ChapUnitCellFE16 | |||
|name=Alliance Soldier | |||
|class=Cavalier | |||
|lv=28 | |||
|#=3 | |||
|hp=38 | |||
|str=22 | |||
|mag=14 | |||
|dex=16 | |||
|spd=18 | |||
|lck=8 | |||
|def=17 | |||
|res=7 | |||
|cha=16 | |||
|mov=7 | |||
|inventory={{Item|16|Silver Lance|image=lance}}<br>{{Item|16|Canto}} • {{Item|16|Lance Prowess Lv 2}} | |||
|notes=• The western ones begin moving if their respective nearby [[Brawler]] is provoked.<br>• The eastern one begins moving if the adjacent Cavalier is provoked. | |||
}} | |||
{{ChapUnitCellFE16 | |||
|name=Alliance Soldier | |||
|class=Cavalier | |||
|version=female | |||
|lv=28 | |||
|#=1 | |||
|hp=38 | |||
|str=22 | |||
|mag=14 | |||
|dex=16 | |||
|spd=18 | |||
|lck=8 | |||
|def=17 | |||
|res=7 | |||
|cha=16 | |||
|mov=7 | |||
|inventory={{Item|16|Silver Lance|image=lance}}<br>{{Item|16|Canto}} • {{Item|16|Lance Prowess Lv 2}} | |||
|notes=Begins moving if the adjacent Cavalier is provoked. | |||
}} | |||
{{ChapUnitCellFE16 | |||
|name=Alliance Soldier | |||
|class=Grappler | |||
|lv=28 | |||
|#=2 | |||
|hp=47 | |||
|str=21 | |||
|mag=14 | |||
|dex=17 | |||
|spd=22 | |||
|lck=10 | |||
|def=20 | |||
|res=6 | |||
|cha=16 | |||
|mov=6 | |||
|inventory={{Item|16|Steel Gauntlets|image=brawling}} • {{Item|16|Unarmed|image=brawling}}<br>{{Item|16|Fistfaire}} • {{Item|16|Unarmed Combat}} • {{Item|16|Brawling Prowess Lv 3}} | |||
|notes=• The western one begins moving if the nearby [[Fortress Knight]] is provoked.<br>• The eastern one begins moving if the nearby [[Brawler]] is provoked. | |||
|last=y | |||
}} | |||
{{ChapUnitReinf|type=Enemy|platform=ns01}} | |||
{{ChapUnitCellFE16 | |||
|name=[[Leonie]] | |||
|class=Paladin | |||
|version=leonie | |||
|lv=29 | |||
|#=1 | |||
|hp=46 | |||
|str=22 | |||
|mag=8 | |||
|dex=22 | |||
|spd=20 | |||
|lck=14 | |||
|def=25 | |||
|res=10 | |||
|cha=15{{h|+5|Granted by Sauin Militia}} | |||
|mov=8 | |||
|inventory={{Item|16|Silver Lance|image=lance}} • {{Item|16|Vulnerary|image=potion}}<br>{{Item|16|Rivalry}} • {{Item|16|Canto}} • {{Item|16|Lancefaire}} • {{Item|16|Terrain Resistance}} • {{Item|16|Lance Prowess Lv 4}} • {{Item|16|Desperation}} • {{Item|16|Defiant Str}}<br>{{Item|16|Sauin Militia|image=battalion infantry silver}} Lv 5: {{Item|16|Poisoned Arrows|image=gambit}} | |||
|notes=Replaced by an Alliance General Paladin if she was recruited. | |||
}} | |||
{{ChapUnitCellFE16 | |||
|name=Alliance General | |||
|class=Paladin | |||
|lv=29 | |||
|#=1 | |||
|hp=50 | |||
|str=23 | |||
|mag=11 | |||
|dex=27 | |||
|spd=22 | |||
|lck=19 | |||
|def=24 | |||
|res=13 | |||
|cha=20{{h|+3|Granted by Alliance Cavalry}} | |||
|mov=8 | |||
|inventory={{Item|16|Silver Lance|image=lance}}<br>{{Item|16|Canto}} • {{Item|16|Lancefaire}} • {{Item|16|Terrain Resistance}} • {{Item|16|Lance Prowess Lv 4}} • {{Item|16|Desperation}} • {{Item|16|Defiant Str}}<br>{{Item|16|Alliance Cavalry|image=battalion cavalry}} Lv 5: {{Item|16|Assault Troop|image=gambit}} | |||
|notes=Replaces Leonie if she was recruited. | |||
}} | |||
{{ChapUnitCellFE16 | |||
|name=Alliance Soldier | |||
|class=Wyvern Rider | |||
|lv=28 | |||
|#=2 | |||
|hp=44 | |||
|str=25 | |||
|mag=13 | |||
|dex=15 | |||
|spd=22 | |||
|lck=10 | |||
|def=23 | |||
|res=8 | |||
|cha=16 | |||
|mov=7 | |||
|inventory={{Item|16|Steel Axe|image=axe}}<br>{{Item|16|Canto}} • {{Item|16|Axefaire}} • {{Item|16|Axe Prowess Lv 3}} | |||
}} | |||
{{ChapUnitCellFE16 | |||
|name=Alliance Soldier | |||
|class=Sniper | |||
|version=female | |||
|lv=28 | |||
|#=3 | |||
|hp=40 | |||
|str=20 | |||
|mag=14 | |||
|dex=27 | |||
|spd=19 | |||
|lck=13 | |||
|def=17 | |||
|res=8 | |||
|cha=16 | |||
|mov=5 | |||
|inventory={{Item|16|Steel Bow|image=bow}}<br>{{Item|16|Bowfaire}} • {{Item|16|Bowrange +1}} • {{Item|16|Bow Prowess Lv 3}} | |||
}} | |||
{{ChapUnitCellFE16 | |||
|name=[[Acheron]] | |||
|class=Cavalier | |||
|lv=29 | |||
|#=1 | |||
|hp=42 | |||
|str=21 | |||
|mag=17 | |||
|dex=17 | |||
|spd=14 | |||
|lck=17 | |||
|def=16 | |||
|res=12 | |||
|cha=15{{h|+3|Granted by Alliance Cavalry}} | |||
|mov=7 | |||
|inventory={{Item|16|Silver Lance|image=lance}}<br>{{Item|16|Poison Strike}} • {{Item|16|Canto}} • {{Item|16|Lance Prowess Lv 3}} • {{Item|16|Poison|link=Poison (ability)}} • {{Item|16|Pass}} | |||
|notes=Leaves the map if [[Leonie]]{{h|*|If she was not recruited}}/the Alliance General [[Paladin]]{{h|*|If Leonie was recruited}} is defeated. | |||
}} | |||
{{ChapUnitCellFE16 | |||
|name=Alliance Soldier | |||
|class=Cavalier | |||
|lv=28 | |||
|#=2 | |||
|hp=38 | |||
|str=22 | |||
|mag=14 | |||
|dex=16 | |||
|spd=18 | |||
|lck=8 | |||
|def=17 | |||
|res=7 | |||
|cha=16 | |||
|mov=7 | |||
|inventory={{Item|16|Iron Lance|image=lance}}<br>{{Item|16|Canto}} • {{Item|16|Lance Prowess Lv 2}} | |||
|notes=Leaves the map if [[Leonie]]{{h|*|If she was not recruited}}/the Alliance General [[Paladin]]{{h|*|If Leonie was recruited}} is defeated. | |||
}} | |||
{{ChapUnitCellFE16 | |||
|name=Alliance Soldier | |||
|class=Cavalier | |||
|version=female | |||
|lv=28 | |||
|#=2 | |||
|hp=38 | |||
|str=22 | |||
|mag=14 | |||
|dex=16 | |||
|spd=18 | |||
|lck=8 | |||
|def=17 | |||
|res=7 | |||
|cha=16 | |||
|mov=7 | |||
|inventory={{Item|16|Iron Lance|image=lance}}<br>{{Item|16|Canto}} • {{Item|16|Lance Prowess Lv 2}} | |||
|notes=Leaves the map if [[Leonie]]{{h|*|If she was not recruited}}/the Alliance General [[Paladin]]{{h|*|If Leonie was recruited}} is defeated. | |||
|last=y | |||
}} | |||
{{ChapUnitFtr}} | |||
|content3={{ChapUnitHdr|type=Enemy|platform=ns01}} | |||
{{ChapUnitCellFE16 | |||
|name=[[Judith]] | |||
|class=Lord | |||
|version=female | |||
|lv=36 | |||
|#=1 | |||
|hp=63 | |||
|str=32 | |||
|mag=25 | |||
|dex=29 | |||
|spd=33 | |||
|lck=25 | |||
|def=28 | |||
|res=22 | |||
|cha=35{{h|+1|Granted by Daphnel Duelists}} | |||
|mov=6 | |||
|inventory={{Item|16|Rapier|image=sword}} • {{Item|16|Hexlock Shield|image=shield|type=drop}}<br>{{Item|16|General|link=General (ability)}} • {{Item|16|Charm}} • {{Item|16|Sword Prowess Lv 5}} • {{Item|16|Authority Lv 5}} • {{Item|16|Death Blow}} • {{Item|16|Seal Defense}} • {{Item|16|Avo +10}}<br>{{Item|16|Daphnel Duelists|image=battalion infantry}} Lv 5: {{Item|16|Onslaught|image=gambit}} | |||
|notes=Immobile until [[Leonie]]{{h|*|If she was not recruited}}/the Alliance General [[Paladin]]{{h|*|If Leonie was recruited}} is defeated, at which point she and all remaining non-reinforcement enemies begin escaping via the northeast. | |||
}} | |||
{{ChapUnitCellFE16 | |||
|name=[[Ignatz]] | |||
|class=Sniper | |||
|version=ignatz | |||
|lv=35 | |||
|#=1 | |||
|hp=52 | |||
|str=31 | |||
|mag=20 | |||
|dex=44 | |||
|spd=30 | |||
|lck=35 | |||
|def=24 | |||
|res=23 | |||
|cha=19{{h|+5|Granted by Victor Private Military}} | |||
|mov=5 | |||
|inventory={{Item|16|Brave Bow|image=bow|type=drop}} • {{Item|16|Vulnerary|image=potion}}<br>{{Item|16|Watchful Eye|image=hit +20}} • {{Item|16|Bowfaire}} • {{Item|16|Bowrange +1}} • {{Item|16|Bow Prowess Lv 4}} • {{Item|16|Bow Avo +20}} • {{Item|16|Seal Speed}}<br>{{Item|16|Victor Private Military|image=battalion infantry silver}} Lv 5: {{Item|16|Assembly|image=gambit}} | |||
|notes=• Begins moving if the eastern [[Fortress Knight]] is provoked.<br>• Replaced by an Alliance General Sniper with [[Alliance Guard]] instead of Victor Private Military and without a Vulnerary or Watchful Eye if he was recruited. | |||
}} | |||
{{ChapUnitCellFE16 | |||
|name=Alliance General | |||
|class=Sniper | |||
|lv=35 | |||
|#=1 | |||
|hp=52 | |||
|str=29 | |||
|mag=20 | |||
|dex=44 | |||
|spd=29 | |||
|lck=35 | |||
|def=24 | |||
|res=17 | |||
|cha=19{{h|+7|Granted by Alliance Guard}} | |||
|mov=5 | |||
|inventory={{Item|16|Brave Bow|image=bow|type=drop}}<br>{{Item|16|Bowfaire}} • {{Item|16|Bowrange +1}} • {{Item|16|Bow Prowess Lv 4}} • {{Item|16|Bow Avo +20}} • {{Item|16|Seal Speed}}<br>{{Item|16|Alliance Guard|image=battalion infantry silver}} Lv 5: {{Item|16|Poison Tactic|image=gambit}} | |||
|notes=• Begins moving if the eastern [[Fortress Knight]] is provoked.<br>• Replaces [[Ignatz]] if he was recruited. | |||
}} | |||
{{ChapUnitCellFE16 | |||
|name=Alliance Soldier | |||
|class=Archer | |||
|lv=34 | |||
|#=2 | |||
|hp=42 | |||
|str=27 | |||
|mag=21 | |||
|dex=26 | |||
|spd=26 | |||
|lck=18 | |||
|def=18 | |||
|res=13 | |||
|cha=23 | |||
|mov=5 | |||
|inventory={{Item|16|Steel Bow|image=bow}}<br>{{Item|16|Bowrange +1}} • {{Item|16|Bow Prowess Lv 4}} • {{Item|16|Poison Strike}} | |||
|notes=• The southern one begins moving if the nearby Archer or [[Armored Knight]] is provoked.<br>• The northern one begins moving if the nearby Archer or [[Warrior]] is provoked. | |||
}} | |||
{{ChapUnitCellFE16 | |||
|name=Alliance Soldier | |||
|class=Archer | |||
|version=female | |||
|lv=34 | |||
|#=2 | |||
|hp=42 | |||
|str=27 | |||
|mag=21 | |||
|dex=26 | |||
|spd=26 | |||
|lck=18 | |||
|def=18 | |||
|res=13 | |||
|cha=23 | |||
|mov=5 | |||
|inventory={{Item|16|Steel Bow|image=bow}}<br>{{Item|16|Bowrange +1}} • {{Item|16|Bow Prowess Lv 4}} • {{Item|16|Poison Strike}} | |||
|notes=• The southern one begins moving if the nearby Archer or [[Armored Knight]] is provoked.<br>• The northern one begins moving if the nearby Archer or [[Warrior]] is provoked. | |||
}} | |||
{{ChapUnitCellFE16 | |||
|name=Alliance Soldier | |||
|class=Armored Knight | |||
|lv=34 | |||
|#=1 | |||
|hp=48 | |||
|str=27 | |||
|mag=21 | |||
|dex=21 | |||
|spd=15 | |||
|lck=13 | |||
|def=29 | |||
|res=5 | |||
|cha=23{{h|+3|Granted by Alliance Armored Co.}} | |||
|mov=4 | |||
|inventory={{Item|16|Silver Axe|image=axe}}<br>{{Item|16|Axe Prowess Lv 4}} • {{Item|16|Armored Blow}}<br>{{Item|16|Alliance Armored Co.|image=battalion armored}} Lv 4: {{Item|16|Disturbance|image=gambit}} | |||
|notes=Begins moving if an adjacent [[Archer]] is provoked. | |||
}} | |||
{{ChapUnitCellFE16 | |||
|name=Alliance Soldier | |||
|class=Fortress Knight | |||
|lv=34 | |||
|#=1 | |||
|hp=60 | |||
|str=28 | |||
|mag=21 | |||
|dex=21 | |||
|spd=11 | |||
|lck=13 | |||
|def=35 | |||
|res=7 | |||
|cha=23{{h|+3|Granted by Alliance Armored Co.}} | |||
|mov=4 | |||
|inventory={{Item|16|Silver Axe|image=axe}}<br>{{Item|16|Axefaire}} • {{Item|16|Weight -5}} • {{Item|16|Axe Prowess Lv 5}} • {{Item|16|Armored Blow}} • {{Item|16|Defiant Def}}<br>{{Item|16|Alliance Armored Co.|image=battalion armored}} Lv 4: {{Item|16|Disturbance|image=gambit}} | |||
|notes=Begins moving if the adjacent [[Grappler]] is provoked. | |||
}} | |||
{{ChapUnitCellFE16 | |||
|name=Alliance Soldier | |||
|class=Fortress Knight | |||
|lv=34 | |||
|#=2 | |||
|hp=60 | |||
|str=28 | |||
|mag=21 | |||
|dex=21 | |||
|spd=11 | |||
|lck=13 | |||
|def=35 | |||
|res=7 | |||
|cha=23 | |||
|mov=4 | |||
|inventory={{Item|16|Silver Axe|image=axe}}<br>{{Item|16|Axefaire}} • {{Item|16|Weight -5}} • {{Item|16|Axe Prowess Lv 5}} • {{Item|16|Armored Blow}} • {{Item|16|Defiant Def}} | |||
|notes=• The western one begins moving if the nearby [[Grappler]] is provoked.<br>• The eastern one begins moving if [[Ignatz]]{{h|*|If he was not recruited}}/the Alliance General [[Sniper]]{{h|*|If Ignatz was recruited}} is provoked. | |||
}} | |||
{{ChapUnitCellFE16 | |||
|name=Alliance Soldier | |||
|class=Warrior | |||
|lv=34 | |||
|#=1 | |||
|hp=58 | |||
|str=35 | |||
|mag=21 | |||
|dex=21 | |||
|spd=27 | |||
|lck=14 | |||
|def=26 | |||
|res=13 | |||
|cha=23{{h|+1|Granted by Alliance Infantry}} | |||
|mov=5 | |||
|inventory={{Item|16|Silver Axe|image=axe}}<br>{{Item|16|Axefaire}} • {{Item|16|Axe Crit +10}} • {{Item|16|Axe Prowess Lv 5}} • {{Item|16|Lancebreaker+|image=lancebreaker}} • {{Item|16|Wrath}}<br>{{Item|16|Alliance Infantry|image=battalion infantry}} Lv 4: {{Item|16|Lure|image=gambit}} | |||
|notes=Begins moving if an adjacent [[Archer]] is provoked. | |||
}} | |||
{{ChapUnitCellFE16 | |||
|name=Alliance Soldier | |||
|class=Brawler | |||
|lv=34 | |||
|#=8 | |||
|hp=49 | |||
|str=27 | |||
|mag=18 | |||
|dex=26 | |||
|spd=35 | |||
|lck=13 | |||
|def=22 | |||
|res=9 | |||
|cha=23 | |||
|mov=5 | |||
|inventory={{Item|16|Silver Gauntlets|image=brawling}} • {{Item|16|Unarmed|image=brawling}}<br>{{Item|16|Unarmed Combat}} • {{Item|16|Brawling Prowess Lv 4}} • {{Item|16|Tomebreaker}} | |||
|notes=• The western ones begin moving if their respective nearby [[Warrior]] or [[Cavalier]] is provoked.<br>• The southeastern three all begin moving if any of them is provoked.<br>• The far eastern one begins moving if a nearby [[Grappler]] is provoked. | |||
}} | |||
{{ChapUnitCellFE16 | |||
|name=Alliance Soldier | |||
|class=Grappler | |||
|lv=34 | |||
|#=1 | |||
|hp=57 | |||
|str=29 | |||
|mag=21 | |||
|dex=24 | |||
|spd=29 | |||
|lck=13 | |||
|def=26 | |||
|res=12 | |||
|cha=23{{h|+1|Granted by Alliance Infantry}} | |||
|mov=6 | |||
|inventory={{Item|16|Steel Gauntlets|image=brawling}} • {{Item|16|Unarmed|image=brawling}}<br>{{Item|16|Fistfaire}} • {{Item|16|Unarmed Combat}} • {{Item|16|Brawling Prowess Lv 5}} • {{Item|16|Tomebreaker}} • {{Item|16|Defiant Spd}}<br>{{Item|16|Alliance Infantry|image=battalion infantry}} Lv 4: {{Item|16|Lure|image=gambit}} | |||
|notes=Begins moving if the adjacent [[Fortress Knight]] is provoked. | |||
}} | |||
{{ChapUnitCellFE16 | |||
|name=Alliance Soldier | |||
|class=Cavalier | |||
|lv=34 | |||
|#=3 | |||
|hp=46 | |||
|str=29 | |||
|mag=21 | |||
|dex=23 | |||
|spd=25 | |||
|lck=13 | |||
|def=24 | |||
|res=13 | |||
|cha=23 | |||
|mov=7 | |||
|inventory={{Item|16|Silver Lance|image=lance}}<br>{{Item|16|Canto}} • {{Item|16|Lance Prowess Lv 4}} • {{Item|16|Swordbreaker+|image=swordbreaker}} | |||
|notes=• The western ones begin moving if their respective nearby [[Brawler]] or [[Warrior]] is provoked.<br>• The eastern one begins moving if the adjacent Cavalier is provoked. | |||
}} | |||
{{ChapUnitCellFE16 | |||
|name=Alliance Soldier | |||
|class=Cavalier | |||
|version=female | |||
|lv=34 | |||
|#=1 | |||
|hp=46 | |||
|str=29 | |||
|mag=21 | |||
|dex=23 | |||
|spd=25 | |||
|lck=13 | |||
|def=24 | |||
|res=13 | |||
|cha=23 | |||
|mov=7 | |||
|inventory={{Item|16|Silver Lance|image=lance}}<br>{{Item|16|Canto}} • {{Item|16|Lance Prowess Lv 4}} • {{Item|16|Swordbreaker+|image=swordbreaker}} | |||
|notes=Begins moving if the adjacent Cavalier is provoked. | |||
}} | |||
{{ChapUnitCellFE16 | |||
|name=Alliance Soldier | |||
|class=Grappler | |||
|lv=34 | |||
|#=3 | |||
|hp=57 | |||
|str=29 | |||
|mag=21 | |||
|dex=24 | |||
|spd=29 | |||
|lck=13 | |||
|def=26 | |||
|res=12 | |||
|cha=23 | |||
|mov=6 | |||
|inventory={{Item|16|Steel Gauntlets|image=brawling}} • {{Item|16|Unarmed|image=brawling}}<br>{{Item|16|Fistfaire}} • {{Item|16|Unarmed Combat}} • {{Item|16|Brawling Prowess Lv 5}} • {{Item|16|Tomebreaker}} • {{Item|16|Defiant Spd}} | |||
|notes=• The western one begins moving if the nearby [[Fortress Knight]] is provoked.<br>• The eastern two both begin moving if either of them or the nearby [[Brawler]] is provoked. | |||
}} | |||
{{ChapUnitCellFE16 | |||
|name=Alliance Soldier | |||
|class=Warrior | |||
|lv=34 | |||
|#=2 | |||
|hp=58 | |||
|str=35 | |||
|mag=21 | |||
|dex=21 | |||
|spd=27 | |||
|lck=14 | |||
|def=26 | |||
|res=13 | |||
|cha=23 | |||
|mov=5 | |||
|inventory={{Item|16|Silver Axe|image=axe}}<br>{{Item|16|Axefaire}} • {{Item|16|Axe Crit +10}} • {{Item|16|Axe Prowess Lv 5}} • {{Item|16|Lancebreaker+|image=lancebreaker}} • {{Item|16|Wrath}} | |||
|notes=Begins moving if the nearby [[Brawler]] or [[Cavalier]] is provoked. | |||
}} | |||
{{ChapUnitCellFE16 | |||
|name=Alliance Soldier | |||
|class=Sniper | |||
|lv=34 | |||
|#=2 | |||
|hp=48 | |||
|str=28 | |||
|mag=21 | |||
|dex=36 | |||
|spd=26 | |||
|lck=16 | |||
|def=25 | |||
|res=13 | |||
|cha=23 | |||
|mov=5 | |||
|inventory={{Item|16|Steel Bow|image=bow}}<br>{{Item|16|Bowfaire}} • {{Item|16|Bowrange +1}} • {{Item|16|Bow Prowess Lv 5}} • {{Item|16|Poison Strike}} • {{Item|16|Vantage}} | |||
|notes=Both begin moving if either is provoked. | |||
|last=y | |||
}} | |||
{{ChapUnitReinf|type=Enemy|platform=ns01}} | |||
{{ChapUnitCellFE16 | |||
|name=[[Leonie]] | |||
|class=Paladin | |||
|version=leonie | |||
|lv=35 | |||
|#=1 | |||
|hp=60 | |||
|str=35 | |||
|mag=17 | |||
|dex=36 | |||
|spd=34 | |||
|lck=26 | |||
|def=29 | |||
|res=18 | |||
|cha=27{{h|+5|Granted by Sauin Militia}} | |||
|mov=8 | |||
|inventory={{Item|16|Silver Lance|image=lance}} • {{Item|16|Vulnerary|image=potion}}<br>{{Item|16|Rivalry}} • {{Item|16|Canto}} • {{Item|16|Lancefaire}} • {{Item|16|Terrain Resistance}} • {{Item|16|Lance Prowess Lv 4}} • {{Item|16|Desperation}} • {{Item|16|Defiant Crit}} • {{Item|16|Wrath}}<br>{{Item|16|Sauin Militia|image=battalion infantry silver}} Lv 5: {{Item|16|Poisoned Arrows|image=gambit}} | |||
|notes=Replaced by an Alliance General Paladin if she was recruited. | |||
}} | |||
{{ChapUnitCellFE16 | |||
|name=Alliance General | |||
|class=Paladin | |||
|lv=35 | |||
|#=1 | |||
|hp=60 | |||
|str=32 | |||
|mag=17 | |||
|dex=36 | |||
|spd=31 | |||
|lck=26 | |||
|def=27 | |||
|res=20 | |||
|cha=27{{h|+3|Granted by Alliance Cavalry}} | |||
|mov=8 | |||
|inventory={{Item|16|Silver Lance|image=lance}}<br>{{Item|16|Canto}} • {{Item|16|Lancefaire}} • {{Item|16|Terrain Resistance}} • {{Item|16|Lance Prowess Lv 4}} • {{Item|16|Desperation}} • {{Item|16|Defiant Crit}} • {{Item|16|Wrath}}<br>{{Item|16|Alliance Cavalry|image=battalion infantry silver}} Lv 5: {{Item|16|Assault Troop|image=gambit}} | |||
|notes=Replaces Leonie if she was recruited. | |||
}} | |||
{{ChapUnitCellFE16 | |||
|name=Alliance Soldier | |||
|class=Wyvern Rider | |||
|lv=34 | |||
|#=2 | |||
|hp=52 | |||
|str=33 | |||
|mag=19 | |||
|dex=22 | |||
|spd=29 | |||
|lck=13 | |||
|def=27 | |||
|res=10 | |||
|cha=23 | |||
|mov=7 | |||
|inventory={{Item|16|Steel Axe|image=axe}}<br>{{Item|16|Canto}} • {{Item|16|Axefaire}} • {{Item|16|Axe Prowess Lv 5}} • {{Item|16|Lancebreaker+|image=lancebreaker}} • {{Item|16|Weight -3}} | |||
}} | |||
{{ChapUnitCellFE16 | |||
|name=Alliance Soldier | |||
|class=Sniper | |||
|version=female | |||
|lv=34 | |||
|#=3 | |||
|hp=48 | |||
|str=28 | |||
|mag=21 | |||
|dex=36 | |||
|spd= | |||
|lck=16 | |||
|def=25 | |||
|res=13 | |||
|cha=23 | |||
|mov=5 | |||
|inventory={{Item|16|Steel Bow|image=bow}}<br>{{Item|16|Bowfaire}} • {{Item|16|Bowrange +1}} • {{Item|16|Bow Prowess Lv 5}} • {{Item|16|Poison Strike}} • {{Item|16|Vantage}} | |||
}} | |||
{{ChapUnitCellFE16 | |||
|name=[[Acheron]] | |||
|class=Cavalier | |||
|lv=35 | |||
|#=1 | |||
|hp=51 | |||
|str=29 | |||
|mag=25 | |||
|dex=24 | |||
|spd=21 | |||
|lck=25 | |||
|def=23 | |||
|res=19 | |||
|cha=22{{h|+3|Granted by Alliance Cavalry}} | |||
|mov=7 | |||
|inventory={{Item|16|Silver Lance|image=lance}}<br>{{Item|16|Poison Strike}} • {{Item|16|Canto}} • {{Item|16|Lance Prowess Lv 3}} • {{Item|16|Poison|link=Poison (ability)}} • {{Item|16|Pass}}<br>{{Item|16|Alliance Cavalry|image=battalion cavalry}} Lv 3: {{Item|16|Assault Troop|image=gambit}} | |||
|notes=Leaves the map if [[Leonie]]{{h|*|If she was not recruited}}/the Alliance General [[Paladin]]{{h|*|If Leonie was recruited}} is defeated. | |||
}} | |||
{{ChapUnitCellFE16 | |||
|name=Alliance Soldier | |||
|class=Cavalier | |||
|lv=34 | |||
|#=2 | |||
|hp=46 | |||
|str=29 | |||
|mag=21 | |||
|dex=23 | |||
|spd=25 | |||
||lck=13 | |||
|def=24 | |||
|res=13 | |||
|cha=23 | |||
|mov=7 | |||
|inventory={{Item|16|Iron Lance|image=lance}}<br>{{Item|16|Canto}} • {{Item|16|Lance Prowess Lv 4}} • {{Item|16|Swordbreaker+|image=swordbreaker}} | |||
|notes=Leaves the map if [[Leonie]]{{h|*|If she was not recruited}}/the Alliance General [[Paladin]]{{h|*|If Leonie was recruited}} is defeated. | |||
}} | }} | ||
{{ChapUnitCellFE16 | |||
|name=Alliance Soldier | |||
|class=Cavalier | |||
|version=female | |||
|lv=34 | |||
|#=2 | |||
|hp=46 | |||
| | |str=29 | ||
|mag=21 | |||
|dex=23 | |||
| | |spd=25 | ||
||lck=13 | |||
|def=24 | |||
|res=13 | |||
|cha=23 | |||
|mov=7 | |||
|inventory={{Item|16|Iron Lance|image=lance}}<br>{{Item|16|Canto}} • {{Item|16|Lance Prowess Lv 4}} • {{Item|16|Swordbreaker+|image=swordbreaker}} | |||
|notes=Leaves the map if [[Leonie]]{{h|*|If she was not recruited}}/the Alliance General [[Paladin]]{{h|*|If Leonie was recruited}} is defeated. | |||
| | |||
| | |||
|# | |||
| | |||
| | |||
| | |||
| | |||
| | |||
| | |||
| | |||
| | |||
| | |||
| | |||
| | |||
| | |||
| | |||
}} | }} | ||
{{ChapUnitCellFE16 | |||
|name=Alliance Soldier | |||
| | |class=Paladin | ||
| | |lv=34 | ||
|#=2 | |||
|hp=53 | |||
|str=29 | |||
|mag=21 | |||
|dex=25 | |||
|spd=25 | |||
|lck=15 | |||
|def=27 | |||
|res=18 | |||
|cha=23{{h|+3|Granted by Alliance Cavalry}} | |||
|mov=8 | |||
|inventory={{Item|16|Silver Lance|image=lance}}<br>{{Item|16|Canto}} • {{Item|16|Lancefaire}} • {{Item|16|Terrain Resistance}} • {{Item|16|Lance Prowess Lv 5}} • {{Item|16|Swordbreaker+|image=swordbreaker}} • {{Item|16|Weight -3}}<br>{{Item|16|Alliance Cavalry|image=battalion cavalry}} Lv 4: {{Item|16|Assault Troop|image=gambit}} | |||
|notes=Leaves the map if [[Leonie]]{{h|*|If she was not recruited}}/the Alliance General [[Paladin]]{{h|*|If Leonie was recruited}} is defeated. | |||
|last=y | |||
| | |||
|# | |||
| | |||
| | |||
| | |||
| | |||
| | |||
| | |||
| | |||
| | |||
| | |||
| | |||
| | |||
| | |||
}} | }} | ||
{{ChapUnitFtr}} | |||
}} | }} | ||
====Reinforcements==== | ====Reinforcements==== | ||
*At the start of the player phase after <small>( | *At the start of the player phase after any player unit enters the area around Judith's fort or all of the Fortress Knights, Grapplers, Cavaliers, Brawlers <small>(Hard/Maddening)</small>, and Warriors <small>(Maddening)</small> west of the fort are defeated. | ||
**[[Leonie]] from the northwest corner of the map | **[[Leonie]] from the northwest corner of the map | ||
** | **1 <small>(Normal)</small>/2 <small>(Hard/Maddening)</small> [[Wyvern Rider]](s) from the northwest corner of the map | ||
** | **2 <small>(Normal)</small>/3 <small>(Hard/Maddening)</small> [[Sniper]]s from the northwest corner of the map | ||
**[[Acheron]] from the northeast corner of the map | **[[Acheron]] from the northeast corner of the map | ||
** | **2 <small>(Normal)</small>/4 <small>(Hard/Maddening)</small> [[Cavalier]]s from the northeast corner of the map | ||
**2 [[Paladin]]s from the northeast corner of the map <small>(Maddening only)</small> | **2 [[Paladin]]s from the northeast corner of the map <small>(Maddening only)</small> | ||
| Line 578: | Line 1,349: | ||
|def=17 | |def=17 | ||
|res=10 | |res=10 | ||
|cha=21{{ | |cha=21{{h|+1|Granted by Daphnel Duelists}} | ||
|move=6 | |move=6 | ||
|inventory={{Item|16|Rapier|image=sword}}<br>{{Item|16|Hexlock Shield|image=shield|type=drop}} | |inventory={{Item|16|Rapier|image=sword}}<br>{{Item|16|Hexlock Shield|image=shield|type=drop}} | ||
| Line 599: | Line 1,370: | ||
|def=22 | |def=22 | ||
|res=14 | |res=14 | ||
|cha=26{{ | |cha=26{{h|+1|Granted by Daphnel Duelists}} | ||
|move=6 | |move=6 | ||
|inventory={{Item|16|Rapier|image=sword}}<br>{{Item|16|Hexlock Shield|image=shield|type=drop}} | |inventory={{Item|16|Rapier|image=sword}}<br>{{Item|16|Hexlock Shield|image=shield|type=drop}} | ||
| Line 620: | Line 1,391: | ||
|def=28 | |def=28 | ||
|res=22 | |res=22 | ||
|cha=35{{ | |cha=35{{h|+1|Granted by Daphnel Duelists}} | ||
|move=6 | |move=6 | ||
|inventory={{Item|16|Rapier|image=sword}}<br>{{Item|16|Hexlock Shield|image=shield|type=drop}} | |inventory={{Item|16|Rapier|image=sword}}<br>{{Item|16|Hexlock Shield|image=shield|type=drop}} | ||
| Line 632: | Line 1,403: | ||
===Sub-bosses=== | ===Sub-bosses=== | ||
{{main|Ignatz}} | {{main|Ignatz}} | ||
Ignatz does not appear if he was recruited and is replaced by an Alliance General Sniper. | |||
{{Tab | {{Tab | ||
|tab1=Normal | |tab1=Normal | ||
| Line 649: | Line 1,421: | ||
|def=12 | |def=12 | ||
|res=11 | |res=11 | ||
|cha=8{{ | |cha=8{{h|+5|Granted by Victor Private Military}} | ||
|move=5 | |move=5 | ||
|inventory={{Item|16|Brave Bow|image=bow|type=drop}}<br>{{Item|16|Vulnerary|image=potion}} | |inventory={{Item|16|Brave Bow|image=bow|type=drop}}<br>{{Item|16|Vulnerary|image=potion}} | ||
| Line 670: | Line 1,442: | ||
|def=17 | |def=17 | ||
|res=16 | |res=16 | ||
|cha=12{{ | |cha=12{{h|+5|Granted by Victor Private Military}} | ||
|move=5 | |move=5 | ||
|inventory={{Item|16|Brave Bow|image=bow|type=drop}}<br>{{Item|16|Vulnerary|image=potion}} | |inventory={{Item|16|Brave Bow|image=bow|type=drop}}<br>{{Item|16|Vulnerary|image=potion}} | ||
| Line 691: | Line 1,463: | ||
|def=24 | |def=24 | ||
|res=23 | |res=23 | ||
|cha=19{{ | |cha=19{{h|+5|Granted by Victor Private Military}} | ||
|move=5 | |move=5 | ||
|inventory={{Item|16|Brave Bow|image=bow|type=drop}}<br>{{Item|16|Vulnerary|image=potion}} | |inventory={{Item|16|Brave Bow|image=bow|type=drop}}<br>{{Item|16|Vulnerary|image=potion}} | ||
| Line 700: | Line 1,472: | ||
}} | }} | ||
}} | }} | ||
{{main|Leonie}} | {{main|Leonie}} | ||
Leonie does not appear if she was recruited and is replaced by an Alliance General Paladin. | |||
{{Tab | {{Tab | ||
|tab1=Normal | |tab1=Normal | ||
| Line 720: | Line 1,492: | ||
|def=25 | |def=25 | ||
|res=10 | |res=10 | ||
|cha=15{{ | |cha=15{{h|+5|Granted by Sauin Militia}} | ||
|move=8 | |move=8 | ||
|inventory={{Item|16|Silver Lance|image=lance}}<br>{{Item|16|Vulnerary|image=potion}} | |inventory={{Item|16|Silver Lance|image=lance}}<br>{{Item|16|Vulnerary|image=potion}} | ||
| Line 742: | Line 1,514: | ||
|def=26 | |def=26 | ||
|res=11 | |res=11 | ||
|cha=20{{ | |cha=20{{h|+5|Granted by Sauin Militia}} | ||
|move=8 | |move=8 | ||
|inventory={{Item|16|Silver Lance|image=lance}}<br>{{Item|16|Vulnerary|image=potion}} | |inventory={{Item|16|Silver Lance|image=lance}}<br>{{Item|16|Vulnerary|image=potion}} | ||
| Line 764: | Line 1,536: | ||
|def=29 | |def=29 | ||
|res=18 | |res=18 | ||
|cha=27{{ | |cha=27{{h|+5|Granted by Sauin Militia}} | ||
|move=8 | |move=8 | ||
|inventory={{Item|16|Silver Lance|image=lance}}<br>{{Item|16|Vulnerary|image=potion}} | |inventory={{Item|16|Silver Lance|image=lance}}<br>{{Item|16|Vulnerary|image=potion}} | ||
| Line 774: | Line 1,546: | ||
}} | }} | ||
}} | }} | ||
{{main|Acheron}} | {{main|Acheron}} | ||
| Line 836: | Line 1,607: | ||
|def=23 | |def=23 | ||
|res=19 | |res=19 | ||
|cha=22{{ | |cha=22{{h|+3|Granted by Alliance Cavalry}} | ||
|move=7 | |move=7 | ||
|inventory={{Item|16|Silver Lance|image=lance}} | |inventory={{Item|16|Silver Lance|image=lance}} | ||
| Line 849: | Line 1,620: | ||
==Strategy== | ==Strategy== | ||
{{strategy}} | {{strategy}} | ||
Edelgard has just been handed her personal weapon, [[Aymr]]. Its exclusive Combat Art, [[Raging Storm]], is effectively an on-command [[Galeforce]]. However, unlike other Relic weapons, Aymr uses the rare [[Agarthium]] to repair, so don't go wasting it when you don't need to. Unless you've found some [[Giant Crawler]]s in auxiliary battles, [[Lady of Deceit|Chapter 16]] will be your ONLY opportunity to restock! | |||
Can be completed on a normal play through without NG+: | |||
Recommended personnel: Byleth (default), Edelgard (default), Jeritza, Hubert (Dark Bishop), Petra (Assassin), Linhardt, Casper (Grappler), Bernadetta (Sniper), Ferdinand (Paladin), Dancer, Lysithea (Gremory) or a high-movement range character | |||
Recommended equipment/gambits/combat arts: Deadeye, Meteor/Bolting, Warp, Encloser, Sword of the Creator (fully repaired), Draw Back/Reposition/Swap/Smite (for two or three characters), Evasion Rings, Accuracy Rings, Chest Keys, March Ring, Stride gambit, Impenetrable Wall gambit | |||
The first battle post-time skip is a great introduction to what can be expected for the remainder of the Black Eagles playthrough. Positioning on the map, using obstacles, and gambit/attack boosts are essential. You will also have future maps where your characters are 5-10 levels lower than the enemy. | |||
Your team will be split into two and you will have approximately five turns to take out Judith before her reinforcements will appear and then attack (they will appear at the end of turn four and attack during the enemy portion of turn five). This can be done. | |||
The north squad of four has only a few objectives: secure the ballista, raid the chest, and kill the two Grapplers as well as the two Paladins closest to the bridge. If you happen to have Lysithea and she has the Warp spell, you can use this to Warp a strong character to the nearest Grappler (such as Jeritza) and if he does not finish him off move Petra to the ballista to finish him off. Be careful not to have Jeritza within the attack range of too many enemies. | |||
For your squad to the south, immediately use Stride and then focus on either the northern or the southern group of enemies (consisting of a Paladin, Warrior, and Grappler). Use the obstacle (rubble?) in the middle of these two groups as a wall to either the left or right of your team (for context, I went after the southernmost group first). Using the right combination of skills, you should be able to take out two of the three, use Encloser (Bernadetta) on the enemy you weren’t able to kill, and then use Impregnable Wall on the group near the rubble. If done correctly, the group you didn’t fight will have to travel around the middle obstacle to get to your squad while being outside of attack range for any of your personnel that does not have Impregnable Wall active. The Fortress Knights in the central area along with any enemies within range will attack the Impregnable Wall group while the remainder of your squad is out of range. This may take a few turns to get the positioning correct so use Divine Pulse as needed. This will complete turn one. | |||
For the next two turns, continue to have the northern group take out the remaining Grappler and two Paladins (one of these Paladins may break off and head towards the group to the south) and if you have Lysithea on hand, keep her near Jeritza so you can use Warp soon. The group to the south should take out the remaining surrounding enemies while using Edelgard as a tank and/or Impregnable Wall to aggro the archers towards your squad. Stay out of range of Ignatz/Brave Bow Sniper for now unless an Impregnable Wall character can safely draw him out. Do not forget about attack gambits, Banshee (Hubert), and Encloser (Bernadetta) if you have an enemy that has too many hit points to finish off in one turn. | |||
On turn four, its time to begin our approach towards Judith, Ignatz, and to claim the chest to the south. If you have still have some straggler enemies left on turn four and need another turn before approaching Judith, make sure you take them out on this turn or use Banshee and gambits while moving your squad closer to Judith. Igntaz/Brave Bow Sniper should be killed by the end of turn four. One hit from Sublime Heaven will usually do the trick but if not, you can use movement combat abilities (Reposition, Draw Back) to move Byleth back and bring in another character to finish Ignatz off. Beware Judith’s Rapier when doing this as it does bonus damage to heavy armor and cavalry units. Additionally on turn four, make sure to have the character with the chest key getting closer to the chest or at least be near the unit that has Stride or Warp (Linhardt most likely). | |||
At the beginning of turn five, reinforcements will appear to the northwest and northeast. You can ignore them, loot the chest to the south for a Bow of Zoltan, move your characters within attack range of Judith for an attack/gambit boost, and then finish her off with a combo of Sublime Heaven and any bow attack from Bernadetta. | |||
Five turns is tight but think of this map as a preview of the maps to come. The positioning of your army, the underrated movement Combat Arts, Warp, and Impregnable Wall will make victory possible. | |||
A final tip for the remaining maps is to use stat boosting items on your character’s strengths with the exception of Luck boosting items as they should go to characters with low luck so as to reduce the chances of an unlucky critical hit. | |||
<!-- | |||
==Trivia== | ==Trivia== | ||
--> | |||
==Etymology and other languages== | ==Etymology and other languages== | ||
{{Names | {{Names | ||
|eng-name=The Great Bridge Coup | |eng-name=The Great Bridge Coup | ||
| | |jpn-name={{h|ミルディン大橋の戦い|Mirudin-daigyō no tatakai}} | ||
| | |jpn-mean=Battle of the Great Bridge of Myrddin | ||
|span-name=Batalla del Gran Puente | |span-name=Batalla del Gran Puente | ||
|span-mean=Battle of the Great Bridge | |span-mean=Battle of the Great Bridge | ||
| Line 866: | Line 1,663: | ||
|ital-name=Battaglia al Gran Ponte | |ital-name=Battaglia al Gran Ponte | ||
|ital-mean=Battle at the Grand Bridge | |ital-mean=Battle at the Grand Bridge | ||
|kor-name={{ | |kor-name={{h|미르딘대교의 전투|Mireudindaegyoui jeontu}} | ||
|kor-mean=Battle of the great bridge of myrddin | |kor-mean=Battle of the great bridge of myrddin | ||
|ch-simp-name={{ | |ch-simp-name={{h|密尔丁大桥之战|mìěrdīng dà qiáo zhī zhàn}} | ||
|ch-simp-mean=Great bridge myrddin battle | |ch-simp-mean=Great bridge myrddin battle | ||
|ch-trad-name={{ | |ch-trad-name={{h|密爾丁大橋之戰|mìěrdīng dà qiáo zhī zhàn}} | ||
|ch-trad-mean=Great bridge myrddin battle | |ch-trad-mean=Great bridge myrddin battle | ||
}} | }} | ||
| Line 876: | Line 1,673: | ||
==Gallery== | ==Gallery== | ||
{{sectstub}} | {{sectstub}} | ||
<gallery> | |||
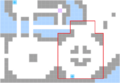
Cm fe16cf 13 trigger.png|Any player unit entering the area outlined in red will cause the reinforcements to appear. | |||
</gallery> | |||
{{ChapterNav | {{ChapterNav | ||
|prechapter=Outset of a Power Struggle/The Battle of Garreg Mach {{!}} The Battle of Garreg Mach | |prechapter=Outset of a Power Struggle/The Battle of Garreg Mach {{!}} The Battle of Garreg Mach | ||
|name=The Great Bridge Coup | |name=The Great Bridge Coup | ||
|nextchapter= | |nextchapter=Capturing Derdriu | ||
}} | }} | ||
{{Nav16}} | {{Nav16}} | ||
{{DEFAULTSORT:Beyond Escape/Great Bridge Coup, The}} | |||
[[Category:Chapters of Fire Emblem: Three Houses]] | [[Category:Chapters of Fire Emblem: Three Houses]] | ||
Latest revision as of 13:31, 28 March 2024
| ||||||||
|

The Great Bridge Coup (Japanese: ミルディン大橋の戦い Battle of the Great Bridge of Myrddin) is the main battle map of the thirteenth chapter of the Crimson Flower route in Fire Emblem: Three Houses. In this map, the Adrestian Empire mounts an attack to seize the strategic location of the Great Bridge of Myrddin.
Beginning log
The Black Eagle Strike Force has an unexpected encounter with someone thought to have died years prior. Amidst the joy, your forces prepare to invade Alliance territory.
Map data
Normal Hard Maddening


Character data
| Characters | |
|---|---|
New units
| |
| |
Required characters
| |
 
| |
Available characters
| |
                            
|
Item data
| |||||||||||||||||||||
|
Enemy data
Normal Hard Maddening
| |||||||||||||||||||||||||||||||||||||||||||||||||||||||||||||||||||||||||||||||||||||||||||||||||||||||||||||||||||||||||||||||||||||||||||||||||||||||||||||||||||||||||||||||||||||||||||||||||||||||||||||||||||||||||||||||||||||||||||||||||||||||||||||||||||||||||||||||||||||||||||||||||||||||||||||||||||||||||||||||||||||||||||||||||||||||||||||||||||||||||||||||||||||||||||||||||||||||||
| |||||||||||||||||||||||||||||||||||||||||||||||||||||||||||||||||||||||||||||||||||||||||||||||||||||||||||||||||||||||||||||||||||||||||||||||||||||||||||||||||||||||||||||||||||||||||||||||||||||||||||||||||||||||||||||||||||||||||||||||||||||||||||||||||||||||||||||||||||||||||||||||||||||||||||||||||||||||||||||||||||||||||||||||||||||||||||||||||||||||||||||||||||||||||||||||||||||||||
| |||||||||||||||||||||||||||||||||||||||||||||||||||||||||||||||||||||||||||||||||||||||||||||||||||||||||||||||||||||||||||||||||||||||||||||||||||||||||||||||||||||||||||||||||||||||||||||||||||||||||||||||||||||||||||||||||||||||||||||||||||||||||||||||||||||||||||||||||||||||||||||||||||||||||||||||||||||||||||||||||||||||||||||||||||||||||||||||||||||||||||||||||||||||||||||||||||||||||
| |||||||||||||||||||||||||||||||||||||||||||||||||||||||||||||||||||||||||||||||||||||||||||||||||||||||||||||||||||||||||||||||||||||||||||||||||||||||||||||||||||||||||||||||||||||||||||||||||||||||||||||||||||||||||||||||||||||||||||||||||||||||||||||||||||||||||||||||||||||||||||||||||||||||||||||||||||||||||||||||||||||||||||||||||||||||||||||||||||||||||||||||||||||||||||||||||||||||||
Reinforcements
- At the start of the player phase after any player unit enters the area around Judith's fort or all of the Fortress Knights, Grapplers, Cavaliers, Brawlers (Hard/Maddening), and Warriors (Maddening) west of the fort are defeated.
- Leonie from the northwest corner of the map
- 1 (Normal)/2 (Hard/Maddening) Wyvern Rider(s) from the northwest corner of the map
- 2 (Normal)/3 (Hard/Maddening) Snipers from the northwest corner of the map
- Acheron from the northeast corner of the map
- 2 (Normal)/4 (Hard/Maddening) Cavaliers from the northeast corner of the map
- 2 Paladins from the northeast corner of the map (Maddening only)
Boss data
- Main article:
Judith
Normal Hard Maddening
|
|
| |||||||||||||||||||||||||||||||||||||||||||||||||||||||||||||||||||||||||||||||||||

Sub-bosses
- Main article:
Ignatz
Ignatz does not appear if he was recruited and is replaced by an Alliance General Sniper.
Normal Hard Maddening
|
|
| |||||||||||||||||||||||||||||||||||||||||||||||||||||||||||||||||||||||||||||||||||

- Main article:
Leonie
Leonie does not appear if she was recruited and is replaced by an Alliance General Paladin.
Normal Hard Maddening
|
|
| |||||||||||||||||||||||||||||||||||||||||||||||||||||||||||||||||||||||||||||||||||

- Main article:
Acheron
Normal Hard Maddening
|
|
| |||||||||||||||||||||||||||||||||||||||||||||||||||||||||||||||||||||||||||||||||||

Strategy
| This section details unofficial strategies that may help with completion of the chapter. This may not work for everybody. |
Edelgard has just been handed her personal weapon, Aymr. Its exclusive Combat Art, Raging Storm, is effectively an on-command Galeforce. However, unlike other Relic weapons, Aymr uses the rare Agarthium to repair, so don't go wasting it when you don't need to. Unless you've found some Giant Crawlers in auxiliary battles, Chapter 16 will be your ONLY opportunity to restock!
Can be completed on a normal play through without NG+:
Recommended personnel: Byleth (default), Edelgard (default), Jeritza, Hubert (Dark Bishop), Petra (Assassin), Linhardt, Casper (Grappler), Bernadetta (Sniper), Ferdinand (Paladin), Dancer, Lysithea (Gremory) or a high-movement range character
Recommended equipment/gambits/combat arts: Deadeye, Meteor/Bolting, Warp, Encloser, Sword of the Creator (fully repaired), Draw Back/Reposition/Swap/Smite (for two or three characters), Evasion Rings, Accuracy Rings, Chest Keys, March Ring, Stride gambit, Impenetrable Wall gambit
The first battle post-time skip is a great introduction to what can be expected for the remainder of the Black Eagles playthrough. Positioning on the map, using obstacles, and gambit/attack boosts are essential. You will also have future maps where your characters are 5-10 levels lower than the enemy.
Your team will be split into two and you will have approximately five turns to take out Judith before her reinforcements will appear and then attack (they will appear at the end of turn four and attack during the enemy portion of turn five). This can be done.
The north squad of four has only a few objectives: secure the ballista, raid the chest, and kill the two Grapplers as well as the two Paladins closest to the bridge. If you happen to have Lysithea and she has the Warp spell, you can use this to Warp a strong character to the nearest Grappler (such as Jeritza) and if he does not finish him off move Petra to the ballista to finish him off. Be careful not to have Jeritza within the attack range of too many enemies.
For your squad to the south, immediately use Stride and then focus on either the northern or the southern group of enemies (consisting of a Paladin, Warrior, and Grappler). Use the obstacle (rubble?) in the middle of these two groups as a wall to either the left or right of your team (for context, I went after the southernmost group first). Using the right combination of skills, you should be able to take out two of the three, use Encloser (Bernadetta) on the enemy you weren’t able to kill, and then use Impregnable Wall on the group near the rubble. If done correctly, the group you didn’t fight will have to travel around the middle obstacle to get to your squad while being outside of attack range for any of your personnel that does not have Impregnable Wall active. The Fortress Knights in the central area along with any enemies within range will attack the Impregnable Wall group while the remainder of your squad is out of range. This may take a few turns to get the positioning correct so use Divine Pulse as needed. This will complete turn one.
For the next two turns, continue to have the northern group take out the remaining Grappler and two Paladins (one of these Paladins may break off and head towards the group to the south) and if you have Lysithea on hand, keep her near Jeritza so you can use Warp soon. The group to the south should take out the remaining surrounding enemies while using Edelgard as a tank and/or Impregnable Wall to aggro the archers towards your squad. Stay out of range of Ignatz/Brave Bow Sniper for now unless an Impregnable Wall character can safely draw him out. Do not forget about attack gambits, Banshee (Hubert), and Encloser (Bernadetta) if you have an enemy that has too many hit points to finish off in one turn.
On turn four, its time to begin our approach towards Judith, Ignatz, and to claim the chest to the south. If you have still have some straggler enemies left on turn four and need another turn before approaching Judith, make sure you take them out on this turn or use Banshee and gambits while moving your squad closer to Judith. Igntaz/Brave Bow Sniper should be killed by the end of turn four. One hit from Sublime Heaven will usually do the trick but if not, you can use movement combat abilities (Reposition, Draw Back) to move Byleth back and bring in another character to finish Ignatz off. Beware Judith’s Rapier when doing this as it does bonus damage to heavy armor and cavalry units. Additionally on turn four, make sure to have the character with the chest key getting closer to the chest or at least be near the unit that has Stride or Warp (Linhardt most likely).
At the beginning of turn five, reinforcements will appear to the northwest and northeast. You can ignore them, loot the chest to the south for a Bow of Zoltan, move your characters within attack range of Judith for an attack/gambit boost, and then finish her off with a combo of Sublime Heaven and any bow attack from Bernadetta.
Five turns is tight but think of this map as a preview of the maps to come. The positioning of your army, the underrated movement Combat Arts, Warp, and Impregnable Wall will make victory possible.
A final tip for the remaining maps is to use stat boosting items on your character’s strengths with the exception of Luck boosting items as they should go to characters with low luck so as to reduce the chances of an unlucky critical hit.
Etymology and other languages
| Names, etymology, and in other regions | ||
|---|---|---|
| Language | Name | Definition, etymology, and notes |
| English |
The Great Bridge Coup |
-- |
| Japanese |
ミルディン大橋の戦い |
Battle of the Great Bridge of Myrddin |
| Spanish |
Batalla del Gran Puente |
Battle of the Great Bridge |
| French |
En vue du grand pont |
In view of the great bridge |
| German |
Bei der Großen Brücke |
At the Great Bridge |
| Italian |
Battaglia al Gran Ponte |
Battle at the Grand Bridge |
| Korean |
미르딘대교의 전투 |
Battle of the great bridge of myrddin |
| Simplified Chinese |
密尔丁大桥之战 |
Great bridge myrddin battle |
| Traditional Chinese |
密爾丁大橋之戰 |
Great bridge myrddin battle |
Gallery
This section has been marked as a stub. Please help improve the page by adding information.
Any player unit entering the area outlined in red will cause the reinforcements to appear.

| ← The Battle of Garreg Mach • | The Great Bridge Coup | • Capturing Derdriu → |
|---|