| Site News |
|---|
| Warning: This wiki contains spoilers. Read at your own risk! Social media: If you would like, please join our Discord server, and/or follow us on Twitter (X) or Tumblr! |
An Inevitable Encounter: Difference between revisions
m (→Boss data) |
|||
| (21 intermediate revisions by 4 users not shown) | |||
| Line 1: | Line 1: | ||
{{Chapter Infobox | {{Chapter Infobox | ||
|title=An Inevitable Encounter | |title=An Inevitable Encounter<br>A Skirmish at Dawn | ||
|image=[[File:Cm fe16 prologue.png|200px]] | |image=[[File:Cm fe16 prologue.png|200px]] | ||
|location=[[Remire Village]] | |location=[[Remire Village]] | ||
|new units=[[Byleth]], [[Edelgard]], [[Dimitri]], [[Claude]] | |new units=[[Byleth]], [[Edelgard]], [[Dimitri]], [[Claude]] | ||
|boss=[[Kostas]] | |boss=[[Kostas]] | ||
|next=[[Three Houses (Three Houses chapter)|Three Houses]] | |||
}} | }} | ||
{{Quote|Please forgive our intrusion. We wouldn't bother you were the situation not dire. We're being pursued by a group of bandits. I can only hope that you will be so kind as to lend your support.|[[Dimitri]]}} | {{Quote|Please forgive our intrusion. We wouldn't bother you were the situation not dire. We're being pursued by a group of bandits. I can only hope that you will be so kind as to lend your support.|[[Dimitri]]}} | ||
'''An Inevitable Encounter''' (Japanese: {{ | '''An Inevitable Encounter''' (Japanese: {{hl|必然の出会い|Hitsuzen no deai}} ''Inevitable Encounter'') is the prologue of {{FE16}}. It consists solely of a mission, '''A Skirmish at Dawn''' (Japanese: {{hl|夜明けの遭遇戦|Yoake no sōgū-sen}} ''Encounter Battle at Dawn''). | ||
==Plot== | ==Plot== | ||
{{main|An Inevitable Encounter/Script}} | {{main|An Inevitable Encounter/Script}} | ||
In | In Imperial Year 91, the divine [[Seiros]] engages the Liberation King [[Nemesis]] in battle and slays him, avenging an incident at the Red Canyon. Approximately one millennium later in 1180, a person named [[Byleth]] has a dream of the battle and of a mysterious girl. Afterwards, they are woken up by their father [[Jeralt]]. The nobles [[Edelgard]], [[Dimitri]], and [[Claude]] appear and explain that bandits have attacked them while they were resting at camp. Jeralt agrees to protect them, and he and Byleth ride out. With Jeralt's guidance, the four rout the bandits and injure their leader [[Kostas]]. | ||
As the battle ends, Kostas | As the battle ends, Kostas attacks Edelgard, but Byleth sacrifices themselves to protect her. They have another vision of the girl, who scolds them for being so reckless, introduces herself as [[Sothis]], and grants them the ability to rewind time with [[Divine Pulse]]. Byleth redoes the past several seconds and this time counters Kostas's strike and drives him off. The group is then reinforced by the [[Knights of Seiros]] led by [[Alois]]. Alois recognizes Jeralt and reveals that he was once the respected captain of the Knights of Seiros who vanished approximately 20 years ago; he browbeats Jeralt into returning to [[Garreg Mach Monastery]] with him and invites Byleth to accompany them. The three lords thank Byleth for their actions and offer Byleth a position with their respective homelands. | ||
===Unused beginning log=== | |||
In Remire Village, three youths pursued by bandits solicit aid from Jeralt and his mercenaries. Together, you help them fight off their pursuers and defend the village. | |||
==Chapter data== | ==Chapter data== | ||
| Line 26: | Line 31: | ||
|other=1 | |other=1 | ||
|enemy=7 | |enemy=7 | ||
|map= | |map={{Tab | ||
{{Tab | |||
|tab1=Normal | |tab1=Normal | ||
|tab2=Hard | |tab2=Hard | ||
|content1=< | |content1=<div>[[File:Cm fe16 prologue.png|200px]]</div> | ||
|content2=< | |content2=<div>[[File:Cm fe16 prologue h.png|200px]]</div> | ||
}} | }} | ||
|col=21 | |||
|row=20 | |||
}} | }} | ||
|content2={{ChapData | |content2={{ChapData | ||
| Line 41: | Line 47: | ||
|enemy=9 | |enemy=9 | ||
|map=[[File:Cm fe16 prologue m.png|200px]] | |map=[[File:Cm fe16 prologue m.png|200px]] | ||
|col=21 | |||
|row=20 | |||
}} | }} | ||
}} | }} | ||
===Character data=== | ===Character data=== | ||
<choose><option>{{#vardefine:A|m}}</option><option>{{#vardefine:A|f}}</option></choose> | |||
{{ChapChars | {{ChapChars | ||
|game#=16 | |game#=16 | ||
|newunit1={{NewUnit | |newunit1={{NewUnit | ||
|name=Byleth | |name=Byleth | ||
|portrait= | |portrait=[[File:Small portrait byleth {{#var:A}} fe16.png|100px]] | ||
|class=Commoner | |class=Commoner | ||
|HP=27 | |HP=27 | ||
|lv=1 | |lv=1 | ||
|inventory={{Item|16|Iron Sword|image=sword}}<br>{{Item|16|Vulnerary|image=potion}} | |||
|recruitment method=Automatically from turn 1 | |recruitment method=Automatically from turn 1 | ||
}} | }} | ||
| Line 62: | Line 71: | ||
|HP=29 | |HP=29 | ||
|lv=1 | |lv=1 | ||
|inventory={{Item|16|Iron Axe|image=axe}}<br>{{Item|16|Vulnerary|image=potion}} | |||
|recruitment method=Automatically from turn 1 | |recruitment method=Automatically from turn 1 | ||
}} | }} | ||
| Line 70: | Line 80: | ||
|HP=28 | |HP=28 | ||
|lv=1 | |lv=1 | ||
|inventory={{Item|16|Iron Lance|image=lance}}<br>{{Item|16|Vulnerary|image=potion}} | |||
|recruitment method=Automatically from turn 1 | |recruitment method=Automatically from turn 1 | ||
}} | }} | ||
| Line 78: | Line 89: | ||
|HP=26 | |HP=26 | ||
|lv=1 | |lv=1 | ||
|inventory={{Item|16|Iron Bow|image=bow}}<br>{{Item|16|Vulnerary|image=potion}} | |||
|recruitment method=Automatically from turn 1 | |recruitment method=Automatically from turn 1 | ||
}} | }} | ||
| Line 96: | Line 108: | ||
|tab2=Hard | |tab2=Hard | ||
|tab3=Maddening | |tab3=Maddening | ||
|content1={{ | |content1={{ChapUnitHdr|type=Enemy|platform=ns01}} | ||
|platform=ns01 | {{ChapUnitCellFE16 | ||
| | |name=[[Kostas]] | ||
| | |class=Thief | ||
| | |lv=3 | ||
| | |#=1 | ||
|#1=6 | |hp=28 | ||
| | |str=10 | ||
| | |mag=5 | ||
|- | |dex=7 | ||
| | |spd=7 | ||
| | |lck=5 | ||
| | |def=6 | ||
| | |res=1 | ||
| | |cha=6 | ||
|mov=5 | |||
|inventory={{Item|16|Iron Axe|image=axe|type=drop}} | |||
|notes=He and his squad begin moving after the first four [[Ruffian (class)|Ruffian]]s are defeated. | |||
}} | |||
{{ChapUnitCellFE16 | |||
|name=Thief | |||
|class=Ruffian | |||
|lv=1 | |||
|#=6 | |||
|hp=18 | |||
|str=7 | |||
|mag=4 | |||
|dex=5 | |||
|spd=9 | |||
|lck=4 | |||
|def=5 | |||
|res=1 | |||
|cha=6 | |||
|mov=4 | |||
|inventory={{Item|16|Iron Sword|image=sword}} | |||
|notes=The northwestern three begin moving if any of them are provoked. | |||
|last=y | |||
}} | |||
{{ChapUnitFtr}} | |||
|content2={{ChapUnitHdr|type=Enemy|platform=ns01}} | |||
{{ChapUnitCellFE16 | |||
|name=[[Kostas]] | |||
|class=Thief | |||
|lv=3 | |||
|#=1 | |||
|hp=29 | |||
|str=11 | |||
|mag=6 | |||
|dex=7 | |||
|spd=7 | |||
|lck=6 | |||
|def=7 | |||
|res=1 | |||
|cha=7 | |||
|mov=5 | |||
|inventory={{Item|16|Iron Axe|image=axe|type=drop}}<br>{{Item|16|Axe Prowess Lv 2}} | |||
|notes=Begins moving after the [[Ruffian (class)|Ruffian]]s are defeated or he or the Thieves are provoked. | |||
}} | |||
{{ChapUnitCellFE16 | |||
|name=Thief | |||
|class=Ruffian | |||
|lv=1 | |||
|#=3 | |||
|hp=18 | |||
|str=7 | |||
|mag=4 | |||
|dex=5 | |||
|spd=9 | |||
|lck=4 | |||
|def=5 | |||
|res=1 | |||
|cha=6 | |||
|mov=4 | |||
|inventory={{Item|16|Iron Sword|image=sword}}<br>{{Item|16|Sword Prowess Lv 1}} | |||
|notes=The northwestern two begin moving if they or the nearby axe-wielding Ruffian is provoked. | |||
}} | |||
{{ChapUnitCellFE16 | |||
|name=Thief | |||
|class=Ruffian | |||
|lv=1 | |||
|#=1 | |||
|hp=18 | |||
|str=7 | |||
|mag=4 | |||
|dex=5 | |||
|spd=9 | |||
|lck=4 | |||
|def=5 | |||
|res=1 | |||
|cha=6 | |||
|mov=4 | |||
|inventory={{Item|16|Iron Axe|image=axe}}<br>{{Item|16|Axe Prowess Lv 2}} | |||
|notes=Begins moving if a nearby sword-wielding [[Ruffian (class)|Ruffian]] is provoked. | |||
}} | |||
{{ChapUnitCellFE16 | |||
|name=Thief | |||
|class=Thief | |||
|lv=1 | |||
|#=2 | |||
|hp=18 | |||
|str=8 | |||
|mag=4 | |||
|dex=6 | |||
|spd=9 | |||
|lck=4 | |||
|def=5 | |||
|res=1 | |||
|cha=6 | |||
|mov=5 | |||
|inventory={{Item|16|Iron Axe|image=axe}}<br>{{Item|16|Axe Prowess Lv 2}} | |||
|notes=Begins moving after the [[Ruffian (class)|Ruffian]]s are defeated or they or Kostas are provoked. | |||
|last=y | |||
}} | |||
{{ChapUnitFtr}} | |||
|content3={{ChapUnitHdr|type=Enemy|platform=ns01}} | |||
{{ChapUnitCellFE16 | |||
|name=[[Kostas]] | |||
|class=Thief | |||
|lv=6 | |||
|#=1 | |||
|hp=32 | |||
|str=12 | |||
|mag=7 | |||
|dex=9 | |||
|spd=10 | |||
|lck=7 | |||
|def=8 | |||
|res=3 | |||
|cha=9 | |||
|mov=5 | |||
|inventory={{Item|16|Iron Axe|image=axe|type=drop}}<br>{{Item|16|Axe Prowess Lv 3}} | |||
|notes=Begins moving after the southern [[Ruffian (class)|Ruffian]]s and Thieves are defeated. | |||
}} | |||
{{ChapUnitCellFE16 | |||
|name=Thief | |||
|class=Ruffian | |||
|lv=4 | |||
|#=3 | |||
|hp=19 | |||
|str=7 | |||
|mag=5 | |||
|dex=6 | |||
|spd=11 | |||
|lck=5 | |||
|def=6 | |||
|res=2 | |||
|cha=7 | |||
|mov=4 | |||
|inventory={{Item|16|Iron Sword|image=sword}}<br>{{Item|16|Sword Prowess Lv 3}} | |||
|notes=The northwestern two begin moving if they or the nearby axe-wielding Ruffian is provoked. | |||
}} | }} | ||
{{ChapUnitCellFE16 | |||
| | |name=Thief | ||
| | |class=Thief | ||
| | |lv=4 | ||
|#=4 | |||
|hp=19 | |||
|# | |str=8 | ||
| | |mag=5 | ||
| | |dex=7 | ||
|spd=11 | |||
| | |lck=5 | ||
| | |def=6 | ||
| | |res=2 | ||
| | |cha=7 | ||
| | |mov=5 | ||
| | |inventory={{Item|16|Iron Axe|image=axe}}<br>{{Item|16|Axe Prowess Lv 2}} | ||
|notes=• The southern two begin moving if either is provoked.<br>• The northern two begin moving after the southern [[Ruffian (class)|Ruffian]]s and Thieves are defeated. | |||
| | |||
| | |||
| | |||
| | |||
}} | }} | ||
{{ChapUnitCellFE16 | |||
|name=Thief | |||
| | |class=Ruffian | ||
| | |lv=4 | ||
| | |#=1 | ||
|hp=19 | |||
|#1 | |str=7 | ||
| | |mag=5 | ||
| | |dex=6 | ||
| | |spd=11 | ||
|lck=5 | |||
| | |def=6 | ||
| | |res=2 | ||
| | |cha=7 | ||
| | |mov=4 | ||
|inventory={{Item|16|Iron Axe|image=axe}}<br>{{Item|16|Axe Prowess Lv 2}} | |||
|notes=Begins moving if a nearby sword-wielding Ruffian is provoked. | |||
|last=y | |||
| | |||
| | |||
| | |||
| | |||
| | |||
}} | }} | ||
{{ChapUnitFtr}} | |||
}} | }} | ||
===NPC data=== | ===NPC data=== | ||
{{ | {{ChapUnitHdr|type=NPC|platform=ns01}} | ||
|platform=ns01 | {{ChapUnitCellFE16 | ||
| | |name=[[Jeralt]] | ||
| | |class=Paladin | ||
| | |version=jeralt | ||
| | |type=other | ||
|# | |lv=3 | ||
| | |#=1 | ||
| | |hp=35 | ||
|str=15 | |||
|mag=8 | |||
|dex=13 | |||
|spd=7 | |||
|lck=10 | |||
|def=14 | |||
|res=10 | |||
|cha=7 | |||
|mov=8 | |||
|inventory={{Item|16|Iron Lance|image=lance}}<br>{{Item|16|Blade Breaker|image=skill self buff}} • {{Item|16|Canto}} • {{Item|16|Keen Intuition}} • {{Item|16|Lance Prowess Lv 1}} | |||
|notes=• Bears the {{Item|16|Crest of Seiros}}.<br>• Immobile until all enemies but [[Kostas]] and his nearby [[Thief|Thieves]] are defeated, at which point he begins moving unprovoked.<br>• If he attacks Kostas and would normally defeat him, his attack will instead leave Kostas at 1 HP. | |||
|last=y | |||
}} | }} | ||
{{ChapUnitFtr}} | |||
===Boss data=== | ===Boss data=== | ||
| Line 251: | Line 387: | ||
==Strategy== | ==Strategy== | ||
{{Strategy}} | {{Strategy}} | ||
Every player unit is capable of wielding every weapon, and Claude's [[Iron Bow]] can be traded multiple times to allow for multiple attacks that the enemy cannot retaliate against; however, units only have a [[combat art]] tied to the weapon they start with, notably [[Dimitri]] is the only unit with [[Tempest Lance]]. Dimitri with Tempest Lance is capable of one-shotting every enemy but [[Kostas]] on every difficulty; [[Byleth]] with [[Wrath Strike]] and [[Edelgard]] with [[Smash (combat art)|Smash]] can one-shot every enemy but Kostas on Normal and Hard. Enemies on Normal and Hard cannot double any units, but the [[sword]]-wielding enemies on Maddening can double a unit wielding the [[Iron Axe]] or [[Iron Lance]]. On every difficulty, without healing, and from full [[HP]], Byleth and Claude can survive four attacks from the sword-wielding Thieves, while Edelgard and Dimtri can survive five; Byleth, Edelgard, and Claude can survive two attacks from the axe-wielding Thieves, while Dimitri can survive three—Edelgard can also survive three attacks from the west-most axe-wielding Thief; and Byleth and Claude can survive one attack from Kostas, while Edelgard and Dimitri can survive two. | |||
Edelgard can safely provoke the western enemies into moving from the forest south of the rock, which she can reach after two full turns of movement; Dimitri can provoke the enemies present only on Maddening from the forest north of him, requiring the same movement. However, provoking both groups at once will require at least one unit to survive at least one additional round of combat, as there are four units but five enemies, and no enemy can be defeated on enemy phase; enemies will prefer to attack the unit with the bow as they cannot retaliate, however, equipping the Iron Bow raises every unit's [[attack speed]] to the point where they will not be doubled. Kostas can be defeated after two attacks using combat arts from any unit other than Claude; moving units east as they fight enemies will allow at least two to reach and defeat Kostats the turn after he moves. | |||
If a route is already planned to be chosen, it may be beneficial to prioritize giving kills to Byleth and that particular lord; additionally, as the two lords whose routes are not picked will leave the party, trading their inventories to Byleth and the chosen lord may also be beneficial. If there is no plan for a route, items and experience can be given to Byleth. | |||
==Trivia== | ==Trivia== | ||
* During this chapter, Byleth and Jeralt are part of the "Mercenaries" faction. Both of them switch to the Church of Seiros after this battle. | * During this chapter, Byleth and Jeralt are part of the "Mercenaries" faction. Both of them switch to the Church of Seiros after this battle. | ||
* It is impossible to see An Inevitable Encounter's beginning log without hacking, as the preparation screen is skipped during this battle, leaving it [[Unused content in Fire Emblem: Three Houses|unseen]]. | |||
==Etymology and other languages== | ==Etymology and other languages== | ||
===An Inevitable Encounter=== | |||
{{Names | {{Names | ||
|eng-name=An Inevitable Encounter | |eng-name=An Inevitable Encounter | ||
| | |jpn-name={{h|必然の出会い|Hitsuzen no deai}} | ||
| | |jpn-mean=Inevitable Encounter | ||
|span-name= | |span-name=Un encuentro inevitable | ||
|span-mean= | |span-mean=An inevitable encounter | ||
|fren-name=Une | |fren-name=Une Rencontre Inévitable | ||
|fren-mean=An | |fren-mean=An inevitable encounter | ||
|ger-name= | |ger-name=Eine unvermeidliche Begegnung | ||
|ger-mean= | |ger-mean=An inevitable Encounter | ||
|ital-name= | |ital-name=Un incontro inevitabile | ||
|ital-mean= | |ital-mean=An inevitable encounter | ||
|kor-name={{h|필연의 만남|Piryeonui mannam}} | |||
|kor-mean=An inevitable encounter | |||
|ch-simp-name={{h|必然的相遇|bìrán de xiāngyù}} | |||
|ch-simp-mean=An inevitable encounter | |||
|ch-trad-name={{h|必然的相遇|bìrán de xiāngyù}} | |||
|ch-trad-mean=An inevitable encounter | |||
}} | }} | ||
===A Skirmish at Dawn=== | |||
{{Names | {{Names | ||
|eng-name=A Skirmish at Dawn | |eng-name=A Skirmish at Dawn | ||
| | |jpn-name={{h|夜明けの遭遇戦|Yoake no sōgū-sen}} | ||
| | |jpn-mean=Battle at Dawn | ||
|span-name= | |span-name=Escaramuza al alba | ||
|span-mean= | |span-mean=Skirmish at dawn | ||
|fren-name=Escarmouche nocturne | |fren-name=Escarmouche nocturne | ||
|fren-mean=Nocturnal skirmish | |fren-mean=Nocturnal skirmish | ||
|ger-name= | |ger-name=Kampf in der Dämmerung | ||
|ger-mean= | |ger-mean=Battle at Dawn | ||
|ital-name= | |ital-name=Scaramuccia all'alba | ||
|ital-mean= | |ital-mean=Skirmish at dawn | ||
|kor-name={{h|새벽녘의 조우전|Saebyeongnyeokkui joujeon}} | |||
|kor-mean=Encounter at dawn | |||
|ch-simp-name={{h|黎明遭遇战|límíng zāoyùzhàn}} | |||
|ch-simp-mean=Dawn Encounter Battle | |||
|ch-trad-name={{h|黎明遭遇戰|límíng zāoyùzhàn}} | |||
|ch-trad-mean=Dawn Encounter Battle | |||
}} | }} | ||
| Line 296: | Line 446: | ||
{{ChapterNav | {{ChapterNav | ||
|nextchapter=Three Houses (Three Houses chapter){{!}}Three Houses | |||
|nextchapter=Three Houses (chapter){{!}}Three Houses | |||
}} | }} | ||
{{Nav16}} | {{Nav16}} | ||
{{DEFAULTSORT:Inevitable Encounter, An}} | |||
[[Category:Chapters of Fire Emblem: Three Houses]] | [[Category:Chapters of Fire Emblem: Three Houses]] | ||
Latest revision as of 12:05, 7 November 2023
| ||||||||
|
| “ | Please forgive our intrusion. We wouldn't bother you were the situation not dire. We're being pursued by a group of bandits. I can only hope that you will be so kind as to lend your support. | ” | — Dimitri |
|---|
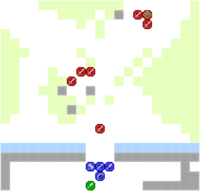
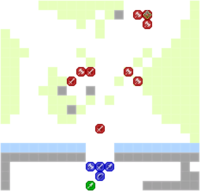
An Inevitable Encounter (Japanese: 必然の出会い Inevitable Encounter) is the prologue of Fire Emblem: Three Houses. It consists solely of a mission, A Skirmish at Dawn (Japanese: 夜明けの遭遇戦 Encounter Battle at Dawn).
Plot
- Main article:
An Inevitable Encounter/Script
In Imperial Year 91, the divine Seiros engages the Liberation King Nemesis in battle and slays him, avenging an incident at the Red Canyon. Approximately one millennium later in 1180, a person named Byleth has a dream of the battle and of a mysterious girl. Afterwards, they are woken up by their father Jeralt. The nobles Edelgard, Dimitri, and Claude appear and explain that bandits have attacked them while they were resting at camp. Jeralt agrees to protect them, and he and Byleth ride out. With Jeralt's guidance, the four rout the bandits and injure their leader Kostas.
As the battle ends, Kostas attacks Edelgard, but Byleth sacrifices themselves to protect her. They have another vision of the girl, who scolds them for being so reckless, introduces herself as Sothis, and grants them the ability to rewind time with Divine Pulse. Byleth redoes the past several seconds and this time counters Kostas's strike and drives him off. The group is then reinforced by the Knights of Seiros led by Alois. Alois recognizes Jeralt and reveals that he was once the respected captain of the Knights of Seiros who vanished approximately 20 years ago; he browbeats Jeralt into returning to Garreg Mach Monastery with him and invites Byleth to accompany them. The three lords thank Byleth for their actions and offer Byleth a position with their respective homelands.
Unused beginning log
In Remire Village, three youths pursued by bandits solicit aid from Jeralt and his mercenaries. Together, you help them fight off their pursuers and defend the village.
Chapter data
Normal/Hard Maddening
| ||||||
|
| |||||
| Victory: Defeat Kostas | Player | Other | Enemy | |||
|---|---|---|---|---|---|---|
| Defeat: Any player unit dies | 4 | 1 | 7 | |||
|
| ||||||
| Map dimensions: 21 columns by 20 rows | ||||||
Character data
| Characters | ||||||||||||||||||||||||||||||||||||||||||||
|---|---|---|---|---|---|---|---|---|---|---|---|---|---|---|---|---|---|---|---|---|---|---|---|---|---|---|---|---|---|---|---|---|---|---|---|---|---|---|---|---|---|---|---|---|
New units
| ||||||||||||||||||||||||||||||||||||||||||||
| ||||||||||||||||||||||||||||||||||||||||||||
Available characters
| ||||||||||||||||||||||||||||||||||||||||||||
| None | ||||||||||||||||||||||||||||||||||||||||||||
Item data
| ||||||
|
Enemy data
Normal Hard Maddening
| ||||||||||||||||||||||||||||||||||||||||||||||||||||||||||||||||||||||||||
| ||||||||||||||||||||||||||||||||||||||||||||||||||||||||||||||||||||||||||
NPC data
| |||||||||||||||||||||||||||||||||||||||||||||
| |||||||||||||||||||||||||||||||||||||||||||||
Boss data
- Main article:
Kostas
Normal Hard Maddening
Strategy
| This section details unofficial strategies that may help with completion of the chapter. This may not work for everybody. |
Every player unit is capable of wielding every weapon, and Claude's Iron Bow can be traded multiple times to allow for multiple attacks that the enemy cannot retaliate against; however, units only have a combat art tied to the weapon they start with, notably Dimitri is the only unit with Tempest Lance. Dimitri with Tempest Lance is capable of one-shotting every enemy but Kostas on every difficulty; Byleth with Wrath Strike and Edelgard with Smash can one-shot every enemy but Kostas on Normal and Hard. Enemies on Normal and Hard cannot double any units, but the sword-wielding enemies on Maddening can double a unit wielding the Iron Axe or Iron Lance. On every difficulty, without healing, and from full HP, Byleth and Claude can survive four attacks from the sword-wielding Thieves, while Edelgard and Dimtri can survive five; Byleth, Edelgard, and Claude can survive two attacks from the axe-wielding Thieves, while Dimitri can survive three—Edelgard can also survive three attacks from the west-most axe-wielding Thief; and Byleth and Claude can survive one attack from Kostas, while Edelgard and Dimitri can survive two.
Edelgard can safely provoke the western enemies into moving from the forest south of the rock, which she can reach after two full turns of movement; Dimitri can provoke the enemies present only on Maddening from the forest north of him, requiring the same movement. However, provoking both groups at once will require at least one unit to survive at least one additional round of combat, as there are four units but five enemies, and no enemy can be defeated on enemy phase; enemies will prefer to attack the unit with the bow as they cannot retaliate, however, equipping the Iron Bow raises every unit's attack speed to the point where they will not be doubled. Kostas can be defeated after two attacks using combat arts from any unit other than Claude; moving units east as they fight enemies will allow at least two to reach and defeat Kostats the turn after he moves.
If a route is already planned to be chosen, it may be beneficial to prioritize giving kills to Byleth and that particular lord; additionally, as the two lords whose routes are not picked will leave the party, trading their inventories to Byleth and the chosen lord may also be beneficial. If there is no plan for a route, items and experience can be given to Byleth.
Trivia
- During this chapter, Byleth and Jeralt are part of the "Mercenaries" faction. Both of them switch to the Church of Seiros after this battle.
- It is impossible to see An Inevitable Encounter's beginning log without hacking, as the preparation screen is skipped during this battle, leaving it unseen.
Etymology and other languages
An Inevitable Encounter
| Names, etymology, and in other regions | ||
|---|---|---|
| Language | Name | Definition, etymology, and notes |
| English |
An Inevitable Encounter |
-- |
| Japanese |
必然の出会い |
Inevitable Encounter |
| Spanish |
Un encuentro inevitable |
An inevitable encounter |
| French |
Une Rencontre Inévitable |
An inevitable encounter |
| German |
Eine unvermeidliche Begegnung |
An inevitable Encounter |
| Italian |
Un incontro inevitabile |
An inevitable encounter |
| Korean |
필연의 만남 |
An inevitable encounter |
| Simplified Chinese |
必然的相遇 |
An inevitable encounter |
| Traditional Chinese |
必然的相遇 |
An inevitable encounter |
A Skirmish at Dawn
| Names, etymology, and in other regions | ||
|---|---|---|
| Language | Name | Definition, etymology, and notes |
| English |
A Skirmish at Dawn |
-- |
| Japanese |
夜明けの遭遇戦 |
Battle at Dawn |
| Spanish |
Escaramuza al alba |
Skirmish at dawn |
| French |
Escarmouche nocturne |
Nocturnal skirmish |
| German |
Kampf in der Dämmerung |
Battle at Dawn |
| Italian |
Scaramuccia all'alba |
Skirmish at dawn |
| Korean |
새벽녘의 조우전 |
Encounter at dawn |
| Simplified Chinese |
黎明遭遇战 |
Dawn Encounter Battle |
| Traditional Chinese |
黎明遭遇戰 |
Dawn Encounter Battle |
Gallery
This section has been marked as a stub. Please help improve the page by adding information.
References
| An Inevitable Encounter | • Three Houses → |
|---|


