| Site News |
|---|
| Warning: This wiki contains spoilers. Read at your own risk! Social media: If you would like, please join our Discord server, and/or follow us on X (Twitter) or Tumblr! |
The Impregnable Fortress (Silver Snow)/Taking Fort Merceus: Difference between revisions
(→Enemy data: Converted to new templates, added unit stats) |
m (→Enemy data) |
||
| Line 449: | Line 449: | ||
|mov=5 | |mov=5 | ||
|inventory={{Item|16|Brave Axe|image=axe|type=drop}} • {{Item|16|Elixir|image=potion}}<br>{{Item|16|Axefaire}} • {{Item|16|Axe Crit +10}} • {{Item|16|Axe Prowess Lv 4}} • {{Item|16|Desperation}} • {{Item|16|Battalion Wrath}} • {{Item|16|Pass}} • {{Item|16|Lancebreaker+|image=lancebreaker}}<br>{{Item|16|Helm Splitter|image=combat art axe}}<br>{{Item|16|Imperial Guard|image=battalion infantry silver}} Lv 4: {{Item|16|Blaze|image=gambit}} | |inventory={{Item|16|Brave Axe|image=axe|type=drop}} • {{Item|16|Elixir|image=potion}}<br>{{Item|16|Axefaire}} • {{Item|16|Axe Crit +10}} • {{Item|16|Axe Prowess Lv 4}} • {{Item|16|Desperation}} • {{Item|16|Battalion Wrath}} • {{Item|16|Pass}} • {{Item|16|Lancebreaker+|image=lancebreaker}}<br>{{Item|16|Helm Splitter|image=combat art axe}}<br>{{Item|16|Imperial Guard|image=battalion infantry silver}} Lv 4: {{Item|16|Blaze|image=gambit}} | ||
|notes= | |notes=Begins moving if the nearby [[Swordmaster]] is provoked. | ||
}} | }} | ||
{{ChapUnitCellFE16 | {{ChapUnitCellFE16 | ||
| Line 946: | Line 946: | ||
|mov=5 | |mov=5 | ||
|inventory={{Item|16|Brave Axe|image=axe|type=drop}} • {{Item|16|Elixir|image=potion}}<br>{{Item|16|Axefaire}} • {{Item|16|Axe Crit +10}} • {{Item|16|Axe Prowess Lv 4}} • {{Item|16|Desperation}} • {{Item|16|Battalion Wrath}} • {{Item|16|Pass}} • {{Item|16|Lancebreaker+|image=lancebreaker}}<br>{{Item|16|Helm Splitter|image=combat art axe}}<br>{{Item|16|Imperial Guard|image=battalion infantry silver}} Lv 4: {{Item|16|Blaze|image=gambit}} | |inventory={{Item|16|Brave Axe|image=axe|type=drop}} • {{Item|16|Elixir|image=potion}}<br>{{Item|16|Axefaire}} • {{Item|16|Axe Crit +10}} • {{Item|16|Axe Prowess Lv 4}} • {{Item|16|Desperation}} • {{Item|16|Battalion Wrath}} • {{Item|16|Pass}} • {{Item|16|Lancebreaker+|image=lancebreaker}}<br>{{Item|16|Helm Splitter|image=combat art axe}}<br>{{Item|16|Imperial Guard|image=battalion infantry silver}} Lv 4: {{Item|16|Blaze|image=gambit}} | ||
|notes= | |notes=Begins moving if the nearby [[Swordmaster]] is provoked. | ||
}} | }} | ||
{{ChapUnitCellFE16 | {{ChapUnitCellFE16 | ||
| Line 1,460: | Line 1,460: | ||
|mov=5 | |mov=5 | ||
|inventory={{Item|16|Brave Axe|image=axe|type=drop}} • {{Item|16|Elixir|image=potion}}<br>{{Item|16|Axefaire}} • {{Item|16|Axe Crit +10}} • {{Item|16|Axe Prowess Lv 4}} • {{Item|16|Desperation}} • {{Item|16|Battalion Wrath}} • {{Item|16|Pass}} • {{Item|16|Lancebreaker+|image=lancebreaker}}<br>{{Item|16|Helm Splitter|image=combat art axe}}<br>{{Item|16|Imperial Guard|image=battalion infantry silver}} Lv 4: {{Item|16|Blaze|image=gambit}} | |inventory={{Item|16|Brave Axe|image=axe|type=drop}} • {{Item|16|Elixir|image=potion}}<br>{{Item|16|Axefaire}} • {{Item|16|Axe Crit +10}} • {{Item|16|Axe Prowess Lv 4}} • {{Item|16|Desperation}} • {{Item|16|Battalion Wrath}} • {{Item|16|Pass}} • {{Item|16|Lancebreaker+|image=lancebreaker}}<br>{{Item|16|Helm Splitter|image=combat art axe}}<br>{{Item|16|Imperial Guard|image=battalion infantry silver}} Lv 4: {{Item|16|Blaze|image=gambit}} | ||
|notes= | |notes=Begins moving if the nearby [[Swordmaster]] is provoked. | ||
}} | }} | ||
{{ChapUnitCellFE16 | {{ChapUnitCellFE16 | ||
Revision as of 16:41, 30 March 2021
| ||||
|

Taking Fort Merceus (Japanese: メリセウス攻防戦 Meriseus battle) is the main battle map of the seventeenth chapter on the Silver Snow route in Fire Emblem: Three Houses. In this map, Byleth and the Resistance Army lead an sneak attack against Fort Merceus.
Beginning log
Fort Merceus, said to be impregnable, lies between you and Enbarr, the Imperial Capital. Seizing the sturdy fortress will require a carefully devised strategy.
Map data
Normal Hard/Maddening
| ||||||
|
| |||||
| Victory: Defeat the Death Knight | Player | Enemy | ||||
|---|---|---|---|---|---|---|
| Defeat: Byleth dies*, the player's army is routed*, or the Death Knight escapes | 10 | 30+∞ | ||||
| ||||||


Character data
| Characters | |
|---|---|
New units
| |
| |
Available characters
| |
                                
|
Item data
| |||||||||||||||||||||
|
Enemy data
Normal Hard Maddening
| |||||||||||||||||||||||||||||||||||||||||||||||||||||||||||||||||||||||||||||||||||||||||||||||||||||||||||||||||||||||||||||||||||||||||||||||||||||||||||||||||||||||||||||||||||||||||||||||||||||||||||||||||||||||||||||||||||||||||||||||||||||||||||||||||||||||||||||||||||||||||||||||||||||||||||||||||||||||||||||||||||||||||||||||||||||||||||||||||||||||||||||||||||||||||||||||||||||||||||||||||||||||||||||||||||||||||||||||||||||||||||||||||||||||||||||||||||||||||||||||||||||||||||||||||||||||||||||||||||||||||||||||||||||||||||||||||||||||||||||||||||||||
| |||||||||||||||||||||||||||||||||||||||||||||||||||||||||||||||||||||||||||||||||||||||||||||||||||||||||||||||||||||||||||||||||||||||||||||||||||||||||||||||||||||||||||||||||||||||||||||||||||||||||||||||||||||||||||||||||||||||||||||||||||||||||||||||||||||||||||||||||||||||||||||||||||||||||||||||||||||||||||||||||||||||||||||||||||||||||||||||||||||||||||||||||||||||||||||||||||||||||||||||||||||||||||||||||||||||||||||||||||||||||||||||||||||||||||||||||||||||||||||||||||||||||||||||||||||||||||||||||||||||||||||||||||||||||||||||||||||||||||||||||||||||
| |||||||||||||||||||||||||||||||||||||||||||||||||||||||||||||||||||||||||||||||||||||||||||||||||||||||||||||||||||||||||||||||||||||||||||||||||||||||||||||||||||||||||||||||||||||||||||||||||||||||||||||||||||||||||||||||||||||||||||||||||||||||||||||||||||||||||||||||||||||||||||||||||||||||||||||||||||||||||||||||||||||||||||||||||||||||||||||||||||||||||||||||||||||||||||||||||||||||||||||||||||||||||||||||||||||||||||||||||||||||||||||||||||||||||||||||||||||||||||||||||||||||||||||||||||||||||||||||||||||||||||||||||||||||||||||||||||||||||||||||||||||||
| |||||||||||||||||||||||||||||||||||||||||||||||||||||||||||||||||||||||||||||||||||||||||||||||||||||||||||||||||||||||||||||||||||||||||||||||||||||||||||||||||||||||||||||||||||||||||||||||||||||||||||||||||||||||||||||||||||||||||||||||||||||||||||||||||||||||||||||||||||||||||||||||||||||||||||||||||||||||||||||||||||||||||||||||||||||||||||||||||||||||||||||||||||||||||||||||||||||||||||||||||||||||||||||||||||||||||||||||||||||||||||||||||||||||||||||||||||||||||||||||||||||||||||||||||||||||||||||||||||||||||||||||||||||||||||||||||||||||||||||||||||||||
Reinforcements
- Each turn, a random combination of the following will appear:
- 1 Paladin from the northwest corner of the map
- 1 Armored Knight from the northern border of the map
- 1 Dark Mage from the southwest corner of the map
- 1 Fortress Knight from the southern border of the map
- Note: Reinforcements are halted if a player unit reaches the spaces where they come from.
Boss data
- Main article:
Death Knight
Normal Hard Maddening
|
|
| |||||||||||||||||||||||||||||||||||||||||||||||||||||||||||||||||||||||||||||||||||

Strategy
| This section details unofficial strategies that may help with completion of the chapter. This may not work for everybody. |
This section has been marked as a stub. Please help improve the page by adding information.
Etymology and other languages
| Names, etymology, and in other regions | ||
|---|---|---|
| Language | Name | Definition, etymology, and notes |
| English |
Taking Fort Merceus |
-- |
| Spanish |
La toma de Fuerte Merceus |
The taking of Fort Merceus |
| French |
L'inexpugnable fort Merceus |
The impregnable fort Merceus |
| German |
Eroberung von Merceus |
Conquest of Merceus |
| Italian |
La presa del forte Merceus |
The taking of fort Merceus |
| Korean |
메리세우스 공방전 |
Battle for Merceus |
| Simplified Chinese |
梅利赛乌斯攻防战 |
Merceus siege battle |
| Traditional Chinese |
梅利賽烏斯攻防戰 |
Merceus siege battle |
Gallery
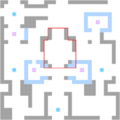
Entering the area outlined in red will trigger the Death Knight's movement.

| ← The Great Bridge Coup • | Taking Fort Merceus | • The Enbarr Infiltration → |
|---|