| Site News |
|---|
| Warning: This wiki contains spoilers. Read at your own risk! Social media: If you would like, please join our Discord server, and/or follow us on Twitter (X) or Tumblr! |
The Golden Deer's Plea/Saving Derdriu: Difference between revisions
m (→Strategy) |
|||
| Line 781: | Line 781: | ||
==Strategy== | ==Strategy== | ||
{{strategy}} | {{strategy}} | ||
If you'd like to collect the treasure, send a good tank to bait the forces carrying droppable weapons to the east such as Alert Stance+ Ingrid. | If you'd like to collect the treasure, send a good tank to bait the forces carrying droppable weapons to the east such as Alert Stance+ Ingrid. It's not really necessary, but can't hurt. | ||
The mission is fairly | The mission is fairly straightforward—make your way north, clearing the Imperial troops there, and toss the occasional Physic staff use over to Hilda or Judith as required (you will get better rewards if they both survive). Consider locking the closest gate by moving a unit on top of the blue square to stop at least one of the reinforcements. Once you step into the central plaza, Lord Arundel will start charging eastward. If you can clear your way toward Hilda, about 2 turns of Arundel's movement should set him up to be intercepted by your troops and taken down for the safe, thorough approach. If you're in a hurry, you can do usual Stride / Warp / Dance shenanigans to get sufficiently deadly fliers on Arundel faster if you'd rather charge his original location. | ||
If the player just completely ignores the situation and stays fortified (Maddening mode assumed), Judith will probably bite it on turn 3 or 4. | If the player just completely ignores the situation and stays fortified (Maddening mode assumed), Judith will probably bite it on turn 3 or 4. Hilda will probably hold out until turn 6-8 or so. Eventually the Alliance Priest will run out of Physics, and if Hilda survives to turn 7 or so, her Battalion will break and run, which will get her killed. If the player continues utterly ignoring the map, Claude will probably die around turn 12 or 13. This should be more than enough time to save the day even if you play very cautiously. | ||
==Trivia== | ==Trivia== | ||
Revision as of 15:37, 17 January 2021
| This page has been marked as a stub. Please help improve the page by adding information. |
| ||||
|

Saving Derdriu (Japanese: デアドラ救援戦 Diadora relief) is the main battle map of the nineteenth chapter on the Azure Moon route in Fire Emblem: Three Houses. In this map, Dimitri marches to Derdriu at the request of Claude to aid him against Adrestia.
Beginning log
Shortly after reclaiming the Kingdom capital, a request for aid arrives from Claude. To save the Alliance from ruin, you head to Derdriu, the Aquatic Capital.
Chapter data
Normal Hard Maddening
| ||||||
|
| |||||
| Victory: Defeat Lord Arundel | Player | Other | Enemy | |||
|---|---|---|---|---|---|---|
| Defeat: Byleth or Dimitri dies*, the player's army is routed*, or Claude dies | 11 | 5 | 30+∞ | |||
| ||||||


Character data
| Characters | |
|---|---|
New units
| |
| |
Available characters
| |
                                   
|
Item data
| ||||||||||||||||||||||||||||||
|
- Note: If Hilda is recruited, Judith surviving the chapter is the only requirement for obtaining the Giant Shell and Goddess Icon.
Enemy data
Normal Hard Maddening
| |||||||||||||||||||||||||||||||||||||||||||||||||||||||||||||||||||||||||||||||||||||||||||||||||||||||||||||||||||||||||||||||||||||
| |||||||||||||||||||||||||||||||||||||||||||||||||||||||||||||||||||||||||||||||||||||||||||||||||||||||||||||||||||||||||||||||||||||
| |||||||||||||||||||||||||||||||||||||||||||||||||||||||||||||||||||||||||||||||||||||||||||||||||||||||||||||||||||||||||||||||||||||
|
Reinforcements
- On Maddening, all reinforcements can act the turn they arrive.
- Every third turn, starting turn 1; halted when the respective gate is seized
- Every third turn, starting turn 1 (Hard and Maddening)
- 1 Paladin from the southeast border.
- 1 Paladin with Empire Cavalry from the southeastern border. (Maddening only)
NPC data
Normal/Hard Maddening
Boss data
- Main article:
Lord Arundel
Normal Hard Maddening
|
|
| |||||||||||||||||||||||||||||||||||||||||||||||||||||||||||||||||||||||||||||||||||

Strategy
| This section details unofficial strategies that may help with completion of the chapter. This may not work for everybody. |
If you'd like to collect the treasure, send a good tank to bait the forces carrying droppable weapons to the east such as Alert Stance+ Ingrid. It's not really necessary, but can't hurt.
The mission is fairly straightforward—make your way north, clearing the Imperial troops there, and toss the occasional Physic staff use over to Hilda or Judith as required (you will get better rewards if they both survive). Consider locking the closest gate by moving a unit on top of the blue square to stop at least one of the reinforcements. Once you step into the central plaza, Lord Arundel will start charging eastward. If you can clear your way toward Hilda, about 2 turns of Arundel's movement should set him up to be intercepted by your troops and taken down for the safe, thorough approach. If you're in a hurry, you can do usual Stride / Warp / Dance shenanigans to get sufficiently deadly fliers on Arundel faster if you'd rather charge his original location.
If the player just completely ignores the situation and stays fortified (Maddening mode assumed), Judith will probably bite it on turn 3 or 4. Hilda will probably hold out until turn 6-8 or so. Eventually the Alliance Priest will run out of Physics, and if Hilda survives to turn 7 or so, her Battalion will break and run, which will get her killed. If the player continues utterly ignoring the map, Claude will probably die around turn 12 or 13. This should be more than enough time to save the day even if you play very cautiously.
Trivia
- If Hilda is recruited, she is replaced in this chapter by a female War Master, a class that is exclusively male, using the female Myrmidon model and class sprite.
Etymology and other languages
| Names, etymology, and in other regions | ||
|---|---|---|
| Language | Name | Definition, etymology, and notes |
| English |
Saving Derdriu |
-- |
| Spanish |
Al auxilio de Derdriu |
To the aid of Derdriu |
| French |
Derdriu en danger |
Derdriu in danger |
| German |
Die Rettung Derdrius |
The Salvation of Derdriu |
| Italian |
In soccorso di Derdriu |
To the aid of Derdriu |
| Korean |
디아도라 구원전 |
Saving diadora |
| Simplified Chinese |
迪亚朵拉救援战 |
Battle to save diadora |
| Traditional Chinese |
迪亞朵拉救援戰 |
Battle to save diadora |
Gallery
This section has been marked as a stub. Please help improve the page by adding information.
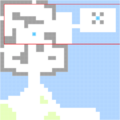
Entering the red area triggers Lord Arundel's movement.

References
| ← Reclaiming the Capital • | Saving Derdriu | • Taking Fort Merceus → |
|---|
| Fire Emblem: Three Houses | |||||||||||||||||||||||||||||||||||||||||||||||||||||||||||||||||||||
|---|---|---|---|---|---|---|---|---|---|---|---|---|---|---|---|---|---|---|---|---|---|---|---|---|---|---|---|---|---|---|---|---|---|---|---|---|---|---|---|---|---|---|---|---|---|---|---|---|---|---|---|---|---|---|---|---|---|---|---|---|---|---|---|---|---|---|---|---|---|
| |||||||||||||||||||||||||||||||||||||||||||||||||||||||||||||||||||||