| Site News |
|---|
| Warning: This wiki contains spoilers. Read at your own risk! Social media: If you would like, please join our Discord server, and/or follow us on Twitter (X) or Tumblr! |
Rumored Nuptials: Difference between revisions
mNo edit summary |
Thecornerman (talk | contribs) m (Text replacement - "\|newunits=\d+\n" to "") |
||
| (43 intermediate revisions by 8 users not shown) | |||
| Line 8: | Line 8: | ||
{{quote|The jerk's entire fortune is soaked in blood. Do you want to rebuild your own house using that kind of money? I mean, it's all just rumors, but I think it still might be worth investigating.|[[Dorothea]]}} | {{quote|The jerk's entire fortune is soaked in blood. Do you want to rebuild your own house using that kind of money? I mean, it's all just rumors, but I think it still might be worth investigating.|[[Dorothea]]}} | ||
'''Rumored Nuptials''' (Japanese: {{ | '''Rumored Nuptials''' (Japanese: {{hl|王国貴族結婚余聞|Ōkoku Taka-zoku kekkon yobun}} ''Kingdom Noble Marriage'') is a [[paralogue]] chapter in {{FE16}}. It is available from [[Field of the Eagle and Lion|Chapter 7]] to [[Throne of Knowledge|Chapter 11]]. In order to attempt this paralogue, the player must have recruited [[Dorothea]] or [[Ingrid]] and neither one must have fallen in battle previously. In this chapter, Dorothea intervenes to prevent Ingrid from being married off to an unscrupulous noble. | ||
==Plot== | ==Plot== | ||
| Line 23: | Line 23: | ||
|tab1=Normal | |tab1=Normal | ||
|tab2=Hard | |tab2=Hard | ||
|tab3=Maddening | |||
|content1={{ChapData | |content1={{ChapData | ||
|victory=Rout the enemy or have [[Ingrid]] reach the target destination | |victory=Rout the enemy or have [[Ingrid]] reach the target destination | ||
|defeat=[[Byleth]] or [[Edelgard]]{{ | |defeat=[[Byleth]] or [[Edelgard]] {{Black Eagles}}/[[Dimitri]] {{Blue Lions}}/[[Claude]] {{Golden Deer}} dies{{h|*|Classic mode}}, or [[Dorothea]] or [[Ingrid]] dies | ||
|ally= | |ally=3–9 | ||
|enemy=19{{ | |enemy=19{{h|+13|Reinforcements}}{{h|+∞|Reinforcements}} | ||
|map= | |map={{Tab | ||
{{Tab | |||
|default=2 | |default=2 | ||
|tab1=Preparations | |tab1=Preparations | ||
|tab2=Battle | |tab2=Battle | ||
|content1=< | |content1=<div>[[File:Cm fe16 rumored nuptials prep.png|200px]]</div> | ||
|content2=< | |content2=<div>[[File:Cm fe16 rumored nuptials.png|200px]]</div> | ||
}} | }} | ||
|col=20 | |||
|row=30 | |||
}} | }} | ||
|content2={{ChapData | |content2={{ChapData | ||
|victory=Rout the enemy or have [[Ingrid]] reach the target destination | |victory=Rout the enemy or have [[Ingrid]] reach the target destination | ||
|defeat=[[Byleth]] or [[Edelgard]]{{ | |defeat=[[Byleth]] or [[Edelgard]] {{Black Eagles}}/[[Dimitri]] {{Blue Lions}}/[[Claude]] {{Golden Deer}} dies{{h|*|Classic mode}}, or [[Dorothea]] or [[Ingrid]] dies | ||
|ally= | |ally=3–9 | ||
|enemy= | |enemy=20{{h|+15|Reinforcements}}{{h|+∞|Reinforcements}} | ||
|map= | |map={{Tab | ||
{{Tab | |default=2 | ||
|tab1=Preparations | |||
|tab2=Battle | |||
|content1=<div>[[File:Cm fe16 rumored nuptials prep.png|200px]]</div> | |||
|content2=<div>[[File:Cm fe16 rumored nuptials h.png|200px]]</div> | |||
}} | |||
|col=20 | |||
|row=30 | |||
}} | |||
|content3={{ChapData | |||
|victory=Rout the enemy or have [[Ingrid]] reach the target destination | |||
|defeat=[[Byleth]] or [[Edelgard]] {{Black Eagles}}/[[Dimitri]] {{Blue Lions}}/[[Claude]] {{Golden Deer}} dies{{h|*|Classic mode}}, or [[Dorothea]] or [[Ingrid]] dies | |||
|ally=3–9 | |||
|enemy=26{{h|+20|Reinforcements}}{{h|+∞|Reinforcements}} | |||
|map={{Tab | |||
|default=2 | |default=2 | ||
|tab1=Preparations | |tab1=Preparations | ||
|tab2=Battle | |tab2=Battle | ||
|content1=< | |content1=<div>[[File:Cm fe16 rumored nuptials prep.png|200px]]</div> | ||
|content2=< | |content2=<div>[[File:Cm fe16 rumored nuptials m.png|200px]]</div> | ||
}} | }} | ||
|col=20 | |||
|row=30 | |||
}} | }} | ||
}} | }} | ||
===Character data=== | ===Character data=== | ||
<choose><option>{{#vardefine:A| | <choose><option>{{#vardefine:A|m}}</option><option>{{#vardefine:A|f}}</option></choose> | ||
{{Tab | {{Tab | ||
|tab1=Black Eagles | |tab1=Black Eagles {{Black Eagles}} | ||
|tab2=Blue Lions | |tab2=Blue Lions {{Blue Lions}} | ||
|tab3=Golden Deer | |tab3=Golden Deer {{Golden Deer}} | ||
|content1={{ChapChars | |content1={{ChapChars | ||
|game#=16 | |game#=16 | ||
| | |forced1=byleth {{#var:A}} | ||
|forced1article=Byleth | |||
| | |forced2=dorothea | ||
|return2= | |forced3=ingrid | ||
|return3= | |return1=edelgard | ||
|return4= | |return2=hubert | ||
|return5= | |return3=ferdinand | ||
|return6= | |return4=linhardt | ||
|return7= | |return5=caspar | ||
|return8= | |return6=bernadetta | ||
|return9= | |return7=petra | ||
|return10= | |return8=felix | ||
|return11= | |return9=ashe | ||
|return12= | |return10=sylvain | ||
|return13= | |return11=mercedes | ||
|return14= | |return12=annette | ||
|return15= | |return13=lorenz | ||
|return16= | |return13article=Lorenz (Three Houses) | ||
| | |return14=raphael | ||
| | |return15=ignatz | ||
| | |return16=lysithea | ||
| | |return17=marianne | ||
|return20= | |return18=leonie | ||
|return21= | |return19=constance 02 | ||
|return22=shamir | |return19article=Constance | ||
| | |return20=balthus | ||
|return21=hapi | |||
|return22=yuri | |||
|return23=anna | |||
|return23article=Anna/Three Houses | |||
|return24=shamir | |||
|return25=flayn | |||
}} | }} | ||
|content2={{ChapChars | |content2={{ChapChars | ||
|game#=16 | |game#=16 | ||
| | |forced1=byleth {{#var:A}} | ||
|forced1article=Byleth | |||
| | |forced2=dorothea | ||
|return2= | |forced3=ingrid | ||
|return3= | |return1=dimitri | ||
|return4= | |return2=dedue | ||
|return5= | |return3=felix | ||
|return6= | |return4=ashe | ||
|return7= | |return5=sylvain | ||
|return8= | |return6=mercedes | ||
|return9= | |return7=annette | ||
|return10= | |return8=ferdinand | ||
|return11= | |return9=linhardt | ||
|return12= | |return10=caspar | ||
|return13= | |return11=bernadetta | ||
|return14= | |return12=petra | ||
|return15= | |return13=lorenz | ||
|return16= | |return13article=Lorenz (Three Houses) | ||
|return14=raphael | |||
|return17= | |return15=ignatz | ||
|return18= | |return16=lysithea | ||
|return19= | |return17=marianne | ||
|return20= | |return18=hilda | ||
|return21= | |return19=leonie | ||
|return22= | |return20=constance 02 | ||
|return23=catherine | |return20article=Constance | ||
| | |return21=balthus | ||
| | |return22=hapi | ||
| | |return23=yuri | ||
|return24=anna | |||
|return24article=Anna/Three Houses | |||
|return25=catherine | |||
|return26=shamir | |||
|return27=cyril | |||
|return28=flayn | |||
}} | }} | ||
|content3={{ChapChars | |content3={{ChapChars | ||
|game#=16 | |game#=16 | ||
| | |forced1=byleth {{#var:A}} | ||
|forced1article=Byleth | |||
| | |forced2=dorothea | ||
| | |forced3=ingrid | ||
| | |return1=claude | ||
| | |return2=lorenz | ||
|return4= | |return2article=Lorenz (Three Houses) | ||
|return5= | |return3=raphael | ||
|return6= | |return4=ignatz | ||
|return7= | |return5=lysithea | ||
|return8= | |return6=marianne | ||
|return9= | |return7=hilda | ||
|return10= | |return8=leonie | ||
|return11= | |return9=ferdinand | ||
|return12= | |return10=linhardt | ||
|return13= | |return11=caspar | ||
|return14= | |return12=bernadetta | ||
|return15= | |return13=petra | ||
|return16= | |return14=felix | ||
|return17= | |return15=ashe | ||
|return18= | |return16=sylvain | ||
|return19= | |return17=mercedes | ||
|return20= | |return18=annette | ||
|return21= | |return19=constance 02 | ||
|return22=catherine | |return19article=Constance | ||
| | |return20=balthus | ||
| | |return21=hapi | ||
| | |return22=yuri | ||
|return23=anna | |||
|return23article=Anna/Three Houses | |||
|return24=catherine | |||
|return25=shamir | |||
|return26=cyril | |||
|return27=flayn | |||
}} | }} | ||
}} | }} | ||
:''Other characters may be available if the paralogue is attempted later.'' | |||
This paralogue only requires Dorothea ''or'' Ingrid to be in Byleth's class. If one of them is not a member of their class, they will be temporarily controllable for this map with the following stats. | This paralogue only requires Dorothea ''or'' Ingrid to be in Byleth's class. If one of them is not a member of their class, they will be temporarily controllable for this map with the following stats. | ||
:''On Maddening, some stats are separated by a '~'. The stats to the left of the ~ are taken during Chapter 7, the earliest possible point where this paralogue may be undertaken; the stats to the right of the ~ are taken from Chapter 8 and later, at which point these units gain a level.'' | |||
{{Tab | {{Tab | ||
|tab1=Dorothea | |tab1=Dorothea, Normal/Hard | ||
|tab2=Ingrid | |tab2=Dorothea, Maddening | ||
|tab3=Ingrid, Normal/Hard | |||
|tab4=Ingrid, Maddening | |||
|content1={{BossStats FE16 | |content1={{BossStats FE16 | ||
|portrait=[[File:Small portrait dorothea fe16.png|128px]] | |portrait=[[File:Small portrait dorothea fe16.png|128px]] | ||
|sprite=mage dorothea playable | |||
|class=Mage | |class=Mage | ||
|lv={{ | |lv={{h|14|Normal}}/{{h|15|Hard}} | ||
|HP=31 | |HP=31 | ||
|str=7 | |str=7 | ||
| Line 170: | Line 212: | ||
|def=5 | |def=5 | ||
|res=17 | |res=17 | ||
|cha=14{{ | |cha=14{{h|+3|Granted by Seiros Magic Corps}} | ||
|move=4 | |move=4 | ||
|inventory={{Item|16|Vulnerary|image=potion}}<br>{{Item|16|Training Sword|image=sword}} | |inventory={{Item|16|Vulnerary|image=potion}}<br>{{Item|16|Training Sword|image=sword}} | ||
|skills={{Item|16|Songstress|link=Songstress (ability)}}<br>{{Item|16|Fire|link=Fire (ability)}} | |skills={{Item|16|Songstress|link=Songstress (ability)}}<br>{{Item|16|Fire|link=Fire (ability)}} | ||
|spells={{Item|16|Thunder|image=black magic}}<br>{{Item|16|Fire|image=black magic}} | |spells={{Item|16|Thunder|image=black magic}}<br>{{Item|16|Fire|image=black magic}} | ||
|battalion={{Item|16|Seiros Magic Corps|image=battalion infantry}} Lv | |battalion={{Item|16|Seiros Magic Corps|image=battalion infantry}} Lv 3<br>{{Item|16|Group Flames|image=gambit}} | ||
|re=C | |re=C | ||
|au=D | |au=D | ||
}} | }} | ||
|content2={{BossStats FE16 | |content2={{BossStats FE16 | ||
|portrait=[[File:Small portrait dorothea fe16.png|128px]] | |||
|sprite=mage dorothea playable | |||
|class=Mage | |||
|lv=21~22 | |||
|HP=37~38 | |||
|str=11 | |||
|mag=25~26 | |||
|dex=19~20 | |||
|spd=18~19 | |||
|luck=16~17 | |||
|def=8 | |||
|res=21~22 | |||
|cha=20~21{{h|+3|Granted by Seiros Magic Corps}} | |||
|move=4 | |||
|inventory={{Item|16|Vulnerary|image=potion}}<br>{{Item|16|Training Sword|image=sword}} | |||
|skills={{Item|16|Songstress|link=Songstress (ability)}}<br>{{Item|16|Fire|link=Fire (ability)}} | |||
|spells={{Item|16|Thunder|image=black magic}}<br>{{Item|16|Fire|image=black magic}} | |||
|battalion={{Item|16|Seiros Magic Corps|image=battalion infantry}} Lv 3<br>{{Item|16|Group Flames|image=gambit}} | |||
|re=C | |||
|au=D | |||
}} | |||
|content3={{BossStats FE16 | |||
|portrait=[[File:Small portrait ingrid fe16.png|128px]] | |portrait=[[File:Small portrait ingrid fe16.png|128px]] | ||
|sprite=pegasus knight ingrid playable | |||
|class=Pegasus Knight | |class=Pegasus Knight | ||
|crest={{Crest|Daphnel|Minor}} | |crest={{Crest|Daphnel|Minor}} | ||
|lv={{ | |lv={{h|14|Normal}}/{{h|15|Hard}} | ||
|HP=37 | |HP=37 | ||
|str=15 | |str=15 | ||
| Line 198: | Line 257: | ||
|def=13 | |def=13 | ||
|res=18 | |res=18 | ||
|cha=16{{ | |cha=16{{h|+5|Granted by Seiros Pegasus Co.}} | ||
|move=6 | |move=6 | ||
|inventory={{Item|16|Steel Lance|image=lance}}<br>{{Item|16|Vulnerary|image=potion}} | |inventory={{Item|16|Steel Lance|image=lance}}<br>{{Item|16|Vulnerary|image=potion}} | ||
|skills={{Item|16|Lady Knight|image=skill gambit}}<br>{{Item|16|Canto}}<br>{{Item|16|Avo +10}} | |skills={{Item|16|Lady Knight|image=skill gambit}}<br>{{Item|16|Canto}}<br>{{Item|16|Avo +10}} | ||
|battalion={{Item|16|Seiros Pegasus Co.|image=battalion flying}} Lv | |battalion={{Item|16|Seiros Pegasus Co.|image=battalion flying}} Lv 3<br>{{Item|16|Assembly|image=gambit}} | ||
| | |la=C | ||
|au=D | |||
|fl=D | |||
}} | |||
|content4={{BossStats FE16 | |||
|portrait=[[File:Small portrait ingrid fe16.png|128px]] | |||
|sprite=pegasus knight ingrid playable | |||
|class=Pegasus Knight | |||
|crest={{Crest|Daphnel|Minor}} | |||
|lv=21~22 | |||
|HP=44~45 | |||
|str=21~22 | |||
|mag=16~17 | |||
|dex=19~20 | |||
|spd=28~29 | |||
|luck=18~19 | |||
|def=17~18 | |||
|res=22~23 | |||
|cha=22~23{{h|+5|Granted by Seiros Pegasus Co.}} | |||
|move=6 | |||
|inventory={{Item|16|Steel Lance|image=lance}}<br>{{Item|16|Vulnerary|image=potion}} | |||
|skills={{Item|16|Lady Knight|image=skill gambit}}<br>{{Item|16|Canto}}<br>{{Item|16|Avo +10}} | |||
|battalion={{Item|16|Seiros Pegasus Co.|image=battalion flying}} Lv 3<br>{{Item|16|Assembly|image=gambit}} | |||
|la=C | |la=C | ||
|au=D | |au=D | ||
|fl=D | |fl=D | ||
| Line 238: | Line 314: | ||
|item7=Galatea Pegasus Co. | |item7=Galatea Pegasus Co. | ||
|item7image=battalion flying silver | |item7image=battalion flying silver | ||
|obtain7=Automatically at the end of the chapter | |obtain7=Automatically at the end of the chapter if Ingrid is a party member | ||
|item8=Goddess Ring | |item8=Goddess Ring | ||
|item8image=ring | |item8image=ring | ||
| Line 249: | Line 325: | ||
===Enemy data=== | ===Enemy data=== | ||
During preparations, only a single enemy is present on the map, a [[Brigand]] to the southeast. Upon leaving preparations and initiating the battle, the other enemies appear. | During preparations, only a single enemy is present on the map, a [[Brigand]] to the southeast. Upon leaving preparations and initiating the battle, the other enemies appear. | ||
:''On Maddening, some stats are separated by a '~'. The stats to the left of the ~ are taken during Chapter 7, the earliest possible point where this chapter may be undertaken; the stats to the right of the ~ are taken from Chapter 8 and later, at which point the enemies gain a level.'' | |||
{{Tab | {{Tab | ||
|width=100% | |width=100% | ||
|tab1=Normal | |tab1=Normal | ||
|tab2=Hard | |tab2=Hard | ||
|content1={{ | |tab3=Maddening | ||
|platform=ns01 | |content1={{ChapUnitHdr|type=Enemy|platform=ns01}} | ||
| | {{ChapUnitCellFE16 | ||
| | |name=Merchant | ||
| | |class=Priest | ||
|# | |lv=13 | ||
| | |#=1 | ||
| | |hp=29 | ||
|str=8 | |||
| | |mag=9 | ||
| | |dex=8 | ||
| | |spd=7 | ||
|# | |lck=8 | ||
| | |def=5 | ||
| | |res=11 | ||
| | |cha=10{{h|+1|Granted by Rogues}} | ||
| | |inventory={{Item|16|Nosferatu|image=white magic}} • {{Item|16|Antitoxin|image=potion|type=drop}} • {{Item|16|Heal|image=white magic}} • {{Item|16|Physic|image=white magic}}<br>{{Item|16|Heal|link=Heal (ability)}} • {{Item|16|White Magic Heal +5}}<br>{{Item|16|Rogues|image=battalion infantry}} Lv 3: {{Item|16|Disturbance|image=gambit}} | ||
| | |notes=Stands on a [[Terrain/Nintendo Switch games#Fire Emblem: Three Houses|heal tile +]]. | ||
| | }} | ||
| | {{ChapUnitCellFE16 | ||
| | |name=Rogue | ||
| | |class=Brigand | ||
| | |lv=13 | ||
| | |#=3 | ||
| | |hp=33 | ||
| | |str=14 | ||
| | |mag=6 | ||
| | |dex=7 | ||
| | |spd=10 | ||
|lck=8 | |||
|def=7 | |||
|res=2 | |||
|cha=6 | |||
|mov=5 | |||
| | |inventory={{Item|16|Iron Axe|image=axe}} | ||
| | |notes=• The northern two both begin moving if either is provoked, or if the southwest reinforcements are triggered.<br>• The southern one begins moving if the nearby Brigand is provoked. | ||
}} | |||
| | {{ChapUnitCellFE16 | ||
| | |name=Rogue | ||
| | |class=Brigand | ||
|#6= | |lv=13 | ||
| | |#=1 | ||
|hp=33 | |||
|str=14 | |||
| | |mag=6 | ||
| | |dex=7 | ||
| | |spd=10 | ||
|# | |lck=8 | ||
| | |def=7 | ||
| | |res=2 | ||
|cha=6{{h|+1|Granted by Rogues}} | |||
| | |mov=5 | ||
| | |inventory={{Item|16|Venin Axe|image=axe}}<br>{{Item|16|Rogues|image=battalion infantry}} Lv 3: {{Item|16|Disturbance|image=gambit}} | ||
| | |notes=Begins moving if the adjacent Brigand is provoked. | ||
|# | }} | ||
| | {{ChapUnitCellFE16 | ||
| | |name=Rogue | ||
|class=Brigand | |||
| | |lv=13 | ||
| | |#=1 | ||
| | |hp=33 | ||
|# | |str=14 | ||
| | |mag=6 | ||
| | |dex=7 | ||
| | |spd=10 | ||
| | |lck=8 | ||
| | |def=7 | ||
| | |res=2 | ||
|cha=6 | |||
| | |mov=5 | ||
| | |inventory={{Item|16|Steel Axe|image=axe}} | ||
|notes=Begins moving if the adjacent Brigand is provoked. | |||
}} | |||
{{ChapUnitCellFE16 | |||
|name=Rogue | |||
| | |class=Brigand | ||
| | |lv=13 | ||
| | |#=1 | ||
| | |hp=33 | ||
| | |str=14 | ||
| | |mag=6 | ||
| | |dex=7 | ||
| | |spd=10 | ||
|lck=8 | |||
| | |def=7 | ||
| | |res=2 | ||
| | |cha=6{{h|+1|Granted by Rogues}} | ||
|# | |mov=5 | ||
| | |inventory={{Item|16|Iron Axe|image=axe}}<br>{{Item|16|Rogues|image=battalion infantry}} Lv 3: {{Item|16|Disturbance|image=gambit}} | ||
|notes=• Only one is present during preparations.<br>• The northern one begins moving if the nearby Brigand is provoked. | |||
| | }} | ||
| | {{ChapUnitCellFE16 | ||
| | |name=Rogue | ||
|# | |class=Brigand | ||
| | |lv=13 | ||
| | |#=1 | ||
| | |hp=32 | ||
| | |str=12 | ||
| | |mag=6 | ||
| | |dex=7 | ||
| | |spd=9 | ||
| | |lck=8 | ||
| | |def=7 | ||
| | |res=4 | ||
| | |cha=6{{h|+1|Granted by Thieves}} | ||
| | |mov=5 | ||
| | |inventory={{Item|16|Venin Axe|image=axe}} • {{Item|16|Prayer Ring|image=ring|type=drop}}<br>{{Item|16|Thieves|image=battalion infantry}} Lv 3: {{Item|16|Disturbance|image=gambit}} | ||
| | |notes=• Starts on a [[Terrain/Nintendo Switch games#Fire Emblem: Three Houses|heal tile +]].<br>• Begins moving if the northeast reinforcements are triggered. | ||
| | }} | ||
| | {{ChapUnitCellFE16 | ||
|name=Rogue | |||
| | |class=Brigand | ||
| | |lv=13 | ||
| | |#=1 | ||
|# | |hp=32 | ||
| | |str=12 | ||
| | |mag=6 | ||
| | |dex=7 | ||
| | |spd=9 | ||
| | |lck=8 | ||
| | |def=7 | ||
| | |res=4 | ||
| | |cha=6{{h|+1|Granted by Thieves}} | ||
|mov=5 | |||
| | |inventory={{Item|16|Devil Axe|image=axe|type=drop}}<br>{{Item|16|Thieves|image=battalion infantry}} Lv 3: {{Item|16|Disturbance|image=gambit}} | ||
|notes=• Starts on a [[Terrain/Nintendo Switch games#Fire Emblem: Three Houses|heal tile +]].<br>• Begins moving if an adjacent [[Thief]] is provoked, or if [[Ingrid]] nears the southeast corner of the map. | |||
}} | |||
{{ChapUnitCellFE16 | |||
|name=Rogue | |||
| | |class=Thief | ||
| | |lv=13 | ||
| | |#=5 | ||
|# | |hp=30 | ||
| | |str=11 | ||
| | |mag=6 | ||
| | |dex=13 | ||
| | |spd=14 | ||
| | |lck=8 | ||
| | |def=7 | ||
| | |res=2 | ||
|cha=6 | |||
| | |mov=5 | ||
| | |inventory={{Item|16|Iron Sword|image=sword}}<br>{{Item|16|Steal}} • {{Item|16|Locktouch}} | ||
| | |notes=• The far northern two both begin moving if either is provoked, or if the southwest reinforcements are triggered.<br>• The southern two both begin moving if either of them or the adjacent [[Brigand]] is provoked, or if [[Ingrid]] nears the southern corner of the map. | ||
|# | }} | ||
| | {{ChapUnitCellFE16 | ||
| | |name=Rogue | ||
| | |class=Thief | ||
| | |lv=13 | ||
|#=1 | |||
|hp=30 | |||
|str=11 | |||
|mag=6 | |||
|dex=13 | |||
|spd=14 | |||
|lck=8 | |||
|def=7 | |||
|res=2 | |||
|cha=6{{h|+1|Granted by Rogues}} | |||
|mov=5 | |||
|inventory={{Item|16|Venin Edge|image=sword}}<br>{{Item|16|Steal}} • {{Item|16|Locktouch}}<br>{{Item|16|Rogues|image=battalion Infantry}} Lv 3: {{Item|16|Disturbance|image=gambit}} | |||
}} | |||
{{ChapUnitCellFE16 | |||
|name=Rogue | |||
|class=Archer | |||
|lv=13 | |||
|#=1 | |||
|hp=28 | |||
|str=11 | |||
|mag=6 | |||
|dex=10 | |||
|spd=10 | |||
|lck=10 | |||
|def=6 | |||
|res=2 | |||
|cha=6{{h|+1|Granted by Rogues}} | |||
|mov=5 | |||
|inventory={{Item|16|Venin Bow|image=bow}}<br>{{Item|16|Bowrange +1}}<br>{{Item|16|Rogues|image=battalion infantry}} Lv 3: {{Item|16|Disturbance|image=gambit}} | |||
}} | |||
{{ChapUnitCellFE16 | |||
|name=Rogue | |||
|class=Archer | |||
|lv=13 | |||
|#=1 | |||
|hp=28 | |||
|str=11 | |||
|mag=6 | |||
|dex=10 | |||
|spd=10 | |||
|lck=10 | |||
|def=6 | |||
|res=2 | |||
|cha=6 | |||
|mov=5 | |||
|inventory={{Item|16|Iron Bow|image=bow}}<br>{{Item|16|Bowrange +1}} | |||
|notes=Begins moving if the nearby Archer is provoked. | |||
}} | |||
{{ChapUnitCellFE16 | |||
|name=Rogue | |||
|class=Archer | |||
|lv=13 | |||
|#=1 | |||
|hp=28 | |||
|str=11 | |||
|mag=6 | |||
|dex=10 | |||
|spd=10 | |||
|lck=10 | |||
|def=6 | |||
|res=2 | |||
|cha=6{{h|+1|Granted by Rogues}} | |||
|mov=5 | |||
|inventory={{Item|16|Iron Bow|image=bow}} • {{Item|16|Antitoxin|image=potion}}<br>{{Item|16|Bowrange +1}}<br>{{Item|16|Rogues|image=battalion infantry}} Lv 3: {{Item|16|Disturbance|image=gambit}} | |||
|notes=Begins moving if the nearby Archer is provoked. | |||
|last=y | |||
}} | |||
{{ChapUnitReinf|type=Enemy|platform=ns01}} | |||
{{ChapUnitCellFE16 | |||
|name=Rogue | |||
|class=Thief | |||
|lv=13 | |||
|#=∞ | |||
|hp=30 | |||
|str=11 | |||
|mag=6 | |||
|dex=13 | |||
|spd=14 | |||
|lck=8 | |||
|def=7 | |||
|res=2 | |||
|cha=6 | |||
|mov=5 | |||
|inventory={{Item|16|Iron Sword|image=sword}}<br>{{Item|16|Steal}} • {{Item|16|Locktouch}} | |||
}} | |||
{{ChapUnitCellFE16 | |||
|name=Rogue | |||
|class=Brigand | |||
|lv=13 | |||
|#=3 | |||
|hp=33 | |||
|str=14 | |||
|mag=6 | |||
|dex=7 | |||
|spd=10 | |||
|lck=8 | |||
|def=7 | |||
|res=2 | |||
|cha=6{{h|+1|Granted by Rogues}} | |||
|mov=5 | |||
|inventory={{Item|16|Iron Axe|image=axe}}<br>{{Item|16|Rogues|image=battalion infantry}} Lv 3: {{Item|16|Disturbance|image=gambit}} | |||
}} | |||
{{ChapUnitCellFE16 | |||
|name=Rogue | |||
|class=Brigand | |||
|lv=13 | |||
|#=3 | |||
|hp=33 | |||
|str=14 | |||
|mag=6 | |||
|dex=7 | |||
|spd=10 | |||
|lck=8 | |||
|def=7 | |||
|res=2 | |||
|cha=6 | |||
|mov=5 | |||
|inventory={{Item|16|Iron Axe|image=axe}} | |||
}} | |||
{{ChapUnitCellFE16 | |||
|name=Rogue | |||
|class=Archer | |||
|lv=13 | |||
|#=1 | |||
|hp=28 | |||
|str=11 | |||
|mag=6 | |||
|dex=10 | |||
|spd=10 | |||
|lck=10 | |||
|def=6 | |||
|res=2 | |||
|cha=6 | |||
|mov=5 | |||
|inventory={{Item|16|Iron Bow|image=bow}}<br>{{Item|16|Bowrange +1}} | |||
}} | |||
{{ChapUnitCellFE16 | |||
|name=Rogue | |||
|class=Archer | |||
|lv=13 | |||
|#=1 | |||
|hp=28 | |||
|str=11 | |||
|mag=6 | |||
|dex=10 | |||
|spd=10 | |||
|lck=10 | |||
|def=6 | |||
|res=2 | |||
|cha=6{{h|+1|Granted by Rogues}} | |||
|mov=5 | |||
|inventory={{Item|16|Iron Bow|image=bow}}<br>{{Item|16|Bowrange +1}}<br>{{Item|16|Rogues|image=battalion infantry}} Lv 3: {{Item|16|Disturbance|image=gambit}} | |||
}} | |||
{{ChapUnitCellFE16 | |||
|name=Rogue | |||
|class=Brigand | |||
|lv=13 | |||
|#=1 | |||
|hp=33 | |||
|str=14 | |||
|mag=6 | |||
|dex=7 | |||
|spd=10 | |||
|lck=8 | |||
|def=7 | |||
|res=2 | |||
|cha=6 | |||
|mov=5 | |||
|inventory={{Item|16|Venin Axe|image=axe}} | |||
}} | |||
{{ChapUnitCellFE16 | |||
|name=Rogue | |||
|class=Thief | |||
|lv=13 | |||
|#=4 | |||
|hp=30 | |||
|str=11 | |||
|mag=6 | |||
|dex=13 | |||
|spd=14 | |||
|lck=8 | |||
|def=7 | |||
|res=2 | |||
|cha=6 | |||
|mov=5 | |||
|inventory={{Item|16|Iron Axe|image=axe}}<br>{{Item|16|Steal}} • {{Item|16|Locktouch}} | |||
|last=y | |||
}} | |||
{{ChapUnitFtr}} | |||
|content2={{ChapUnitHdr|type=Enemy|platform=ns01}} | |||
{{ChapUnitCellFE16 | |||
|name=Merchant | |||
|class=Priest | |||
|lv=14 | |||
|#=1 | |||
|hp=32 | |||
|str=9 | |||
|mag=9 | |||
|dex=8 | |||
|spd=9 | |||
|lck=10 | |||
|def=5 | |||
|res=14 | |||
|cha=13{{h|+1|Granted by Rogues}} | |||
|inventory={{Item|16|Nosferatu|image=white magic}} • {{Item|16|Antitoxin|image=potion|type=drop}} • {{Item|16|Heal|image=white magic}} • {{Item|16|Physic|image=white magic}}<br>{{Item|16|Heal|link=Heal (ability)}} • {{Item|16|White Magic Heal +5}} • {{Item|16|Faith Lv 2}}<br>{{Item|16|Rogues|image=battalion infantry}} Lv 3: {{Item|16|Disturbance|image=Gambit}} | |||
|notes=Stands on a [[Terrain/Nintendo Switch games#Fire Emblem: Three Houses|heal tile +]]. | |||
}} | |||
{{ChapUnitCellFE16 | |||
|name=Rogue | |||
|class=Brigand | |||
|lv=14 | |||
|#=3 | |||
|hp=35 | |||
|str=16 | |||
|mag=6 | |||
|dex=8 | |||
|spd=13 | |||
|lck=8 | |||
|def=10 | |||
|res=2 | |||
|cha=9 | |||
|mov=5 | |||
|inventory={{Item|16|Iron Axe|image=axe}}<br>{{Item|16|Axe Prowess Lv 2}} | |||
|notes=• The northern two both begin moving if either is provoked, or if the southwest reinforcements are triggered.<br>• The southern one begins moving if the nearby Brigand is provoked. | |||
}} | |||
{{ChapUnitCellFE16 | |||
|name=Rogue | |||
|class=Brigand | |||
|lv=14 | |||
|#=2 | |||
|hp=35 | |||
|str=16 | |||
|mag=6 | |||
|dex=8 | |||
|spd=13 | |||
|lck=8 | |||
|def=10 | |||
|res=2 | |||
|cha=9 | |||
|mov=5 | |||
|inventory={{Item|16|Steel Axe|image=axe}}<br>{{Item|16|Axe Prowess Lv 2}} | |||
|notes=Both begin moving if either of them or the adjacent [[Venin Axe]] Brigand is provoked. | |||
}} | |||
{{ChapUnitCellFE16 | |||
|name=Rogue | |||
|class=Brigand | |||
|lv=14 | |||
|#=1 | |||
|hp=35 | |||
|str=16 | |||
|mag=6 | |||
|dex=8 | |||
|spd=13 | |||
|lck=8 | |||
|def=10 | |||
|res=2 | |||
|cha=9{{h|+1|Granted by Rogues}} | |||
|mov=5 | |||
|inventory={{Item|16|Venin Axe|image=axe}}<br>{{Item|16|Axe Prowess Lv 2}}<br>{{Item|16|Rogues|image=battalion infantry}} Lv 3: {{Item|16|Disturbance|image=gambit}} | |||
|notes=Begins moving if an adjacent Brigand is provoked. | |||
}} | |||
{{ChapUnitCellFE16 | |||
|name=Rogue | |||
|class=Brigand | |||
|lv=14 | |||
|#=2 | |||
|hp=35 | |||
|str=16 | |||
|mag=6 | |||
|dex=8 | |||
|spd=13 | |||
|lck=8 | |||
|def=10 | |||
|res=2 | |||
|cha=9{{h|+1|Granted by Rogues}} | |||
|mov=5 | |||
|inventory={{Item|16|Iron Axe|image=axe}}<br>{{Item|16|Axe Prowess Lv 2}}<br>{{Item|16|Rogues|image=battalion infantry}} Lv 3: {{Item|16|Disturbance|image=gambit}} | |||
|notes=• Only one is present during preparations.<br>• The northern one begins moving if the nearby Brigand is provoked. | |||
}} | |||
{{ChapUnitCellFE16 | |||
|name=Rogue | |||
|class=Brigand | |||
|lv=14 | |||
|#=1 | |||
|hp=34 | |||
|str=14 | |||
|mag=7 | |||
|dex=8 | |||
|spd=11 | |||
|lck=8 | |||
|def=10 | |||
|res=4 | |||
|cha=9{{h|+1|Granted by Thieves}} | |||
|mov=5 | |||
|inventory={{Item|16|Venin Axe|image=axe}} • {{Item|16|Prayer Ring|image=ring|type=drop}}<br>{{Item|16|Axe Prowess Lv 2}}<br>{{Item|16|Thieves|image=battalion infantry}} Lv 3: {{Item|16|Disturbance|image=gambit}} | |||
|notes=• Starts on a [[Terrain/Nintendo Switch games#Fire Emblem: Three Houses|heal tile +]].<br>• Begins moving if the northeast reinforcements are triggered. | |||
}} | |||
{{ChapUnitCellFE16 | |||
|name=Rogue | |||
|class=Brigand | |||
|lv=14 | |||
|#=1 | |||
|hp=34 | |||
|str=14 | |||
|mag=7 | |||
|dex=8 | |||
|spd=11 | |||
|lck=8 | |||
|def=10 | |||
|res=4 | |||
|cha=9{{h|+1|Granted by Thieves}} | |||
|mov=5 | |||
|inventory={{Item|16|Devil Axe|image=axe|type=drop}}<br>{{Item|16|Axe Prowess Lv 2}}<br>{{Item|16|Thieves|image=battalion infantry}} Lv 3: {{Item|16|Disturbance|image=gambit}} | |||
|notes=• Starts on a [[Terrain/Nintendo Switch games#Fire Emblem: Three Houses|heal tile +]].<br>• Begins moving if an adjacent [[Thief]] is provoked, or if [[Ingrid]] nears the southeast corner of the map. | |||
}} | |||
{{ChapUnitCellFE16 | |||
|name=Rogue | |||
|class=Thief | |||
|lv=14 | |||
|#=5 | |||
|hp=32 | |||
|str=13 | |||
|mag=6 | |||
|dex=13 | |||
|spd=16 | |||
|lck=8 | |||
|def=10 | |||
|res=3 | |||
|cha=9 | |||
|mov=5 | |||
|inventory={{Item|16|Iron Sword|image=sword}}<br>{{Item|16|Steal}} • {{Item|16|Locktouch}} • {{Item|16|Sword Prowess Lv 2}} | |||
|notes=• The northern two both begin moving if either is provoked, or if the southwest reinforcements are triggered.<br>• The southern two both begin moving if either of them or the adjacent [[Brigand]] is provoked, or if [[Ingrid]] nears the southeast corner of the map. | |||
}} | |||
{{ChapUnitCellFE16 | |||
|name=Rogue | |||
|class=Thief | |||
|lv=14 | |||
|#=1 | |||
|hp=32 | |||
|str=13 | |||
|mag=6 | |||
|dex=13 | |||
|spd=16 | |||
|lck=8 | |||
|def=10 | |||
|res=3 | |||
|cha=9{{h|+1|Granted by Rogues}} | |||
|mov=5 | |||
|inventory={{item|16|Venin Edge|image=sword}}<br>{{item|16|Steal}} • {{Item|16|Locktouch}} • {{Item|16|Sword Prowess Lv 2}}<br>{{Item|16|Rogues|image=battalion infantry}} Lv 3: {{Item|16|Disturbance|image=gambit}} | |||
}} | |||
{{ChapUnitCellFE16 | |||
|name=Rogue | |||
|class=Archer | |||
|lv=14 | |||
|#=1 | |||
|hp=31 | |||
|str=13 | |||
|mag=6 | |||
|dex=11 | |||
|spd=13 | |||
|lck=10 | |||
|def=8 | |||
|res=3 | |||
|cha=9{{h|+1|Granted by Rogues}} | |||
|mov=5 | |||
|inventory={{Item|16|Venin Bow|image=bow}}<br>{{Item|16|Bowrange +1}} • {{Item|16|Bow Prowess Lv 2}}<br>{{Item|16|Rogues|image=battalion infantry}} Lv 3: {{Item|16|Disturbance|image=gambit}} | |||
}} | |||
{{ChapUnitCellFE16 | |||
|name=Rogue | |||
|class=Archer | |||
|lv=14 | |||
|#=1 | |||
|hp=31 | |||
|str=13 | |||
|mag=6 | |||
|dex=11 | |||
|spd=13 | |||
|lck=10 | |||
|def=8 | |||
|res=3 | |||
|cha=9 | |||
|mov=5 | |||
|inventory={{Item|16|Iron Bow|image=bow}}<br>{{Item|16|Bowrange +1}} • {{Item|16|Bow Prowess Lv 2}} | |||
|notes=Begins moving if the nearby Archer is provoked. | |||
}} | |||
{{ChapUnitCellFE16 | |||
|name=Rogue | |||
|class=Archer | |||
|lv=14 | |||
|#=1 | |||
|hp=31 | |||
|str=13 | |||
|mag=6 | |||
|dex=11 | |||
|spd=13 | |||
|lck=10 | |||
|def=8 | |||
|res=3 | |||
|cha=9{{h|+1|Granted by Rogues}} | |||
|mov=5 | |||
|inventory={{Item|16|Iron Bow|image=bow}} • {{Item|16|Antitoxin|image=potion}}<br>{{Item|16|Bowrange +1}} • {{Item|16|Bow Prowess Lv 2}}<br>{{Item|16|Rogues|image=battalion infantry}} Lv 3: {{Item|16|Disturbance|image=gambit}} | |||
|notes=Begins moving if the nearby Archer is provoked. | |||
|last=y | |||
}} | |||
{{ChapUnitReinf|type=Enemy|platform=ns01}} | |||
{{ChapUnitCellFE16 | |||
|name=Rogue | |||
|class=Thief | |||
|lv=14 | |||
|#=∞ | |||
|hp=32 | |||
|str=13 | |||
|mag=6 | |||
|dex=13 | |||
|spd=16 | |||
|lck=8 | |||
|def=10 | |||
|res=3 | |||
|cha=9 | |||
|mov=5 | |||
|inventory={{Item|16|Steel Sword|image=sword}}<br>{{Item|16|Steal}} • {{Item|16|Locktouch}} • {{Item|16|Sword Prowess Lv 2}} | |||
}} | |||
{{ChapUnitCellFE16 | |||
|name=Rogue | |||
|class=Brigand | |||
|lv=14 | |||
|#=3 | |||
|hp=35 | |||
|str=16 | |||
|mag=6 | |||
|dex=8 | |||
|spd=13 | |||
|lck=8 | |||
|def=10 | |||
|res=2 | |||
|cha=9{{h|+1|Granted by Rogues}} | |||
|mov=5 | |||
|inventory={{Item|16|Steel Axe|image=axe}}<br>{{Item|16|Axe Prowess Lv 2}}<br>{{Item|16|Rogues|image=battalion infantry}} Lv 3: {{Item|16|Disturbance|image=gambit}} | |||
}} | |||
{{ChapUnitCellFE16 | |||
|name=Rogue | |||
|class=Brigand | |||
|lv=14 | |||
|#=3 | |||
|hp=35 | |||
|str=16 | |||
|mag=6 | |||
|dex=8 | |||
|spd=13 | |||
|lck=8 | |||
|def=10 | |||
|res=2 | |||
|cha=9 | |||
|mov=5 | |||
|inventory={{Item|16|Steel Axe|image=axe}}<br>{{Item|16|Axe Prowess Lv 2}} | |||
}} | |||
{{ChapUnitCellFE16 | |||
|name=Rogue | |||
|class=Archer | |||
|lv=14 | |||
|#=1 | |||
|hp=31 | |||
|str=13 | |||
|mag=6 | |||
|dex=11 | |||
|spd=13 | |||
|lck=10 | |||
|def=8 | |||
|res=3 | |||
|cha=9 | |||
|mov=5 | |||
|inventory={{Item|16|Steel Bow|image=bow}}<br>{{Item|16|Bowrange +1}} • {{Item|16|Bow Prowess Lv 2}} | |||
}} | |||
{{ChapUnitCellFE16 | |||
|name=Rogue | |||
|class=Archer | |||
|lv=14 | |||
|#=1 | |||
|hp=31 | |||
|str=13 | |||
|mag=6 | |||
|dex=11 | |||
|spd=13 | |||
|lck=10 | |||
|def=8 | |||
|res=3 | |||
|cha=9{{h|+1|Granted by Rogues}} | |||
|mov=5 | |||
|inventory={{Item|16|Steel Bow|image=bow}}<br>{{Item|16|Bowrange +1}} • {{Item|16|Bow Prowess Lv 2}}<br>{{Item|16|Rogues|image=battalion infantry}} Lv 3: {{Item|16|Disturbance|image=gambit}} | |||
}} | |||
{{ChapUnitCellFE16 | |||
|name=Rogue | |||
|class=Brigand | |||
|lv=14 | |||
|#=2 | |||
|hp=35 | |||
|str=16 | |||
|mag=6 | |||
|dex=8 | |||
|spd=13 | |||
|lck=8 | |||
|def=10 | |||
|res=2 | |||
|cha=9 | |||
|mov=5 | |||
|inventory={{Item|16|Iron Axe|image=axe}}<br>{{Item|16|Axe Prowess Lv 2}} | |||
}} | |||
{{ChapUnitCellFE16 | |||
|name=Rogue | |||
|class=Brigand | |||
|lv=14 | |||
|#=1 | |||
|hp=35 | |||
|str=16 | |||
|mag=6 | |||
|dex=8 | |||
|spd=13 | |||
|lck=8 | |||
|def=10 | |||
|res=2 | |||
|cha=9 | |||
|mov=5 | |||
|inventory={{Item|16|Venin Axe|image=axe}}<br>{{Item|16|Axe Prowess Lv 2}} | |||
}} | |||
{{ChapUnitCellFE16 | |||
|name=Rogue | |||
|class=Thief | |||
|lv=14 | |||
|#=4 | |||
|hp=32 | |||
|str=13 | |||
|mag=6 | |||
|dex=13 | |||
|spd=16 | |||
|lck=8 | |||
|def=10 | |||
|res=3 | |||
|cha=9 | |||
|mov=5 | |||
|inventory={{Item|16|Iron Axe|image=axe}}<br>{{Item|16|Steal}} • {{Item|16|Locktouch}} • {{Item|16|Sword Prowess Lv 2}} | |||
|last=y | |||
}} | |||
{{ChapUnitFtr}} | |||
|content3={{ChapUnitHdr|type=Enemy|platform=ns01}} | |||
{{ChapUnitCellFE16 | |||
|name=Merchant | |||
|class=Priest | |||
|lv=20~21 | |||
|#=1 | |||
|hp=37 | |||
|str=13 | |||
|mag=12 | |||
|dex=12 | |||
|spd=13 | |||
|lck=15~16 | |||
|def=9 | |||
|res=18~19 | |||
|cha=18~19{{h|+1|Granted by Rogues}} | |||
|inventory={{Item|16|Nosferatu|image=white magic}} • {{Item|16|Antitoxin|image=potion|type=drop}} • {{Item|16|Heal|image=white magic}} • {{Item|16|Physic|image=white magic}}<br>{{Item|16|Heal|link=Heal (ability)}} • {{Item|16|White Magic Heal +5}} • {{Item|16|Faith Lv 4}} • {{Item|16|Renewal}}<br>{{Item|16|Rogues|image=battalion infantry}} Lv 3: {{Item|16|Disturbance|image=gambit}} | |||
|notes=Stands on a [[Terrain/Nintendo Switch games#Fire Emblem: Three Houses|heal tile +]]. | |||
}} | |||
{{ChapUnitCellFE16 | |||
|name=Rogue | |||
|class=Brigand | |||
|lv=20~21 | |||
|#=3 | |||
|hp=41~42 | |||
|str=22~23 | |||
|mag=9 | |||
|dex=13 | |||
|spd=18~19 | |||
|lck=10 | |||
|def=15 | |||
|res=5 | |||
|cha=14 | |||
|mov=5 | |||
|inventory={{Item|16|Iron Axe|image=axe}}<br>{{Item|16|Axe Prowess Lv 4}} • {{Item|16|Lancebreaker+|image=lancebreaker}} | |||
|notes=• The northern two both begin moving if either of them or the nearby [[Archer]] is provoked.<br>• The southern one begins moving if the nearby Brigand or Archer is provoked. | |||
}} | |||
{{ChapUnitCellFE16 | |||
|name=Rogue | |||
|class=Brigand | |||
|lv=20~21 | |||
|#=2 | |||
|hp=41~42 | |||
|str=22~23 | |||
|mag=9 | |||
|dex=13 | |||
|spd=18~19 | |||
|lck=10 | |||
|def=15 | |||
|res=5 | |||
|cha=14 | |||
|mov=5 | |||
|inventory={{Item|16|Steel Axe|image=axe}}<br>{{Item|16|Axe Prowess Lv 4}} • {{Item|16|Lancebreaker+|image=lancebreaker}} | |||
|notes=Both begin moving if either of them, the adjacent [[Venin Axe]] Brigand, or the nearby [[Warrior]] is provoked. | |||
}} | |||
{{ChapUnitCellFE16 | |||
|name=Rogue | |||
|class=Brigand | |||
|lv=20~21 | |||
|#=1 | |||
|hp=41~42 | |||
|str=22~23 | |||
|mag=9 | |||
|dex=13 | |||
|spd=18~19 | |||
|lck=10 | |||
|def=15 | |||
|res=5 | |||
|cha=14{{h|+1|Granted by Rogues}} | |||
|mov=5 | |||
|inventory={{Item|16|Venin Axe|image=axe}}<br>{{Item|16|Axe Prowess Lv 4}} • {{Item|16|Lancebreaker+|image=lancebreaker}}<br>{{Item|16|Rogues|image=battalion infantry}} Lv 3: {{Item|16|Disturbance|image=gambit}} | |||
|notes=Begins moving if a nearby Brigand or [[Warrior]] is provoked. | |||
}} | |||
{{ChapUnitCellFE16 | |||
|name=Rogue | |||
|class=Brigand | |||
|lv=20~21 | |||
|#=2 | |||
|hp=41~42 | |||
|str=22~23 | |||
|mag=9 | |||
|dex=13 | |||
|spd=18~19 | |||
|lck=10 | |||
|def=15 | |||
|res=5 | |||
|cha=14{{h|+1|Granted by Rogues}} | |||
|mov=5 | |||
|inventory={{Item|16|Iron Axe|image=axe}}<br>{{Item|16|Axe Prowess Lv 4}} • {{Item|16|Lancebreaker+|image=lancebreaker}}<br>{{Item|16|Rogues|image=battalion infantry}} Lv 3: {{Item|16|Disturbance|image=gambit}} | |||
|notes=• Only one is present during preparations.<br>• The northern one begins moving if the nearby Brigand or [[Archer]] is provoked. | |||
}} | |||
{{ChapUnitCellFE16 | |||
|name=Rogue | |||
|class=Brigand | |||
|lv=20~21 | |||
|#=1 | |||
|hp=40~41 | |||
|str=20~21 | |||
|mag=11 | |||
|dex=12 | |||
|spd=16 | |||
|lck=10 | |||
|def=15 | |||
|res=7 | |||
|cha=14{{h|+1|Granted by Thieves}} | |||
|mov=5 | |||
|inventory={{Item|16|Venin Axe|image=axe}} • {{Item|16|Prayer Ring|image=ring|type=drop}}<br>{{Item|16|Axe Prowess Lv 4}} • {{Item|16|Lancebreaker+|image=lancebreaker}}<br>{{Item|16|Thieves|image=battalion infantry}} Lv 3: {{Item|16|Disturbance|image=gambit}} | |||
|notes=• Starts on a [[Terrain/Nintendo Switch games#Fire Emblem: Three Houses|heal tile +]].<br>• Begins moving if the northeast reinforcements are triggered. | |||
}} | |||
{{ChapUnitCellFE16 | |||
|name=Rogue | |||
|class=Brigand | |||
|lv=20~21 | |||
|#=1 | |||
|hp=40~41 | |||
|str=20~21 | |||
|mag=11 | |||
|dex=12 | |||
|spd=16 | |||
|lck=10 | |||
|def=15 | |||
|res=7 | |||
|cha=14{{h|+1|Granted by Thieves}} | |||
|mov=5 | |||
|inventory={{Item|16|Devil Axe|image=axe|type=drop}}<br>{{Item|16|Axe Prowess Lv 4}} • {{Item|16|Lancebreaker+|image=lancebreaker}}<br>{{Item|16|Thieves|image=battalion infantry}} Lv 3: {{Item|16|Disturbance|image=gambit}} | |||
|notes=• Starts on a [[Terrain/Nintendo Switch games#Fire Emblem: Three Houses|heal tile +]].<br>• Begins moving if a nearby [[Thief]] or [[Sniper]] is provoked, or if [[Ingrid]] nears the southeast corner of the map. | |||
}} | |||
{{ChapUnitCellFE16 | |||
|name=Rogue | |||
|class=Thief | |||
|lv=20~21 | |||
|#=5 | |||
|hp=37~38 | |||
|str=18~19 | |||
|mag=9 | |||
|dex=16~17 | |||
|spd=23~24 | |||
|lck=10 | |||
|def=15 | |||
|res=7 | |||
|cha=14 | |||
|mov=5 | |||
|inventory={{Item|16|Iron Sword|image=sword}}<br>{{Item|16|Steal}} • {{Item|16|Locktouch}} • {{Item|16|Sword Prowess Lv 4}} • {{Item|16|Pass}} | |||
|notes=• The northern two both begin moving if either of them or the nearby [[Archer]] is provoked, or if the southwest reinforcements are triggered.<br>• The southern two both begin moving if either of them or the nearby [[Brigand]] or [[Sniper]] is provoked, or if [[Ingrid]] nears the southeast corner of the map. | |||
}} | |||
{{ChapUnitCellFE16 | |||
|name=Rogue | |||
|class=Thief | |||
|lv=20~21 | |||
|#=1 | |||
|hp=37~38 | |||
|str=18~19 | |||
|mag=9 | |||
|dex=16~17 | |||
|spd=23~24 | |||
|lck=10 | |||
|def=15 | |||
|res=7 | |||
|cha=14{{h|+1|Granted by Rogues}} | |||
|mov=5 | |||
|inventory={{Item|16|Venin Edge|image=sword}}<br>{{Item|16|Steal}} • {{Item|16|Locktouch}} • {{Item|16|Sword Prowess Lv 4}} • {{Item|16|Pass}}<br>{{Item|16|Rogues|image=battalion infantry}} Lv 3: {{Item|16|Disturbance|image=gambit}} | |||
}} | |||
{{ChapUnitCellFE16 | |||
|name=Rogue | |||
|class=Archer | |||
|lv=20~21 | |||
|#=1 | |||
|hp=36 | |||
|str=18~19 | |||
|mag=9 | |||
|dex=16~17 | |||
|spd=18~19 | |||
|lck=14 | |||
|def=13 | |||
|res=7 | |||
|cha=14{{h|+1|Granted by Rogues}} | |||
|mov=5 | |||
|inventory={{Item|16|Venin Bow|image=bow}}<br>{{Item|16|Bowrange +1}} • {{Item|16|Bow Prowess Lv 4}} • {{Item|16|Poison Strike}}<br>{{Item|16|Rogues|image=battalion infantry}} Lv 3: {{Item|16|Disturbance|image=gambit}} | |||
}} | |||
{{ChapUnitCellFE16 | |||
|name=Rogue | |||
|class=Archer | |||
|lv=20~21 | |||
|#=1 | |||
|hp=36 | |||
|str=18~19 | |||
|mag=9 | |||
|dex=16~17 | |||
|spd=18~19 | |||
|lck=14 | |||
|def=13 | |||
|res=7 | |||
|cha=14 | |||
|mov=5 | |||
|inventory={{Item|16|Iron Bow|image=bow}}<br>{{Item|16|Bowrange +1}} • {{Item|16|Bow Prowess Lv 4}} • {{Item|16|Poison Strike}} | |||
|notes=Begins moving if a nearby Archer is provoked. | |||
}} | |||
{{ChapUnitCellFE16 | |||
|name=Rogue | |||
|class=Archer | |||
|lv=20~21 | |||
|#=1 | |||
|hp=36 | |||
|str=18~19 | |||
|mag=9 | |||
|dex=16~17 | |||
|spd=18~19 | |||
|lck=14 | |||
|def=13 | |||
|res=7 | |||
|cha=14{{h|+1|Granted by Rogues}} | |||
|mov=5 | |||
|inventory={{Item|16|Iron Bow|image=bow}} • {{Item|16|Antitoxin|image=potion}}<br>{{Item|16|Bowrange +1}} • {{Item|16|Bow Prowess Lv 4}} • {{Item|16|Poison Strike}}<br>{{Item|16|Rogues|image=battalion infantry}} Lv 3: {{Item|16|Disturbance|image=gambit}} | |||
|notes=Begins moving if a nearby Archer is provoked. | |||
}} | |||
{{ChapUnitCellFE16 | |||
|name=Rogue | |||
|class=Warrior | |||
|lv=20~21 | |||
|#=1 | |||
|hp=46~47 | |||
|str=24~25 | |||
|mag=9 | |||
|dex=13 | |||
|spd=19~20 | |||
|lck=11 | |||
|def=17~18 | |||
|res=8 | |||
|cha=14{{h|+1|Granted by Rogues}} | |||
|mov=5 | |||
|inventory={{Item|16|Venin Axe|image=axe}}<br>{{Item|16|Axefaire}} • {{Item|16|Axe Crit +10}} • {{Item|16|Axe Prowess Lv 5}} • {{Item|16|Lancebreaker+|image=lancebreaker}} • {{Item|16|Wrath}}<br>{{Item|16|Rogues|image=battalion infantry}} Lv 3: {{Item|16|Disturbance|image=gambit}} | |||
|notes=Begins moving if a nearby [[Brigand]] is provoked. | |||
}} | |||
{{ChapUnitCellFE16 | |||
|name=Rogue | |||
|class=Archer | |||
|lv=20~21 | |||
|#=4 | |||
|hp=36 | |||
|str=18~19 | |||
|mag=9 | |||
|dex=16~17 | |||
|spd=18~19 | |||
|lck=14 | |||
|def=13 | |||
|res=7 | |||
|cha=14 | |||
|mov=5 | |||
|inventory={{Item|16|Steel Bow|image=bow}}<br>{{Item|16|Bowrange +1}} • {{Item|16|Bow Prowess Lv 4}} • {{Item|16|Poison Strike}} | |||
|notes=• The center-northern one begins moving if a nearby [[Brigand]] is provoked.<br>• The center-southern one begins moving if a nearby Brigand is provoked.<br>• The far northern one begins moving if a nearby [[Thief]] is provoked.<br>• The far southern one begins moving if a nearby Archer is provoked. | |||
}} | |||
{{ChapUnitCellFE16 | |||
|name=Rogue | |||
|class=Sniper | |||
|lv=20~21 | |||
|#=1 | |||
|hp=39~40 | |||
|str=19~20 | |||
|mag=9 | |||
|dex=23~24 | |||
|spd=18~19 | |||
|lck=13 | |||
|def=16~17 | |||
|res=8 | |||
|cha=14{{h|+1|Granted by Rogues}} | |||
|mov=5 | |||
|inventory={{Item|16|Steel Bow|image=bow}}<br>{{Item|16|Bowfaire}} • {{Item|16|Bowrange +1}} • {{Item|16|Bow Prowess Lv 5}} • {{Item|16|Poison Strike}} • {{Item|16|Vantage}}<br>{{Item|16|Rogues|image=battalion infantry}} Lv 3: {{Item|16|Disturbance|image=gambit}} | |||
|notes=Begins moving if a nearby [[Brigand]] or [[Thief]] is provoked. | |||
|last=y | |||
}} | |||
{{ChapUnitReinf|type=Enemy|platform=ns01}} | |||
{{ChapUnitCellFE16 | |||
|name=Rogue | |||
|class=Thief | |||
|lv=20~21 | |||
|#=∞ | |||
|hp=37~38 | |||
|str=18~19 | |||
|mag=9 | |||
|dex=16~17 | |||
|spd=23~24 | |||
|lck=10 | |||
|def=15 | |||
|res=7 | |||
|cha=14 | |||
|mov=5 | |||
|inventory={{Item|16|Steel Sword|image=sword}}<br>{{Item|16|Steal}} • {{Item|16|Locktouch}} • {{Item|16|Sword Prowess Lv 4}} • {{Item|16|Pass}} | |||
}} | |||
{{ChapUnitCellFE16 | |||
|name=Rogue | |||
|class=Warrior | |||
|lv=20~21 | |||
|#=6 | |||
|hp=46~47 | |||
|str=24~25 | |||
|mag=9 | |||
|dex=13 | |||
|spd=19~20 | |||
|lck=11 | |||
|def=17~18 | |||
|res=8 | |||
|cha=14 | |||
|mov=5 | |||
|inventory={{Item|16|Steel Axe|image=axe}}<br>{{Item|16|Axefaire}} • {{Item|16|Axe Crit +10}} • {{Item|16|Axe Prowess Lv 5}} • {{Item|16|Lancebreaker+|image=lancebreaker}} • {{Item|16|Wrath}} | |||
}} | |||
{{ChapUnitCellFE16 | |||
|name=Rogue | |||
|class=Sniper | |||
|lv=20~21 | |||
|#=2 | |||
|hp=39~40 | |||
|str=19~20 | |||
|mag=9 | |||
|dex=23~24 | |||
|spd=18~19 | |||
|lck=13 | |||
|def=16~17 | |||
|res=8 | |||
|cha=14 | |||
|mov=5 | |||
|inventory={{Item|16|Steel Bow|image=bow}}<br>{{Item|16|Bowfaire}} • {{Item|16|Bowrange +1}} • {{Item|16|Bow Prowess Lv 5}} • {{Item|16|Poison Strike}} • {{Item|16|Vantage}} | |||
}} | |||
{{ChapUnitCellFE16 | |||
|name=Rogue | |||
|class=Thief | |||
|lv=20~21 | |||
|#=4 | |||
|hp=37~38 | |||
|str=18~19 | |||
|mag=9 | |||
|dex=16~17 | |||
|spd=23~24 | |||
|lck=10 | |||
|def=15 | |||
|res=7 | |||
|cha=14 | |||
|mov=5 | |||
|inventory={{Item|16|Iron Axe|image=axe}}<br>{{Item|16|Steal}} • {{Item|16|Locktouch}} • {{Item|16|Sword Prowess Lv 4}} • {{Item|16|Pass}} | |||
}} | |||
{{ChapUnitCellFE16 | |||
|name=Rogue | |||
|class=Warrior | |||
|lv=20~21 | |||
|#=4 | |||
|hp=46~47 | |||
|str=24~25 | |||
|mag=9 | |||
|dex=13 | |||
|spd=19~20 | |||
|lck=11 | |||
|def=17~18 | |||
|res=8 | |||
|cha=14{{h|+1|Granted nu Rogues}} | |||
|mov=5 | |||
|inventory={{Item|16|Steel Axe|image=axe}}<br>{{Item|16|Axefaire}} • {{Item|16|Axe Crit +10}} • {{Item|16|Axe Prowess Lv 5}} • {{Item|16|Lancebreaker+|image=lancebreaker}} • {{Item|16|Wrath}}<br>{{Item|16|Rogues|image=battalion infantry}} Lv 3: {{Item|16|Disturbance|image=gambit}} | |||
}} | |||
{{ChapUnitCellFE16 | |||
|name=Rogue | |||
|class=Assassin | |||
|lv=20~21 | |||
|#=1 | |||
|hp=39~40 | |||
|str=19~20 | |||
|mag=9 | |||
|dex=19~20 | |||
|spd=29~30 | |||
|lck=11 | |||
|def=16~17 | |||
|res=8 | |||
|cha=13{{h|+1|Granted by Rogues}} | |||
|mov=6 | |||
|inventory={{Item|16|Iron Sword|image=sword}}<br>{{Item|16|Swordfaire}} • {{Item|16|Locktouch}} • {{Item|16|Stealth}} • {{Item|16|Sword Prowess Lv 5}} • {{Item|16|Pass}} • {{Item|16|Poison|link=Poison (ability)}}<br>{{Item|16|Rogues|image=battalion infantry}} Lv 3: {{Item|16|Disturbance|image=gambit}} | |||
}} | |||
{{ChapUnitCellFE16 | |||
|name=Rogue | |||
|class=Brigand | |||
|lv=20~21 | |||
|#=2 | |||
|hp=41~42 | |||
|str=22~23 | |||
|mag=9 | |||
|dex=13 | |||
|spd=18~19 | |||
|lck=10 | |||
|def=15 | |||
|res=5 | |||
|cha=14 | |||
|mov=5 | |||
|inventory={{Item|16|Iron Axe|image=axe}}<br>{{Item|16|Axe Prowess Lv 4}} • {{Item|16|Lancebreaker+|image=lancebreaker}} | |||
}} | }} | ||
{{ChapUnitCellFE16 | |||
|name=Rogue | |||
|class=Brigand | |||
|lv=20~21 | |||
|#=1 | |||
|hp=41~42 | |||
|str=22~23 | |||
|mag=9 | |||
|dex=13 | |||
|spd=18~19 | |||
|lck=10 | |||
|def=15 | |||
|res=5 | |||
|cha=14 | |||
|mov=5 | |||
|inventory={{Item|16|Venin Axe|image=axe}}<br>{{Item|16|Axe Prowess Lv 4}} • {{Item|16|Lancebreaker+|image=lancebreaker}} | |||
|last=y | |||
| | |||
| | |||
| | |||
|# | |||
| | |||
| | |||
| | |||
| | |||
| | |||
| | |||
| | |||
| | |||
| | |||
| | |||
| | |||
| | |||
}} | }} | ||
{{ChapUnitFtr}} | |||
}} | }} | ||
====Reinforcements==== | ====Reinforcements==== | ||
* For the first three turns of five-turn cycles, repeating indefinitely | *For the first three turns of five-turn cycles, repeating indefinitely until the Merchant is defeated, appearing on enemy phase; on Maddening, these can act the turn they appear | ||
** 1 [[Thief]] with an [[Iron Sword]] to the right of the Merchant | **1 [[Thief]] with an [[Iron Sword]] <small>(Normal)</small>/[[Steel Sword]] <small>(Hard/Maddening)</small> to the right of the Merchant | ||
* Upon Ingrid nearing the western heal tile +, before defeating the | **1 [[Thief]] with a [[Steel Sword]] to the right of the Merchant <small>(Maddening only)</small> | ||
** 2 [[Brigand]]s with [[Iron Axe]]s | *Upon Ingrid nearing the western heal tile +, before defeating the merchant. On Maddening, these appear immediately after Ingrid enters the region; on other difficulties, they appear on the next enemy phase | ||
** 2 [[Brigand]]s with [[Iron Axe]]s | **2 [[Brigand]]s with [[Iron Axe]]s <small>(Normal)</small>/[[Steel Axe]]s <small>(Hard/Maddening)</small>, one with a [[Rogues]] battalion, from northeast of the heal tile + <small>(Normal/Hard only)</small> | ||
** | **2 [[Brigand]]s with [[Iron Axe]]s <small>(Normal)</small>/[[Steel Axe]]s <small>(Hard/Maddening)</small> and [[Rogues]] battalions from south of the heal tile + <small>(Normal/Hard only)</small> | ||
* Upon nearing the east chest | **2 [[Archer]]s with [[Iron Bow]]s <small>(Normal)</small>/[[Steel Bow]]s <small>(Hard/Maddening)</small>, one with a [[Rogues]] battalion, from southeast of the heal tile + <small>(Normal/Hard only)</small> | ||
** 2 [[Thief|Thieves]] with [[Iron Axe]]s from | **2 [[Brigand]]s with [[Steel Axe]]s from southwest of the heal tile + <small>(Hard only)</small> | ||
* Upon nearing the large central crater after defeating the Merchant | **6 [[Warrior]]s; two from northeast of the heal tile +, two from south of the heal tile +, and two from southwest of the heal tile + <small>(Maddening only)</small> | ||
** 2 [[Thief|Thieves]] with [[Iron Axe]]s from the northeast | **2 [[Sniper]]s from southeast of the heal tile + <small>(Maddening only)</small> | ||
* Upon Ingrid nearing the southeast corner of the map | *Upon nearing the east chest after defeating the Merchant; on Maddening, these can act the turn they appear | ||
** 3 [[Brigand]]s, two with [[Iron Axe]]s and one with a [[Venin Axe]], near the escape points | **2 [[Thief|Thieves]] with [[Iron Axe]]s from near ally starting positions | ||
**1 [[Warrior]] with a [[Rogues]] battalion from near ally starting positions <small>(Maddening only)</small> | |||
*Upon nearing the large central crater after defeating the Merchant; on Maddening, these can act the turn they appear | |||
**2 [[Thief|Thieves]] with [[Iron Axe]]s from the northeast | |||
**1 [[Assassin]] from the northeast <small>(Maddening only)</small> | |||
*Upon Ingrid nearing the southeast corner of the map | |||
**3 [[Warriors]] with [[Rogues]] battalions; one from near the escape points, two from the southwest <small>(Maddening only)</small> | |||
**3 [[Brigand]]s, two with [[Iron Axe]]s and one with a [[Venin Axe]], from near the escape points | |||
==Strategy== | ==Strategy== | ||
{{strategy}} | {{strategy}} | ||
Note the crater tiles covering the ground. These burn anyone dumb or unlucky enough to stand on them at the start of their turn, so watch out. They can't kill you, though; only bring you down to 1 HP. Your first move should be to clear out the | Note the crater tiles covering the ground. These burn anyone dumb or unlucky enough to stand on them at the start of their turn, so watch out. They can't kill you, though; only bring you down to 1 HP. Your first move should be to clear out the four thugs just south of your starting location and claim the Killer Axe in the chest. Your best bet is to prioritize the Warrior, then rattle the Brigands with a well-placed gambit so you can clean up on turn 2. Afterwards, split your forces into two teams. The north group should make their way over to the Merchant summoning reinforcements at the northeast corner while the south group should head south and clean up the bandits down that way. The enemies are powerful, but Ingrid as a temporary companion is very fast and solidly bulky, allowing her to get beaten up quite a bit. Your top priority is to make your way over to the Merchant in the northeast corner and kill him before his reinforcements can overwhelm you. Once he's dead, you can take the rest of the map at your own pace; just don't forget to get the eastern chest, as Linhardt/Mercedes/Marianne/Flayn would really appreciate that Healing Staff. | ||
<!-- | |||
==Trivia== | ==Trivia== | ||
--> | |||
==Etymology and other languages== | ==Etymology and other languages== | ||
{{Names | {{Names | ||
|eng-name=Rumored Nuptials | |eng-name=Rumored Nuptials | ||
| | |jpn-name={{hover|王国貴族結婚余聞|Ōkoku Taka-zoku kekkon yobun}} | ||
| | |jpn-mean=Kingdom noble marriage | ||
|span-name=Campanas de boda | |||
|span-mean=Wedding bells | |||
|fren-name=Une demande incongrue | |||
|fren-mean=An incongruous request | |||
|ger-name=Hochzeitsgerüchte | |||
|ger-mean=Wedding rumors | |||
|ital-name=Voci di nozze | |||
|ital-mean=Wedding rumors | |||
|kor-name={{hover|왕국 귀족의 혼담|Wanggung gwijogui hondam}} | |||
|kor-mean=Kingdom noble marriage | |||
|ch-simp-name={{hover|王国贵族结婚余闻|wángguó guìzú jiéhūn yúwén}} | |||
|ch-simp-mean=Anecdotes of a kingdom noble's marriage | |||
|ch-trad-name={{hover|王國貴族結婚餘聞|wángguó guìzú jiéhūn yúwén}} | |||
|ch-trad-mean=Anecdotes of a kingdom noble's marriage | |||
}} | }} | ||
Revision as of 17:34, 13 February 2024
| ||||
|

| “ | The jerk's entire fortune is soaked in blood. Do you want to rebuild your own house using that kind of money? I mean, it's all just rumors, but I think it still might be worth investigating. | ” | — Dorothea |
|---|
Rumored Nuptials (Japanese: 王国貴族結婚余聞 Kingdom Noble Marriage) is a paralogue chapter in Fire Emblem: Three Houses. It is available from Chapter 7 to Chapter 11. In order to attempt this paralogue, the player must have recruited Dorothea or Ingrid and neither one must have fallen in battle previously. In this chapter, Dorothea intervenes to prevent Ingrid from being married off to an unscrupulous noble.
Plot
- Main article:
Rumored Nuptials/Script
Byleth and Dorothea bump into Ingrid, who has received a letter from her father, Count Galatea. The letter explains that a noble has proposed marriage to Ingrid. However, Dorothea recognizes the noble's name from her days as an opera singer, explains that his entire fortune is nothing but blood money, and warns Ingrid to stay far away from him. At Dorothea's behest, Byleth sorties their students to investigate the noble and find proof of his misdeeds so they can call off the marriage.
The group discovers proof of the noble's crimes and prepare to return to Garreg Mach Monastery. However, rogues hired by the noble ambush them at Ailell with the intention of kidnapping Ingrid and killing her companions. Byleth, Dorothea, and Ingrid break through the rogues and escape to the monastery. Afterwards, Ingrid reveals that the marriage has been called off. If Ingrid is a member of Byleth's class, she also receives Lúin, the Heroes' Relic of House Galatea.
Beginning log
Ingrid receives an unexpected proposal of marriage from a noble of rising status. As soon as Dorothea hears the name, she is adamantly against any engagement between them...
Chapter data
Normal Hard Maddening


Character data
Black Eagles ![]() Blue Lions
Blue Lions ![]() Golden Deer
Golden Deer ![]()
| Characters | |
|---|---|
New units
| |
| |
Required characters
| |
  
| |
Available characters
| |
                        
|


- Other characters may be available if the paralogue is attempted later.
This paralogue only requires Dorothea or Ingrid to be in Byleth's class. If one of them is not a member of their class, they will be temporarily controllable for this map with the following stats.
- On Maddening, some stats are separated by a '~'. The stats to the left of the ~ are taken during Chapter 7, the earliest possible point where this paralogue may be undertaken; the stats to the right of the ~ are taken from Chapter 8 and later, at which point these units gain a level.
Dorothea, Normal/Hard Dorothea, Maddening Ingrid, Normal/Hard Ingrid, Maddening
|
|
| |||||||||||||||||||||||||||||||||||||||||||||||||||||||||||||||||||||||||||||||||||


Item data
| ||||||||||||||||||||||||||||||
|
Enemy data
During preparations, only a single enemy is present on the map, a Brigand to the southeast. Upon leaving preparations and initiating the battle, the other enemies appear.
- On Maddening, some stats are separated by a '~'. The stats to the left of the ~ are taken during Chapter 7, the earliest possible point where this chapter may be undertaken; the stats to the right of the ~ are taken from Chapter 8 and later, at which point the enemies gain a level.
Normal Hard Maddening
| ||||||||||||||||||||||||||||||||||||||||||||||||||||||||||||||||||||||||||||||||||||||||||||||||||||||||||||||||||||||||||||||||||||||||||||||||||||||||||||||||||||||||||||||||||||||||||||||||||||||||||||||||||||||||||||||||||||||||||||||||||||||||||||||||||||||||||||||||||||||||||||||||||||||||||||||||||||||||||||||||||||||||||||||||||||||||||||||||||||||||||||
| ||||||||||||||||||||||||||||||||||||||||||||||||||||||||||||||||||||||||||||||||||||||||||||||||||||||||||||||||||||||||||||||||||||||||||||||||||||||||||||||||||||||||||||||||||||||||||||||||||||||||||||||||||||||||||||||||||||||||||||||||||||||||||||||||||||||||||||||||||||||||||||||||||||||||||||||||||||||||||||||||||||||||||||||||||||||||||||||||||||||||||||
| ||||||||||||||||||||||||||||||||||||||||||||||||||||||||||||||||||||||||||||||||||||||||||||||||||||||||||||||||||||||||||||||||||||||||||||||||||||||||||||||||||||||||||||||||||||||||||||||||||||||||||||||||||||||||||||||||||||||||||||||||||||||||||||||||||||||||||||||||||||||||||||||||||||||||||||||||||||||||||||||||||||||||||||||||||||||||||||||||||||||||||||
| ||||||||||||||||||||||||||||||||||||||||||||||||||||||||||||||||||||||||||||||||||||||||||||||||||||||||||||||||||||||||||||||||||||||||||||||||||||||||||||||||||||||||||||||||||||||||||||||||||||||||||||||||||||||||||||||||||||||||||||||||||||||||||||||||||||||||||||||||||||||||||||||||||||||||||||||||||||||||||||||||||||||||||||||||||||||||||||||||||||||||||||
Reinforcements
- For the first three turns of five-turn cycles, repeating indefinitely until the Merchant is defeated, appearing on enemy phase; on Maddening, these can act the turn they appear
- 1 Thief with an Iron Sword (Normal)/Steel Sword (Hard/Maddening) to the right of the Merchant
- 1 Thief with a Steel Sword to the right of the Merchant (Maddening only)
- Upon Ingrid nearing the western heal tile +, before defeating the merchant. On Maddening, these appear immediately after Ingrid enters the region; on other difficulties, they appear on the next enemy phase
- 2 Brigands with Iron Axes (Normal)/Steel Axes (Hard/Maddening), one with a Rogues battalion, from northeast of the heal tile + (Normal/Hard only)
- 2 Brigands with Iron Axes (Normal)/Steel Axes (Hard/Maddening) and Rogues battalions from south of the heal tile + (Normal/Hard only)
- 2 Archers with Iron Bows (Normal)/Steel Bows (Hard/Maddening), one with a Rogues battalion, from southeast of the heal tile + (Normal/Hard only)
- 2 Brigands with Steel Axes from southwest of the heal tile + (Hard only)
- 6 Warriors; two from northeast of the heal tile +, two from south of the heal tile +, and two from southwest of the heal tile + (Maddening only)
- 2 Snipers from southeast of the heal tile + (Maddening only)
- Upon nearing the east chest after defeating the Merchant; on Maddening, these can act the turn they appear
- Upon nearing the large central crater after defeating the Merchant; on Maddening, these can act the turn they appear
- Upon Ingrid nearing the southeast corner of the map
Strategy
| This section details unofficial strategies that may help with completion of the chapter. This may not work for everybody. |
Note the crater tiles covering the ground. These burn anyone dumb or unlucky enough to stand on them at the start of their turn, so watch out. They can't kill you, though; only bring you down to 1 HP. Your first move should be to clear out the four thugs just south of your starting location and claim the Killer Axe in the chest. Your best bet is to prioritize the Warrior, then rattle the Brigands with a well-placed gambit so you can clean up on turn 2. Afterwards, split your forces into two teams. The north group should make their way over to the Merchant summoning reinforcements at the northeast corner while the south group should head south and clean up the bandits down that way. The enemies are powerful, but Ingrid as a temporary companion is very fast and solidly bulky, allowing her to get beaten up quite a bit. Your top priority is to make your way over to the Merchant in the northeast corner and kill him before his reinforcements can overwhelm you. Once he's dead, you can take the rest of the map at your own pace; just don't forget to get the eastern chest, as Linhardt/Mercedes/Marianne/Flayn would really appreciate that Healing Staff.
Etymology and other languages
| Names, etymology, and in other regions | ||
|---|---|---|
| Language | Name | Definition, etymology, and notes |
| English |
Rumored Nuptials |
-- |
| Japanese |
王国貴族結婚余聞 |
Kingdom noble marriage |
| Spanish |
Campanas de boda |
Wedding bells |
| French |
Une demande incongrue |
An incongruous request |
| German |
Hochzeitsgerüchte |
Wedding rumors |
| Italian |
Voci di nozze |
Wedding rumors |
| Korean |
왕국 귀족의 혼담 |
Kingdom noble marriage |
| Simplified Chinese |
王国贵族结婚余闻 |
Anecdotes of a kingdom noble's marriage |
| Traditional Chinese |
王國貴族結婚餘聞 |
Anecdotes of a kingdom noble's marriage |
Gallery
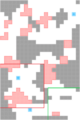
Ingrid entering the red area triggers reinforcements around the heal tile +, and her entering the green area triggers reinforcements from the escape route.
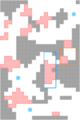
Entering the orange area triggers the northwest reinforcements and entering the blue area triggers the northeast reinforcements
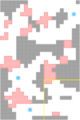
Entering the yellow area causes the southwest enemies to begin moving.


References
| Rumored Nupitals |
|---|