|
|
| Line 748: |
Line 748: |
| ==Strategy== | | ==Strategy== |
| {{strategy}} | | {{strategy}} |
| {{sectstub}}
| | In general, this map shouldn't be too difficult. There aren't any reinforcements that actually attack you, and enemies will politely wait for you to threaten their group before attacking. So, take your time if things look rough; there isn't any loss from a slow and safe clear, in general. To beat the map, all you need to do is defeat Cornelia. Sub-objectives include flipping the top-right switch to turn off the Viskams; defeating the top-left three enemies that carry a Wo Dao, Brave Sword, and Elixir; armor-breaking a few [[Titanus]]es if you want some [[Agarthium]] to repair the Scythe of Sariel or Devil weapons with; and triggering the Thief reinforcement if you'd like to collect the [[Tathlum Bow]]. |
| | |
| | * The very fast way to clear the map is just to rush down Cornelia with flyers. She's posted some Longbow archers meant to dissuade this approach, but skills like Reposition / Shove / Draw Back as well as Dance or Stride can help your flyers get to Cornelia from extreme range anyway. Alert Stance+, Swordbreaker (for the Titanuses), and the high-range Hit penalty also mean that characters like Falcon Knight [[Ingrid]] can close in reasonably safely anyway. |
| | * The fast way involves just smashing through the 3 Titanuses guarding the "front". The Viskams will harry your units and you'll want some good dodgetanks, but this is still quite doable. |
| | * The thorough and safe way is to clean out the "sides" of the map, flip the lever, collect the treasure from the back three units, then attack Cornelia from behind. You'll need to clean up the Titanuses guarding the "top" of the map, but that should be even easier and safer than walking directly in. |
| | * Cornelia herself doesn't move, doesn't have the infinite-range Counterattack skill, and tops out at 3 range. Any range 4+ unit (Snipers with Hunter's Volley, mages with a range-increasing skill or relic) can easily and safely weaken her, as can Gambits as usual. It's probably overkill as Gremory is not a particularly durable class anyway. For style points, Dimitri's Atrocity should one-shot her, even on Maddening mode. |
| | * Don't be too torn up about defeating the reinforcement Thief; sadly, the Tathlum Bow is underwhelming, essentially being a 3 weight heavier [[Silver Bow+]] that gains a bit of regen. If you've built [[Mercedes]]'s bow rank, she likely wants to use [[Magic Bow+]] anyway, and the health regeneration is not really relevant. |
|
| |
|
| ==Trivia== | | ==Trivia== |
| This page has been marked as a stub. Please help improve the page by adding information.
|
| Reclaiming the Capital
|
|
|
|
|
|
Reclaiming the Capital (Japanese: 王都奪還戦 Capital city recapture) is the main battle map of the eighteenth chapter on the Azure Moon route in Fire Emblem: Three Houses. In this map, Dimitri and co. march on the Kingdom capital of Fhirdiad in an effort to reclaim it for the Kingdom of Faerghus.
Beginning log
After Rodrigue's death, Dimitri reassesses his plan of attack. For the sake of the Kingdom, he chooses to forestall an invasion of the Empire in favor of securing his own capital city of Fhirdiad.
Map data
|
|
|
|
|
| Victory: Defeat Cornelia
|
Player
|
Partner
|
Other
|
Enemy
|
Third
|
| Defeat: Byleth or Dimitri dies* or the player's army is routed*
|
12
|
{{{partner}}}
|
{{{other}}}
|
35+2
|
0+1
|
|
|
|
|
|
|
|
|
|
| Victory: Defeat Cornelia
|
Player
|
Partner
|
Other
|
Enemy
|
Third
|
| Defeat: Byleth or Dimitri dies* or the player's army is routed*
|
12
|
{{{partner}}}
|
{{{other}}}
|
40+2
|
0+1
|
|
|
|
|
- Any player unit entering the middle area will cause the Viskam to activate. They can be deactivated by interacting with the lever to the northeast, which will also remove the buffs on the central Titanus.
- The escape point that the third army sniper attempts to reach is not visually defined; it is located two spaces below Byleth's starting position, where some other unit may start the map.
Character data
Item data
Enemy data
|
|
|
|
Name
|
Class
|
Lv
|
#
|
Inventory and Skills
|
Notes
|
|
|
Kingdom Soldier
|
Fortress Knight
|
35
|
2
|
 Silver Axe Silver Axe
 Axefaire • Axefaire •  Weight -5 Weight -5
 Kingdom Armored Co. Lv 4: Kingdom Armored Co. Lv 4:  Impregnable Wall Impregnable Wall
|
• Both begin moving if either is provoked.
• The right one begins moving if any player unit enters the north-center area.
|
|
|
Kingdom Soldier
|
Bishop
|
35
|
1
|
 Abraxas • Physic Abraxas • Physic
 White Magic Uses x2 • White Magic Uses x2 •  White Magic Heal +10 • White Magic Heal +10 •  Terrain Resistance Terrain Resistance
|
Begins moving if any player unit enters the north-center area.
|
|
|
Kingdom Soldier
|
Fortress Knight
|
35
|
1
|
Tomahawk
Axefaire • Weight -5 •  Hit +20 Hit +20
Kingdom Armored Co. Lv 4: Impregnable Wall
|
• The western one begins moving if the nearby Sniper is provoked.
• The eastern one begins moving if the nearby Bishop, Grappler, or Dark Bishop is provoked, or if any player unit enters the north-center area.
|
|
|
Kingdom Soldier
|
Warlock
|
35
|
2
|
 Ragnarok Ragnarok
 Black Tomefaire • Black Tomefaire •  Black Magic Uses x2 Black Magic Uses x2
|
• The western one begins moving if the adjacent Swordmaster is provoked.
• The eastern one begins moving if the adjacent Swordmaster is provoked, or if any player unit enters the north-center area.
|
|
|
Kingdom Soldier
|
Swordmaster
|
35
|
2
|
 Silver Sword Silver Sword
 Swordfaire • Swordfaire •  Sword Crit +10 Sword Crit +10
|
• The western one begins moving if the adjacent Warlock is provoked.
• The eastern one begins moving if the adjacent Warlock is provoked, or if any player unit enters the north-center area.
|
|
|
Kingdom Soldier
|
Falcon Knight
|
35
|
1
|
 Silver Lance Silver Lance
 Canto • Canto •  Lancefaire • Lancefaire •  Avo +10 Avo +10
|
Begins moving if any player unit enters the north-center area.
|
|
|
Kingdom Soldier
|
Sniper
|
35
|
2
|
 Silver Bow Silver Bow
 Bowfaire • Bowfaire •  Bowrange +1 Bowrange +1
|
Both begin moving if either of them or the nearby male Sniper is provoked.
|
|
|
Kingdom Soldier
|
Sniper
|
35
|
2
|
Silver Bow
Bowfaire • Bowrange +1
|
• The western one begins moving if the nearby Fortress Knight is provoked, or if any player unit enters the north-center area.
• The central one begins moving if a nearby female Sniper is provoked.
|
|
|
Kingdom Soldier
|
Fortress Knight
|
35
|
2
|
Tomahawk
Axefaire • Weight -5
Kingdom Armored Co. Lv 4: Impregnable Wall
|
• The western one begins moving if the nearby Sniper is provoked.
• The eastern one begins moving if the nearby Bishop, Grappler, or Dark Bishop is provoked, or if any player unit enters the north-center area.
|
|
|
Kingdom Soldier
|
Bishop
|
35
|
1
|
Abraxas • Physic
White Magic Uses x2 • White Magic Heal +10 • Terrain Resistance
|
Begins moving if the nearby Grappler, Fortress Knight, or Dark Bishop is provoked, or if any player unit enters the north-center area.
|
|
|
Kingdom Soldier
|
Grappler
|
35
|
4
|
 Silver Gauntlets • Unarmed Silver Gauntlets • Unarmed
 Fistfaire • Fistfaire •  Unarmed Combat Unarmed Combat
|
• The northern one begins moving if any player unit enters the north-center area.
• The eastern one begins moving if the nearby Bishop, Fortress Knight, or Dark Bishop is provoked, or if any player unit enters the north-center area.
• The western two both begin moving if either is provoked.
|
|
|
Kingdom Soldier
|
Warlock
|
35
|
1
|
Ragnarok
Black Tomefaire • Black Magic Uses x2
 Kingdom Magic Users Lv 4: Kingdom Magic Users Lv 4:  Resonant Ice Resonant Ice
|
• Immobile.
• Mans a Fire Orb.
|
|
|
Kingdom Soldier
|
Dark Bishop
|
35
|
1
|
 Banshee Θ • Miasma Δ • Death Γ Banshee Θ • Miasma Δ • Death Γ
 Miasma Δ • Miasma Δ •  Fiendish Blow • Fiendish Blow •  Heartseeker Heartseeker
|
Begins moving if the nearby Bishop, Grappler or Fortress Knight is provoked, or if any player unit enters the north-center area.
|
|
|
Imperial Soldier
|
Fortress Knight
|
35
|
1
|
Silver Axe
Axefaire • Weight -5
|
Begins moving if any player unit enters the north-center area.
|
|
|
Imperial Soldier
|
Dark Bishop
|
35
|
1
|
Banshee Θ •  Elixir Elixir • Miasma Δ • Death Γ • Miasma Δ • Death Γ
Miasma Δ • Fiendish Blow • Heartseeker
Empire Magic Users Lv 4: Resonant Flames
|
Begins moving if a nearby Swordmaster is provoked or if any player unit enters the north-center area.
|
|
|
Imperial Soldier
|
Swordmaster
|
35
|
1
|
Wo Dao
Swordfaire • Sword Crit +10
|
Begins moving if the nearby Dark Bishop or Kingdom General Swordmaster is provoked, or if any player unit enters the north-center area.
|
|
|
Titanus
|
Titanus
|
35
|
2
|
Giant Katar
 Sword Prowess Lv 3 • Sword Prowess Lv 3 •  Barrier • Barrier •  Pavise • Aegis • Pavise • Aegis •  Axebreaker+ Axebreaker+  • Swordfaire • Swordfaire 
 Titanomachy Titanomachy
|
•  Weak to Lances. Weak to Lances.
• Gains +10 strength, defense and resistance and +15 dexterity reinforcement; removed by activating the northeast lever.
• The southern one begins moving if the west Viskam is provoked.
• The northern one begins moving if any player unit reaches the northern area.
|
|
|
Titanus
|
Titanus
|
35
|
3
|
Giant Katar
Sword Prowess Lv 3 • Barrier • Pavise • Aegis • Axebreaker+ • Swordfaire
Titanomachy
|
•  Weak to Axes. Weak to Axes.
• Gains +10 strength, defense and resistance and +15 dexterity reinforcement; removed by activating the northeast lever.
• The southern one begins moving if the east Viskam is provoked.
• The northern two begin moving if any player unit enters the north-center area.
|
|
|
Titanus
|
Titanus
|
35
|
1
|
Giant Katar
Sword Prowess Lv 3 • Barrier • Pavise • Aegis • Axebreaker+ • Swordfaire
Titanomachy
|
•  Weak to Swords. Weak to Swords.
• Gains +10 strength, defense and resistance and +15 dexterity reinforcement; removed by activating the northeast lever.
• Begins moving if any player unit enters the north-center area.
|
|
|
Kingdom Soldier
|
Bishop
|
35
|
1
|
Abraxas • Physic
White Magic Uses x2 • White Magic Heal +10 • Terrain Resistance
 Kingdom Magic Corps Lv 4: Group Ice Kingdom Magic Corps Lv 4: Group Ice
|
Starts on a heal tile +.
|
|
|
Kingdom General
|
Swordmaster
|
35
|
1
|
Brave Sword
Swordfaire • Sword Crit +10
|
• Begins moving if the nearby Dark Bishop or Swordmaster is provoked.
• Starts on a heal tile +.
|
|
|
Kingdom General
|
Warlock
|
35
|
1
|
Ragnarok • Meteor
Black Tomefaire • Black Magic Uses x2
Kingdom Magic Users Lv 4: Resonant Ice
|
Immobile; stands on a heal tile +.
|
|
|
Cornelia
|
Gremory
|
37
|
1
|
Death Γ •  Asclepius • Luna Λ Asclepius • Luna Λ
Agarthan Technology • Black Magic Uses x2 •  Dark Magic Uses x2 • White Magic Uses x2 • Dark Magic Uses x2 • White Magic Uses x2 •  Reason Lv 4 • Reason Lv 4 •  Defense +2 • Defense +2 •  Poison Strike • Poison Strike •  Defiant Mag • Defiant Mag •  Unsealable Magic Unsealable Magic
 Blue Lion Magic Corps Lv 4: Resonant Ice Blue Lion Magic Corps Lv 4: Resonant Ice
|
Immobile; stands on a stronghold.
|
|
|
|
|
|
Name
|
Class
|
Lv
|
#
|
Inventory and Skills
|
Notes
|
|
|
|
|
|
Name
|
Class
|
Lv
|
#
|
Inventory and Skills
|
Notes
|
|
|
Kingdom Soldier
|
Fortress Knight
|
36
|
2
|
Silver Axe
Axefaire • Weight -5 •  Axe Prowess Lv 3 Axe Prowess Lv 3
Kingdom Armored Co. Lv 4: Impregnable Wall
|
• Both begin moving if either of them or the nearby Sniper are provoked.
• The right one begins moving if any player unit enters the north-center area.
|
|
|
Kingdom Soldier
|
Bishop
|
36
|
1
|
Abraxas • Physic
White Magic Uses x2 • White Magic Heal +10 • Terrain Resistance •  Faith Lv 3 Faith Lv 3
|
Begins moving if any player unit enters the north-center area.
|
|
|
Kingdom Soldier
|
Fortress Knight
|
36
|
1
|
Tomahawk
Axefaire • Weight -5 • Hit +20
Kingdom Armored Co. Lv 4: Impregnable Wall
|
--
|
|
|
Kingdom Soldier
|
Warlock
|
36
|
2
|
Ragnarok
Black Tomefaire • Black Magic Uses x2 •  Reason Lv 3 Reason Lv 3
|
• The western one begins moving if an adjacent Swordmaster is provoked.
• The eastern one begins moving if an adjacent Swordmaster is provoked, or if any player unit enters the north-center area.
|
|
|
Kingdom Soldier
|
Swordmaster
|
36
|
4
|
Silver Sword
Swordfaire • Sword Crit +10 • Sword Prowess Lv 3
|
• The lower-west one begins moving if the adjacent Warlock or nearby Swordmaster is provoked.
• The other three begin moving if the respective adjacent Warlock or nearby Swordmaster is provoked, or if any player unit enters the north-center area.
|
|
|
Kingdom Soldier
|
Falcon Knight
|
36
|
1
|
Silver Lance
Canto • Lancefaire • Avo +10 •  Lance Prowess Lv 3 Lance Prowess Lv 3
|
Begins moving if any player unit enters the north-center area.
|
|
|
Kingdom Soldier
|
Sniper
|
36
|
2
|
Silver Bow
Bowfaire • Bowrange +1 •  Bow Prowess Lv 3 Bow Prowess Lv 3
|
Both begin moving if either of them or the nearby male Sniper are provoked.
|
|
|
Kingdom Soldier
|
Sniper
|
36
|
2
|
Silver Bow
Bowfaire • Bowrange +1 • Bow Prowess Lv 3
|
The eastern one begins moving if the nearby Fortress Knight or Titanus is provoked, or if any player unit enters the north-center area.
|
|
|
Kingdom Soldier
|
Fortress Knight
|
36
|
2
|
Tomahawk
Axefaire • Weight -5 • Axe Prowess Lv 3
Kingdom Armored Co. Lv 4: Impregnable Wall
|
• The western one begins moving if the nearby Sniper or Titanus is provoked.
• The eastern one begins moving if the nearby Bishop, Grappler, or Dark Bishop is provoked, or if any player unit enters the north-center area.
|
|
|
Kingdom Soldier
|
Bishop
|
36
|
1
|
Abraxas • Physic
White Magic Uses x2 • White Magic Heal +10 • Terrain Resistance • Faith Lv 3
|
Begins moving if the nearby Grappler, Fortress Knight, or Dark Bishop is provoked, or if any player unit enters the north-center area.
|
|
|
Kingdom Soldier
|
Grappler
|
36
|
4
|
Silver Gauntlets • Unarmed
Fistfaire • Unarmed Combat •  Brawling Prowess Lv 3 Brawling Prowess Lv 3
|
• The northern one begins moving if any player unit enters the north-center area.
• The southeast one begins moving if the nearby Bishop, Fortress Knight, or Dark Bishop is provoked, or if any player unit enters the north-center area.
• The western two being moving if either is provoked, or if any player unit enters the north-center area.
|
|
|
Kingdom Soldier
|
Warlock
|
36
|
1
|
Ragnarok
Black Tomefaire • Black Magic Uses x2 • Reason Lv 3
Kingdom Magic Users Lv 4: Resonant Ice
|
• Immobile.
• Mans a Fire Orb.
|
|
|
Kingdom Soldier
|
Dark Bishop
|
36
|
1
|
Banshee Θ • Miasma Δ • Death Γ
Miasma Δ • Fiendish Blow • Heartseeker • Reason Lv 3
|
Begins moving if the nearby Bishop, Grappler, or Fortress Knight is provoked, or if any player unit enters the north-center area.
|
|
|
Imperial Soldier
|
Fortress Knight
|
36
|
1
|
Silver Axe
Axefaire • Weight -5 • Axe Prowess Lv 3
|
Begins moving if any player unit enters the north-center area.
|
|
|
Imperial Soldier
|
Dark Bishop
|
36
|
1
|
Banshee Θ • Elixir • Miasma Δ • Death Γ
Miasma Δ • Fiendish Blow • Heartseeker • Reason Lv 3
Empire Magic Users Lv 4: Resonant Flames
|
Begins moving if a nearby Swordmaster is provoked, or if any player unit enters the north-center area.
|
|
|
Imperial Soldier
|
Swordmaster
|
36
|
1
|
Wo Dao
Swordfaire • Sword Crit +10 • Sword Prowess Lv 3
|
Begins moving if the nearby Dark Bishop or Swordmaster is provoked, or if any player unit enters the north-center area.
|
|
|
Titanus
|
Titanus
|
36
|
2
|
Giant Katar
Sword Prowess Lv 3 • Barrier • Pavise • Aegis • Axebreaker+ • Swordfaire
Titanomachy
|
• Weak to Lances.
• Gains +10 strength, defense and resistance and +15 dexterity reinforcement; removed by activating the northeast lever.
• The southern one begins moving if the west Viskam is provoked.
• The northern one begins moving if any player unit enters the north-center area.
|
|
|
Titanus
|
Titanus
|
36
|
2
|
Giant Katar
Sword Prowess Lv 3 • Barrier • Pavise • Aegis • Axebreaker+ • Swordfaire
Titanomachy
|
• Weak to Swords.
• Gains +10 strength, defense and resistance and +15 dexterity reinforcement; removed by activating the northeast lever.
• The northern one begins moving if any player unit enters the north-center area.
|
|
|
Titanus
|
Titanus
|
36
|
3
|
Giant Katar
Sword Prowess Lv 3 • Barrier • Pavise • Aegis • Axebreaker+ • Swordfaire
Titanomachy
|
• Weak to Axes.
• Gains +10 strength, defense and resistance and +15 dexterity reinforcement; removed by activating the northeast lever.
• The southern one begins moving if the east Viskam is provoked.
• The northern two begin moving if any player unit enters the north-center area.
|
|
|
Kingdom Soldier
|
Bishop
|
36
|
1
|
Abraxas • Physic
White Magic Uses x2 • White Magic Heal +10 • Terrain Resistance • Faith Lv 3
Kingdom Magic Corps Lv 4: Group Ice
|
Starts on a heal tile +.
|
|
|
Kingdom Soldier
|
Sniper
|
36
|
1
|
Silver Bow
Bowfaire • Bowrange +1 • Bow Prowess Lv 3
 Deadeye Deadeye
Kingdom Snipers Lv 4:  Fusillade Fusillade
|
Begins moving if a nearby Fortress Knight is provoked, or if any player unit enters the north-center area.
|
|
|
Titanus
|
Titanus
|
36
|
1
|
Giant Katar
Sword Prowess Lv 3 • Barrier • Pavise • Aegis • Axebreaker+ • Swordfaire
Titanomachy
|
• Weak to Axes.
• Begins moving if the nearby Sniper or Fortress Knight is provoked.
|
|
|
Kingdom General
|
Swordmaster
|
36
|
1
|
Brave Sword
Swordfaire • Sword Crit +10 • Sword Prowess Lv 3
|
• Begins moving if the nearby Dark Bishop or Swordmaster is provoked.
• Starts on a heal tile +.
|
|
|
Kingdom General
|
Warlock
|
36
|
1
|
Ragnarok • Meteor
Black Tomefaire • Black Magic Uses x2 • Reason Lv 3
Kingdom Magic Users Lv 4: Resonant Ice
|
Immobile; stands on a heal tile +.
|
|
|
Cornelia
|
Gremory
|
38
|
1
|
Death Γ • Asclepius • Luna Λ
Agarthan Technology • Black Magic Uses x2 • Dark Magic Uses x2 • White Magic Uses x2 • Reason Lv 4 • Defense +2 • Poison Strike • Defiant Mag • Unsealable Magic
Blue Lion Magic Corps Lv 4: Resonant Ice
|
Immobile; stands on a stronghold.
|
|
|
|
|
|
Name
|
Class
|
Lv
|
#
|
Inventory and Skills
|
Notes
|
|
|
|
|
|
Name
|
Class
|
Lv
|
#
|
Inventory and Skills
|
Notes
|
|
|
Kingdom Soldier
|
Fortress Knight
|
42
|
2
|
Silver Axe
Axefaire • Weight -5 •  Axe Prowess Lv 5 • Axe Prowess Lv 5 •  Armored Blow • Armored Blow •  Defiant Def Defiant Def
Kingdom Armored Co. Lv 4: Impregnable Wall
|
• Both begin moving if either of them or the nearby Sniper are provoked.
• The right one begins moving if any player unit enters the north-center area.
|
|
|
Kingdom Soldier
|
Bishop
|
42
|
1
|
Abraxas • Physic
White Magic Uses x2 • White Magic Heal +10 • Terrain Resistance •  Faith Lv 5 • Faith Lv 5 •  Renewal • Renewal •  Miracle Miracle
|
Begins moving if any player unit enters the north-center area.
|
|
|
Kingdom Soldier
|
Fortress Knight
|
42
|
1
|
Tomahawk
Axefaire • Weight -5 • Hit +20
Kingdom Armored Co. Lv 4: Impregnable Wall
|
--
|
|
|
Kingdom Soldier
|
Warlock
|
42
|
2
|
Ragnarok
Black Tomefaire • Black Magic Uses x2 •  Reason Lv 5 • Reason Lv 5 •  Magic +2 • Magic +2 •  Seal Defense Seal Defense
|
• The western one begins moving if an adjacent Swordmaster is provoked.
• The eastern one begins moving if an adjacent Swordmaster is provoked, or if any player unit enters the north-center area.
|
|
|
Kingdom Soldier
|
Swordmaster
|
42
|
4
|
Silver Sword
Swordfaire • Sword Crit +10 •  Sword Prowess Lv 5 • Axebreaker+ • Sword Prowess Lv 5 • Axebreaker+ •  Quick Riposte Quick Riposte
|
• The lower-west one begins moving if the adjacent Warlock or nearby Swordmaster is provoked.
• The other three begin moving if the respective adjacent Warlock or nearby Swordmaster is provoked, or if any player unit enters the north-center area.
|
|
|
Kingdom Soldier
|
Falcon Knight
|
42
|
1
|
Silver Lance
Canto • Lancefaire • Avo +10 •  Lance Prowess Lv 5 • Lance Prowess Lv 5 •  Swordbreaker+ • Swordbreaker+ •  Weight -3 Weight -3
|
Begins moving if any player unit enters the north-center area.
|
|
|
Kingdom Soldier
|
Sniper
|
42
|
1
|
Silver Bow
Bowfaire • Bowrange +1 •  Bow Prowess Lv 5 • Poison Strike • Bow Prowess Lv 5 • Poison Strike •  Vantage Vantage
|
Begins moving if the nearby Fortress Knight or Titanus is provoked, or if any player unit enters the north-center area.
|
|
|
Kingdom Soldier
|
Fortress Knight
|
42
|
2
|
Tomahawk
Axefaire • Weight -5 • Axe Prowess Lv 5 • Armored Blow • Defiant Def
Kingdom Armored Co. Lv 4: Impregnable Wall
|
• The western one begins moving if the nearby Sniper or Titanus is provoked.
• The eastern one begins moving if the nearby Bishop, Grappler, or Dark Bishop is provoked, or if any player unit enters the north-center area.
|
|
|
Kingdom Soldier
|
Bishop
|
42
|
1
|
Abraxas • Physic
White Magic Uses x2 • White Magic Heal +10 • Terrain Resistance • Faith Lv 5 • Renewal • Miracle
|
Begins moving if the nearby Grappler, Fortress Knight, or Dark Bishop is provoked, or if any player unit enters the north-center area.
|
|
|
Kingdom Soldier
|
Grappler
|
42
|
4
|
Silver Gauntlets • Unarmed
Fistfaire • Unarmed Combat •  Brawling Prowess Lv 5 • Brawling Prowess Lv 5 •  Tomebreaker • Tomebreaker •  Defiant Spd Defiant Spd
|
• The northern one begins moving if any player unit enters the north-center area.
• The southeast one begins moving if the nearby Bishop, Fortress Knight, or Dark Bishop is provoked, or if any player unit enters the north-center area.
• The western two being moving if either is provoked, or if any player unit enters the north-center area.
|
|
|
Kingdom Soldier
|
Warlock
|
42
|
1
|
Ragnarok
Black Tomefaire • Black Magic Uses x2 • Reason Lv 5 • Magic +2 • Defiant Def
Kingdom Magic Users Lv 4: Resonant Ice
|
• Immobile.
• Mans a Fire Orb.
|
|
|
Kingdom Soldier
|
Dark Bishop
|
42
|
1
|
Banshee Θ • Miasma Δ • Death Γ
Miasma Δ • Fiendish Blow • Heartseeker • Reason Lv 5 • Magic +2 •  Seal Strength Seal Strength
|
Begins moving if the nearby Bishop, Grappler, or Fortress Knight is provoked, or if any player unit enters the north-center area.
|
|
|
Imperial Soldier
|
Fortress Knight
|
42
|
1
|
Silver Axe
Axefaire • Weight -5 • Axe Prowess Lv 5 • Armored Blow • Defiant Def
|
Begins moving if any player unit enters the north-center area.
|
|
|
Imperial Soldier
|
Dark Bishop
|
42
|
1
|
Banshee Θ • Elixir • Miasma Δ • Death Γ
Miasma Δ • Fiendish Blow • Heartseeker • Reason Lv 5 • Magic +2 • Seal Strength
Empire Magic Users Lv 4: Resonant Flames
|
Begins moving if a nearby Swordmaster is provoked, or if any player unit enters the north-center area.
|
|
|
Imperial Soldier
|
Swordmaster
|
42
|
1
|
Wo Dao
Swordfaire • Sword Crit +10 • Sword Prowess Lv 5 • Axebreaker+ • Quick Riposte
|
Begins moving if the nearby Dark Bishop or Swordmaster is provoked, or if any player unit enters the north-center area.
|
|
|
Titanus
|
Titanus
|
42
|
2
|
Giant Katar
Sword Prowess Lv 3 • Barrier • Pavise • Aegis • Axebreaker+ • Swordfaire
Titanomachy
|
• Weak to Lances.
• Gains +10 strength, defense and resistance and +15 dexterity reinforcement; removed by activating the northeast lever.
• The southern one begins moving if the west Viskam is provoked.
• The northern one begins moving if any player unit enters the north-center area.
|
|
|
Titanus
|
Titanus
|
42
|
2
|
Giant Katar
Sword Prowess Lv 3 • Barrier • Pavise • Aegis • Axebreaker+ • Swordfaire
Titanomachy
|
• Weak to Swords.
• Gains +10 strength, defense and resistance and +15 dexterity reinforcement; removed by activating the northeast lever.
• The northern one begins moving if any player unit enters the north-center area.
|
|
|
Titanus
|
Titanus
|
42
|
3
|
Giant Katar
Sword Prowess Lv 3 • Barrier • Pavise • Aegis • Axebreaker+ • Swordfaire
Titanomachy
|
• Weak to Axes.
• Gains +10 strength, defense and resistance and +15 dexterity reinforcement; removed by activating the northeast lever.
• The southern one begins moving if the east Viskam is provoked.
• The northern two begin moving if any player unit enters the north-center area.
|
|
|
Kingdom Soldier
|
Sniper
|
42
|
2
|
Longbow
Bowfaire • Bowrange +1 • Bow Prowess Lv 5 • Poison Strike • Vantage
Deadeye
Kingdom Snipers Lv 4: Fusillade
|
Begin moving if they or the adjacent Sniper are provoked.
|
|
|
Kingdom Soldier
|
Sniper
|
42
|
2
|
Silver Bow
Bowfaire • Bowrange +1 • Bow Prowess Lv 5 • Poison Strike • Vantage
Deadeye
Kingdom Snipers Lv 4: Fusillade
|
• The central one begins moving if an adjacent Sniper is provoked.
• The western one begins moving if a nearby Fortress Knight is provoked, or if any player unit enters the north-center area.
|
|
|
Kingdom Soldier
|
Bishop
|
42
|
1
|
Abraxas • Physic
White Magic Uses x2 • White Magic Heal +10 • Terrain Resistance • Faith Lv 5 • Renewal • Miracle
Kingdom Magic Corps Lv 4: Group Ice
|
Starts on a heal tile +.
|
|
|
Titanus
|
Titanus
|
42
|
1
|
Giant Katar
Sword Prowess Lv 3 • Barrier • Pavise • Aegis • Axebreaker+ • Swordfaire
Titanomachy
|
• Weak to Axes.
• Begins moving if the nearby Sniper or Fortress Knight is provoked.
|
|
|
Kingdom General
|
Swordmaster
|
42
|
1
|
Brave Sword
Swordfaire • Sword Crit +10 • Sword Prowess Lv 5 • Axefaire • Quick Riposte
|
• Begins moving if the nearby Dark Bishop or Swordmaster is provoked.
• Stands on a heal tile +.
|
|
|
Kingdom General
|
Warlock
|
42
|
1
|
Ragnarok • Meteor
Black Tomefaire • Black Magic Uses x2 • Reason Lv 5 • Magic +2 • Seal Defense
Kingdom Magic Users Lv 4: Resonant Ice
|
Immobile; stands on a heal tile +.
|
|
|
Cornelia
|
Gremory
|
44
|
1
|
Death Γ • Asclepius • Luna Λ
Agarthan Technology • Black Magic Uses x2 • Dark Magic Uses x2 • White Magic Uses x2 • Reason Lv 4 • Defense +2 • Poison Strike • Defiant Mag • Unsealable Magic
Blue Lion Magic Corps Lv 4: Resonant Ice
|
Immobile; stands on a stronghold.
|
|
|
|
|
|
Name
|
Class
|
Lv
|
#
|
Inventory and Skills
|
Notes
|
|
Third Army data
|
|
|
|
Name
|
Class
|
Lv
|
#
|
Inventory and Skills
|
Notes
|
|
|
|
|
|
Reinforcements
- Immediately upon defeating the westernmost Titanus (Hard and Maddening only) and Warlock and entering the 3×3 square centered on the northern Grappler; these conditions do not have to be met on the same turn
- 1 Sniper from the western border
Boss data
- Main article: Cornelia
|
|
|
|
|
|
|
Skill Levels

|

|

|

|

|

|

|

|

|

|

|

|
| E
|
E
|
E
|
E
|
E
|
A
|
A
|
A
|
E
|
E
|
E
|

|
|
|
|
|
|
|
|
|
|
Skill Levels
|
|
|
|
|
|
|
|
|
|
|
|
|
| E
|
E
|
E
|
E
|
E
|
A
|
A
|
A
|
E
|
E
|
E
|
|
|
|
|
|
|
|
|
|
|
Skill Levels
|
|
|
|
|
|
|
|
|
|
|
|
|
| E
|
E
|
E
|
E
|
E
|
A
|
A
|
A
|
E
|
E
|
E
|
|
|
|
Strategy
| This section details unofficial strategies that may help with completion of the chapter. This may not work for everybody.
|
In general, this map shouldn't be too difficult. There aren't any reinforcements that actually attack you, and enemies will politely wait for you to threaten their group before attacking. So, take your time if things look rough; there isn't any loss from a slow and safe clear, in general. To beat the map, all you need to do is defeat Cornelia. Sub-objectives include flipping the top-right switch to turn off the Viskams; defeating the top-left three enemies that carry a Wo Dao, Brave Sword, and Elixir; armor-breaking a few Titanuses if you want some Agarthium to repair the Scythe of Sariel or Devil weapons with; and triggering the Thief reinforcement if you'd like to collect the Tathlum Bow.
- The very fast way to clear the map is just to rush down Cornelia with flyers. She's posted some Longbow archers meant to dissuade this approach, but skills like Reposition / Shove / Draw Back as well as Dance or Stride can help your flyers get to Cornelia from extreme range anyway. Alert Stance+, Swordbreaker (for the Titanuses), and the high-range Hit penalty also mean that characters like Falcon Knight Ingrid can close in reasonably safely anyway.
- The fast way involves just smashing through the 3 Titanuses guarding the "front". The Viskams will harry your units and you'll want some good dodgetanks, but this is still quite doable.
- The thorough and safe way is to clean out the "sides" of the map, flip the lever, collect the treasure from the back three units, then attack Cornelia from behind. You'll need to clean up the Titanuses guarding the "top" of the map, but that should be even easier and safer than walking directly in.
- Cornelia herself doesn't move, doesn't have the infinite-range Counterattack skill, and tops out at 3 range. Any range 4+ unit (Snipers with Hunter's Volley, mages with a range-increasing skill or relic) can easily and safely weaken her, as can Gambits as usual. It's probably overkill as Gremory is not a particularly durable class anyway. For style points, Dimitri's Atrocity should one-shot her, even on Maddening mode.
- Don't be too torn up about defeating the reinforcement Thief; sadly, the Tathlum Bow is underwhelming, essentially being a 3 weight heavier Silver Bow+ that gains a bit of regen. If you've built Mercedes's bow rank, she likely wants to use Magic Bow+ anyway, and the health regeneration is not really relevant.
Trivia
- Unused data suggests that Felix and Annette were planned to potentially leave the party at some point prior to this mission and be fought here, replacing the "Kingdom General" units; this was cut from the final game.[1][2]
Etymology and other languages
| Names, etymology, and in other regions
|
| Language
|
Name
|
Definition, etymology, and notes
|
| English
|
Reclaiming the Capital
|
--
|
| Spanish
|
La reconquista de la capital
|
The reconquest of the capital
|
| French
|
La reconquête de Fhirdiad
|
The reconquest of Fhirdiad
|
| German
|
Kampf um die Hauptstadt
|
Fight for the Capital
|
| Italian
|
La reiconquista della capitale
|
The reconquest of the capital
|
| Korean
|
왕도 탈환전
|
Kingdom capital recapture
|
| Simplified Chinese
|
王都夺还战
|
The king's battle to reclaim the capital
|
| Traditional Chinese
|
王都奪還戰
|
The king's battle to reclaim the capital
|
|
|
Gallery
This section has been marked as a stub. Please help improve the page by adding information.
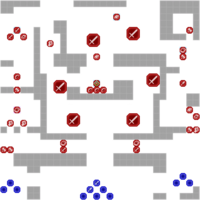
Entering the red area activates the Viskam, the yellow region defines the "north-center area", and entering the blue area triggers third army reinforcement.
References
- ↑ DeathChaos, Fire Emblem: Three Houses - Hidden/Impossible Battle Conversations (Blue Lions ch18 SPOILERS), YouTube, Published: August 21, 2019, Retrieved: November 4, 2019
- ↑ DeathChaos, Fire Emblem: Three Houses - Hidden/Impossible Battle Conversations (Blue Lions ch18 SPOILERS) (pt2), YouTube, Published: August 21, 2019, Retrieved: November 4, 2019


