| Site News |
|---|
| Warning: This wiki contains spoilers. Read at your own risk! Social media: If you would like, please join our Discord server, and/or follow us on Twitter (X) or Tumblr! |
The Golden Scheme/Taking Fort Merceus: Difference between revisions
m (→Item data) |
Tag: Undo |
||
| Line 129: | Line 129: | ||
|item6=Vulnerary | |item6=Vulnerary | ||
|item6image=potion | |item6image=potion | ||
|obtain6=Steal from [[Linhardt]]{{h|*|If he was not | |obtain6=Steal from [[Linhardt]]{{h|*|If he was not recruited}} | ||
|itemlast=Elixir | |itemlast=Elixir | ||
|itemlastimage=potion | |itemlastimage=potion | ||
Revision as of 15:54, 30 March 2021
| ||||
|

Taking Fort Merceus (Japanese: メリセウス攻防戦 Meriseus battle) is the main battle map of the eighteenth chapter on the Verdant Wind route in Fire Emblem: Three Houses. In this map, Claude leads an sneak attack against Fort Merceus, bringing along unfamiliar allies to aid him.
Beginning log
Fort Merceus, said to be impregnable, lies between you and Enbarr, the Imperial Capital. Seizing the sturdy fortress will require a carefully devised strategy.
Map data
Normal Hard/Maddening
| ||||||
|
| |||||
| Victory: Defeat the Death Knight | Player | Other | Enemy | |||
|---|---|---|---|---|---|---|
| Defeat: Byleth or Claude dies*, the player's army is routed*, or the Death Knight escapes | 11 | 0+5 | 30+∞ | |||
| ||||||


Character data
| Characters | |
|---|---|
New units
| |
| |
Available characters
| |
                                 
|
Item data
| ||||||||||||||||||||||||
|
Enemy data
Normal Hard Maddening
| |||||||||||||||||||||||||||||||||||||||||||||||||||||||||||||||||||||||||||||||||||||||||||||||||||||||||||||||||||||||||||||||||||||||||||||||||||||||||||||||||||||||||||||||||||||||||||||||||||||||||||||||||||||||||||||||||||||||||||||||||||||||||||||||||||||||||||||||||||||||||||||||||||||||||||||||||||||||||||||||||||||||||||||||||||||||||||||||||||||||||||||||||||||||||||||||||||||||||||||||||||||||||||||||||||||||||||||||||||||||||||||||||||||||||||||||||||||||||||||||||||||||||||||||||||||||||||||||||||||||||||||||||||||||||||||||||||||||||||||||||||||||||||||||||||||||||||||||||||||||||||||||||||||||||||||||||
| |||||||||||||||||||||||||||||||||||||||||||||||||||||||||||||||||||||||||||||||||||||||||||||||||||||||||||||||||||||||||||||||||||||||||||||||||||||||||||||||||||||||||||||||||||||||||||||||||||||||||||||||||||||||||||||||||||||||||||||||||||||||||||||||||||||||||||||||||||||||||||||||||||||||||||||||||||||||||||||||||||||||||||||||||||||||||||||||||||||||||||||||||||||||||||||||||||||||||||||||||||||||||||||||||||||||||||||||||||||||||||||||||||||||||||||||||||||||||||||||||||||||||||||||||||||||||||||||||||||||||||||||||||||||||||||||||||||||||||||||||||||||||||||||||||||||||||||||||||||||||||||||||||||||||||||||||
| |||||||||||||||||||||||||||||||||||||||||||||||||||||||||||||||||||||||||||||||||||||||||||||||||||||||||||||||||||||||||||||||||||||||||||||||||||||||||||||||||||||||||||||||||||||||||||||||||||||||||||||||||||||||||||||||||||||||||||||||||||||||||||||||||||||||||||||||||||||||||||||||||||||||||||||||||||||||||||||||||||||||||||||||||||||||||||||||||||||||||||||||||||||||||||||||||||||||||||||||||||||||||||||||||||||||||||||||||||||||||||||||||||||||||||||||||||||||||||||||||||||||||||||||||||||||||||||||||||||||||||||||||||||||||||||||||||||||||||||||||||||||||||||||||||||||||||||||||||||||||||||||||||||||||||||||||
| |||||||||||||||||||||||||||||||||||||||||||||||||||||||||||||||||||||||||||||||||||||||||||||||||||||||||||||||||||||||||||||||||||||||||||||||||||||||||||||||||||||||||||||||||||||||||||||||||||||||||||||||||||||||||||||||||||||||||||||||||||||||||||||||||||||||||||||||||||||||||||||||||||||||||||||||||||||||||||||||||||||||||||||||||||||||||||||||||||||||||||||||||||||||||||||||||||||||||||||||||||||||||||||||||||||||||||||||||||||||||||||||||||||||||||||||||||||||||||||||||||||||||||||||||||||||||||||||||||||||||||||||||||||||||||||||||||||||||||||||||||||||||||||||||||||||||||||||||||||||||||||||||||||||||||||||||
Reinforcements
- Each turn, a random combination of the following will appear:
- 1 Paladin from the northwest corner of the map
- 1 Armored Knight from the northern border of the map
- 1 Dark Mage from the southwest corner of the map
- 1 Fortress Knight from the southern border of the map
- Note: Reinforcements are halted if a player unit reaches the spaces where they come from.
NPC data
Normal Hard Maddening
| |||||||||||||||||||||||||||||||||||||||||||||||||||||||||||||||||||||||||||||||||||||||||||||||||||||||
| |||||||||||||||||||||||||||||||||||||||||||||||||||||||||||||||||||||||||||||||||||||||||||||||||||||||
| |||||||||||||||||||||||||||||||||||||||||||||||||||||||||||||||||||||||||||||||||||||||||||||||||||||||
| |||||||||||||||||||||||||||||||||||||||||||||||||||||||||||||||||||||||||||||||||||||||||||||||||||||||
Reinforcements
- At the start of turn 1
Boss data
- Main article:
Death Knight
Normal Hard Maddening
|
|
| |||||||||||||||||||||||||||||||||||||||||||||||||||||||||||||||||||||||||||||||||||

Sub-bosses
- Main article:
Linhardt
Normal Hard Maddening
|
|
| |||||||||||||||||||||||||||||||||||||||||||||||||||||||||||||||||||||||||||||||||||

- Main article:
Caspar
Normal Hard Maddening
|
|
| |||||||||||||||||||||||||||||||||||||||||||||||||||||||||||||||||||||||||||||||||||

Strategy
| This section details unofficial strategies that may help with completion of the chapter. This may not work for everybody. |
The goal of the map is to defeat the Death Knight and you start surprisingly close to him. If you attempt to approach him via conventional means without using Stride or Warp, the Death Knight will begin to flee to the Northwest exit; however, with properly trained units you should be able to take out the Death Knight in two turns. The first method is to use Lysithea's Dark Spikes Τ spell to one-shot the Death Knight. The minimum stats needed for Lysithea to exactly one-shot the Death Knight are 23/36/49 Magic plus Fiendish Blow and an equipped battalion bonus of +8 to magic which is granted by a max level Alliance Sages battalion from the Battalion Guild. To get Lysithea to the Death Knight, have a mounted unit use Stride on Lysithea, a Warp User, and a Dancer then move that unit to the left with Canto. Move Lysithea as far to the northwest as possible and take out the enemy Fortress Knight. Dance Lysithea and move her closer to the ballista directly to the north. Move your Warp user as close to Lysithea as possible then end your turn or move your other units however you like. On the next turn, use stride on Lysithea, and your Warp user if necessary, and Warp Lysithea as close to the Death Knight as possible. With Stride, and a magic-range increasing staff, either the Caduceus Staff or Thyrsus should do, Lysithea can reach the Death Knight and one-shot him, ending the chapter before he can even think of running away.
If your Lysithea is too weak to one-shot the Death Knight, there is an even easier method to kill him quickly. If you have the Lance of Ruin and a unit with Knightkneeler (preferrably a Wyvern Lord or Falcon Knight), as long as they have at least 14/26/35 Strength combined with Death Blow and a +8 bonus to strength granted by the Immortal Corps, they can one-shot the Death Knight on the first turn. Start by using Stride on your dancer and your flying Death Knight-killer. Move the flier as close to the Death Knight as possible but within your dancer's movement range then wait with that unit, dance them so they can move again, then have that unit one-shot the Death Knight. In addition to this method, there is an even easier method. If you have a Seteth, Sylvain or Ferdinand that has learned Swift Strikes and have the Spear of Assal, you essentially have a guaranteed one-round kill against the Death Knight. As long as those units have at least 1/7/11 (yes, the strength requirement is actually that low) Strength, or 13/19/23 if the unit in question lacks Death Blow, they one-round the Death Knight. You can use the same methods mentioned earlier if the Swift Strikes user is a flier; alternatively, if they are a Paladin without any flying class certifications, add a Warp user to the mix to warp them past the line of axe-users to the south of the Death Knight.
Etymology and other languages
| Names, etymology, and in other regions | ||
|---|---|---|
| Language | Name | Definition, etymology, and notes |
| English |
Taking Fort Merceus |
-- |
| Spanish |
La toma de Fuerte Merceus |
The taking of Fort Merceus |
| French |
L'inexpugnable fort Merceus |
The impregnable fort Merceus |
| German |
Eroberung von Merceus |
Conquest of Merceus |
| Italian |
La presa del forte Merceus |
The taking of fort Merceus |
| Korean |
메리세우스 공방전 |
Battle for Merceus |
| Simplified Chinese |
梅利赛乌斯攻防战 |
Merceus siege battle |
| Traditional Chinese |
梅利賽烏斯攻防戰 |
Merceus siege battle |
Gallery
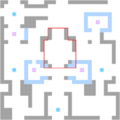
Entering the area outlined in red will trigger the Death Knight's movement.

| ← To War at Gronder • | Taking Fort Merceus | • The Enbarr Infiltration → |
|---|