| Site News |
|---|
| Warning: This wiki contains spoilers. Read at your own risk! Social media: If you would like, please join our Discord server, and/or follow us on Twitter (X) or Tumblr! |
Black Market Scheme: Difference between revisions
Thecornerman (talk | contribs) (Added details for regional reinforcement triggers—could not verify triggers for units near northwest ramparts or opera house, and the lack of dialogue most of them have as opposed to the dialogue other groups have inclines me to believe they don't exist; misc.) |
|||
| Line 13: | Line 13: | ||
[[Balthus]] approaches [[Byleth]] and reports that [[Hapi]] has been abducted; she climbed into a box full of fluffy feathers and fell asleep, at which point the box was stolen and taken to Enbarr to be sold on the black market. He convinces Byleth to aid him, and the two rush to Enbarr. As the two search Enbarr for her, Hapi suddenly appears unharmed. Balthus admits that he fabricated the abduction story to get to Enbarr so he could stop a certain possession of his mother's from being sold on the black market, but the group is accosted by bandits before he can finish explaining. | [[Balthus]] approaches [[Byleth]] and reports that [[Hapi]] has been abducted; she climbed into a box full of fluffy feathers and fell asleep, at which point the box was stolen and taken to Enbarr to be sold on the black market. He convinces Byleth to aid him, and the two rush to Enbarr. As the two search Enbarr for her, Hapi suddenly appears unharmed. Balthus admits that he fabricated the abduction story to get to Enbarr so he could stop a certain possession of his mother's from being sold on the black market, but the group is accosted by bandits before he can finish explaining. | ||
The party battles and defeats both the bandits and [[Baron Ochs]] to claim the item Balthus is looking for, Hero's Relic-like gauntlets called the [[Vajra-Mushti]]. After returning home, Balthus explains that the Vajra-Mushti is a replica Relic created after the War of Heroes that was passed down through his mother's village. He lied to the party because he was afraid that he couldn't take on a Demonic Beast alone if things got out of hand and feared that the [[Church of Seiros]] would impound the Vajra-Mushti if he told the truth. He and Hapi wonder who Baron Ochs was; [[Edelgard]] explains that he wanted the Vajra-Mushti as collateral to rescue his daughter [[ | The party battles and defeats both the bandits and [[Baron Ochs]] to claim the item Balthus is looking for, Hero's Relic-like gauntlets called the [[Vajra-Mushti]]. After returning home, Balthus explains that the Vajra-Mushti is a replica Relic created after the War of Heroes that was passed down through his mother's village. He lied to the party because he was afraid that he couldn't take on a Demonic Beast alone if things got out of hand and feared that the [[Church of Seiros]] would impound the Vajra-Mushti if he told the truth. He and Hapi wonder who Baron Ochs was; [[Edelgard]] explains that he wanted the Vajra-Mushti as collateral to rescue his daughter [[Monica]]. Balthus receives a letter from his mother entrusting the Vajra-Mushti to him. | ||
===Beginning log=== | ===Beginning log=== | ||
Revision as of 21:30, 12 June 2022
| ||||
|

Black Market Scheme (Japanese: 許し難き行い Unforgivable Deed) is a paralogue in Fire Emblem: Three Houses available through downloadable content. It is available from Chapter 7 to Chapter 11. In order to attempt this paralogue, the player must have recruited Balthus or Hapi and neither one must have fallen in battle previously. In this chapter, Balthus travels to Enbarr to stop the Vajra-Mushti from being sold on the black market.
Plot
- Main article:
Black Market Scheme/Script
Balthus approaches Byleth and reports that Hapi has been abducted; she climbed into a box full of fluffy feathers and fell asleep, at which point the box was stolen and taken to Enbarr to be sold on the black market. He convinces Byleth to aid him, and the two rush to Enbarr. As the two search Enbarr for her, Hapi suddenly appears unharmed. Balthus admits that he fabricated the abduction story to get to Enbarr so he could stop a certain possession of his mother's from being sold on the black market, but the group is accosted by bandits before he can finish explaining.
The party battles and defeats both the bandits and Baron Ochs to claim the item Balthus is looking for, Hero's Relic-like gauntlets called the Vajra-Mushti. After returning home, Balthus explains that the Vajra-Mushti is a replica Relic created after the War of Heroes that was passed down through his mother's village. He lied to the party because he was afraid that he couldn't take on a Demonic Beast alone if things got out of hand and feared that the Church of Seiros would impound the Vajra-Mushti if he told the truth. He and Hapi wonder who Baron Ochs was; Edelgard explains that he wanted the Vajra-Mushti as collateral to rescue his daughter Monica. Balthus receives a letter from his mother entrusting the Vajra-Mushti to him.
Beginning log
It seems Hapi has gone missing. Following a tip from Balthus, your search leads you to the black market in Enbarr.
Chapter data
Normal Hard Maddening

Character data
Black Eagles ![]() Blue Lions
Blue Lions ![]() Golden Deer
Golden Deer ![]()
| Characters | |
|---|---|
New units
| |
| |
Available characters
| |
                           
|


- Other characters may be available if the paralogue is attempted later.
This paralogue only requires Balthus or Hapi to be in Byleth's class. If one of them is not a member of their class, they will be temporarily controllable for this map with the following stats.
Balthus, Normal Balthus, Hard Balthus, Maddening Hapi, Normal Hapi, Hard Hapi, Maddening
|
|
| |||||||||||||||||||||||||||||||||||||||||||||||||||||||||||||||||||||||||||||||||||


Item data
| ||||||||||||
|
Enemy data
- On Maddening, some stats are separated by a '~'. The stats to the left of the ~ are taken during Chapter 7, the earliest possible point where this chapter may be undertaken; the stats to the right of the ~ are taken from Chapter 8 and later, at which point the enemies gain a level.
Normal Hard Maddening
| ||||||||||||||||||||||||||||||||||||||||||||||||||||||||||||||||||||||||||||||||||||||||||||||||||||||||||||||||||||||||||||||||||||||||||||||||||||||||||||||||||||||||||||||||||||||||||||||||||||||||||||||||||||||||||||||||||||||||||||||||||||||||||||||||||||||||||||||||||||||||||||||||||||||||||||||||||||||||||||||||||||||||||||||||||||||||||||||||||||||||||||||||||||||||||||||||||||||||||||||||||||||||||||||||||||||
| ||||||||||||||||||||||||||||||||||||||||||||||||||||||||||||||||||||||||||||||||||||||||||||||||||||||||||||||||||||||||||||||||||||||||||||||||||||||||||||||||||||||||||||||||||||||||||||||||||||||||||||||||||||||||||||||||||||||||||||||||||||||||||||||||||||||||||||||||||||||||||||||||||||||||||||||||||||||||||||||||||||||||||||||||||||||||||||||||||||||||||||||||||||||||||||||||||||||||||||||||||||||||||||||||||||||
| ||||||||||||||||||||||||||||||||||||||||||||||||||||||||||||||||||||||||||||||||||||||||||||||||||||||||||||||||||||||||||||||||||||||||||||||||||||||||||||||||||||||||||||||||||||||||||||||||||||||||||||||||||||||||||||||||||||||||||||||||||||||||||||||||||||||||||||||||||||||||||||||||||||||||||||||||||||||||||||||||||||||||||||||||||||||||||||||||||||||||||||||||||||||||||||||||||||||||||||||||||||||||||||||||||||||
| ||||||||||||||||||||||||||||||||||||||||||||||||||||||||||||||||||||||||||||||||||||||||||||||||||||||||||||||||||||||||||||||||||||||||||||||||||||||||||||||||||||||||||||||||||||||||||||||||||||||||||||||||||||||||||||||||||||||||||||||||||||||||||||||||||||||||||||||||||||||||||||||||||||||||||||||||||||||||||||||||||||||||||||||||||||||||||||||||||||||||||||||||||||||||||||||||||||||||||||||||||||||||||||||||||||||
Reinforcements
- Turn 6 (Normal/Hard)/At the start of turn 5 (Maddening)
- 2 Cavaliers from near the northwestern ramparts
- 1 Paladin from near the northwestern ramparts (Hard/Maddening only)
- 1 Sniper with a Rogues battalion from near the northwestern ramparts (Maddening only)
- 1 Mercenary from near the northernmost edifice
- 1 Warlock with Wind from near the northernmost edifice (Hard/Maddening only)
- 1 Thief with an Empire Infantry battalion from near the northernmost edifice (Hard/Maddening only)
- 1 Warrior with an Empire Infantry battalion from near the northernmost edifice (Maddening only)
- 2 Brigands from the north of the opera hall
- 1 Warrior with a Thieves battalion from north of the opera hall (Hard/Maddening only)
- Turn 6 (Normal/Hard)/At the start of turn 5 (Maddening), or after the player unit southeast of the church leaves their starting area
- Turn 6 (Normal/Hard)/At the start of turn 5 (Maddening), or after the player unit that starts just east of Baron Ochs leaves their starting area
- Turn 6 (Normal/Hard)/At the start of turn 5 (Maddening), or after Byleth, Balthus, or the player unit in the northeast enter the area between Baron Ochs and the north-south river
- 1 Thief from south of Balthus's starting position
- 1 Warlock with Thunder and a Rogues battalion from south of Balthus's starting position
- 1 Brawler with a Rogues battalion from south of Balthus's starting position (Maddening only)
- 1 Grappler from south of Balthus's starting position (Maddening only)
- Turn 6 (Normal/Hard)/At the start of turn 5 (Maddening), or after Byleth, Balthus, or the player unit in the northeast enter the area northeast of the central chest
- After Baron Ochs is defeated once
- Baron Ochs transforms into the Forlorn Beast
Boss data
- Stats with two figures separated by a ~ are presented as a range. The figures to the left of the ~ are taken during Chapter 7, the earliest possible point where this chapter may be undertaken; the figures to the right of the ~ are taken from Chapter 8, the point where this boss gains a level and stops scaling.
- Main article:
Baron Ochs
Normal Hard Maddening
|
|
| |||||||||||||||||||||||||||||||||||||||||||||||||||||||||||||||||||||||||||||||||||

- Forlorn Beast
Normal Hard Maddening
|
|
| |||||||||||||||||||||||||||||||||||||||||||||||||||||||||||||||||||||||||||||||||||

Strategy
| This section details unofficial strategies that may help with completion of the chapter. This may not work for everybody. |
You and your allies start off strewn across the streets of Enbarr. Given that you are separated, things are going to start off really nasty. Move Hapi to safety immediately, move Byleth just inside the northern Brigand's range, and move Balthus next to them; if he's got D Authority, now's a good time to pop Rally Strength. In the northeast corner, stick someone with good Charm, a gambit that hits both Mages, and a forged 1-2 range weapon and you'll be fine. Whoever's closest to the Archers on the bridge wants to get right between them and hit one with their hardest attack, hopefully killing him instantly. The north-center unit needs to pull a Cavalier or two away from the bridge unit to take the pressure off. In the southwest corner, you're stuck with a Sniper, a Bishop, and a Brawler - here's a good place to trigger a powerful gambit like Blaze if you have it. The western unit is safe for now, and can make to regroup with someone. The south center unit also wants to be able to kill their Archer so they can deal with the Brawler safely. If you're having trouble, it might be a good idea to underdeploy for this map so nobody gets killed.
Trivia
- In the chapter's script, a piece of Edelgard's dialogue is set to change if the game checks the paralogue is being done before Chapter 6. As the paralogue is available from Chapter 7 onwards, this dialogue ultimately goes unused.
Etymology and other languages
| Names, etymology, and in other regions | ||
|---|---|---|
| Language | Name | Definition, etymology, and notes |
| English |
Black Market Scheme |
-- |
| Spanish |
Un acto imperdonable |
An unpardonable act |
| French |
Un acte impardonnable |
An unpardonable act |
| German |
Schwarzmarkttricks |
Black market Tricks |
| Italian |
Atto imperdonabile |
Unpardonable act |
| Korean |
용서할 수 없는 행위 |
Unforgivable act |
| Simplified Chinese |
不可原谅的行为 |
Unforgivable action |
| Traditional Chinese |
不可原諒的行為 |
Unforgivable action |
Gallery

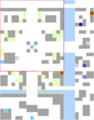
The areas the units east of the church and east of Baron Ochs will trigger reinforcements by exiting.
The areas the eastern units will trigger by entering.


References
| Black Market Scheme |
|---|