| Site News |
|---|
| Warning: This wiki contains spoilers. Read at your own risk! Social media: If you would like, please join our Discord server, and/or follow us on Twitter (X) or Tumblr! |
The Ghosts of Bern: Difference between revisions
Thecornerman (talk | contribs) (Added previous and next chapters, and new character inventories) |
SovietFarmer (talk | contribs) m (→Trivia) |
||
| (26 intermediate revisions by 12 users not shown) | |||
| Line 1: | Line 1: | ||
{{Chapter Infobox | {{Chapter Infobox | ||
|image=[[File:Cm fe06 23.png|200px]] | |image=[[File:Cm fe06 23.png|200px]] | ||
|location= | |location=Dragon Temple Exterior | ||
|new units=[[Karel]] | |new units=[[Karel]] | ||
|boss=[[Brunnya]] | |boss=[[Brunnya]] | ||
| Line 11: | Line 10: | ||
{{Quote|Bern recognizes itself as being the strongest force in Elibe. Their pride would not allow them accept defeat without fighting.|[[Guinivere]] to [[Roy]]}} | {{Quote|Bern recognizes itself as being the strongest force in Elibe. Their pride would not allow them accept defeat without fighting.|[[Guinivere]] to [[Roy]]}} | ||
'''The Ghosts of Bern''' (Japanese: {{hl|ベルンの亡霊|Berun no bōrei}} '' | '''The Ghosts of Bern''' (Japanese: {{hl|ベルンの亡霊|Berun no bōrei}} ''Ghosts of Bern'') is Chapter 23 of {{FE6}}. In order to play this chapter, the player must have completed every side quest, collected every divine weapon, and kept every divine weapon intact. | ||
==Plot== | ==Plot== | ||
{{main|The Ghosts of Bern/Script}} | {{main|The Ghosts of Bern/Script}} | ||
With Zephiel's death, most of Bern's forces have scattered. However, the remaining Bernese forces, under command of the last Wyvern General [[Brunnya]], have gathered outside the [[Dragon Temple]] in one last stand against the Etrurian Army. Though [[Roy]] offers them a peaceful surrender, [[Guinivere]] explains that their pride as Bern's knight will not allow them to, and the stays by the frontlines to hear their final struggle. | |||
[[ | |||
As the fight continues, [[Karel]] the Sword Saint notices the battle approaching the isolated village he resides in, but he has no interest in joining, unless his daughter [[Fir]] or her father [[Bartre]] enter. Either of them will tell Karel that his sister [[Karla]] has succumbed to her illness, and Karel then joins the battle to support his remaining family. | |||
Roy pushes through Brunnya's army and reaches the temple. Elffin warns him that the temple supposedly holds the power of dragons, which will empower the dragons inside. As a precaution, Roy chooses to only enter with those capable of wielding the [[legendary weapons]]. | |||
==Chapter data== | ==Chapter data== | ||
| Line 24: | Line 25: | ||
|victory=Seize the castle gate | |victory=Seize the castle gate | ||
|defeat=[[Roy]] dies | |defeat=[[Roy]] dies | ||
|ally= | |ally=1–16{{h|+1|Upon Karel being recruited}} | ||
|enemy=41 | |enemy=41 | ||
|map=[[File:Cm fe06 23.png]] | |map=[[File:Cm fe06 23.png]] | ||
| Line 41: | Line 42: | ||
|recruitment method=Visit [[village]] with [[Fir]] or [[Bartre]] | |recruitment method=Visit [[village]] with [[Fir]] or [[Bartre]] | ||
}} | }} | ||
|return1= | |forced1=roy | ||
|return2= | |return1=marcus | ||
|return3= | |return2=alen | ||
|return4=lance | |return3=bors | ||
| | |return4=wolt | ||
| | |return5=lance | ||
| | |return5article=Lance (character) | ||
| | |return6=merlinus | ||
| | |return7=elen | ||
|return9= | |return8=ward | ||
|return10= | |return8article=Ward (character) | ||
|return11= | |return9=lot | ||
|return12= | |return10=dieck | ||
|return13= | |return11=shanna | ||
|return14= | |return12=chad | ||
|return15= | |return13=lugh | ||
|return16= | |return14=clarine | ||
|return17= | |return15=rutger | ||
|return18= | |return16=saul | ||
|return19= | |return17=dorothy | ||
|return20= | |return18=sue | ||
|return21= | |return19=zelot | ||
|return22= | |return20=trec | ||
|return23= | |return21=noah | ||
|return24= | |return22=astolfo | ||
|return25= | |return23=lilina | ||
|return26= | |return24=gwendolyn | ||
|return27= | |return25=barthe | ||
|return28= | |return26=ogier | ||
|return29= | |return27=fir | ||
|return30= | |return28=sin | ||
|return31= | |return29=gonzalez | ||
|return32= | |return30=klein | ||
|return33= | |return31=thea | ||
|return34= | |return32=larum | ||
|return35= | |return33=echidna | ||
|return36= | |return34=elffin | ||
|return37= | |return35=bartre | ||
|return38= | |return36=geese | ||
|return39= | |return37=raigh | ||
|return40= | |return38=cath | ||
|return41= | |return39=melady | ||
|return42= | |return40=perceval | ||
|return43= | |return41=cecilia | ||
|return44= | |return42=sophia | ||
|return45= | |return43=igrene | ||
|return46= | |return44=garret | ||
|return47= | |return45=fae | ||
|return48= | |return46=hugh | ||
|return49= | |return47=zeiss | ||
|return50= | |return48=douglas | ||
|return51= | |return49=niime | ||
|return52 | |return50=juno | ||
|return51=dayan | |||
|return52=yoder | |||
}} | }} | ||
| Line 100: | Line 102: | ||
{{ChapItems | {{ChapItems | ||
|platform=gba | |platform=gba | ||
|item1= | |item1=Guiding Ring | ||
|obtain1=Steal from enemy [[Manakete]] | |obtain1=Steal from [[Brunnya]] | ||
| | |item2=Firestone | ||
| | |obtain2=Steal from enemy [[Manakete]] (thief must be [[Berserk (condition)|berserked]], [[Glitch#Obtain_a_Firestone|glitch]]) | ||
|itemlast= | |item3=Firestone | ||
|obtainlast=Steal from [[ | |obtain3=Steal from enemy [[Manakete]] (thief must be [[Berserk (condition)|berserked]], glitch) | ||
|item4=Firestone | |||
|obtain4=Steal from enemy [[Manakete]] (thief must be [[Berserk (condition)|berserked]], glitch) | |||
|item5=Firestone | |||
|obtain5=Steal from enemy [[Manakete]] (thief must be [[Berserk (condition)|berserked]], glitch) | |||
|item6=Red Gem | |||
|obtain6=Steal from enemy [[Manakete]] | |||
|itemlast=Blue Gem | |||
|obtainlast=Steal from enemy [[Druid]] | |||
}} | }} | ||
| Line 161: | Line 171: | ||
|bocost6=2,000 | |bocost6=2,000 | ||
|anima1=Fire | |anima1=Fire | ||
|ancost1=420 | |ancost1=420 | ||
|anima2=Thunder | |anima2=Thunder | ||
|ancost2=500 | |ancost2=500 | ||
|anima3=Elfire | |anima3=Elfire | ||
| Line 202: | Line 210: | ||
|tab2=Hard | |tab2=Hard | ||
|content1={{ChapUnitHdr|type=Enemy|platform=gba}} | |content1={{ChapUnitHdr|type=Enemy|platform=gba}} | ||
{{ChapUnitCellGBA | |||
|name=[[Brunnya]] | |||
|class=Sage | |||
|version=female | |||
|lv=20 | |||
|#=1 | |||
|hp=38 | |||
|str=23 | |||
|skill=18 | |||
|spd=18 | |||
|lck=17 | |||
|def=18 | |||
|res=25 | |||
|con=6 | |||
|mov=6 | |||
|inventory={{Item|6|Fimbulvetr}} • {{Item|6|Bolting}} • {{Item|6|Guiding Ring}} | |||
|notes=Does not move; stands on the [[Terrain/Game Boy Advance games#Fire Emblem: The Binding Blade|gate]], the chapter's seize point. | |||
}} | |||
{{ChapUnitCellGBA | {{ChapUnitCellGBA | ||
|name=Manakete | |name=Manakete | ||
| Line 317: | Line 343: | ||
|con=11 | |con=11 | ||
|mov=8 | |mov=8 | ||
|inventory={{Item|6|Silver Lance}} • {{Item|6|Spear}} | |inventory={{Item|6|Silver Lance}} • {{Item|6|Spear|image=spear fe06}} | ||
|notes=The lower one moves to attack units in range. | |notes=The lower one moves to attack units in range. | ||
}} | }} | ||
| Line 434: | Line 460: | ||
|con=6 | |con=6 | ||
|mov=6 | |mov=6 | ||
|inventory={{Item|6|Nosferatu}} • {{Item|6|Physic}} • {{Item|6|Blue Gem}} | |inventory={{Item|6|Nosferatu|image=nosferatu fe06}} • {{Item|6|Physic}} • {{Item|6|Blue Gem}} | ||
|notes=Attacks units he can attack without moving, or moves to be next to units within four tiles without attacking; otherwise, returns to starting position. Checks for movement targets every other turn after returning to starting position. | |notes=Attacks units he can attack without moving, or moves to be next to units within four tiles without attacking; otherwise, returns to starting position. Checks for movement targets every other turn after returning to starting position. | ||
}} | }} | ||
| Line 468: | Line 494: | ||
|con=6 | |con=6 | ||
|mov=6 | |mov=6 | ||
|inventory={{Item|6|Nosferatu}} • {{Item|6|Physic}} | |inventory={{Item|6|Nosferatu|image=nosferatu fe06}} • {{Item|6|Physic}} | ||
}} | }} | ||
{{ChapUnitCellGBA | {{ChapUnitCellGBA | ||
| Line 486: | Line 512: | ||
|inventory={{Item|6|Flux}} • {{Item|6|Mend}} | |inventory={{Item|6|Flux}} • {{Item|6|Mend}} | ||
|notes=The eastern one begins moving unprovoked when he can attack a unit within two turns. | |notes=The eastern one begins moving unprovoked when he can attack a unit within two turns. | ||
|last=y | |||
}} | }} | ||
{{ChapUnitFtr}} | |||
|content2={{ChapUnitHdr|type=Enemy|platform=gba}} | |||
{{ChapUnitCellGBA | {{ChapUnitCellGBA | ||
|name=[[Brunnya]] | |name=[[Brunnya]] | ||
| Line 493: | Line 522: | ||
|lv=20 | |lv=20 | ||
|#=1 | |#=1 | ||
|hp= | |hp=43~46 | ||
|str= | |str=28~30 | ||
|skill= | |skill=21~24 | ||
|spd= | |spd=21~23 | ||
|lck= | |lck=18~20 | ||
|def= | |def=19~20 | ||
|res=25 | |res=25 | ||
|con=6 | |con=6 | ||
| Line 504: | Line 533: | ||
|inventory={{Item|6|Fimbulvetr}} • {{Item|6|Bolting}} • {{Item|6|Guiding Ring}} | |inventory={{Item|6|Fimbulvetr}} • {{Item|6|Bolting}} • {{Item|6|Guiding Ring}} | ||
|notes=Does not move; stands on the [[Terrain/Game Boy Advance games#Fire Emblem: The Binding Blade|gate]], the chapter's seize point. | |notes=Does not move; stands on the [[Terrain/Game Boy Advance games#Fire Emblem: The Binding Blade|gate]], the chapter's seize point. | ||
}} | }} | ||
{{ChapUnitCellGBA | {{ChapUnitCellGBA | ||
|name=Manakete | |name=Manakete | ||
| Line 623: | Line 649: | ||
|con=11 | |con=11 | ||
|mov=8 | |mov=8 | ||
|inventory={{Item|6|Silver Lance}} • {{Item|6|Spear}} | |inventory={{Item|6|Silver Lance}} • {{Item|6|Spear|image=spear fe06}} | ||
|notes=The lower one moves to attack units in range. | |notes=The lower one moves to attack units in range. | ||
}} | }} | ||
| Line 740: | Line 766: | ||
|con=6 | |con=6 | ||
|mov=6 | |mov=6 | ||
|inventory={{Item|6|Nosferatu}} • {{Item|6|Physic}} • {{Item|6|Blue Gem}} | |inventory={{Item|6|Nosferatu|image=nosferatu fe06}} • {{Item|6|Physic}} • {{Item|6|Blue Gem}} | ||
|notes=Attacks units he can attack without moving, or moves to be next to units within four tiles without attacking; otherwise, returns to starting position. Checks for movement targets every other turn after returning to starting position. | |notes=Attacks units he can attack without moving, or moves to be next to units within four tiles without attacking; otherwise, returns to starting position. Checks for movement targets every other turn after returning to starting position. | ||
}} | }} | ||
| Line 774: | Line 800: | ||
|con=6 | |con=6 | ||
|mov=6 | |mov=6 | ||
|inventory={{Item|6|Nosferatu}} • {{Item|6|Physic}} | |inventory={{Item|6|Nosferatu|image=nosferatu fe06}} • {{Item|6|Physic}} | ||
}} | }} | ||
{{ChapUnitCellGBA | {{ChapUnitCellGBA | ||
| Line 792: | Line 818: | ||
|inventory={{Item|6|Flux}} • {{Item|6|Mend}} | |inventory={{Item|6|Flux}} • {{Item|6|Mend}} | ||
|notes=The eastern one begins moving unprovoked when he can attack a unit within two turns. | |notes=The eastern one begins moving unprovoked when he can attack a unit within two turns. | ||
|last=y | |last=y | ||
}} | }} | ||
| Line 863: | Line 871: | ||
==Strategy== | ==Strategy== | ||
{{strategy}} | {{strategy}} | ||
'''Preparing for Battle:''' | |||
* Assemble a diverse team including bow-wielders, [[Mage]]s, and agile yet powerful units like [[Hero]]es or [[Swordmaster]]s. | |||
* Purchase equipment that will be useful, and sell off everything else. Starting [[Legends and Lies|next chapter]], you fight exactly 2 classes of enemies; [[Manakete]]s and [[Demon Dragon]]s. Since legendary weapons would need to have be conserved to even get to this point and are the best way to fight dragons, only buy equipment useful against them unless you desperately need something to clear this chapter. Likewise, [[Armorslayer|anti-]][[Hammer|armor]] and [[Horseslayer|anti-]][[Halberd|horse]] weapons are all but useless, since there's none left for you to fight; sell all of them. | |||
** Recommended equipment for physical units should be either Silver or Killer equipment if they can't use a Legendary Weapon, or if said weapon is low on durability; ~19-20 STR is the benchmark where hit+crit from Killer equals 2 hits of Silver in damage; units above the mark favor Killer weapons for crit rate while units below the mark need the extra punching power on Silver weapons to get better damage averages against Manaketes. | |||
** For magic users, just buy the strongest tome you can get; Manaketes only have 15 RES on Hard, so magic users can deal consistent damage to them, even if they take a lot of damage from them in the process. | |||
** For staff users, [[Physic]] is purchasable and recommended; Chapter 24 has narrow pathways that can have other units block the staff user from reaching the injured unit. Failing that, [[Mend]] or [[Recover]] is recommended as Manaketes do a lot of damage and therefore frontline units require a lot of healing to keep taking hits. | |||
'''Initial Battle Strategy:''' | |||
* At the start, only the nearest [[Dragon Rider]]s and the two closest [[Druid]]s will approach you. Position your units and be prepared. | |||
* Split your team into two: Have the top group stay outside the [[Manakete]]'s attack range. Position the bottom group to engage the Dragon Riders on the subsequent turn. | |||
* Always use terrain to your advantage. When forests are present, station your units within them to benefit from defensive boosts. | |||
'''Advanced Tactics:''' | |||
* Once the initial wave of enemies is dealt with, deploy your top flying unit equipped with a [[Delphi Shield]] to neutralize the [[Archer]]s manning the [[ballista]]e. If you do not have this shield, use a well-defended or evasive character to exhaust the ballista or simply keep out of its range. | |||
* For dealing with Manaketes: Place Mages just outside a Manakete's attack zone. On the next turn, focus all attacks on them. | |||
* The toughest opponents are near [[Brunnya]]. Particularly, Druids equipped with disruptive staves have a range of roughly 16 tiles. If you've split your forces, ensure both groups have at least one of the following: [[Barrier]] staff, [[Restore]] staff, or [[Pure Water]]. | |||
* First, draw out and defeat the remaining Dragon Riders, maintaining distance from other foes. Next, engage the Manaketes using units equipped with legendary weapons or [[Wyrmslayer]]s. Finally, confront the remaining adversaries. Given the likelihood of incurring damage, position healers equipped with [[Physic]] staves and have [[Elffin]]/[[Larum]] on standby to provide additional turns. | |||
'''Firestone [[Glitch#Obtain_a_firestone|Glitch]]''': | |||
This chapter allows you to steal an enemy manakete's [[Firestone]]. You'll need an enemy with a [[Berserk (staff)|Berserk Staff]] and another enemy holding a Firestone. To trigger the glitch: | |||
# Let one of your [[Thief|thieves]] get hit by the Berserk [[status effect]] near a manakete. | |||
# When it's the berserked Thief's turn, they'll likely steal the nearest manakete's Firestone because of the high steal priority in the Thief AI. | |||
# To increase the odds, ensure the manakete is the only unit within the thief's reach. | |||
# This glitch provides [[Fae]] an unlimited-use Firestone, which can help save her stronger [[Divinestone]]'s [[durability]]. | |||
'''Engaging the Boss, Brunnya:''' | |||
If you've followed the strategy above, you'll face Brunnya when she's wielding her [[Bolting]] magic. This will significantly reduce her speed, allowing your units to possibly land double or even quadruple attacks, especially if equipped with Brave weapons. If not, deploy your strongest unit with a killer or silver weapon to challenge her. | |||
==Trivia== | ==Trivia== | ||
*This chapter holds the only [[armory]] in the entire game which sells [[Light Brand]]s. | *This chapter holds the only [[armory]] in the entire game which sells [[Light Brand]]s and [[Longbow]]s. | ||
==Etymology and other languages== | ==Etymology and other languages== | ||
| Line 874: | Line 909: | ||
|eng-mean=Used in [[Unused content in Fire Emblem: The Blazing Blade#The Binding Blade data transfer leftovers|leftover text from the data transfer menu]] in the English version of {{FE7}}. | |eng-mean=Used in [[Unused content in Fire Emblem: The Blazing Blade#The Binding Blade data transfer leftovers|leftover text from the data transfer menu]] in the English version of {{FE7}}. | ||
|eng-fan-name=The Ghosts of Bern | |eng-fan-name=The Ghosts of Bern | ||
| | |jpn-name={{h|ベルンの亡霊|Berun no bōrei}} | ||
| | |jpn-mean=Ghosts of Bern | ||
}} | }} | ||
==Gallery== | ==Gallery== | ||
<gallery> | |||
Cm fe06 23.png|Map of the chapter | |||
</gallery> | |||
{{refbar}} | {{refbar}} | ||
| Line 889: | Line 926: | ||
{{Nav6}} | {{Nav6}} | ||
{{DEFAULTSORT:Ghosts of Bern, The}} | |||
[[Category:Chapters of Fire Emblem: The Binding Blade]] | [[Category:Chapters of Fire Emblem: The Binding Blade]] | ||
Revision as of 03:03, 10 February 2024
| ||||||||||
|

| “ | Bern recognizes itself as being the strongest force in Elibe. Their pride would not allow them accept defeat without fighting. | ” | — Guinivere to Roy |
|---|
The Ghosts of Bern (Japanese: ベルンの亡霊 Ghosts of Bern) is Chapter 23 of Fire Emblem: The Binding Blade. In order to play this chapter, the player must have completed every side quest, collected every divine weapon, and kept every divine weapon intact.
Plot
- Main article:
The Ghosts of Bern/Script
With Zephiel's death, most of Bern's forces have scattered. However, the remaining Bernese forces, under command of the last Wyvern General Brunnya, have gathered outside the Dragon Temple in one last stand against the Etrurian Army. Though Roy offers them a peaceful surrender, Guinivere explains that their pride as Bern's knight will not allow them to, and the stays by the frontlines to hear their final struggle.
As the fight continues, Karel the Sword Saint notices the battle approaching the isolated village he resides in, but he has no interest in joining, unless his daughter Fir or her father Bartre enter. Either of them will tell Karel that his sister Karla has succumbed to her illness, and Karel then joins the battle to support his remaining family.
Roy pushes through Brunnya's army and reaches the temple. Elffin warns him that the temple supposedly holds the power of dragons, which will empower the dragons inside. As a precaution, Roy chooses to only enter with those capable of wielding the legendary weapons.
Chapter data
| ||||||
|
| |||||
| Victory: Seize the castle gate | Player | Enemy | ||||
|---|---|---|---|---|---|---|
| Defeat: Roy dies | 1–16+1 | 41 | ||||
| ||||||
Character data
| Characters | |||||||||||
|---|---|---|---|---|---|---|---|---|---|---|---|
New units
| |||||||||||
| |||||||||||
Required characters
| |||||||||||
Available characters
| |||||||||||

Item data
| ||||||||||||||||||||||||
|
Shop data
Swords Lances Axes Bows Anima Light Dark Staves Items Secret
| Name | Cost | |
|---|---|---|
| Slim Sword | 480 | |
| Iron Sword | 460 | |
| Steel Sword | 600 | |
| Silver Sword | 1,500 | |
| Iron Blade | 980 | |
| Steel Blade | 1,250 | |
| Silver Blade | 1,800 | |
| Killing Edge | 1,300 | |
| Light Brand | 1,250 | |
| Armorslayer | 1,260 |
Enemy data
- Stats with two figures separated by a ~ are presented as a range, representing stats that vary due to random growths. The figures to the left and right of the ~ are the stat's minimum and maximum possible values respectively.
Normal Hard
| |||||||||||||||||||||||||||||||||||||||||||||||||||||||||||||||||||||||||||||||||||||||||||||||||||||||||||||||||||||||||||||||||||||||||||||||||||||||||||||||||||||||||||||||||||||||||||||||||||||||||||||||||||||||||||||||||||||||||||||||||||||||||||||||||||||||||||||||||||||||||||||||||||||||||||||||||||||||||||||||||||||||||||||||||||||||||||||||||||||||||||||||||||||||||||||||||||||||||||||||||||||||||||||||||||||||||||||||||||||||||||||||||||||||||||||||||||||||||||||||||||||||||||||||||||||
| |||||||||||||||||||||||||||||||||||||||||||||||||||||||||||||||||||||||||||||||||||||||||||||||||||||||||||||||||||||||||||||||||||||||||||||||||||||||||||||||||||||||||||||||||||||||||||||||||||||||||||||||||||||||||||||||||||||||||||||||||||||||||||||||||||||||||||||||||||||||||||||||||||||||||||||||||||||||||||||||||||||||||||||||||||||||||||||||||||||||||||||||||||||||||||||||||||||||||||||||||||||||||||||||||||||||||||||||||||||||||||||||||||||||||||||||||||||||||||||||||||||||||||||||||||||
Boss data
- Main article:
Brunnya - Stats with two figures separated by a ~ are presented as a range, representing stats that vary due to random growths. The figures to the left and right of the ~ are the stat's minimum and maximum possible values respectively.[1]
Normal Hard
|
|
| |||||||||||||||||||||||||||||||||||||||||||||||||

Strategy
| This section details unofficial strategies that may help with completion of the chapter. This may not work for everybody. |
Preparing for Battle:
- Assemble a diverse team including bow-wielders, Mages, and agile yet powerful units like Heroes or Swordmasters.
- Purchase equipment that will be useful, and sell off everything else. Starting next chapter, you fight exactly 2 classes of enemies; Manaketes and Demon Dragons. Since legendary weapons would need to have be conserved to even get to this point and are the best way to fight dragons, only buy equipment useful against them unless you desperately need something to clear this chapter. Likewise, anti-armor and anti-horse weapons are all but useless, since there's none left for you to fight; sell all of them.
- Recommended equipment for physical units should be either Silver or Killer equipment if they can't use a Legendary Weapon, or if said weapon is low on durability; ~19-20 STR is the benchmark where hit+crit from Killer equals 2 hits of Silver in damage; units above the mark favor Killer weapons for crit rate while units below the mark need the extra punching power on Silver weapons to get better damage averages against Manaketes.
- For magic users, just buy the strongest tome you can get; Manaketes only have 15 RES on Hard, so magic users can deal consistent damage to them, even if they take a lot of damage from them in the process.
- For staff users, Physic is purchasable and recommended; Chapter 24 has narrow pathways that can have other units block the staff user from reaching the injured unit. Failing that, Mend or Recover is recommended as Manaketes do a lot of damage and therefore frontline units require a lot of healing to keep taking hits.
Initial Battle Strategy:
- At the start, only the nearest Dragon Riders and the two closest Druids will approach you. Position your units and be prepared.
- Split your team into two: Have the top group stay outside the Manakete's attack range. Position the bottom group to engage the Dragon Riders on the subsequent turn.
- Always use terrain to your advantage. When forests are present, station your units within them to benefit from defensive boosts.
Advanced Tactics:
- Once the initial wave of enemies is dealt with, deploy your top flying unit equipped with a Delphi Shield to neutralize the Archers manning the ballistae. If you do not have this shield, use a well-defended or evasive character to exhaust the ballista or simply keep out of its range.
- For dealing with Manaketes: Place Mages just outside a Manakete's attack zone. On the next turn, focus all attacks on them.
- The toughest opponents are near Brunnya. Particularly, Druids equipped with disruptive staves have a range of roughly 16 tiles. If you've split your forces, ensure both groups have at least one of the following: Barrier staff, Restore staff, or Pure Water.
- First, draw out and defeat the remaining Dragon Riders, maintaining distance from other foes. Next, engage the Manaketes using units equipped with legendary weapons or Wyrmslayers. Finally, confront the remaining adversaries. Given the likelihood of incurring damage, position healers equipped with Physic staves and have Elffin/Larum on standby to provide additional turns.
Firestone Glitch:
This chapter allows you to steal an enemy manakete's Firestone. You'll need an enemy with a Berserk Staff and another enemy holding a Firestone. To trigger the glitch:
- Let one of your thieves get hit by the Berserk status effect near a manakete.
- When it's the berserked Thief's turn, they'll likely steal the nearest manakete's Firestone because of the high steal priority in the Thief AI.
- To increase the odds, ensure the manakete is the only unit within the thief's reach.
- This glitch provides Fae an unlimited-use Firestone, which can help save her stronger Divinestone's durability.
Engaging the Boss, Brunnya:
If you've followed the strategy above, you'll face Brunnya when she's wielding her Bolting magic. This will significantly reduce her speed, allowing your units to possibly land double or even quadruple attacks, especially if equipped with Brave weapons. If not, deploy your strongest unit with a killer or silver weapon to challenge her.
Trivia
- This chapter holds the only armory in the entire game which sells Light Brands and Longbows.
Etymology and other languages
| Names, etymology, and in other regions | ||
|---|---|---|
| Language | Name | Definition, etymology, and notes |
| English |
Apparitions of Bern |
Used in leftover text from the data transfer menu in the English version of Fire Emblem: The Blazing Blade. |
| English (unofficial) |
The Ghosts of Bern |
-- |
| Japanese |
ベルンの亡霊 |
Ghosts of Bern |
Gallery
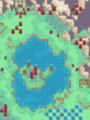
Map of the chapter
References
- ↑ The Ghosts of Bern, triangleattack.com, Retrieved: December 24, 2020
| ← Unattained Dream • | The Ghosts of Bern | • Legends and Lies → |
|---|