| Site News |
|---|
| Warning: This wiki contains spoilers. Read at your own risk! Social media: If you would like, please join our Discord server, and/or follow us on Twitter (X) or Tumblr! |
The Blazing Blade (chapter): Difference between revisions
m (Text replacement - "|jap-" to "|jpn-") |
m (→Strategy) |
||
| (14 intermediate revisions by 5 users not shown) | |||
| Line 1: | Line 1: | ||
{{Chapter Infobox | {{Chapter Infobox | ||
|title=The Blazing Blade | |title=The Blazing Blade | ||
| Line 15: | Line 14: | ||
==Plot== | ==Plot== | ||
{{main|The Blazing Blade (chapter)/Script}} | {{main|The Blazing Blade (chapter)/Script}} | ||
[[Lilina]] tells [[Roy]] about a cave near [[Ostia]] where a dragonslaying weapon is held, and Roy's forces head there to obtain it. The area is infested with bandits under command of [[Henning]], who is surprised to find an army but thinks to defeat them by luring them into lava geysers. Lilina informs Roy that the weapon they are looking for is [[Durandal]] – the sword of [[Roland]], one of the [[Eight Legends]] – and it cannot be removed from its sheath except by descendants of Roland, so there is no risk of bandits taking it. | |||
Roy's forces then fight the bandits, defeat them, and obtain the Durandal. Roy wonders if he could use it one day, and Lilina jokes that she is unsure. Their conversation is interrupted by [[Merlinus]] rushing in and telling them that [[Bern]]'s wyvern riders have arrived in Ostia. | |||
Roy's troops return to the castle and confront the enemy leader, [[Narcian]]; however, the confrontation is interrupted by the arrival of Etrurian forces led by the Mage General [[Cecilia]] and the Knight General [[Perceval]]. Realizing that he cannot win this battle, Narcian retreats and vows revenge. Perceval tells Roy that he only arrived because his king ordered him to do so, and the king gave the order because Cecilia opposed him until he agreed to help [[Lycia]]; Perceval then departs for [[Etruria]], leaving Cecilia to "take care of the loose ends". Cecilia tells Roy that Etruria declared war on [[Bern]] using Lycia's call for aid as justification, and Ostia will benefit from Etruria's protection going forward. | |||
==Chapter data== | ==Chapter data== | ||
| Line 48: | Line 24: | ||
|victory=Seize the throne | |victory=Seize the throne | ||
|defeat=[[Roy]] dies | |defeat=[[Roy]] dies | ||
|ally= | |ally=1–10 | ||
|enemy=31 | |enemy=31 | ||
|map=[[File:Cm fe06 8x.png]] | |map=[[File:Cm fe06 8x.png]] | ||
| Line 56: | Line 32: | ||
{{ChapChars | {{ChapChars | ||
|game#=06 | |game#=06 | ||
| | |forced1=roy | ||
| | |return1=marcus | ||
| | |return2=alen | ||
| | |return3=bors | ||
| | |return4=wolt | ||
| | |return5=lance | ||
| | |return5article=Lance (character) | ||
|return7= | |return6=merlinus | ||
|return8= | |return7=elen | ||
| | |return8=ward | ||
| | |return8article=Ward (character) | ||
| | |return9=lot | ||
| | |return10=dieck | ||
| | |return11=shanna | ||
| | |return12=chad | ||
| | |return13=lugh | ||
| | |return14=clarine | ||
| | |return15=rutger | ||
| | |return16=saul | ||
| | |return17=dorothy | ||
| | |return18=sue | ||
| | |return19=zelot | ||
| | |return20=trec | ||
| | |return21=noah | ||
| | |return22=astolfo | ||
| | |return23=lilina | ||
| | |return24=gwendolyn | ||
| | |return25=barthe | ||
|return26=ogier | |||
}} | }} | ||
| Line 118: | Line 95: | ||
|tab2=Hard | |tab2=Hard | ||
|content1={{ChapUnitHdr|type=Enemy|platform=gba}} | |content1={{ChapUnitHdr|type=Enemy|platform=gba}} | ||
{{ChapUnitCellGBA | |||
|name=[[Henning]] | |||
|class=Hero | |||
|lv=1 | |||
|#=1 | |||
|hp=33 | |||
|str=10 | |||
|skill=19 | |||
|spd=16 | |||
|lck=5 | |||
|def=11 | |||
|res=2 | |||
|con=10 | |||
|mov=6 | |||
|inventory={{Item|6|Steel Blade}} • {{Item|6|Hand Axe}} | |||
|notes=Does not move; stands on a [[Terrain/Game Boy Advance games#Fire Emblem: The Binding Blade|throne]], the chapter's seize point. | |||
}} | |||
{{ChapUnitCellGBA | {{ChapUnitCellGBA | ||
|name=Bandit | |name=Bandit | ||
| Line 385: | Line 379: | ||
|con=6 | |con=6 | ||
|mov=5 | |mov=5 | ||
|inventory={{Item|6|Thunder | |inventory={{Item|6|Thunder}} • {{Item|6|Vulnerary}} | ||
|notes=Does not move. | |notes=Does not move. | ||
}} | }} | ||
| Line 451: | Line 445: | ||
|con=6 | |con=6 | ||
|mov=5 | |mov=5 | ||
|inventory={{Item|6|Fire | |inventory={{Item|6|Fire}} | ||
}} | }} | ||
{{ChapUnitCellGBA | {{ChapUnitCellGBA | ||
| Line 484: | Line 478: | ||
|mov=5 | |mov=5 | ||
|inventory={{Item|6|Steel Sword}} | |inventory={{Item|6|Steel Sword}} | ||
|last=y | |||
}} | }} | ||
{{ChapUnitFtr}} | |||
|content2={{ChapUnitHdr|type=Enemy|platform=gba}} | |||
{{ChapUnitCellGBA | {{ChapUnitCellGBA | ||
|name=[[Henning]] | |name=[[Henning]] | ||
| Line 490: | Line 487: | ||
|lv=1 | |lv=1 | ||
|#=1 | |#=1 | ||
|hp= | |hp=37~39 | ||
|str= | |str=11~13 | ||
|skill= | |skill=20~22 | ||
|spd= | |spd=17~18 | ||
|lck= | |lck=6~7 | ||
|def= | |def=12~13 | ||
|res=2 | |res=2~3 | ||
|con=10 | |con=10 | ||
|mov=6 | |mov=6 | ||
|inventory={{Item|6|Steel Blade}} • {{Item|6|Hand Axe}} | |inventory={{Item|6|Steel Blade}} • {{Item|6|Hand Axe}} | ||
|notes=Does not move; stands on a [[Terrain/Game Boy Advance games#Fire Emblem: The Binding Blade|throne]], the chapter's seize point. | |notes=Does not move; stands on a [[Terrain/Game Boy Advance games#Fire Emblem: The Binding Blade|throne]], the chapter's seize point. | ||
}} | }} | ||
{{ChapUnitCellGBA | {{ChapUnitCellGBA | ||
|name=Bandit | |name=Bandit | ||
| Line 772: | Line 766: | ||
|con=6 | |con=6 | ||
|mov=5 | |mov=5 | ||
|inventory={{Item|6|Thunder | |inventory={{Item|6|Thunder}} • {{Item|6|Vulnerary}} | ||
|notes=Does not move. | |notes=Does not move. | ||
}} | }} | ||
| Line 838: | Line 832: | ||
|con=6 | |con=6 | ||
|mov=5 | |mov=5 | ||
|inventory={{Item|6|Fire | |inventory={{Item|6|Fire}} | ||
}} | }} | ||
{{ChapUnitCellGBA | {{ChapUnitCellGBA | ||
| Line 871: | Line 865: | ||
|mov=5 | |mov=5 | ||
|inventory={{Item|6|Steel Sword}} | |inventory={{Item|6|Steel Sword}} | ||
|last=y | |last=y | ||
}} | }} | ||
| Line 941: | Line 918: | ||
==Strategy== | ==Strategy== | ||
{{sectstub}} | {{sectstub}} | ||
This battle is straightforward, but be cautious of the reddish floor tiles. Not all of them, but some, will randomly emit fire that can damage your units. Avoid having your units stand on these tiles. | |||
Deploy characters that you'd like to level up, such as [[Ogier]] or [[Gwendolyn]], along with characters that have good movement speed to help you quickly navigate past the fire traps. Direct most of your units forward, but leave a few behind to handle enemies coming from the left side. Note that enemies near the throne and in the map's center won't move unless you enter their attack range; use this information to your strategic advantage. | |||
The boss, [[Henning]], is a bit more challenging than previous bosses, boasting high skill and speed stats. If you've leveled up [[Lugh]], he can deal significant damage to Henning. However, make sure to attack from a distance and immediately rescue Lugh afterward. Henning will retaliate with his [[Hand Axe]] during his turn, and he could potentially kill Lugh. As an alternative strategy, you can whittle down Henning's health with fast units like [[Rutger]] or use strong units like [[Marcus]] or [[Zealot]] for quicker results. Finish him off with a low-leveled unit to earn extra experience points. | |||
==Etymology and other languages== | ==Etymology and other languages== | ||
{{Names | {{Names | ||
| Line 955: | Line 934: | ||
==Gallery== | ==Gallery== | ||
<gallery> | |||
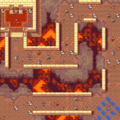
Cm fe06 8x.png|Map of the chapter | |||
</gallery> | |||
{{refbar}} | {{refbar}} | ||
Latest revision as of 14:12, 1 September 2023
| ||||||||
|

| “ | Only descendants of Roland know how to remove Durandal from its sheath. | ” | — Lilina to Roy |
|---|
The Blazing Blade (Japanese: 烈火の剣 The Sword of Flame) is the first extra chapter in Fire Emblem: The Binding Blade. In order to be able to fight Bern's dragons, Roy and his army try to take one of the Legendary Weapons—Durandal, the blazing blade. In order to play this chapter, Lilina must have survived the previous chapter.
Plot
- Main article:
The Blazing Blade (chapter)/Script
Lilina tells Roy about a cave near Ostia where a dragonslaying weapon is held, and Roy's forces head there to obtain it. The area is infested with bandits under command of Henning, who is surprised to find an army but thinks to defeat them by luring them into lava geysers. Lilina informs Roy that the weapon they are looking for is Durandal – the sword of Roland, one of the Eight Legends – and it cannot be removed from its sheath except by descendants of Roland, so there is no risk of bandits taking it.
Roy's forces then fight the bandits, defeat them, and obtain the Durandal. Roy wonders if he could use it one day, and Lilina jokes that she is unsure. Their conversation is interrupted by Merlinus rushing in and telling them that Bern's wyvern riders have arrived in Ostia.
Roy's troops return to the castle and confront the enemy leader, Narcian; however, the confrontation is interrupted by the arrival of Etrurian forces led by the Mage General Cecilia and the Knight General Perceval. Realizing that he cannot win this battle, Narcian retreats and vows revenge. Perceval tells Roy that he only arrived because his king ordered him to do so, and the king gave the order because Cecilia opposed him until he agreed to help Lycia; Perceval then departs for Etruria, leaving Cecilia to "take care of the loose ends". Cecilia tells Roy that Etruria declared war on Bern using Lycia's call for aid as justification, and Ostia will benefit from Etruria's protection going forward.
Chapter data
| ||||||
|
| |||||
| Victory: Seize the throne | Player | Enemy | ||||
|---|---|---|---|---|---|---|
| Defeat: Roy dies | 1–10 | 31 | ||||
| ||||||
Character data
| Characters | |
|---|---|
New units
| |
| |
Required characters
| |
Available characters
| |
Item data
| |||||||||||||||||||||||||||||||||
|
Enemy data
- Stats with two figures separated by a ~ are presented as a range, representing stats that vary due to random growths. The figures to the left and right of the ~ are the stat's minimum and maximum possible values respectively.
Normal Hard
| ||||||||||||||||||||||||||||||||||||||||||||||||||||||||||||||||||||||||||||||||||||||||||||||||||||||||||||||||||||||||||||||||||||||||||||||||||||||||||||||||||||||||||||||||||||||||||||||||||||||||||||||||||||||||||||||||||||||||||||||||||||||||||||||||||||||||||||||||||||||||||||||||||||||||||||||||||||||||||||||||||||||||||||||||||||||||||||||||||||||||||||||||||||||||||||||||||||||||||||||||||||||||||||||||||||||||||||||||||||||||||||||||||||||||||||||||||||||||||||||||||||||||||||||||||||||||||||||||||||||||||||||||||||||||||||||||||||||||||||||||||||||||||||||||||||||||||||||||||||||||||||||||||||||||||||||||||||||||||||
| ||||||||||||||||||||||||||||||||||||||||||||||||||||||||||||||||||||||||||||||||||||||||||||||||||||||||||||||||||||||||||||||||||||||||||||||||||||||||||||||||||||||||||||||||||||||||||||||||||||||||||||||||||||||||||||||||||||||||||||||||||||||||||||||||||||||||||||||||||||||||||||||||||||||||||||||||||||||||||||||||||||||||||||||||||||||||||||||||||||||||||||||||||||||||||||||||||||||||||||||||||||||||||||||||||||||||||||||||||||||||||||||||||||||||||||||||||||||||||||||||||||||||||||||||||||||||||||||||||||||||||||||||||||||||||||||||||||||||||||||||||||||||||||||||||||||||||||||||||||||||||||||||||||||||||||||||||||||||||||
Boss data
- Main article:
Henning - Stats with two figures separated by a ~ are presented as a range, representing stats that vary due to random growths. The figures to the left and right of the ~ are the stat's minimum and maximum possible values respectively.[1]
Normal Hard
|
|
| |||||||||||||||||||||||||||||||||||||||||||||||||

Strategy
This section has been marked as a stub. Please help improve the page by adding information.
This battle is straightforward, but be cautious of the reddish floor tiles. Not all of them, but some, will randomly emit fire that can damage your units. Avoid having your units stand on these tiles.
Deploy characters that you'd like to level up, such as Ogier or Gwendolyn, along with characters that have good movement speed to help you quickly navigate past the fire traps. Direct most of your units forward, but leave a few behind to handle enemies coming from the left side. Note that enemies near the throne and in the map's center won't move unless you enter their attack range; use this information to your strategic advantage.
The boss, Henning, is a bit more challenging than previous bosses, boasting high skill and speed stats. If you've leveled up Lugh, he can deal significant damage to Henning. However, make sure to attack from a distance and immediately rescue Lugh afterward. Henning will retaliate with his Hand Axe during his turn, and he could potentially kill Lugh. As an alternative strategy, you can whittle down Henning's health with fast units like Rutger or use strong units like Marcus or Zealot for quicker results. Finish him off with a low-leveled unit to earn extra experience points.
Etymology and other languages
| Names, etymology, and in other regions | ||
|---|---|---|
| Language | Name | Definition, etymology, and notes |
| English |
The Blazing Blade |
Used in leftover text from the data transfer menu in the English version of Fire Emblem: The Blazing Blade. |
| English (unofficial) |
The Blazing Blade |
-- |
| Japanese |
烈火の剣 |
The Sword of Flame |
Gallery
Map of the chapter
References
- ↑ The Blazing Blade, triangleattack.com, Retrieved: December 24, 2020
| ← Reunion • | The Blazing Blade | • The Misty Isles → |
|---|