| Site News |
|---|
| Warning: This wiki contains spoilers. Read at your own risk! Social media: If you would like, please join our Discord server, and/or follow us on Twitter (X) or Tumblr! |
Ilia's Salvation: Difference between revisions
m (→Chapter data) |
Thecornerman (talk | contribs) m (Text replacement - "([Cc])hapter (\d+)" to "$1hapter $2") |
||
| (24 intermediate revisions by 8 users not shown) | |||
| Line 1: | Line 1: | ||
{{Chapter Infobox | {{Chapter Infobox | ||
|image=[[File:Cm fe06 20A.png|200px]] | |image=[[File:Cm fe06 20A.png|200px]] | ||
| Line 7: | Line 6: | ||
|previous=[[Bitter Cold]] | |previous=[[Bitter Cold]] | ||
|next=*[[The Binding Blade (chapter)|The Binding Blade]] | |next=*[[The Binding Blade (chapter)|The Binding Blade]] | ||
*[[The Freezing Lance]] <small>( | *[[The Freezing Lance]] <small>(side quest)</small> | ||
|sidequest=*[[Zelot]] and Juno are recruited and alive | |sidequest=*[[Zelot]] and Juno are recruited and alive | ||
*Chapter is completed within 25 turns | *Chapter is completed within 25 turns | ||
| Line 14: | Line 13: | ||
{{Quote|When we take this castle, we can use it as a base to launch attacks on Bern.|[[Roy]] to [[Guinivere]]}} | {{Quote|When we take this castle, we can use it as a base to launch attacks on Bern.|[[Roy]] to [[Guinivere]]}} | ||
'''Ilia's Salvation''' (Japanese: {{hl|イリア解放|Iria kaihō}} ''Ilia's Liberation'') is | '''Ilia's Salvation''' (Japanese: {{hl|イリア解放|Iria kaihō}} ''Ilia's Liberation'') is Chapter 20A of {{FE6}}. In order to play [[The Freezing Lance|the side quest after]], this chapter must be completed within 25 turns and [[Juno]] and [[Zelot]] must be recruited and alive. | ||
==Plot== | ==Plot== | ||
{{main|Ilia's Salvation/Script}} | {{main|Ilia's Salvation/Script}} | ||
The [[Etruria|Etrurian Army]] reach Edessa in the northeast of [[Ilia]]. Castle Edessa is both [[Zelot]]'s home and the mercenaries' headquarters, but was taken by [[Bern]] during Zelot's absence and used as Bern's stronghold for their invasion of Ilia. With General [[Murdock]] back in Bern, the former Etrurian High Chancellor [[Roartz]] remains in charge of Bern's last Ilian base. | |||
Roartz requests aid from the mercenary groups Bern hired, yet none respond after [[Sigune]]'s death. Even Zelot's troop cannot be found, since they've joined the Etrurian Army, even though Roartz is holding Zelot's wife [[Juno]] hostage in the castle dungeon. | |||
Outside, [[Roy]] asks [[Guinivere]] more about her family. She explains that she and [[Zephiel]] are half-siblings. [[Desmond|Her father]] and [[Hellene|Zephiel's mother]] had been in a loveless political marriage. He truly wanted to be with his lover, Guinivere's mother, and loathed Zephiel because of this circumstance. Despite this, Zephiel strived to be the perfect son for his father's affection. Before Guinivere can explain more, the battle around Castle Edessa begins. | |||
If Juno reunites with any of her family members, including her sisters [[Shanna]] and [[Thea]] as well as her husband Zelot, she will join the Etrurian Army in battle. Additionally, if she and Zelot survive after Roartz's defeat, [[Merlinus]] will receive a report of that ruins containing a [[Maltet|legendary lance]] used in the [[Scouring]] are nearby. Roy then decides to head for the ruins immediately. | |||
If either Juno or Zelot die, or the battle drags on for too long, Roy will instead resume his conversation with Guinivere once Roartz is dead and the castle is secured. She tells him that her father was jealous of Zephiel's talents because he was so ordinary, and wished to prevent Zephiel's ascension, going so far as to promise Bern's throne to Guinivere's future husband. Yet the people of Bern wished for Zephiel to become king, motivating Desmond to attempt to murder his son. | |||
Desmond gave Zephiel a poisoned drink at a banquet. For ten days, Zephiel fell ill and only survived thanks to Murdock's aid. Somehow, Zephiel learned of Desmond's plans to murder anyone Zephiel held dear, including his mother and Murdock, so Zephiel faked his own demise. During the funeral, when Desmond went to view Zephiel's body, Zephiel jumped from the coffin with a sword in hand, killing his father. Since that moment, Zephiel never smiled again. Though Guinivere misses the kind brother she once knew, she asks Roy to put a stop to Zephiel's plans. Roy answers that he may need his sword to do so, which Guinivere accepts. | |||
==Chapter data== | ==Chapter data== | ||
| Line 31: | Line 38: | ||
|defeat=[[Roy]] dies | |defeat=[[Roy]] dies | ||
|ally=1–13{{h|+2|Upon Juno and Cath being recruited}} | |ally=1–13{{h|+2|Upon Juno and Cath being recruited}} | ||
|other=6{{h| | |other=6{{h|−1|Upon Juno being recruited}} | ||
|enemy=32{{h|+23|Reinforcements}}{{h| | |enemy=32{{h|+23|Reinforcements}}{{h|−1|Upon Cath being recruited}} | ||
|map=[[File:Cm fe06 20A.png]] | |map=[[File:Cm fe06 20A.png]] | ||
}} | }} | ||
| Line 39: | Line 46: | ||
|defeat=[[Roy]] dies | |defeat=[[Roy]] dies | ||
|ally=1–13{{h|+2|Upon Juno and Cath being recruited}} | |ally=1–13{{h|+2|Upon Juno and Cath being recruited}} | ||
|other=6{{h| | |other=6{{h|−1|Upon Juno being recruited}} | ||
|enemy=32{{h|+43|Reinforcements}}{{h| | |enemy=32{{h|+43|Reinforcements}}{{h|−1|Upon Cath being recruited}} | ||
|map=[[File:Cm fe06 20A.png]] | |map=[[File:Cm fe06 20A.png]] | ||
}} | }} | ||
| Line 74: | Line 81: | ||
|return6=merlinus | |return6=merlinus | ||
|return7=elen | |return7=elen | ||
|return8= | |return8=ward | ||
|return8article=Ward (character) | |||
|return9=lot | |return9=lot | ||
|return10=dieck | |return10=dieck | ||
| Line 122: | Line 130: | ||
|platform=gba | |platform=gba | ||
|item1=Red Gem | |item1=Red Gem | ||
|obtain1=Steal from | |obtain1=Steal from [[Roartz]] | ||
|item2= | |item2=Red Gem | ||
|obtain2=Steal from enemy [[ | |obtain2=Steal from enemy [[Druid]] | ||
|item3=Vulnerary | |item3=Vulnerary | ||
|obtain3=Steal from enemy [[Fighter]] | |obtain3=Steal from enemy [[Fighter]] | ||
|item4= | |item4=Vulnerary | ||
|obtain4=Steal from enemy [[ | |obtain4=Steal from enemy [[Fighter]] | ||
|item5= | |item5=Elysian Whip | ||
|obtain5=Steal from [[ | |obtain5=Steal from enemy [[Archer]] (requires [[Warp]] to access) | ||
|item6=Lockpick | |item6=Lockpick | ||
|obtain6=Steal from [[Cath]] or recruit her (reinforcement) | |obtain6=Steal from [[Cath]] or recruit her (reinforcement) | ||
| Line 195: | Line 203: | ||
|bocost4=1,760 | |bocost4=1,760 | ||
|anima1=Fire | |anima1=Fire | ||
|ancost1=420 | |ancost1=420 | ||
|anima2=Thunder | |anima2=Thunder | ||
|ancost2=500 | |ancost2=500 | ||
|anima3=Elfire | |anima3=Elfire | ||
| Line 222: | Line 228: | ||
|tab2=Hard | |tab2=Hard | ||
|content1={{ChapUnitHdr|type=Enemy|platform=gba}} | |content1={{ChapUnitHdr|type=Enemy|platform=gba}} | ||
{{ChapUnitCellGBA | |||
|name=[[Roartz]] | |||
|class=General | |||
|lv=10 | |||
|#=1 | |||
|hp=50 | |||
|str=21 | |||
|skill=13 | |||
|spd=12 | |||
|lck=13 | |||
|def=20 | |||
|res=11 | |||
|con=16 | |||
|mov=5 | |||
|inventory={{Item|6|Spear|image=spear fe06}} • {{Item|6|Red Gem}} | |||
|notes=Does not move; stands on the [[Terrain/Game Boy Advance games#Fire Emblem: The Binding Blade|throne]], the chapter's seize point. | |||
}} | |||
{{ChapUnitCellGBA | {{ChapUnitCellGBA | ||
|name=Ilia | |name=Ilia | ||
| Line 403: | Line 426: | ||
|con=6 | |con=6 | ||
|mov=6 | |mov=6 | ||
|inventory={{Item|6|Nosferatu}} | |inventory={{Item|6|Nosferatu|image=nosferatu fe06}} | ||
}} | }} | ||
{{ChapUnitCellGBA | {{ChapUnitCellGBA | ||
| Line 452: | Line 475: | ||
|con=6 | |con=6 | ||
|mov=6 | |mov=6 | ||
|inventory={{Item|6|Nosferatu}} • {{Item|6|Berserk|link=Berserk (staff)}} | |inventory={{Item|6|Nosferatu|image=nosferatu fe06}} • {{Item|6|Berserk|link=Berserk (staff)}} | ||
|notes=Does not move, except to heal. | |notes=Does not move, except to heal. | ||
}} | }} | ||
| Line 588: | Line 611: | ||
|inventory={{Item|6|Steel Bow}} | |inventory={{Item|6|Steel Bow}} | ||
|notes=Does not move; operates an [[Iron Ballista]] | |notes=Does not move; operates an [[Iron Ballista]] | ||
|last=y | |last=y | ||
}} | }} | ||
| Line 678: | Line 684: | ||
{{ChapUnitFtr}} | {{ChapUnitFtr}} | ||
|content2={{ChapUnitHdr|type=Enemy|platform=gba}} | |content2={{ChapUnitHdr|type=Enemy|platform=gba}} | ||
{{ChapUnitCellGBA | |||
|name=[[Roartz]] | |||
|class=General | |||
|lv=10 | |||
|#=1 | |||
|hp=58~61 | |||
|str=24~26 | |||
|skill=15~17 | |||
|spd=13~14 | |||
|lck=15~16 | |||
|def=22~24 | |||
|res=12~14 | |||
|con=16 | |||
|mov=5 | |||
|inventory={{Item|6|Spear|image=spear fe06}} • {{Item|6|Red Gem}} | |||
|notes=Does not move; stands on the [[Terrain/Game Boy Advance games#Fire Emblem: The Binding Blade|throne]], the chapter's seize point. | |||
}} | |||
{{ChapUnitCellGBA | {{ChapUnitCellGBA | ||
|name=Ilia | |name=Ilia | ||
| Line 859: | Line 882: | ||
|con=6 | |con=6 | ||
|mov=6 | |mov=6 | ||
|inventory={{Item|6|Nosferatu}} | |inventory={{Item|6|Nosferatu|image=nosferatu fe06}} | ||
}} | }} | ||
{{ChapUnitCellGBA | {{ChapUnitCellGBA | ||
| Line 908: | Line 931: | ||
|con=6 | |con=6 | ||
|mov=6 | |mov=6 | ||
|inventory={{Item|6|Nosferatu}} • {{Item|6|Berserk|link=Berserk (staff)}} | |inventory={{Item|6|Nosferatu|image=nosferatu fe06}} • {{Item|6|Berserk|link=Berserk (staff)}} | ||
|notes=Does not move, except to heal. | |notes=Does not move, except to heal. | ||
}} | }} | ||
| Line 1,044: | Line 1,067: | ||
|inventory={{Item|6|Steel Bow}} | |inventory={{Item|6|Steel Bow}} | ||
|notes=Does not move; operates an [[Iron Ballista]] | |notes=Does not move; operates an [[Iron Ballista]] | ||
|last=y | |last=y | ||
}} | }} | ||
| Line 1,141: | Line 1,147: | ||
*Enemy phase of turns 11 – 14 <small>(Normal Mode)</small>/18 <small>(Hard Mode)</small> | *Enemy phase of turns 11 – 14 <small>(Normal Mode)</small>/18 <small>(Hard Mode)</small> | ||
**3 [[Fighter]]s from the north edge of the map | **3 [[Fighter]]s from the north edge of the map | ||
*Enemy phase of turns 11 <small>(Hard Mode)</small>/15 <small>( | *Enemy phase of turns 11 <small>(Hard Mode)</small>/15 <small>(Normal Mode)</small> – 18 | ||
**2 [[Mercenary|Mercenaries]] from the southeast path | **2 [[Mercenary|Mercenaries]] from the southeast path. The northern one is on a [[Terrain/Game_Boy_Advance_games#Fire_Emblem:_The_Binding_Blade|peak]] | ||
===NPC data=== | ===NPC data=== | ||
{{ChapUnitHdr|type=NPC|platform=gba}} | {{ChapUnitHdr|type=NPC|platform=gba}} | ||
{{ChapUnitCellGBA | |||
|name=[[Juno]] | |||
|class=Falcoknight | |||
|type=other | |||
|lv=9 | |||
|#=1 | |||
|hp=33 | |||
|str=11 | |||
|skill=14 | |||
|spd=16 | |||
|lck=14 | |||
|def=8 | |||
|res=12 | |||
|con=7 | |||
|mov=8 | |||
|notes=Does not move, except to heal. | |||
}} | |||
{{ChapUnitCellGBA | {{ChapUnitCellGBA | ||
|name=Citizen | |name=Citizen | ||
| Line 1,162: | Line 1,185: | ||
|con=4 | |con=4 | ||
|mov=5 | |mov=5 | ||
|notes=Does not move, except to heal. | |notes=Does not move, except to heal. | ||
|last=y | |last=y | ||
| Line 1,205: | Line 1,211: | ||
|con=16 | |con=16 | ||
|aid=15 | |aid=15 | ||
|inventory={{Item|6|Spear}}<br>{{Item|6|Red Gem}} | |inventory={{Item|6|Spear|image=spear fe06}}<br>{{Item|6|Red Gem}} | ||
|la=y | |la=y | ||
|ax=y | |ax=y | ||
| Line 1,224: | Line 1,230: | ||
|con=16 | |con=16 | ||
|aid=15 | |aid=15 | ||
|inventory={{Item|6|Spear}}<br>{{Item|6|Red Gem}} | |inventory={{Item|6|Spear|image=spear fe06}}<br>{{Item|6|Red Gem}} | ||
|la=y | |la=y | ||
|ax=y | |ax=y | ||
| Line 1,231: | Line 1,237: | ||
==Strategy== | ==Strategy== | ||
{{ | {{strategy}} | ||
1. Enemy Formation and Tactics: | |||
* A diverse group of enemies will aggressively move in to attack. | |||
* Position your strongest units as a barrier a safe distance from the castle's entry points. | |||
* Avoid using [[Knight]]s or [[General]]s; [[Druid]]s can eliminate them in a single move. Instead, use units with high evasion, resistance, and HP, especially those wielding [[lance]]s or [[sword]]s. | |||
* Equip some of your magical units with [[Restore]] Staves to counter the [[Sleep (staff)|Sleep]] staves wielded by Druids. | |||
* Take your time to keep from facing too many enemies at the same time. | |||
2. Advancing After Initial Defense: | |||
* Once the initial onslaught is over, look over the enemy's weapons and split your team into two to cover both entrances. Beware of the [[Bishop]] with long-range magic located in the map's center. A ranged mounted unit, paired with [[Elffin]]/[[Larum]] for an extra move, can effectively counter this threat. | |||
* You will now mainly face enemies at the bottom of the map and [[Archer]]s on [[Ballista (weapon)|Ballista]]e. Reinforcements will arrive, but they are armed only with steel weapons. Position sword-wielding units against [[Fighter]]s and lance-users against [[Mercenary|Mercenaries]]. Equip these defenders with [[Vulnerary|Vulneraries]] and capitalize on the XP gains. | |||
3. Key Points to Remember: | |||
* Engage [[Juno]] in conversation using [[Thea]], [[Shanna]], or [[Zelot]] to make her an ally. | |||
* Use a [[Thief]] to pilfer the treasure chests. If you are out of [[Lockpick]]s, swipe them from enemy thieves. | |||
* Purchase several silver weapons, about 5 [[Aircalibur]]s, and stock up on [[Pure Water]]s. While these are not immediate necessities, they will be invaluable soon. The [[Silver Card]] can help a lot here. | |||
* The civilians are vulnerable and can be killed easily. Use mounted units to rescue them and transport them to your starting point so they can easily escape. Alternatively, clear the map of distant attackers and let them exit on their own. | |||
* This chapter provides another opportunity for [[Cath]]'s recruitment. Note that only one more such chance exists. If this is [[Roy]]'s first interaction with her, recruitment is off the table. | |||
4. Boss Strategy: | |||
* The Druid and [[Sniper]] near the boss, [[Roartz]], pose a significant threat. You can either exhaust the Druid's [[Berserk (staff)|Berserk]] staff (with its 14-tile range) or confront and neutralize them while keeping a Restore staff handy. Engage Roartz using magic; well-leveled mages can deal considerable damage but may require healing afterward. | |||
==Trivia== | ==Trivia== | ||
*The northern of the two [[mercenary]] reinforcements in the southeast spawns on a [[Terrain/Game_Boy_Advance_games#Fire_Emblem:_The_Binding_Blade|peak]], a tile he cannot normally traverse. Note that it is possible for him to move, as there exists traversable terrain below him. | |||
==Etymology and other languages== | ==Etymology and other languages== | ||
{{Names | {{Names | ||
| Line 1,245: | Line 1,272: | ||
==Gallery== | ==Gallery== | ||
<gallery> | |||
Cm fe06 20A.png|Map of the chapter | |||
</gallery> | |||
{{refbar}} | {{refbar}} | ||
| Line 1,252: | Line 1,281: | ||
|prechapter=Bitter Cold | |prechapter=Bitter Cold | ||
|nextchapter=The Binding Blade (chapter){{!}}The Binding Blade | |nextchapter=The Binding Blade (chapter){{!}}The Binding Blade | ||
|nextalternate=The Freezing Lance | |nextalternate=The Freezing Lance{{!}}The Freezing Lance <small>(side quest)</small> | ||
}} | }} | ||
{{Nav6}} | {{Nav6}} | ||
[[Category:Chapters of Fire Emblem: The Binding Blade]] | [[Category:Chapters of Fire Emblem: The Binding Blade]] | ||
Latest revision as of 15:04, 28 March 2024
| ||||||||||||
|

| “ | When we take this castle, we can use it as a base to launch attacks on Bern. | ” | — Roy to Guinivere |
|---|
Ilia's Salvation (Japanese: イリア解放 Ilia's Liberation) is Chapter 20A of Fire Emblem: The Binding Blade. In order to play the side quest after, this chapter must be completed within 25 turns and Juno and Zelot must be recruited and alive.
Plot
- Main article:
Ilia's Salvation/Script
The Etrurian Army reach Edessa in the northeast of Ilia. Castle Edessa is both Zelot's home and the mercenaries' headquarters, but was taken by Bern during Zelot's absence and used as Bern's stronghold for their invasion of Ilia. With General Murdock back in Bern, the former Etrurian High Chancellor Roartz remains in charge of Bern's last Ilian base.
Roartz requests aid from the mercenary groups Bern hired, yet none respond after Sigune's death. Even Zelot's troop cannot be found, since they've joined the Etrurian Army, even though Roartz is holding Zelot's wife Juno hostage in the castle dungeon.
Outside, Roy asks Guinivere more about her family. She explains that she and Zephiel are half-siblings. Her father and Zephiel's mother had been in a loveless political marriage. He truly wanted to be with his lover, Guinivere's mother, and loathed Zephiel because of this circumstance. Despite this, Zephiel strived to be the perfect son for his father's affection. Before Guinivere can explain more, the battle around Castle Edessa begins.
If Juno reunites with any of her family members, including her sisters Shanna and Thea as well as her husband Zelot, she will join the Etrurian Army in battle. Additionally, if she and Zelot survive after Roartz's defeat, Merlinus will receive a report of that ruins containing a legendary lance used in the Scouring are nearby. Roy then decides to head for the ruins immediately.
If either Juno or Zelot die, or the battle drags on for too long, Roy will instead resume his conversation with Guinivere once Roartz is dead and the castle is secured. She tells him that her father was jealous of Zephiel's talents because he was so ordinary, and wished to prevent Zephiel's ascension, going so far as to promise Bern's throne to Guinivere's future husband. Yet the people of Bern wished for Zephiel to become king, motivating Desmond to attempt to murder his son.
Desmond gave Zephiel a poisoned drink at a banquet. For ten days, Zephiel fell ill and only survived thanks to Murdock's aid. Somehow, Zephiel learned of Desmond's plans to murder anyone Zephiel held dear, including his mother and Murdock, so Zephiel faked his own demise. During the funeral, when Desmond went to view Zephiel's body, Zephiel jumped from the coffin with a sword in hand, killing his father. Since that moment, Zephiel never smiled again. Though Guinivere misses the kind brother she once knew, she asks Roy to put a stop to Zephiel's plans. Roy answers that he may need his sword to do so, which Guinivere accepts.
Chapter data
Normal Hard
| ||||||
|
| |||||
| Victory: Seize the throne | Player | Other | Enemy | |||
|---|---|---|---|---|---|---|
| Defeat: Roy dies | 1–13+2 | 6−1 | 32+23−1 | |||
| ||||||
Character data
| Characters | ||||||||||||||||||||||
|---|---|---|---|---|---|---|---|---|---|---|---|---|---|---|---|---|---|---|---|---|---|---|
New units
| ||||||||||||||||||||||
| ||||||||||||||||||||||
Required characters
| ||||||||||||||||||||||
Available characters
| ||||||||||||||||||||||


Item data
| |||||||||||||||||||||||||||||||||||||||||||||||||||||||||
|
Shop data
Swords Lances Axes Bows Anima Light Dark Staves Items Secret
| Name | Cost | |
|---|---|---|
| Iron Sword | 460 | |
| Steel Sword | 600 | |
| Silver Sword | 1,500 | |
| Iron Blade | 980 | |
| Steel Blade | 1,250 |
Enemy data
- Stats with two figures separated by a ~ are presented as a range, representing stats that vary due to random growths. The figures to the left and right of the ~ are the stat's minimum and maximum possible values respectively.
Normal Hard
| ||||||||||||||||||||||||||||||||||||||||||||||||||||||||||||||||||||||||||||||||||||||||||||||||||||||||||||||||||||||||||||||||||||||||||||||||||||||||||||||||||||||||||||||||||||||||||||||||||||||||||||||||||||||||||||||||||||||||||||||||||||||||||||||||||||||||||||||||||||||||||||||||||||||||||||||||||||||||||||||||||||||||||||||||||||||||||||||||||||||||||||||||||||||||||||||||||||||||||||||||||||||||||||||||||||||||||||||||||||||||||||||||||||||||||||||||||||||||||||||||||||||||||||||||||||||||||||||||||||||||||||||||||||||||||||||||||||||||||||||||||||||||||||||||||||||||||||||||||||||||||||||||||||||||||||||||||||||||||||
| ||||||||||||||||||||||||||||||||||||||||||||||||||||||||||||||||||||||||||||||||||||||||||||||||||||||||||||||||||||||||||||||||||||||||||||||||||||||||||||||||||||||||||||||||||||||||||||||||||||||||||||||||||||||||||||||||||||||||||||||||||||||||||||||||||||||||||||||||||||||||||||||||||||||||||||||||||||||||||||||||||||||||||||||||||||||||||||||||||||||||||||||||||||||||||||||||||||||||||||||||||||||||||||||||||||||||||||||||||||||||||||||||||||||||||||||||||||||||||||||||||||||||||||||||||||||||||||||||||||||||||||||||||||||||||||||||||||||||||||||||||||||||||||||||||||||||||||||||||||||||||||||||||||||||||||||||||||||||||||
| ||||||||||||||||||||||||||||||||||||||||||||||||||||||||||||||||||||||||||||||||||||||||||||||||||||||||||||||||||||||||||||||||||||||||||||||||||||||||||||||||||||||||||||||||||||||||||||||||||||||||||||||||||||||||||||||||||||||||||||||||||||||||||||||||||||||||||||||||||||||||||||||||||||||||||||||||||||||||||||||||||||||||||||||||||||||||||||||||||||||||||||||||||||||||||||||||||||||||||||||||||||||||||||||||||||||||||||||||||||||||||||||||||||||||||||||||||||||||||||||||||||||||||||||||||||||||||||||||||||||||||||||||||||||||||||||||||||||||||||||||||||||||||||||||||||||||||||||||||||||||||||||||||||||||||||||||||||||||||||
| ||||||||||||||||||||||||||||||||||||||||||||||||||||||||||||||||||||||||||||||||||||||||||||||||||||||||||||||||||||||||||||||||||||||||||||||||||||||||||||||||||||||||||||||||||||||||||||||||||||||||||||||||||||||||||||||||||||||||||||||||||||||||||||||||||||||||||||||||||||||||||||||||||||||||||||||||||||||||||||||||||||||||||||||||||||||||||||||||||||||||||||||||||||||||||||||||||||||||||||||||||||||||||||||||||||||||||||||||||||||||||||||||||||||||||||||||||||||||||||||||||||||||||||||||||||||||||||||||||||||||||||||||||||||||||||||||||||||||||||||||||||||||||||||||||||||||||||||||||||||||||||||||||||||||||||||||||||||||||||
Reinforcements
- Enemy phase of turn 10
- Enemy phase of turns 11 – 14 (Normal Mode)/18 (Hard Mode)
- 3 Fighters from the north edge of the map
- Enemy phase of turns 11 (Hard Mode)/15 (Normal Mode) – 18
- 2 Mercenaries from the southeast path. The northern one is on a peak
NPC data
| |||||||||||||||||||||||||||||||||||||||||||||||||||||||||||||||||||||
| |||||||||||||||||||||||||||||||||||||||||||||||||||||||||||||||||||||
Boss data
- Main article:
Roartz - Stats with two figures separated by a ~ are presented as a range, representing stats that vary due to random growths. The figures to the left and right of the ~ are the stat's minimum and maximum possible values respectively.[1]
Normal Hard

Strategy
| This section details unofficial strategies that may help with completion of the chapter. This may not work for everybody. |
1. Enemy Formation and Tactics:
- A diverse group of enemies will aggressively move in to attack.
- Position your strongest units as a barrier a safe distance from the castle's entry points.
- Avoid using Knights or Generals; Druids can eliminate them in a single move. Instead, use units with high evasion, resistance, and HP, especially those wielding lances or swords.
- Equip some of your magical units with Restore Staves to counter the Sleep staves wielded by Druids.
- Take your time to keep from facing too many enemies at the same time.
2. Advancing After Initial Defense:
- Once the initial onslaught is over, look over the enemy's weapons and split your team into two to cover both entrances. Beware of the Bishop with long-range magic located in the map's center. A ranged mounted unit, paired with Elffin/Larum for an extra move, can effectively counter this threat.
- You will now mainly face enemies at the bottom of the map and Archers on Ballistae. Reinforcements will arrive, but they are armed only with steel weapons. Position sword-wielding units against Fighters and lance-users against Mercenaries. Equip these defenders with Vulneraries and capitalize on the XP gains.
3. Key Points to Remember:
- Engage Juno in conversation using Thea, Shanna, or Zelot to make her an ally.
- Use a Thief to pilfer the treasure chests. If you are out of Lockpicks, swipe them from enemy thieves.
- Purchase several silver weapons, about 5 Aircaliburs, and stock up on Pure Waters. While these are not immediate necessities, they will be invaluable soon. The Silver Card can help a lot here.
- The civilians are vulnerable and can be killed easily. Use mounted units to rescue them and transport them to your starting point so they can easily escape. Alternatively, clear the map of distant attackers and let them exit on their own.
- This chapter provides another opportunity for Cath's recruitment. Note that only one more such chance exists. If this is Roy's first interaction with her, recruitment is off the table.
4. Boss Strategy:
- The Druid and Sniper near the boss, Roartz, pose a significant threat. You can either exhaust the Druid's Berserk staff (with its 14-tile range) or confront and neutralize them while keeping a Restore staff handy. Engage Roartz using magic; well-leveled mages can deal considerable damage but may require healing afterward.
Trivia
- The northern of the two mercenary reinforcements in the southeast spawns on a peak, a tile he cannot normally traverse. Note that it is possible for him to move, as there exists traversable terrain below him.
Etymology and other languages
| Names, etymology, and in other regions | ||
|---|---|---|
| Language | Name | Definition, etymology, and notes |
| English |
Liberation of Ilia |
Used in leftover text from the data transfer menu in the English version of Fire Emblem: The Blazing Blade. |
| English (unofficial) |
Ilia's Salvation |
-- |
| Japanese |
イリア解放 |
Ilia's Liberation |
Gallery
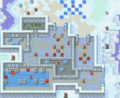
Map of the chapter
References
- ↑ Ilia's Salvation, triangleattack.com, Retrieved: December 24, 2020
| ← Bitter Cold • | Ilia's Salvation | • The Binding Blade → • The Freezing Lance (side quest) → |
|---|