| Site News |
|---|
| Warning: This wiki contains spoilers. Read at your own risk! Social media: If you would like, please join our Discord server, and/or follow us on Twitter (X) or Tumblr! |
Western Resistance: Difference between revisions
Thecornerman (talk | contribs) m (→Chapter data) |
Thecornerman (talk | contribs) m (Text replacement - "([Cc])hapter (\d+)" to "$1hapter $2") |
||
| (19 intermediate revisions by 10 users not shown) | |||
| Line 1: | Line 1: | ||
{{Chapter Infobox | {{Chapter Infobox | ||
|image=[[File:Cm fe06 10A.png|200px]] | |image=[[File:Cm fe06 10A.png|200px]] | ||
|location= | |location=Armagh | ||
|new units=[[Geese]], [[Gonzalez]] | |new units=[[Geese]], [[Gonzalez]] | ||
|boss=[[Nord]] | |boss=[[Nord]] | ||
| Line 11: | Line 10: | ||
{{quote|...Lord Arcardo did say to get rid of the Lycian League Army while they were here... Hahaha... What a splendid chance to gain favor with Lord Arcardo and earn a share of his riches! Dispatch our troops! Kill off the Lycian League Army!|[[Nord]]}} | {{quote|...Lord Arcardo did say to get rid of the Lycian League Army while they were here... Hahaha... What a splendid chance to gain favor with Lord Arcardo and earn a share of his riches! Dispatch our troops! Kill off the Lycian League Army!|[[Nord]]}} | ||
'''Western Resistance''' (Japanese: {{hl|あらがう者たち|Aragau monotachi}} ''Resistance Force'') is | '''Western Resistance''' (Japanese: {{hl|あらがう者たち|Aragau monotachi}} ''Resistance Force'') is Chapter 10A of {{FE6}}. To play this chapter, the player must have visited the village that offers a [[Killer Bow]] (or else must not have visited either of the two villages) in the [[The Misty Isles|previous chapter]] and thus headed north towards [[Mount Eburacum]]. Otherwise, [[Amidst a Struggle]] will be played instead, in which case Roy heads west toward [[Caldonia]]. | ||
==Plot== | ==Plot== | ||
{{main|Western Resistance/Script}} | {{main|Western Resistance/Script}} | ||
[[Roy]]'s Lycian Army arrives at Fibernia, the largest of three islands comprising the Western Isles, and heads to Eburacum, the largest mine. On the way to Eburacum, Roy sends a messenger to the local castle's lord, [[Nord]], requesting permission to pass through his lands. | |||
As Roy's army travels, Nord talks with his soldiers about the resistance spy he imprisoned, [[Larum]]. She claims she is unaffiliated with the resistance, and Nord considers interrogating her himself, but he is interrupted by the message from Roy about permission to pass through his lands. As the Etrurian lord [[Arcardo]] had told him to eliminate the Lycian Army while it was here, Nord orders his soldiers to attack Roy's forces and kill the messenger. | |||
Roy soon learns that his messenger has been killed and that Nord's forces are rushing to attack his army, and a battle ensues. During the battle, [[Geese]] tells a villager of his ship's crewmates being imprisoned by Nord and worked to death in the mines; he then leaves the village and starts fighting Nord's forces to seek revenge. If Roy talks to Geese, he explains that he is for hire and offers his services to Roy, as he is a pirate and knows the area while also wanting to fight the castle's forces, just like Roy does. Roy accepts the offer, and Geese joins his army. | |||
Meanwhile, Nord talks to [[Gonzalez]] at the castle and orders him to burn down the village. Gonzalez is apprehensive, but cannot stand up to Nord and heads toward the village. On the way there, [[Lilina]] may talk to him; he asks her to warn the villagers, but Lilina explains that Gonzalez does not have to attack the village and can join the Lycian Army instead. Gonzalez is afraid because people tend to view him as a monster, but Lilina swears that the people in her army will not treat him that way, and he agrees to switch sides. | |||
Eventually, Roy seizes Nord's castle, and Nord himself is killed in battle. He does not learn why Nord attacked him, but he finds the imprisoned Larum, who immediately informs him that she is with the resistance and that their real enemy is [[Etruria]]. Etrurians have been enslaving the populace and working it to death in the mines. The resistance Larum is a part of was planning to strike at Eburacum, but a villager leaked the plan's details, and the resistance is now in danger. Roy agrees to help Larum's group, and Larum hugs him in gratitude before offering him a [[Wyrmslayer]], the sword of her group's leader, and joining his army. | |||
==Chapter data== | ==Chapter data== | ||
| Line 27: | Line 31: | ||
|victory=Seize the castle gate | |victory=Seize the castle gate | ||
|defeat=[[Roy]] dies | |defeat=[[Roy]] dies | ||
|ally= | |ally=1–12{{h|+2|Upon Geese and Gonzalez being recruited}} | ||
|other=0{{h|+1|Reinforcement}}{{h| | |other=0{{h|+1|Reinforcement}}{{h|−1|Upon Geese being recruited}} | ||
|enemy=23{{h|+19|Reinforcements}}{{h| | |enemy=23{{h|+19|Reinforcements}}{{h|−1|Upon Gonzalez being recruited}} | ||
|map=[[File:Cm fe06 10A.png]] | |map=[[File:Cm fe06 10A.png]] | ||
}} | }} | ||
| Line 35: | Line 39: | ||
|victory=Seize the castle gate | |victory=Seize the castle gate | ||
|defeat=[[Roy]] dies | |defeat=[[Roy]] dies | ||
|ally= | |ally=1–12{{h|+2|Upon Geese and Gonzalez being recruited}} | ||
|other=0{{h|+1|Reinforcement}}{{h| | |other=0{{h|+1|Reinforcement}}{{h|−1|Upon Geese being recruited}} | ||
|enemy=23{{h|+22|Reinforcements}}{{h| | |enemy=23{{h|+22|Reinforcements}}{{h|−1|Upon Gonzalez being recruited}} | ||
|map=[[File:Cm fe06 10A.png]] | |map=[[File:Cm fe06 10A.png]] | ||
}} | }} | ||
| Line 63: | Line 67: | ||
|recruitment method=Enemy, talk to with [[Lilina]] | |recruitment method=Enemy, talk to with [[Lilina]] | ||
}} | }} | ||
| | |forced1=roy | ||
| | |return1=marcus | ||
| | |return2=alen | ||
| | |return3=bors | ||
| | |return4=wolt | ||
| | |return5=lance | ||
| | |return5article=Lance (character) | ||
|return7= | |return6=merlinus | ||
|return8= | |return7=elen | ||
| | |return8=ward | ||
| | |return8article=Ward (character) | ||
| | |return9=lot | ||
| | |return10=dieck | ||
| | |return11=shanna | ||
| | |return12=chad | ||
| | |return13=lugh | ||
| | |return14=clarine | ||
| | |return15=rutger | ||
| | |return16=saul | ||
| | |return17=dorothy | ||
| | |return18=sue | ||
| | |return19=zelot | ||
| | |return20=trec | ||
| | |return21=noah | ||
| | |return22=astolfo | ||
| | |return23=lilina | ||
| | |return24=gwendolyn | ||
| | |return25=barthe | ||
| | |return26=ogier | ||
| | |return27=fir | ||
|return28=sin | |||
}} | }} | ||
| Line 106: | Line 111: | ||
|item4=Vulnerary | |item4=Vulnerary | ||
|obtain4=Steal from enemy [[Berserker]] | |obtain4=Steal from enemy [[Berserker]] | ||
|item5= | |item5=Antitoxin | ||
|obtain5=Steal from [[ | |obtain5=Steal from enemy [[Pirate]] (reinforcement; up to 3) | ||
|item6= | |item6=Vulnerary | ||
|obtain6=Steal from | |obtain6=Steal from [[Gonzalez]] or recruit him (reinforcement) | ||
|itemlast=Wyrmslayer | |itemlast=Wyrmslayer | ||
|obtainlast=Automatically at end of chapter | |obtainlast=Automatically at end of chapter | ||
| Line 121: | Line 126: | ||
|tab2=Hard | |tab2=Hard | ||
|content1={{ChapUnitHdr|type=Enemy|platform=gba}} | |content1={{ChapUnitHdr|type=Enemy|platform=gba}} | ||
{{ChapUnitCellGBA | |||
|name=[[Nord]] | |||
|class=Druid | |||
|lv=5 | |||
|#=1 | |||
|hp=31 | |||
|str=13 | |||
|skill=7 | |||
|spd=8 | |||
|lck=4 | |||
|def=8 | |||
|res=11 | |||
|con=8 | |||
|mov=6 | |||
|inventory={{Item|6|Nosferatu|image=nosferatu fe06}} | |||
|notes=Does not move; stands on the [[Terrain/Game Boy Advance games#Fire Emblem: The Binding Blade|gate]], the chapter's seize point. | |||
}} | |||
{{ChapUnitCellGBA | {{ChapUnitCellGBA | ||
|name=Armagh | |name=Armagh | ||
| Line 385: | Line 407: | ||
|con=5 | |con=5 | ||
|mov=5 | |mov=5 | ||
|inventory={{Item|6|Nosferatu}} | |inventory={{Item|6|Nosferatu|image=nosferatu fe06}} | ||
|notes=Moves to attack units in range. | |notes=Moves to attack units in range. | ||
|last=y | |last=y | ||
}} | }} | ||
| Line 493: | Line 498: | ||
{{ChapUnitFtr}} | {{ChapUnitFtr}} | ||
|content2={{ChapUnitHdr|type=Enemy|platform=gba}} | |content2={{ChapUnitHdr|type=Enemy|platform=gba}} | ||
{{ChapUnitCellGBA | |||
|name=[[Nord]] | |||
|class=Druid | |||
|lv=5 | |||
|#=1 | |||
|hp=34~36 | |||
|str=16~18 | |||
|skill=9~10 | |||
|spd=9~11 | |||
|lck=5~6 | |||
|def=8~9 | |||
|res=12~14 | |||
|con=8 | |||
|mov=6 | |||
|inventory={{Item|6|Nosferatu|image=nosferatu fe06}} | |||
|notes=Does not move; stands on the [[Terrain/Game Boy Advance games#Fire Emblem: The Binding Blade|gate]], the chapter's seize point. | |||
}} | |||
{{ChapUnitCellGBA | {{ChapUnitCellGBA | ||
|name=Armagh | |name=Armagh | ||
| Line 757: | Line 779: | ||
|con=5 | |con=5 | ||
|mov=5 | |mov=5 | ||
|inventory={{Item|6|Nosferatu}} | |inventory={{Item|6|Nosferatu|image=nosferatu fe06}} | ||
|notes=Moves to attack units in range. | |notes=Moves to attack units in range. | ||
|last=y | |last=y | ||
}} | }} | ||
| Line 893: | Line 898: | ||
**1 [[Fighter]] with a [[Steel Axe]] from the left southern fort | **1 [[Fighter]] with a [[Steel Axe]] from the left southern fort | ||
**1 [[Fighter]] with a [[Steel Axe]] and a [[Hand Axe]] from the right southern fort | **1 [[Fighter]] with a [[Steel Axe]] and a [[Hand Axe]] from the right southern fort | ||
*Enemy phase of turns 5, 8, and 11 | *(Hard Mode only) Enemy phase of turns 5, 8, and 11 | ||
**1 [[Pirate]] with a [[Hammer]] from the west fort | **1 [[Pirate]] with a [[Hammer]] from the west fort | ||
| Line 943: | Line 948: | ||
|con=8 | |con=8 | ||
|aid=7 | |aid=7 | ||
|inventory={{Item|6|Nosferatu}} | |inventory={{Item|6|Nosferatu|image=nosferatu fe06}} | ||
|da=y | |da=y | ||
|st=y | |st=y | ||
| Line 962: | Line 967: | ||
|con=8 | |con=8 | ||
|aid=7 | |aid=7 | ||
|inventory={{Item|6|Nosferatu}} | |inventory={{Item|6|Nosferatu|image=nosferatu fe06}} | ||
|da=y | |da=y | ||
|st=y | |st=y | ||
| Line 969: | Line 974: | ||
==Strategy== | ==Strategy== | ||
{{ | {{strategy}} | ||
The chapter is not particularly difficult. If you are using [[Shanna]], make sure to protect her from the ballista and the [[Berserker]]. Wait for enemies on the bridges, as they can not cross the river. Additionally, the enemies in the middle of the map will remain stationary unless you enter their attack range. Just remember the weapon triangle and you should have no trouble. To speed things up, consider deploying your mounted units. | |||
[[Geese]] will appear as a neutral unit on a green square during turn 4; have [[Roy]] talk to him. [[Gonzalez]] will then show up on turn 6 with the intent of destroying the village. If you do not intervene, he'll accomplish this by turn 11. To prevent this, have [[Lilina]] speak with him. | |||
==Etymology and other languages== | ==Etymology and other languages== | ||
{{Names | {{Names | ||
| Line 979: | Line 985: | ||
|eng-fan-name=Western Resistance | |eng-fan-name=Western Resistance | ||
|eng-fan-mean= | |eng-fan-mean= | ||
| | |jpn-name={{h|あらがう者たち|Aragau monotachi}} | ||
| | |jpn-mean=Resistance Force | ||
}} | }} | ||
==Gallery== | ==Gallery== | ||
<gallery> | |||
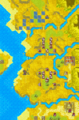
Cm fe06 10A.png|Map of the chapter | |||
</gallery> | |||
{{refbar}} | {{refbar}} | ||
Latest revision as of 17:46, 28 March 2024
| ||||||||||
|

| “ | ...Lord Arcardo did say to get rid of the Lycian League Army while they were here... Hahaha... What a splendid chance to gain favor with Lord Arcardo and earn a share of his riches! Dispatch our troops! Kill off the Lycian League Army! | ” | — Nord |
|---|
Western Resistance (Japanese: あらがう者たち Resistance Force) is Chapter 10A of Fire Emblem: The Binding Blade. To play this chapter, the player must have visited the village that offers a Killer Bow (or else must not have visited either of the two villages) in the previous chapter and thus headed north towards Mount Eburacum. Otherwise, Amidst a Struggle will be played instead, in which case Roy heads west toward Caldonia.
Plot
- Main article:
Western Resistance/Script
Roy's Lycian Army arrives at Fibernia, the largest of three islands comprising the Western Isles, and heads to Eburacum, the largest mine. On the way to Eburacum, Roy sends a messenger to the local castle's lord, Nord, requesting permission to pass through his lands.
As Roy's army travels, Nord talks with his soldiers about the resistance spy he imprisoned, Larum. She claims she is unaffiliated with the resistance, and Nord considers interrogating her himself, but he is interrupted by the message from Roy about permission to pass through his lands. As the Etrurian lord Arcardo had told him to eliminate the Lycian Army while it was here, Nord orders his soldiers to attack Roy's forces and kill the messenger.
Roy soon learns that his messenger has been killed and that Nord's forces are rushing to attack his army, and a battle ensues. During the battle, Geese tells a villager of his ship's crewmates being imprisoned by Nord and worked to death in the mines; he then leaves the village and starts fighting Nord's forces to seek revenge. If Roy talks to Geese, he explains that he is for hire and offers his services to Roy, as he is a pirate and knows the area while also wanting to fight the castle's forces, just like Roy does. Roy accepts the offer, and Geese joins his army.
Meanwhile, Nord talks to Gonzalez at the castle and orders him to burn down the village. Gonzalez is apprehensive, but cannot stand up to Nord and heads toward the village. On the way there, Lilina may talk to him; he asks her to warn the villagers, but Lilina explains that Gonzalez does not have to attack the village and can join the Lycian Army instead. Gonzalez is afraid because people tend to view him as a monster, but Lilina swears that the people in her army will not treat him that way, and he agrees to switch sides.
Eventually, Roy seizes Nord's castle, and Nord himself is killed in battle. He does not learn why Nord attacked him, but he finds the imprisoned Larum, who immediately informs him that she is with the resistance and that their real enemy is Etruria. Etrurians have been enslaving the populace and working it to death in the mines. The resistance Larum is a part of was planning to strike at Eburacum, but a villager leaked the plan's details, and the resistance is now in danger. Roy agrees to help Larum's group, and Larum hugs him in gratitude before offering him a Wyrmslayer, the sword of her group's leader, and joining his army.
Chapter data
Normal Hard
| ||||||
|
| |||||
| Victory: Seize the castle gate | Player | Other | Enemy | |||
|---|---|---|---|---|---|---|
| Defeat: Roy dies | 1–12+2 | 0+1−1 | 23+19−1 | |||
| ||||||
Character data
| Characters | ||||||||||||||||||||||
|---|---|---|---|---|---|---|---|---|---|---|---|---|---|---|---|---|---|---|---|---|---|---|
New units
| ||||||||||||||||||||||
| ||||||||||||||||||||||
Required characters
| ||||||||||||||||||||||
Available characters
| ||||||||||||||||||||||


Item data
| ||||||||||||||||||||||||
|
Enemy data
- Stats with two figures separated by a ~ are presented as a range, representing stats that vary due to random growths. The figures to the left and right of the ~ are the stat's minimum and maximum possible values respectively.
Normal Hard
| ||||||||||||||||||||||||||||||||||||||||||||||||||||||||||||||||||||||||||||||||||||||||||||||||||||||||||||||||||||||||||||||||||||||||||||||||||||||||||||||||||||||||||||||||||||||||||||||||||||||||||||||||||||||||||||||||||||||||||||||||||||||||||||||||||||||||||||||||||||||||||||||||||||||||||||||||||||||||||||||||||||||||||||||||||||||||||||||||||||||||||||||||||||||||||||||||||||||||||||||||||||||||||||||||||||||||||||||||||||||||||||||||||||||||||||||||||||||||||
| ||||||||||||||||||||||||||||||||||||||||||||||||||||||||||||||||||||||||||||||||||||||||||||||||||||||||||||||||||||||||||||||||||||||||||||||||||||||||||||||||||||||||||||||||||||||||||||||||||||||||||||||||||||||||||||||||||||||||||||||||||||||||||||||||||||||||||||||||||||||||||||||||||||||||||||||||||||||||||||||||||||||||||||||||||||||||||||||||||||||||||||||||||||||||||||||||||||||||||||||||||||||||||||||||||||||||||||||||||||||||||||||||||||||||||||||||||||||||||
| ||||||||||||||||||||||||||||||||||||||||||||||||||||||||||||||||||||||||||||||||||||||||||||||||||||||||||||||||||||||||||||||||||||||||||||||||||||||||||||||||||||||||||||||||||||||||||||||||||||||||||||||||||||||||||||||||||||||||||||||||||||||||||||||||||||||||||||||||||||||||||||||||||||||||||||||||||||||||||||||||||||||||||||||||||||||||||||||||||||||||||||||||||||||||||||||||||||||||||||||||||||||||||||||||||||||||||||||||||||||||||||||||||||||||||||||||||||||||||
| ||||||||||||||||||||||||||||||||||||||||||||||||||||||||||||||||||||||||||||||||||||||||||||||||||||||||||||||||||||||||||||||||||||||||||||||||||||||||||||||||||||||||||||||||||||||||||||||||||||||||||||||||||||||||||||||||||||||||||||||||||||||||||||||||||||||||||||||||||||||||||||||||||||||||||||||||||||||||||||||||||||||||||||||||||||||||||||||||||||||||||||||||||||||||||||||||||||||||||||||||||||||||||||||||||||||||||||||||||||||||||||||||||||||||||||||||||||||||||
Reinforcements
- Enemy phase of turns 4, 6, and 10
- 1 Pirate with a Poison Axe from the west fort
- Enemy phase of turn 6
- Gonzalez from the gate
- Enemy phase of turns 6, 9, and 12
- Enemy phase of turns 13–18
- (Hard Mode only) Enemy phase of turns 5, 8, and 11
NPC data
| ||||||||||||||||||||||||||||||||||||||||||
| ||||||||||||||||||||||||||||||||||||||||||
Reinforcements
Boss data
- Main article:
Nord - Stats with two figures separated by a ~ are presented as a range, representing stats that vary due to random growths. The figures to the left and right of the ~ are the stat's minimum and maximum possible values respectively.[1]
Normal Hard

Strategy
| This section details unofficial strategies that may help with completion of the chapter. This may not work for everybody. |
The chapter is not particularly difficult. If you are using Shanna, make sure to protect her from the ballista and the Berserker. Wait for enemies on the bridges, as they can not cross the river. Additionally, the enemies in the middle of the map will remain stationary unless you enter their attack range. Just remember the weapon triangle and you should have no trouble. To speed things up, consider deploying your mounted units.
Geese will appear as a neutral unit on a green square during turn 4; have Roy talk to him. Gonzalez will then show up on turn 6 with the intent of destroying the village. If you do not intervene, he'll accomplish this by turn 11. To prevent this, have Lilina speak with him.
Etymology and other languages
| Names, etymology, and in other regions | ||
|---|---|---|
| Language | Name | Definition, etymology, and notes |
| English |
Fighters |
Used in leftover text from the data transfer menu in the English version of Fire Emblem: The Blazing Blade. |
| English (unofficial) |
Western Resistance |
|
| Japanese |
あらがう者たち |
Resistance Force |
Gallery
Map of the chapter
References
- ↑ Western Resistance, triangleattack.com, Retrieved: December 24, 2020
| ← The Misty Isles • | Western Resistance | • The Hero of the West → |
|---|