| Site News |
|---|
| Warning: This wiki contains spoilers. Read at your own risk! Social media: If you would like, please join our Discord server, and/or follow us on Twitter (X) or Tumblr! |
The True Enemy: Difference between revisions
Thecornerman (talk | contribs) m (Text replacement - "ward↵return" to "ward |return") |
Thecornerman (talk | contribs) m (Text replacement - "([Ll])evel (\d+)" to "$1evel $2") |
||
| (23 intermediate revisions by 7 users not shown) | |||
| Line 7: | Line 7: | ||
*[[Flight Toward Freedom]] <small>(southern route)</small> | *[[Flight Toward Freedom]] <small>(southern route)</small> | ||
|next=*[[Rescue Mission]] | |next=*[[Rescue Mission]] | ||
*[[The Thunder Axe]] <small>( | *[[The Thunder Axe]] <small>(side quest)</small> | ||
|sidequest=*Chapter was completed within 20 turns | |sidequest=*Chapter was completed within 20 turns | ||
*Elffin is alive | *Elffin is alive | ||
| Line 14: | Line 14: | ||
{{Quote|This is the capital... Once we take it down, we can go home.|[[Roy]]}} | {{Quote|This is the capital... Once we take it down, we can go home.|[[Roy]]}} | ||
'''The True Enemy''' (Japanese: {{hl|真実の敵|Shinjitsu no teki}} ''The True Enemy'') is the twelfth chapter of {{FE6}}. In order to play | '''The True Enemy''' (Japanese: {{hl|真実の敵|Shinjitsu no teki}} ''The True Enemy'') is the twelfth chapter of {{FE6}}. In order to play [[The Thunder Axe|the side quest after]], this chapter must be completed before the enemy phase of turn 20, and [[Elffin]] must be alive if he was recruited. | ||
==Plot== | ==Plot== | ||
{{main|The True Enemy/Script}} | {{main|The True Enemy/Script}} | ||
The Lycian Army arrives in Juteaux, the Western Isles' capital and current residence of Lord [[Arcardo]], with the intent to defeat him and finally liberate the Isles from his unjust rule. However, Arcardo has fled, leaving Juteaux in the hands of the Bernese General [[Flaer]]. In turn, Flaer leaves to report the Lycian Army's advances to the Wyvern General [[Narcian]]. In the end, the Lycian Army faces off against the Manakete [[Ein]]. | |||
Outside Juteaux' castle, Roy receives word from either Larum or Elffin that an "unhuman" has been spotted inside, referring to Ein. He can scarcely believe the reports of a human turning into a dragon. The Lycian Army charges into the castle regardless, with appropiate caution. | |||
Inside, [[Raigh]], [[Lugh]]'s twin brother, poses as an enemy soldier to learn more about Bern's dragons. Only when reuniting with either Lugh or his friend [[Chad]] can he be persuaded to join the Lycian Army, though he feigns disinterest in Chad and Lugh's desire to avenge their father after he was killed by Bern. | |||
[[Cath]] also enters the castle to loot it amidst the chaos of combat. If Roy talks to her, he apologizes for his previous callous behavior torwards Cath, and promises to help her rebuild her hometown once the war against Bern ends. Cath is moved by his words, and joins the Lycian Army to see if Roy will live up to his promise. | |||
Finally, the Lycian Army defeats Ein, thus at last liberating the Western Isles from both Etruria and Bern. [[Elffin]] points out that the presence of a dragon confirms Arcardo's cooperation with Bernese forces. These news scare Roy, and he wishes to hurry back to Lycia. If Elffin escapes combat unscathed, he will also tell Roy that a legendary weapon is hidden in a cave on the Isles. Despite his fear for Lycia, Roy agrees to retrieve it to better the Lycian Army's chances in combat. | |||
==Chapter data== | ==Chapter data== | ||
| Line 31: | Line 37: | ||
|defeat=[[Roy]] dies | |defeat=[[Roy]] dies | ||
|ally=1–13{{h|+2|Upon Raigh and Cath being recruited}} | |ally=1–13{{h|+2|Upon Raigh and Cath being recruited}} | ||
|enemy=28{{h|+25|Reinforcements}}{{h| | |enemy=28{{h|+25|Reinforcements}}{{h|−3|Upon Flaer leaving, and Raigh and Cath being recruited}} | ||
|map=[[File:Cm fe06 12.png]] | |map=[[File:Cm fe06 12.png]] | ||
}} | }} | ||
| Line 38: | Line 44: | ||
|defeat=[[Roy]] dies | |defeat=[[Roy]] dies | ||
|ally=1–13{{h|+2|Upon Raigh and Cath being recruited}} | |ally=1–13{{h|+2|Upon Raigh and Cath being recruited}} | ||
|enemy=28{{h|+36|Reinforcements}}{{h| | |enemy=28{{h|+36|Reinforcements}}{{h|−3|Upon Flaer leaving, and Raigh and Cath being recruited}} | ||
|map=[[File:Cm fe06 12.png]] | |map=[[File:Cm fe06 12.png]] | ||
}} | }} | ||
| Line 52: | Line 58: | ||
|HP=23 | |HP=23 | ||
|lv=12 | |lv=12 | ||
|inventory={{Item|6|Nosferatu}} | |inventory={{Item|6|Nosferatu|image=nosferatu fe06}} | ||
|recruitment method=Enemy, talk to with [[Chad]] or [[Lugh]] | |recruitment method=Enemy, talk to with [[Chad]] or [[Lugh]] | ||
}} | }} | ||
| Line 135: | Line 141: | ||
|tab2=Hard | |tab2=Hard | ||
|content1={{ChapUnitHdr|type=Enemy|platform=gba}} | |content1={{ChapUnitHdr|type=Enemy|platform=gba}} | ||
{{ChapUnitCellGBA | |||
|name=[[Arcardo]] | |||
|class=Paladin | |||
|lv=10 | |||
|#=1 | |||
|hp=48 | |||
|str=20 | |||
|skill=14 | |||
|spd=13 | |||
|lck=13 | |||
|def=16 | |||
|res=10 | |||
|con=11 | |||
|mov=8 | |||
|inventory={{Item|6|Silver Lance}} • {{Item|6|Elixir}} | |||
|notes=Present during preparations; leaves the map at the start of turn 1 and is replaced by [[Flaer]]. | |||
}} | |||
{{ChapUnitCellGBA | {{ChapUnitCellGBA | ||
|name=Juteaux | |name=Juteaux | ||
| Line 250: | Line 273: | ||
|con=4 | |con=4 | ||
|mov=5 | |mov=5 | ||
|inventory={{Item|6|Nosferatu}} | |inventory={{Item|6|Nosferatu|image=nosferatu fe06}} | ||
|notes=Does not move, except to heal. | |notes=Does not move, except to heal. | ||
}} | }} | ||
| Line 499: | Line 522: | ||
}} | }} | ||
{{ChapUnitCellGBA | {{ChapUnitCellGBA | ||
|name=[[Flaer]] | |||
|class=Wyvern Lord | |||
|lv=1 | |||
|name=[[Flaer]] | |||
|class=Wyvern Lord | |||
|lv=1 | |||
|#=1 | |#=1 | ||
|hp=44 | |hp=44 | ||
| Line 767: | Line 773: | ||
|content2={{ChapUnitHdr|type=Enemy|platform=gba}} | |content2={{ChapUnitHdr|type=Enemy|platform=gba}} | ||
{{ChapUnitCellGBA | {{ChapUnitCellGBA | ||
|name= | |name=[[Arcardo]] | ||
|class= | |class=Paladin | ||
|lv= | |lv=10 | ||
|#=1 | |#=1 | ||
|hp=34~40 | |hp=53~56 | ||
|str=21~23 | |||
|skill=16~18 | |||
|spd=14~15 | |||
|def=16~18 | |||
|lck=14~16 | |||
|res=11~12 | |||
|con=11 | |||
|mov=8 | |||
|inventory={{Item|6|Silver Lance}} • {{Item|6|Elixir}} | |||
|notes=Present during preparations; leaves the map at the start of turn 1 and is replaced by [[Flaer]]. | |||
}} | |||
{{ChapUnitCellGBA | |||
|name=Juteaux | |||
|class=Fighter | |||
|lv=12 | |||
|#=1 | |||
|hp=34~40 | |||
|str=14~18 | |str=14~18 | ||
|skill=7~11 | |skill=7~11 | ||
| Line 881: | Line 904: | ||
|con=4 | |con=4 | ||
|mov=5 | |mov=5 | ||
|inventory={{Item|6|Nosferatu}} | |inventory={{Item|6|Nosferatu|image=nosferatu fe06}} | ||
|notes=Does not move, except to heal. | |notes=Does not move, except to heal. | ||
}} | }} | ||
| Line 1,128: | Line 1,151: | ||
|inventory={{Item|6|Silver Bow}} • {{Item|6|Vulnerary}} | |inventory={{Item|6|Silver Bow}} • {{Item|6|Vulnerary}} | ||
|notes=Does not move, except to heal. | |notes=Does not move, except to heal. | ||
}} | }} | ||
{{ChapUnitCellGBA | {{ChapUnitCellGBA | ||
| Line 1,407: | Line 1,413: | ||
**1 [[Warrior]] and 3 [[Fighter]]s—levels 15, 14, and 13—from north of the southeast cliffs | **1 [[Warrior]] and 3 [[Fighter]]s—levels 15, 14, and 13—from north of the southeast cliffs | ||
*Enemy phase of turns 12 <small>(Hard Mode; if Ein is alive)</small> and 20 | *Enemy phase of turns 12 <small>(Hard Mode; if Ein is alive)</small> and 20 | ||
**1 [[Hero]] and 3 [[Mercenary|Mercenaries]]—one at level 13, two at level 16—from the southern edge of the map | **1 [[Hero]] and 3 [[Mercenary|Mercenaries]]—one at level 13, two at level 16—from the southern edge of the map | ||
*Enemy phase of turns 17–22 | *Enemy phase of turns 17–22 | ||
**2 [[Fighter]]s—levels 12 and 14—from the stairs in the throne room. | **2 [[Fighter]]s—levels 12 and 14—from the stairs in the throne room. | ||
| Line 1,500: | Line 1,506: | ||
==Strategy== | ==Strategy== | ||
{{ | {{strategy}} | ||
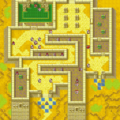
Before starting the battle, note that neither [[Arcardo]] nor [[Flaer]] is the true boss. The real boss is a [[Manakete]] name [[Ein]] who will appear on the enemy's first turn. When preparing your team, choose at least one character from the following classes: [[Priest]], [[Mage]], [[Thief]], and those skilled with [[sword]]s or [[axe]]s. Rearrange these characters based on their abilities to ensure two balanced groups. Prioritize including long-range attackers like [[Sue]] or [[Shin]], especially in your left-hand group, as they excel at quickly navigating through corridors. | |||
If you've acquired door or chest keys in earlier chapters, now is the time to use them. However, it's still possible to complete the chapter in fewer than 20 turns with only a Thief in each group, allowing you to unlock Chapter 12x. When engaging the enemy, target those who are beyond walls when possible and heal your characters as needed. You can avoid problems by consistently checking the attack range and weapons of your enemies. Some [[Archer]]s, for example, are equipped with [[Longbow]]s. Also, if you have a [[Restore]] staff, bring it along. The Priest positioned between your groups has a [[Sleep (staff)|Sleep staff]], which can immobilize your characters with lower resistance for a couple of turns unless you counteract it with the [[Restore]] staff. | |||
- | |||
For your right-hand group, be cautious when moving up the corridor. A [[Sniper]] with a [[Silver Bow]] will attack you, potentially in combination with a [[Fighter]] wielding a [[Killer Axe]]. Defeat the Fighter first, then proceed carefully, staying out of the Sniper's attack range if you cannot defeat him from a distance. Trying to break the wall is a waste of time; it's easier to simply avoid the Sniper. If you have extra door or chest keys, this group is the best one to use them with, as you can access rooms containing valuable chests. Also, focus on stopping [[Cath]] with this group by blocking her escape routes (doors and stairs) until [[Roy]] can speak with her. If she escapes, she'll steal all the treasures. If [[Roy]] has spoken to Cath in two previous chapters and you didn't defeat her, she will join your side if you speak to her again here. You'll also have three more chances in later chapters to recruit her. | |||
Finally, when you approach the boss's room, place a character skilled in swordsmanship at the front to take on the [[Warrior]] boss. Recruit [[Raigh]] by using [[Lugh]] to talk to him, but avoid attacking him. You can use [[Larum]] to give Lugh extra mobility and initiate the conversation immediately. Once this is done, proceed to confront the main boss. If you've been fast, it's likely you'll avoid encountering the reinforcements that appear on the right side of the map. If you suspect they'll catch up, keep some [[sword]]-wielding characters and [[Archer]]s nearby as a precaution. | |||
==Etymology and other languages== | ==Etymology and other languages== | ||
{{Names | {{Names | ||
| Line 1,525: | Line 1,535: | ||
|prealternate=Flight Toward Freedom | |prealternate=Flight Toward Freedom | ||
|nextchapter=Rescue Mission | |nextchapter=Rescue Mission | ||
|nextalternate=The Thunder Axe{{!}}The Thunder Axe <small>( | |nextalternate=The Thunder Axe{{!}}The Thunder Axe <small>(side quest)</small> | ||
}} | }} | ||
Latest revision as of 21:25, 28 March 2024
| ||||||||||||
|

| “ | This is the capital... Once we take it down, we can go home. | ” | — Roy |
|---|
The True Enemy (Japanese: 真実の敵 The True Enemy) is the twelfth chapter of Fire Emblem: The Binding Blade. In order to play the side quest after, this chapter must be completed before the enemy phase of turn 20, and Elffin must be alive if he was recruited.
Plot
- Main article:
The True Enemy/Script
The Lycian Army arrives in Juteaux, the Western Isles' capital and current residence of Lord Arcardo, with the intent to defeat him and finally liberate the Isles from his unjust rule. However, Arcardo has fled, leaving Juteaux in the hands of the Bernese General Flaer. In turn, Flaer leaves to report the Lycian Army's advances to the Wyvern General Narcian. In the end, the Lycian Army faces off against the Manakete Ein.
Outside Juteaux' castle, Roy receives word from either Larum or Elffin that an "unhuman" has been spotted inside, referring to Ein. He can scarcely believe the reports of a human turning into a dragon. The Lycian Army charges into the castle regardless, with appropiate caution.
Inside, Raigh, Lugh's twin brother, poses as an enemy soldier to learn more about Bern's dragons. Only when reuniting with either Lugh or his friend Chad can he be persuaded to join the Lycian Army, though he feigns disinterest in Chad and Lugh's desire to avenge their father after he was killed by Bern.
Cath also enters the castle to loot it amidst the chaos of combat. If Roy talks to her, he apologizes for his previous callous behavior torwards Cath, and promises to help her rebuild her hometown once the war against Bern ends. Cath is moved by his words, and joins the Lycian Army to see if Roy will live up to his promise.
Finally, the Lycian Army defeats Ein, thus at last liberating the Western Isles from both Etruria and Bern. Elffin points out that the presence of a dragon confirms Arcardo's cooperation with Bernese forces. These news scare Roy, and he wishes to hurry back to Lycia. If Elffin escapes combat unscathed, he will also tell Roy that a legendary weapon is hidden in a cave on the Isles. Despite his fear for Lycia, Roy agrees to retrieve it to better the Lycian Army's chances in combat.
Chapter data
Normal Hard
| ||||||
|
| |||||
| Victory: Seize the throne | Player | Enemy | ||||
|---|---|---|---|---|---|---|
| Defeat: Roy dies | 1–13+2 | 28+25−3 | ||||
| ||||||
Character data
| Characters | ||||||||||||||||||||||
|---|---|---|---|---|---|---|---|---|---|---|---|---|---|---|---|---|---|---|---|---|---|---|
New units
| ||||||||||||||||||||||
| ||||||||||||||||||||||
Required characters
| ||||||||||||||||||||||
Available characters
| ||||||||||||||||||||||


Item data
| ||||||||||||||||||||||||||||||
|
Enemy data
- Stats with two figures separated by a ~ are presented as a range, representing stats that vary due to random growths. The figures to the left and right of the ~ are the stat's minimum and maximum possible values respectively.
Normal Hard
| |||||||||||||||||||||||||||||||||||||||||||||||||||||||||||||||||||||||||||||||||||||||||||||||||||||||||||||||||||||||||||||||||||||||||||||||||||||||||||||||||||||||||||||||||||||||||||||||||||||||||||||||||||||||||||||||||||||||||||||||||||||||||||||||||||||||||||||||||||||||||||||||||||||||||||||||||||||||||||||||||||||||||||||||||||||||||||||||||||||||||||||||||||||||||||||||||||||||||||||||||||||||||||||||||||||||||||||||||||||||||||||||||||||||||||||||||||||||||||||||||||||||||||||||||||||||||||||||||||||||||||||||||||||||||||||||||||||||||||||||||||||||||||||||||||||||||||||||||||||||||||||||||||||||||||||||||||||||||||||||||||||||||||||||||||||||
| |||||||||||||||||||||||||||||||||||||||||||||||||||||||||||||||||||||||||||||||||||||||||||||||||||||||||||||||||||||||||||||||||||||||||||||||||||||||||||||||||||||||||||||||||||||||||||||||||||||||||||||||||||||||||||||||||||||||||||||||||||||||||||||||||||||||||||||||||||||||||||||||||||||||||||||||||||||||||||||||||||||||||||||||||||||||||||||||||||||||||||||||||||||||||||||||||||||||||||||||||||||||||||||||||||||||||||||||||||||||||||||||||||||||||||||||||||||||||||||||||||||||||||||||||||||||||||||||||||||||||||||||||||||||||||||||||||||||||||||||||||||||||||||||||||||||||||||||||||||||||||||||||||||||||||||||||||||||||||||||||||||||||||||||||||||||
| |||||||||||||||||||||||||||||||||||||||||||||||||||||||||||||||||||||||||||||||||||||||||||||||||||||||||||||||||||||||||||||||||||||||||||||||||||||||||||||||||||||||||||||||||||||||||||||||||||||||||||||||||||||||||||||||||||||||||||||||||||||||||||||||||||||||||||||||||||||||||||||||||||||||||||||||||||||||||||||||||||||||||||||||||||||||||||||||||||||||||||||||||||||||||||||||||||||||||||||||||||||||||||||||||||||||||||||||||||||||||||||||||||||||||||||||||||||||||||||||||||||||||||||||||||||||||||||||||||||||||||||||||||||||||||||||||||||||||||||||||||||||||||||||||||||||||||||||||||||||||||||||||||||||||||||||||||||||||||||||||||||||||||||||||||||||
| |||||||||||||||||||||||||||||||||||||||||||||||||||||||||||||||||||||||||||||||||||||||||||||||||||||||||||||||||||||||||||||||||||||||||||||||||||||||||||||||||||||||||||||||||||||||||||||||||||||||||||||||||||||||||||||||||||||||||||||||||||||||||||||||||||||||||||||||||||||||||||||||||||||||||||||||||||||||||||||||||||||||||||||||||||||||||||||||||||||||||||||||||||||||||||||||||||||||||||||||||||||||||||||||||||||||||||||||||||||||||||||||||||||||||||||||||||||||||||||||||||||||||||||||||||||||||||||||||||||||||||||||||||||||||||||||||||||||||||||||||||||||||||||||||||||||||||||||||||||||||||||||||||||||||||||||||||||||||||||||||||||||||||||||||||||||
Reinforcements
- Enemy phase of turn 1
- Enemy phase of turn 7, if Cath was not killed in a previous chapter.
- Cath from the north stairs
- Enemy phase of turns 12 and 15 (Hard Mode), if Ein is alive each turn
- 3 Wyvern Riders—levels 15, 12, and 13—from the northeast corner of the map
- 1 Warrior and 3 Fighters—levels 15, 14, and 13—from north of the southeast cliffs
- Enemy phase of turns 12 (Hard Mode; if Ein is alive) and 20
- 1 Hero and 3 Mercenaries—one at level 13, two at level 16—from the southern edge of the map
- Enemy phase of turns 17–22
- 2 Fighters—levels 12 and 14—from the stairs in the throne room.
Boss data
- Stats with two figures separated by a ~ are presented as a range, representing stats that vary due to random growths. The figures to the left and right of the ~ are the stat's minimum and maximum possible values respectively.[1]
- Main article:
Ein
Normal Hard

- Main article:
Arcardo
Normal Hard
|
|
| |||||||||||||||||||||||||||||||||||||||||||||||||

Strategy
| This section details unofficial strategies that may help with completion of the chapter. This may not work for everybody. |
Before starting the battle, note that neither Arcardo nor Flaer is the true boss. The real boss is a Manakete name Ein who will appear on the enemy's first turn. When preparing your team, choose at least one character from the following classes: Priest, Mage, Thief, and those skilled with swords or axes. Rearrange these characters based on their abilities to ensure two balanced groups. Prioritize including long-range attackers like Sue or Shin, especially in your left-hand group, as they excel at quickly navigating through corridors.
If you've acquired door or chest keys in earlier chapters, now is the time to use them. However, it's still possible to complete the chapter in fewer than 20 turns with only a Thief in each group, allowing you to unlock Chapter 12x. When engaging the enemy, target those who are beyond walls when possible and heal your characters as needed. You can avoid problems by consistently checking the attack range and weapons of your enemies. Some Archers, for example, are equipped with Longbows. Also, if you have a Restore staff, bring it along. The Priest positioned between your groups has a Sleep staff, which can immobilize your characters with lower resistance for a couple of turns unless you counteract it with the Restore staff.
For your right-hand group, be cautious when moving up the corridor. A Sniper with a Silver Bow will attack you, potentially in combination with a Fighter wielding a Killer Axe. Defeat the Fighter first, then proceed carefully, staying out of the Sniper's attack range if you cannot defeat him from a distance. Trying to break the wall is a waste of time; it's easier to simply avoid the Sniper. If you have extra door or chest keys, this group is the best one to use them with, as you can access rooms containing valuable chests. Also, focus on stopping Cath with this group by blocking her escape routes (doors and stairs) until Roy can speak with her. If she escapes, she'll steal all the treasures. If Roy has spoken to Cath in two previous chapters and you didn't defeat her, she will join your side if you speak to her again here. You'll also have three more chances in later chapters to recruit her.
Finally, when you approach the boss's room, place a character skilled in swordsmanship at the front to take on the Warrior boss. Recruit Raigh by using Lugh to talk to him, but avoid attacking him. You can use Larum to give Lugh extra mobility and initiate the conversation immediately. Once this is done, proceed to confront the main boss. If you've been fast, it's likely you'll avoid encountering the reinforcements that appear on the right side of the map. If you suspect they'll catch up, keep some sword-wielding characters and Archers nearby as a precaution.
Etymology and other languages
| Names, etymology, and in other regions | ||
|---|---|---|
| Language | Name | Definition, etymology, and notes |
| English |
The True Enemy |
Used in leftover text from the data transfer menu in the English version of Fire Emblem: The Blazing Blade. |
| English (unofficial) |
The True Enemy |
-- |
| Japanese |
真実の敵 |
The True Enemy |
Gallery
Map of the chapter
References
- ↑ The True Enemy, triangleattack.com, Retrieved: December 24, 2020
| ← Amidst a Struggle • ← Flight Toward Freedom • |
The True Enemy | • Rescue Mission → • The Thunder Axe (side quest) → |
|---|