| Site News |
|---|
| Warning: This wiki contains spoilers. Read at your own risk! Social media: If you would like, please join our Discord server, and/or follow us on X (Twitter) or Tumblr! |
The Sable Order: Difference between revisions
Thecornerman (talk | contribs) m (Text replacement - "\|\-(\d+)\|" to "|−$1|") |
mNo edit summary |
||
| (7 intermediate revisions by 3 users not shown) | |||
| Line 6: | Line 6: | ||
|boss=[[Sternlin]] | |boss=[[Sternlin]] | ||
|previous=*[[Star and Savior]] | |previous=*[[Star and Savior]] | ||
*[[Helena Castle]] <small>(''Shadow Dragon'' | *[[Helena Castle]] <small>(''Shadow Dragon'' side quest)</small> | ||
|next=[[Manakete Princess]] | |next=[[Manakete Princess]] | ||
}} | }} | ||
| Line 116: | Line 116: | ||
|lv=3 | |lv=3 | ||
|inventory={{Item|ds|Ridersbane}}<br>{{Item|ds|Mercurius}} | |inventory={{Item|ds|Ridersbane}}<br>{{Item|ds|Mercurius}} | ||
|recruitment method=Enemy, talk to with [[Marth]] | |recruitment method=Enemy, talk to with [[Marth]]{{h|*|Est will not attack; instead, she will seek out Marth and initiate her recruitment.}} | ||
}} | }} | ||
|forced1=marth | |forced1=marth | ||
| Line 227: | Line 227: | ||
|bocost2=2200 | |bocost2=2200 | ||
|tome1=Fire | |tome1=Fire | ||
|tocost1=300 | |tocost1=300 | ||
|tome2=Thunder | |tome2=Thunder | ||
|tocost2=460 | |tocost2=460 | ||
|tome3=Blizzard | |tome3=Blizzard | ||
| Line 269: | Line 267: | ||
|bocost2=2100 | |bocost2=2100 | ||
|tome1=Fire | |tome1=Fire | ||
|tocost1=300 | |tocost1=300 | ||
|tome2=Thunder | |tome2=Thunder | ||
|tocost2=420 | |tocost2=420 | ||
|tome3=Blizzard | |tome3=Blizzard | ||
| Line 480: | Line 476: | ||
|mov=8 | |mov=8 | ||
|inventory=[[Armorslayer]] | |inventory=[[Armorslayer]] | ||
|notes=Drops {{drop|Mercurius}} upon defeat.<br>• Moves to [[Marth]] and initiates her recruitment.<br>• Does not appear if [[Minerva]] was not recruited. | |notes=Drops {{drop|Mercurius}} upon defeat.<br>• Moves to [[Marth]] and initiates her recruitment.<br>• Does not appear if [[Minerva]] was defeated or not recruited. | ||
}} | }} | ||
{{ChapUnitCellFE1 | {{ChapUnitCellFE1 | ||
| Line 2,644: | Line 2,640: | ||
==Strategy== | ==Strategy== | ||
{{strategy}} | {{strategy}} | ||
===Preparation=== | |||
* This chapter is cavalry-heavy, so prepare accordingly. Bring [[Ridersbane]]s, [[Poleaxe]]s, and the [[Wing Spear]]. | |||
* Sell iron weapons and buy steel ones for more damage, but save some money for later chapters where only silver weapons are effective. | |||
* Focus on using and leveling up only your strongest units from this point forward. | |||
* Try to conserve resources, as future battles will require more powerful weapons and well-leveled units. | |||
===During Battle=== | |||
'''1. Initial Strategy:''' | |||
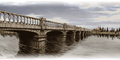
* Position high-defense units, like [[General]]s, on the bridge to block and counter enemies. | |||
* Use anti-cavalry weapons to eliminate threats. | |||
* Optionally, let [[Marth]] use his [[Rapier]] to take down [[Horseman|Horsemen]] for extra experience. | |||
'''2. Reinforcements & New Recruit:''' | |||
* Expect additional enemies from the southwest forts upon reaching the southern shore. | |||
* [[Est]] arrives on turn 6 in the southwest corner of the map carrying the powerful [[Mercurius]] sword. Speak to her with Marth to recruit her. While she's initially weak, her [[Triangle Attack]] can be very powerful. | |||
'''3. Combat Tips:''' | |||
* Beware of enemies with strong weapons (Silver, Killer, [[Armorslayer]]). | |||
* Try to eliminate foes in one turn because of the [[Curate]] with the [[Fortify]] staff. | |||
* Flying units can safely harass from the sea with [[Javelin]]s as long as you watch out for the Horsemen and [[Cavalier]]s with ranged weapons. | |||
* Use long-range magic to safely deal with the boss, [[Sternlin]]. | |||
==Trivia== | ==Trivia== | ||
*A modified version of this map is used for [[Soulful Bridge|Chapter 8]] in {{title|Mystery of the Emblem}} Book 2 and {{title|New Mystery of the Emblem}}, though this chapter was cut from ''Mystery of the Emblem'' Book 1. | *A modified version of this map is used for [[Soulful Bridge|Chapter 8]] in {{title|Mystery of the Emblem}} Book 2 and {{title|New Mystery of the Emblem}}, though this chapter was cut from ''Mystery of the Emblem'' Book 1. | ||
==Etymology and other languages== | ==Etymology and other languages== | ||
| Line 2,665: | Line 2,681: | ||
==Gallery== | ==Gallery== | ||
{{ | {{sectstub}} | ||
<gallery> | <gallery> | ||
Cg fe11 c18.png|CG image displayed during the intro for {{title|Shadow Dragon}} | Cg fe11 c18.png|CG image displayed during the intro for {{title|Shadow Dragon}} | ||
Latest revision as of 22:19, 25 April 2024
- This article is about the chapter. For the order this chapter is named after, see Sable Order.
| ||||||||||
|

The Sable Order (Japanese: グルニア黒騎士団 Grunia Black Knights) is the eighteenth chapter in Fire Emblem: Shadow Dragon & the Blade of Light and Fire Emblem: Shadow Dragon. It is one of the five chapters to be cut from Book I of Fire Emblem: Mystery of the Emblem.
Plot
- Main article:
The Sable Order/Script
With Altea liberated, Marth sets out for the Fane of Raman to retrieve the Lightsphere and the Starsphere. He is accosted by a cohort of Grustian cavalry, and Nyna expresses concerns that the famed Grustian general Camus will oppose them; Marth explains that he has angered Dolhr for insubordination and is currently being kept "on a short leash", to her relief. During the ensuing battle, the Whitewing sister Est arrives and joins Marth's forces, having stolen the Archanean regalia sword Mercurius. Marth overcomes Grust's forces and elects to take a handful of soldiers to search the Fane of Raman.
Chapter data
Shadow Dragon & the Blade of Light Shadow Dragon

| ||||||
|
| |||||
| Victory: Seize | Player | Enemy | ||||
|---|---|---|---|---|---|---|
| Defeat: Marth dies | 1–15+1 | 22+20−1 | ||||
| ||||||
| Map dimensions: 30 columns by 28 rows | ||||||
Character data
Shadow Dragon & the Blade of Light Shadow Dragon
| Characters | |||||||||||
|---|---|---|---|---|---|---|---|---|---|---|---|
New units
| |||||||||||
| |||||||||||
Required characters
| |||||||||||

| |||||||||||
Available characters
| |||||||||||
                                                  
| |||||||||||

Item data
Shadow Dragon & the Blade of Light Shadow Dragon
| |||||||||
|
Shop data
Shadow Dragon & the Blade of Light Shadow Dragon
Swords Lances Axes Bows Tomes Staves Items Secret
| Name | Cost | |
|---|---|---|
| Steel Sword | 875 | |
| Silver Sword | 2000 | |
| Levin Sword | 1600 | |
| Armorslayer | 1000 | |
| Rapier | 1120 |
Only one Rapier can be bought.
Enemy data
Shadow Dragon & the Blade of Light Shadow Dragon
- Stats with a decimal can vary randomly; the decimal represents the chance for the stat to increase to the nearest integer, or otherwise be truncated.
Normal Hard-1 Hard-2 Hard-3 Hard-4 Hard-5
| |||||||||||||||||||||||||||||||||||||||||||||||||||||||||||||||||||||||||||||||||||||||||||||||||||||||||||||||||||||||||||||||||||||||||||||||||||||||||||||||||||||||||||||||||||||||||||||||||||||||||||||||||||||||||||||||||||||||||||||||||||||||||||||||||||||||||||||||||||||||||||||||||||||||||||||||||||||||||||||||||||||||||||||||||||||||||||||||||||||||||||||||||||||||||||||||||||||||||
| |||||||||||||||||||||||||||||||||||||||||||||||||||||||||||||||||||||||||||||||||||||||||||||||||||||||||||||||||||||||||||||||||||||||||||||||||||||||||||||||||||||||||||||||||||||||||||||||||||||||||||||||||||||||||||||||||||||||||||||||||||||||||||||||||||||||||||||||||||||||||||||||||||||||||||||||||||||||||||||||||||||||||||||||||||||||||||||||||||||||||||||||||||||||||||||||||||||||||
| |||||||||||||||||||||||||||||||||||||||||||||||||||||||||||||||||||||||||||||||||||||||||||||||||||||||||||||||||||||||||||||||||||||||||||||||||||||||||||||||||||||||||||||||||||||||||||||||||||||||||||||||||||||||||||||||||||||||||||||||||||||||||||||||||||||||||||||||||||||||||||||||||||||||||||||||||||||||||||||||||||||||||||||||||||||||||||||||||||||||||||||||||||||||||||||||||||||||||
| |||||||||||||||||||||||||||||||||||||||||||||||||||||||||||||||||||||||||||||||||||||||||||||||||||||||||||||||||||||||||||||||||||||||||||||||||||||||||||||||||||||||||||||||||||||||||||||||||||||||||||||||||||||||||||||||||||||||||||||||||||||||||||||||||||||||||||||||||||||||||||||||||||||||||||||||||||||||||||||||||||||||||||||||||||||||||||||||||||||||||||||||||||||||||||||||||||||||||
Reinforcements
Shadow Dragon & the Blade of Light
- Turn 6
- Est appears from the southwestern sea
- Turns 8–16
- One Cavalier from the center-right southwestern fort
- Turns 9–16
- One Cavalier from the center-left southwestern fort
- Turns 10–16
- One Horseman from the rightmost southwestern fort
- Turns 11–16
- One Paladin with a Levin Sword from the leftmost southwestern fort
- Turns 14–16
- One Paladin with a Silver Sword from the center fort
Shadow Dragon
- Turn 6
- Est appears from the southwestern sea
- Turns 8, 10, 12, 14; halted when Sternlin is defeated
- One Paladin with a Steel Lance*/Silver Lance* from the leftmost southwestern fort
- One Cavalier from the center-left southwestern fort
- One Cavalier from the center-right southwestern fort
- One Horseman from the rightmost southwestern fort
- Turns 14, 16, 18; halted when Sternlin is defeated
- One Paladin with a Silver Sword from the center fort
Boss data
- Main article:
Sternlin
Shadow Dragon & the Blade of Light Shadow Dragon
- Stats with a decimal can vary randomly; the decimal represents the chance for the stat to increase to the nearest integer, or be otherwise truncated.
Normal Hard-1 Hard-2 Hard-3 Hard-4 Hard-5
|
|
| |||||||||||||||||||||||||||||||||||||||||||

Strategy
| This section details unofficial strategies that may help with completion of the chapter. This may not work for everybody. |
Preparation
- This chapter is cavalry-heavy, so prepare accordingly. Bring Ridersbanes, Poleaxes, and the Wing Spear.
- Sell iron weapons and buy steel ones for more damage, but save some money for later chapters where only silver weapons are effective.
- Focus on using and leveling up only your strongest units from this point forward.
- Try to conserve resources, as future battles will require more powerful weapons and well-leveled units.
During Battle
1. Initial Strategy:
- Position high-defense units, like Generals, on the bridge to block and counter enemies.
- Use anti-cavalry weapons to eliminate threats.
- Optionally, let Marth use his Rapier to take down Horsemen for extra experience.
2. Reinforcements & New Recruit:
- Expect additional enemies from the southwest forts upon reaching the southern shore.
- Est arrives on turn 6 in the southwest corner of the map carrying the powerful Mercurius sword. Speak to her with Marth to recruit her. While she's initially weak, her Triangle Attack can be very powerful.
3. Combat Tips:
- Beware of enemies with strong weapons (Silver, Killer, Armorslayer).
- Try to eliminate foes in one turn because of the Curate with the Fortify staff.
- Flying units can safely harass from the sea with Javelins as long as you watch out for the Horsemen and Cavaliers with ranged weapons.
- Use long-range magic to safely deal with the boss, Sternlin.
Trivia
- A modified version of this map is used for Chapter 8 in Mystery of the Emblem Book 2 and New Mystery of the Emblem, though this chapter was cut from Mystery of the Emblem Book 1.
Etymology and other languages
| Names, etymology, and in other regions | ||
|---|---|---|
| Language | Name | Definition, etymology, and notes |
| English |
The Sable Order |
-- |
| Japanese |
グルニア黒騎士団 |
Grunia Black Knights |
| Spanish |
La Orden Ópalo |
The Opal Order |
| French |
L'Ordre noir |
The Black Order |
| German |
Schwarzer Orden |
Black Order |
| Italian |
L'Ordine dello Zibellino Nero |
The Sable Order |
Gallery
This section has been marked as a stub. Please help improve the page by adding information.
CG image displayed during the intro for Shadow Dragon

References
| ← Star and Savior • ← Helena Castle (Shadow Dragon) • |
The Sable Order | • Manakete Princess → |
|---|
| Fire Emblem: Shadow Dragon | ||||||||||||||||||||
|---|---|---|---|---|---|---|---|---|---|---|---|---|---|---|---|---|---|---|---|---|
|