| Site News |
|---|
| Warning: This wiki contains spoilers. Read at your own risk! Social media: If you would like, please join our Discord server, and/or follow us on Twitter (X) or Tumblr! |
The Misty Isles: Difference between revisions
Thecornerman (talk | contribs) mNo edit summary |
mNo edit summary |
||
| (20 intermediate revisions by 7 users not shown) | |||
| Line 1: | Line 1: | ||
{{Chapter Infobox | {{Chapter Infobox | ||
|image=[[File:Cm fe06 9.png|200px]] | |image=[[File:Cm fe06 9.png|200px]] | ||
|location=[[Fibernia]] | |location=[[Fibernia]]n Coast | ||
|new units=[[Fir]], [[Sin]] | |new units=[[Fir]], [[Sin]] | ||
|boss=[[Scott]] | |boss=[[Scott]] | ||
|weather=[[Fog of war]] | |weather=[[Fog of war]] | ||
|previous=*[[Reunion (The Binding Blade)|Reunion]] | |previous=*[[Reunion (The Binding Blade)|Reunion]] | ||
*[[The Blazing Blade (chapter)|The Blazing Blade]] <small>( | *[[The Blazing Blade (chapter)|The Blazing Blade]] <small>(side quest)</small> | ||
|next=*[[Western Resistance]] <small>(northern route)</small> | |next=*[[Western Resistance]] <small>(northern route)</small> | ||
*[[Amidst a Struggle]] <small>( | *[[Amidst a Struggle]] <small>(western route)</small> | ||
}} | }} | ||
| Line 15: | Line 15: | ||
'''The Misty Isles''' (Japanese: {{hl|霧にけむる島|Kiri ni kemuru shima}} ''Foggy island'') is the ninth chapter in {{FE6}}. As part of the treaty with [[Etruria]], the newly-reformed [[Lycia]]n League Army is sent to the [[Western Isles]] to deal with the outlaws who are threatening the place. | '''The Misty Isles''' (Japanese: {{hl|霧にけむる島|Kiri ni kemuru shima}} ''Foggy island'') is the ninth chapter in {{FE6}}. As part of the treaty with [[Etruria]], the newly-reformed [[Lycia]]n League Army is sent to the [[Western Isles]] to deal with the outlaws who are threatening the place. | ||
Which set of the next two chapters is played after this one depends on which of the northeast two [[village]]s is visited: if the left one is visited or neither is visited, the northern route will be played; if the right village is visited, the | Which set of the next two chapters is played after this one depends on which of the northeast two [[village]]s is visited: if the left one is visited or neither is visited, the northern route will be played; if the right village is visited, the western route is played. | ||
==Plot== | ==Plot== | ||
{{main|The Misty Isles/Script}} | {{main|The Misty Isles/Script}} | ||
After [[Etruria]]'s intervention in [[Ostia]], the political situation in [[Elibe]] drastically changed. [[Bern]] is no longer attacking, while [[Pherae]] has become the strongest power in [[Lycia]] and [[Roy]] now leads an army that is meant to protect the entire Lycian League. However, Etruria requests the army be sent to the [[Western Isles]], as there is a struggle with bandits in the area and the Western Isles are a wealthy colony of Etruria. Because of Etruria's role in halting Bern's invasion and saving Ostia, Roy cannot refuse, and so he heads to the Isles with his army. | |||
As Roy arrives at the Isles, he discusses the situation with [[Cecilia]], who apologizes that she could not prevent this. She explains to Roy that the Etrurian King [[Mordred]] is currently incapable of ruling, because he is in sorrow over the recent sudden death of his son, [[Myrddin]]. The two most influential people in Etruria are now Lord [[Arcardo]], who oversees the mining operations on the Isles, and High Chancellor [[Roartz]], who governs the palace and keeps the generals – [[Perceval]], [[Douglas]], and Cecilia – away from the king. [[Guinivere]], who is also present, asks if she could stay with Roy as he carries out his mission, but he orders her to go into hiding in Etruria under Cecilia's protection, as he believes it is safer for her. Cecilia and Guinivere then leave, and Roy’s forces start fighting against the local pirates. | |||
[[Fir]] talks to [[Scott]], the pirate leader, who convinces her that they are being attacked by pirates. Fir volunteers to help Scott, and Scott tells her to work alongside [[Sin]], a skilled bow user. Fir then talks to Sin, who is taciturn, but reveals that he is a mercenary from [[Sacae]] that is searching for the granddaughter of his clan's chieftain. Meanwhile, Scott tells his pirates that they are meant to watch Fir until she dies and then take her sword, as he believes it to be valuable. | |||
During the battle, [[Noah]] may talk to Fir and explain that she has been tricked, prompting her to join Roy and turn on the pirates. Additionally, [[Sue]] – the person Sin is looking for – can talk to him. Sin informs Sue that their clan lost the war against Bern; her grandfather is alive and leads a resistance against Bern, but Sacae is as good as lost at the moment. Sin then joins Roy's forces, as they are battling against Bern. | |||
Once the battle is over and Scott is dead, Roy decides to head north or west, depending on which north-eastern village his troops visited during the battle. He either hears that the miners in the north are being forced into slave labor and must be freed, or he hears that there is a resistance group in the west that is fighting bandits. Roy also muses about the fact that they were ambushed by pirates, as if the pirates knew the Lycian Army was coming. | |||
==Chapter data== | ==Chapter data== | ||
| Line 58: | Line 33: | ||
|victory=Seize the castle gate | |victory=Seize the castle gate | ||
|defeat=[[Roy]] dies | |defeat=[[Roy]] dies | ||
|ally= | |ally=1–13{{h|+2|Upon Fir and Sin being recruited}} | ||
|enemy=29{{h|+29|Reinforcements}}{{h| | |enemy=29{{h|+29|Reinforcements}}{{h|−2|Upon Fir and Sin being recruited}} | ||
|map=[[File:Cm fe06 9.png]] | |map=[[File:Cm fe06 9.png]] | ||
}} | }} | ||
| Line 73: | Line 48: | ||
|lv=1 | |lv=1 | ||
|inventory={{Item|6|Wo Dao}}<br>{{Item|6|Vulnerary}} | |inventory={{Item|6|Wo Dao}}<br>{{Item|6|Vulnerary}} | ||
|recruitment method=Enemy, talk to with [[Noah]] | |recruitment method=[[Enemy]], talk to with [[Noah]] | ||
}} | }} | ||
|newunit2={{NewUnit | |newunit2={{NewUnit | ||
| Line 82: | Line 57: | ||
|lv=5 | |lv=5 | ||
|inventory={{Item|6|Short Bow}} | |inventory={{Item|6|Short Bow}} | ||
|recruitment method=Enemy, talk to with [[Sue]] | |recruitment method=[[Enemy]], talk to with [[Sue]] | ||
}} | }} | ||
|return1= | |forced1=roy | ||
|return2= | |return1=marcus | ||
|return3= | |return2=alen | ||
|return4=lance | |return3=bors | ||
| | |return4=wolt | ||
| | |return5=lance | ||
| | |return5article=Lance (character) | ||
| | |return6=merlinus | ||
| | |return7=elen | ||
|return9= | |return8=ward | ||
|return10= | |return8article=Ward (character) | ||
|return11= | |return9=lot | ||
|return12= | |return10=dieck | ||
|return13= | |return11=shanna | ||
|return14= | |return12=chad | ||
|return15= | |return13=lugh | ||
|return16= | |return14=clarine | ||
|return17= | |return15=rutger | ||
|return18= | |return16=saul | ||
|return19= | |return17=dorothy | ||
|return20= | |return18=sue | ||
|return21= | |return19=zelot | ||
|return22= | |return20=trec | ||
|return23= | |return21=noah | ||
|return24= | |return22=astolfo | ||
|return25= | |return23=lilina | ||
|return26 | |return24=gwendolyn | ||
|return25=barthe | |||
|return26=ogier | |||
}} | }} | ||
| Line 162: | Line 138: | ||
|axcost4=800 | |axcost4=800 | ||
|anima1=Fire | |anima1=Fire | ||
|ancost1=420 | |ancost1=420 | ||
|staff1=Heal | |staff1=Heal | ||
| Line 186: | Line 161: | ||
|tab2=Hard | |tab2=Hard | ||
|content1={{ChapUnitHdr|type=Enemy|platform=gba}} | |content1={{ChapUnitHdr|type=Enemy|platform=gba}} | ||
{{ChapUnitCellGBA | |||
|name=[[Scott]] | |||
|class=Berserker | |||
|lv=5 | |||
|#=1 | |||
|hp=42 | |||
|str=12 | |||
|skill=9 | |||
|spd=12 | |||
|lck=5 | |||
|def=11 | |||
|res=2 | |||
|con=15 | |||
|mov=6 | |||
|inventory={{Item|6|Killer Axe}} • {{Item|6|Hand Axe}} | |||
|notes=Does not move; stands on the [[Terrain/Game Boy Advance games#Fire Emblem: The Binding Blade|gate]], the chapter's seize point | |||
}} | |||
{{ChapUnitCellGBA | {{ChapUnitCellGBA | ||
|name=Western Thief | |name=Western Thief | ||
| Line 400: | Line 392: | ||
|con=6 | |con=6 | ||
|mov=5 | |mov=5 | ||
|inventory={{Item|6|Thunder | |inventory={{Item|6|Thunder}} | ||
|notes=Moves to attack units in range. | |notes=Moves to attack units in range. | ||
}} | }} | ||
| Line 544: | Line 536: | ||
|lv=12 | |lv=12 | ||
|#=1 | |#=1 | ||
|hp=28~31 | |||
|str=10~12 | |||
|skill=5~7 | |||
|spd=6~8 | |||
|lck=1~2 | |||
|def=3~4 | |||
|res=0~2 | |||
|con=11 | |||
|mov=5 | |||
|inventory={{Item|6|Poison Axe}} • {{Item|6|Antitoxin}} | |inventory={{Item|6|Poison Axe}} • {{Item|6|Antitoxin}} | ||
|notes=Begins moving unprovoked when he can attack a unit within two turns. | |notes=Begins moving unprovoked when he can attack a unit within two turns. | ||
| Line 580: | Line 581: | ||
|inventory={{Item|6|Iron Bow}} | |inventory={{Item|6|Iron Bow}} | ||
|notes=• The left one begins moving unprovoked when he can attack a unit within two turns.<br>• The right one moves to attack units in range. | |notes=• The left one begins moving unprovoked when he can attack a unit within two turns.<br>• The right one moves to attack units in range. | ||
|last=y | |last=y | ||
}} | }} | ||
| Line 688: | Line 672: | ||
{{ChapUnitFtr}} | {{ChapUnitFtr}} | ||
|content2={{ChapUnitHdr|type=Enemy|platform=gba}} | |content2={{ChapUnitHdr|type=Enemy|platform=gba}} | ||
{{ChapUnitCellGBA | |||
|name=[[Scott]] | |||
|class=Berserker | |||
|lv=5 | |||
|#=1 | |||
|hp=46~48 | |||
|str=14~16 | |||
|skill=10~12 | |||
|spd=12~14 | |||
|lck=6~7 | |||
|def=11~12 | |||
|res=2~3 | |||
|con=15 | |||
|mov=6 | |||
|inventory={{Item|6|Killer Axe}} • {{Item|6|Hand Axe}} | |||
|notes=Does not move; stands on the [[Terrain/Game Boy Advance games#Fire Emblem: The Binding Blade|gate]], the chapter's seize point | |||
}} | |||
{{ChapUnitCellGBA | {{ChapUnitCellGBA | ||
|name=Western Thief | |name=Western Thief | ||
| Line 902: | Line 903: | ||
|con=6 | |con=6 | ||
|mov=5 | |mov=5 | ||
|inventory={{Item|6|Thunder | |inventory={{Item|6|Thunder}} | ||
|notes=Moves to attack units in range. | |notes=Moves to attack units in range. | ||
}} | }} | ||
| Line 1,091: | Line 1,092: | ||
|inventory={{Item|6|Iron Bow}} | |inventory={{Item|6|Iron Bow}} | ||
|notes=• The left one begins moving unprovoked when he can attack a unit within two turns.<br>• The right one moves to attack units in range. | |notes=• The left one begins moving unprovoked when he can attack a unit within two turns.<br>• The right one moves to attack units in range. | ||
|last=y | |last=y | ||
}} | }} | ||
| Line 1,264: | Line 1,248: | ||
The boss, [[Scott]], is a [[Berserker]], which means a high critical rate. It is recommended to force him to use his [[Hand Axe]]; the [[Killer Axe]]—which has a better hit rate than the [[Hand Axe]]—and his critical rate could spell death to any unit. Sword-wielding units and [[Magic (element)|magic]] users are the best option. | The boss, [[Scott]], is a [[Berserker]], which means a high critical rate. It is recommended to force him to use his [[Hand Axe]]; the [[Killer Axe]]—which has a better hit rate than the [[Hand Axe]]—and his critical rate could spell death to any unit. Sword-wielding units and [[Magic (element)|magic]] users are the best option. | ||
Once the boss is defeated, Roy can seize the castle and the chapter will end with one of two possible endings. If the | Once the boss is defeated, Roy can seize the castle and the chapter will end with one of two possible endings. If the eastern [[village]]—which hands over a [[Restore]] staff—is visited, the story will move to the [[Amidst a Struggle|second]] [[Flight Toward Freedom|version]], where [[Elffin]] and [[Bartre]] are available; otherwise, the player will experience the [[Western Resistance|first]] [[The Hero of the West|version]] of the story, with [[Larum]] and [[Echidna]] as recruitable units. | ||
<!-- | <!-- | ||
==Trivia== | ==Trivia== | ||
| Line 1,274: | Line 1,258: | ||
|eng-mean=Used in [[Unused content in Fire Emblem: The Blazing Blade#The Binding Blade data transfer leftovers|leftover text from the data transfer menu]] in the English version of {{FE7}}. | |eng-mean=Used in [[Unused content in Fire Emblem: The Blazing Blade#The Binding Blade data transfer leftovers|leftover text from the data transfer menu]] in the English version of {{FE7}}. | ||
|eng-fan-name=The Misty Isles | |eng-fan-name=The Misty Isles | ||
| | |jpn-name={{h|霧にけむる島|Kiri ni kemuru shima}} | ||
| | |jpn-mean=Foggy island | ||
}} | }} | ||
==Gallery== | ==Gallery== | ||
<gallery> | |||
Cm fe06 9.png|Map of the chapter | |||
</gallery> | |||
{{refbar}} | {{refbar}} | ||
| Line 1,285: | Line 1,271: | ||
{{ChapterNav | {{ChapterNav | ||
|prechapter=Reunion (The Binding Blade){{!}}Reunion | |prechapter=Reunion (The Binding Blade){{!}}Reunion | ||
|prealternate=The Blazing Blade (chapter){{!}}The Blazing Blade | |prealternate=The Blazing Blade (chapter){{!}}The Blazing Blade <small>(side quest)</small> | ||
|nextchapter=Western Resistance | |nextchapter=Western Resistance | ||
|nextalternate=Amidst a Struggle | |nextalternate=Amidst a Struggle | ||
| Line 1,291: | Line 1,277: | ||
{{Nav6}} | {{Nav6}} | ||
{{DEFAULTSORT:Misty Isles, The}} | |||
[[Category:Chapters of Fire Emblem: The Binding Blade]] | [[Category:Chapters of Fire Emblem: The Binding Blade]] | ||
Latest revision as of 22:46, 28 February 2024
| ||||||||||||
|

| “ | We will return to Lycia as soon as we complete our mission here. | ” | — Roy |
|---|
The Misty Isles (Japanese: 霧にけむる島 Foggy island) is the ninth chapter in Fire Emblem: The Binding Blade. As part of the treaty with Etruria, the newly-reformed Lycian League Army is sent to the Western Isles to deal with the outlaws who are threatening the place.
Which set of the next two chapters is played after this one depends on which of the northeast two villages is visited: if the left one is visited or neither is visited, the northern route will be played; if the right village is visited, the western route is played.
Plot
- Main article:
The Misty Isles/Script
After Etruria's intervention in Ostia, the political situation in Elibe drastically changed. Bern is no longer attacking, while Pherae has become the strongest power in Lycia and Roy now leads an army that is meant to protect the entire Lycian League. However, Etruria requests the army be sent to the Western Isles, as there is a struggle with bandits in the area and the Western Isles are a wealthy colony of Etruria. Because of Etruria's role in halting Bern's invasion and saving Ostia, Roy cannot refuse, and so he heads to the Isles with his army.
As Roy arrives at the Isles, he discusses the situation with Cecilia, who apologizes that she could not prevent this. She explains to Roy that the Etrurian King Mordred is currently incapable of ruling, because he is in sorrow over the recent sudden death of his son, Myrddin. The two most influential people in Etruria are now Lord Arcardo, who oversees the mining operations on the Isles, and High Chancellor Roartz, who governs the palace and keeps the generals – Perceval, Douglas, and Cecilia – away from the king. Guinivere, who is also present, asks if she could stay with Roy as he carries out his mission, but he orders her to go into hiding in Etruria under Cecilia's protection, as he believes it is safer for her. Cecilia and Guinivere then leave, and Roy’s forces start fighting against the local pirates.
Fir talks to Scott, the pirate leader, who convinces her that they are being attacked by pirates. Fir volunteers to help Scott, and Scott tells her to work alongside Sin, a skilled bow user. Fir then talks to Sin, who is taciturn, but reveals that he is a mercenary from Sacae that is searching for the granddaughter of his clan's chieftain. Meanwhile, Scott tells his pirates that they are meant to watch Fir until she dies and then take her sword, as he believes it to be valuable.
During the battle, Noah may talk to Fir and explain that she has been tricked, prompting her to join Roy and turn on the pirates. Additionally, Sue – the person Sin is looking for – can talk to him. Sin informs Sue that their clan lost the war against Bern; her grandfather is alive and leads a resistance against Bern, but Sacae is as good as lost at the moment. Sin then joins Roy's forces, as they are battling against Bern.
Once the battle is over and Scott is dead, Roy decides to head north or west, depending on which north-eastern village his troops visited during the battle. He either hears that the miners in the north are being forced into slave labor and must be freed, or he hears that there is a resistance group in the west that is fighting bandits. Roy also muses about the fact that they were ambushed by pirates, as if the pirates knew the Lycian Army was coming.
Chapter data
| ||||||
|
| |||||
| Victory: Seize the castle gate | Player | Enemy | ||||
|---|---|---|---|---|---|---|
| Defeat: Roy dies | 1–13+2 | 29+29−2 | ||||
| ||||||
Character data
| Characters | ||||||||||||||||||||||
|---|---|---|---|---|---|---|---|---|---|---|---|---|---|---|---|---|---|---|---|---|---|---|
New units
| ||||||||||||||||||||||
| ||||||||||||||||||||||
Required characters
| ||||||||||||||||||||||
Available characters
| ||||||||||||||||||||||


Item data
| ||||||||||||||||||||||||||||||||||||
|
Shop data
Swords Lances Axes Bows Anima Light Dark Staves Items Secret
| Name | Cost | |
|---|---|---|
| Slim Sword | 480 | |
| Iron Sword | 460 | |
| Steel Sword | 600 | |
| Iron Blade | 980 | |
| Steel Blade | 1,250 |
Enemy data
- Stats with two figures separated by a ~ are presented as a range, representing stats that vary due to random growths. The figures to the left and right of the ~ are the stat's minimum and maximum possible values respectively.
Normal Hard
| ||||||||||||||||||||||||||||||||||||||||||||||||||||||||||||||||||||||||||||||||||||||||||||||||||||||||||||||||||||||||||||||||||||||||||||||||||||||||||||||||||||||||||||||||||||||||||||||||||||||||||||||||||||||||||||||||||||||||||||||||||||||||||||||||||||||||||||||||||||||||||||||||||||||||||||||||||||||||||||||||||||||||||||||||||||||||||||||||||||||||||||||||||||||||||||||||||||||||||||||||||||||||||||||||||||||||||||||||||||||||||||||||||||||||||||||||||||||||||||||||||||||||||||||||||||||||||||||||||||||||||||||||||||||||||||||||||||||||||||||||||||||||||||||||||||||||||||||||||||||||||||||||||||||||||||||||||||||||||||||||||||||||||||||||||||||||||||||||||||||||||||||||||
| ||||||||||||||||||||||||||||||||||||||||||||||||||||||||||||||||||||||||||||||||||||||||||||||||||||||||||||||||||||||||||||||||||||||||||||||||||||||||||||||||||||||||||||||||||||||||||||||||||||||||||||||||||||||||||||||||||||||||||||||||||||||||||||||||||||||||||||||||||||||||||||||||||||||||||||||||||||||||||||||||||||||||||||||||||||||||||||||||||||||||||||||||||||||||||||||||||||||||||||||||||||||||||||||||||||||||||||||||||||||||||||||||||||||||||||||||||||||||||||||||||||||||||||||||||||||||||||||||||||||||||||||||||||||||||||||||||||||||||||||||||||||||||||||||||||||||||||||||||||||||||||||||||||||||||||||||||||||||||||||||||||||||||||||||||||||||||||||||||||||||||||||||||
| ||||||||||||||||||||||||||||||||||||||||||||||||||||||||||||||||||||||||||||||||||||||||||||||||||||||||||||||||||||||||||||||||||||||||||||||||||||||||||||||||||||||||||||||||||||||||||||||||||||||||||||||||||||||||||||||||||||||||||||||||||||||||||||||||||||||||||||||||||||||||||||||||||||||||||||||||||||||||||||||||||||||||||||||||||||||||||||||||||||||||||||||||||||||||||||||||||||||||||||||||||||||||||||||||||||||||||||||||||||||||||||||||||||||||||||||||||||||||||||||||||||||||||||||||||||||||||||||||||||||||||||||||||||||||||||||||||||||||||||||||||||||||||||||||||||||||||||||||||||||||||||||||||||||||||||||||||||||||||||||||||||||||||||||||||||||||||||||||||||||||||||||||||
| ||||||||||||||||||||||||||||||||||||||||||||||||||||||||||||||||||||||||||||||||||||||||||||||||||||||||||||||||||||||||||||||||||||||||||||||||||||||||||||||||||||||||||||||||||||||||||||||||||||||||||||||||||||||||||||||||||||||||||||||||||||||||||||||||||||||||||||||||||||||||||||||||||||||||||||||||||||||||||||||||||||||||||||||||||||||||||||||||||||||||||||||||||||||||||||||||||||||||||||||||||||||||||||||||||||||||||||||||||||||||||||||||||||||||||||||||||||||||||||||||||||||||||||||||||||||||||||||||||||||||||||||||||||||||||||||||||||||||||||||||||||||||||||||||||||||||||||||||||||||||||||||||||||||||||||||||||||||||||||||||||||||||||||||||||||||||||||||||||||||||||||||||||
Reinforcements
- Enemy phase of turn 2
- Enemy phase of turns 12–20
Boss data
- Main article:
Scott - Stats with two figures separated by a ~ are presented as a range, representing stats that vary due to random growths. The figures to the left and right of the ~ are the stat's minimum and maximum possible values respectively.[1]
Normal Hard
|
|
| |||||||||||||||||||||||||||||||||||||||||||||||||

Strategy
| This section details unofficial strategies that may help with completion of the chapter. This may not work for everybody. |
The first chapter of the second arc welcomes the player with a feature introduced in Thracia 776: fog of war. This feature covers all kinds of weather conditions that limit the vision in the battlefield, so, instead of being able to see the whole field as usual, the player will be limited to some squares. Thieves can see further, and there are also two items that improve sight in fog of war, the Torch and the Torch staff.
Recommended units for this chapter are magic users for dealing with the boss, sword-wielding units, Sue, and Noah. Those two are for recruiting Sin and Fir, respectively. If the player by any chance lost them in previous chapters or did not recruit them, Fir and/or Sin cannot be recruited by Roy. The map is shock-full of axe users, so it is a good place to train sword users; if the player is interested in Fir, it is better to bring a light sword for her, as it would be a waste to use the Wo Dao in this chapter.
The enemies present no problem other than their sheer numbers. If the player takes their time clearing the nearby forces, they will probably meet Fir in the upper middle island, and one or two turns later, Sin. The player should be careful when approaching Fir, as her sword gives her a good critical rate.
Between turns 12 and 20, two Pirates will emerge from the two forts in the southern little island, and between turns 16 and 20, a pirate from the northern lone fort will join them. A third of them wield Poison Axes, which will poison any unit they hit. Thankfully, their hit rate is quite low—a mere 50%—and some of them carry antitoxins on their inventories, so they are not a big threat. By the way, the only village that is in danger is the southern one, which will be destroyed in Turn 15. They hand out a valuable silver sword, so it is up to the player whether they go off course or not.
The boss, Scott, is a Berserker, which means a high critical rate. It is recommended to force him to use his Hand Axe; the Killer Axe—which has a better hit rate than the Hand Axe—and his critical rate could spell death to any unit. Sword-wielding units and magic users are the best option.
Once the boss is defeated, Roy can seize the castle and the chapter will end with one of two possible endings. If the eastern village—which hands over a Restore staff—is visited, the story will move to the second version, where Elffin and Bartre are available; otherwise, the player will experience the first version of the story, with Larum and Echidna as recruitable units.
Etymology and other languages
| Names, etymology, and in other regions | ||
|---|---|---|
| Language | Name | Definition, etymology, and notes |
| English |
Island of Mists |
Used in leftover text from the data transfer menu in the English version of Fire Emblem: The Blazing Blade. |
| English (unofficial) |
The Misty Isles |
-- |
| Japanese |
霧にけむる島 |
Foggy island |
Gallery
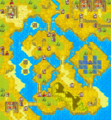
Map of the chapter
References
- ↑ The Misty Isles, triangleattack.com, Retrieved: December 24, 2020
| ← Reunion • ← The Blazing Blade (side quest) • |
The Misty Isles | • Western Resistance → • Amidst a Struggle → |
|---|