| Site News |
|---|
| Warning: This wiki contains spoilers. Read at your own risk! Social media: If you would like, please join our Discord server, and/or follow us on Twitter (X) or Tumblr! |
The Laws of Sacae: Difference between revisions
Thecornerman (talk | contribs) |
Anferensis (talk | contribs) m (→Strategy) |
||
| Line 1,091: | Line 1,091: | ||
==Strategy== | ==Strategy== | ||
{{strategy}} | |||
Chapter 18B is the second Sacae chapter, characterized by its many [[Nomad]] enemies. | Chapter 18B is the second Sacae chapter, characterized by its many [[Nomad]] enemies. | ||
Revision as of 21:56, 19 September 2023
- This article is about the chapter from The Binding Blade. For the skill appearing in 'Heroes, see Laws of Sacae.
| ||||||||
|

| “ | Lure them into our territory as planned. We shall show them our strength. | ” | — Monke |
|---|
The Laws of Sacae (Japanese: サカの掟 Law of Sacae) is chapter 18B of Fire Emblem: The Binding Blade.
Plot
- Main article:
The Laws of Sacae/Script
This section has been marked as a stub. Please help improve the page by adding information.
Beginning log
After defeating Arcardo, Roy crossed the border and entered the land of Sacae.
The Djute clan, the most powerful clan in Sacae, had joined Bern after suffering defeat. Not standing a chance against the joint force, the other clans were quickly decimated. Although Dayan, the chief of the Kutolah clan known as the "Silver Wolf," was fighting back with guerilla tactics, the situation looked grim. Sacae had become a territory of Bern.
As Roy entered the plains of Sacae, the warriors of the Djute clan stood in his path.
Chapter data
| ||||||
|
| |||||
| Victory: Seize the castle gate | Player | Enemy | ||||
|---|---|---|---|---|---|---|
| Defeat: Roy dies | 1–15 | 31+18+∞ | ||||
| ||||||
Character data
| Characters | |
|---|---|
New units
| |
| |
Required characters
| |
Available characters
| |
Item data
| ||||||||||||||||||||||||||||||
|
Shop data
Swords Lances Axes Bows Anima Light Dark Staves Items Secret
| Name | Cost | |
|---|---|---|
| Iron Sword | 460 | |
| Killing Edge | 1,300 | |
| Iron Blade | 980 |
Enemy data
- Stats with two figures separated by a ~ are presented as a range, representing stats that vary due to random growths. The figures to the left and right of the ~ are the stat's minimum and maximum possible values respectively.
Normal Hard
| |||||||||||||||||||||||||||||||||||||||||||||||||||||||||||||||||||||||||||||||||||||||||||||||||||||||||||||||||||||||||||||||||||||||||||||||||||||||||||||||||||||||||||||||||||||||||||||||||||||||||||||||||||||||||||||||||||||||||||||||||||||||||||||||||||||||||||||||||||||||||||||||||||||||||||||||||||||||||||||||||||||||||||||||||||||||||||||||||||||||||||||||||||||||||||||||||||||||||||||||||||||||||||||||||||||||||||||||||||||||||||||||||||||||||||||||||||||||||||||||||||||||||||||||||||||
| |||||||||||||||||||||||||||||||||||||||||||||||||||||||||||||||||||||||||||||||||||||||||||||||||||||||||||||||||||||||||||||||||||||||||||||||||||||||||||||||||||||||||||||||||||||||||||||||||||||||||||||||||||||||||||||||||||||||||||||||||||||||||||||||||||||||||||||||||||||||||||||||||||||||||||||||||||||||||||||||||||||||||||||||||||||||||||||||||||||||||||||||||||||||||||||||||||||||||||||||||||||||||||||||||||||||||||||||||||||||||||||||||||||||||||||||||||||||||||||||||||||||||||||||||||||
| |||||||||||||||||||||||||||||||||||||||||||||||||||||||||||||||||||||||||||||||||||||||||||||||||||||||||||||||||||||||||||||||||||||||||||||||||||||||||||||||||||||||||||||||||||||||||||||||||||||||||||||||||||||||||||||||||||||||||||||||||||||||||||||||||||||||||||||||||||||||||||||||||||||||||||||||||||||||||||||||||||||||||||||||||||||||||||||||||||||||||||||||||||||||||||||||||||||||||||||||||||||||||||||||||||||||||||||||||||||||||||||||||||||||||||||||||||||||||||||||||||||||||||||||||||||
| |||||||||||||||||||||||||||||||||||||||||||||||||||||||||||||||||||||||||||||||||||||||||||||||||||||||||||||||||||||||||||||||||||||||||||||||||||||||||||||||||||||||||||||||||||||||||||||||||||||||||||||||||||||||||||||||||||||||||||||||||||||||||||||||||||||||||||||||||||||||||||||||||||||||||||||||||||||||||||||||||||||||||||||||||||||||||||||||||||||||||||||||||||||||||||||||||||||||||||||||||||||||||||||||||||||||||||||||||||||||||||||||||||||||||||||||||||||||||||||||||||||||||||||||||||||
Reinforcements
- Each enemy phase after entering the circle of huts surrounding the castle gate (columns 14–22, rows 17–23; and columns 15–21, rows 16 and 24)
- Nomads and Nomadic Troopers randomly appear from the huts—Nomads appear from the east seven huts and the left of the top one; level 6 Nomadic Troopers appear from the west five huts, the middle of the top three, and the left of the bottom two
- Enemy phase of turns 10, 15, and 20
- 2 Nomads—one with a Vulnerary—and 1 level 4 Nomadic Trooper from the southwest corner of the map
- Enemy phase of turns 12, 17, 22
- 2 Nomads—one with a Vulnerary—from the southeast corner of the map
- 1 level 5 Nomadic Trooper from the south edge of the map
- Enemy phase of turns 13 and 23
- 3 Wyvern Riders—one with a Steel Lance, one an Axereaver, and one a Horseslayer—from the northeast corner of the map.
Boss data
- Main article:
Monke - Stats with two figures separated by a ~ are presented as a range, representing stats that vary due to random growths. The figures to the left and right of the ~ are the stat's minimum and maximum possible values respectively.[1]
Normal Hard
|
|
| |||||||||||||||||||||||||||||||||||||||||||||||||

Strategy
| This section details unofficial strategies that may help with completion of the chapter. This may not work for everybody. |
Chapter 18B is the second Sacae chapter, characterized by its many Nomad enemies.
Nomads and their advanced form, Nomad Troopers, are fast, making them hard to hit, but they are not very powerful, especially as they often use the weak Short Bow. Units like Douglas or Melady equipped with a Delphi Shield can effectively block them. However, fighting back against their bow attacks can be tricky due to their speed. Snipers or Anima users deal the most damage to them but are susceptible to their attacks. The challenge on this map is to prevent your weaker units from being overwhelmed.
Your team starts isolated by a river with two bridges. Using strong defense units to block these bridges can keep the Nomad swarm at bay. Be wary of certain enemies like the Myrmidon with an Armorslayer and the river-crossing Nomad Troopers. A good strategy against the Troopers is to hit them with Anima magic and then move the unit to safety.
There is a group of Wyvern Riders to the east that will become aggressive by the second turn. You can avoid them by moving south, but reinforcements will keep coming. So, plan for anti-Wyvern measures when you approach the map's center, where more Nomad reinforcements will also appear.
The main goal is to get Roy, a vulnerable character, to the gate. He is in danger if too many Nomads attack him. Moreover, getting near the huts triggers more enemy spawns. The continuous wave of enemies means you should defeat the boss quickly to prevent being overrun.
Two strategies include:
- Rush a strong unit to take out the boss in one turn, using Larum or Elffin for support. This is risky as the boss, Monke, is elusive and failing leaves your unit vulnerable.
- Keep your team at the starting point and send a single strong unit to carry Roy to the gate. This is safer but slow, as that unit has to push through many Nomads and might even risk running out of weapons.
Etymology and other languages
| Names, etymology, and in other regions | ||
|---|---|---|
| Language | Name | Definition, etymology, and notes |
| English |
The Laws of Sacae |
Used in leftover text from the data transfer menu in the English version of Fire Emblem: The Blazing Blade. The skill named after it in Fire Emblem Heroes (Laws of Sacae) also uses a plural name, hence the use of a plural name on this wiki. |
| English (unofficial) |
The Law of Sacae |
-- |
| Japanese |
サカの掟 |
Law of Sacae |
Gallery
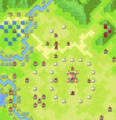
Map of the chapter
References
- ↑ The Laws of Sacae, triangleattack.com, Retrieved: December 24, 2020
| ← The Bishop's Teachings • | The Laws of Sacae | • Battle in Bulgar → |
|---|