| Site News |
|---|
| Warning: This wiki contains spoilers. Read at your own risk! Social media: If you would like, please join our Discord server, and/or follow us on Twitter (X) or Tumblr! |
The Glorious Ascension
| ||||||||||
|

| “ | This is the Tower of the Saint. Saint Elimine's weapon, the Aureola spell book, lies here. | ” | — Douglas to Roy |
|---|
The Glorious Ascension (Japanese: 至高の光 Supreme light) is Chapter 16x of Fire Emblem: The Binding Blade. In order to play this chapter, Douglas must have survived the previous chapter.
Which set of the next four chapters (and potentially sidquest) is played after this one depends on the combined experience of four units: if the sum of the experience gained by Shanna and Thea is greater than or equal to that of Sue and Sin, the Ilia route will be played; otherwise, the Sacae route will be played.
Plot
- Main article:
The Glorious Ascension/Script
This section has been marked as a stub. Please help improve the page by adding information.
Beginning log
At the request of King Mordred, Roy headed for the Tower of the Saint on the outskirts of Aquileia. The Tower of the Saint was a place of worship for Saint Elimine, one of the Eight Heroes. In the tower lay various holy relics relating to her. However, the sacred tower was under the control of Bishop Windham, who had rebelled against the Elimine Church by Roartz's orders.
Chapter data
| ||||||
|
| |||||
| Victory: Seize the throne | Player | Enemy | ||||
|---|---|---|---|---|---|---|
| Defeat: Roy dies | 1–10+1 | 31+4 | ||||
| ||||||
On each turn, magical arrows will deal 10 damage to all units in a random number of columns; the arrows can strike columns 5, 7, 9, 14, 15, 17, 18, 23, 25, and 27.
Character data
| Characters | |||||||||||
|---|---|---|---|---|---|---|---|---|---|---|---|
New units
| |||||||||||
| |||||||||||
Required characters
| |||||||||||
Available characters
| |||||||||||

Item data
| ||||||||||||||||||
|
Enemy data
- Stats with two figures separated by a ~ are presented as a range, representing stats that vary due to random growths. The figures to the left and right of the ~ are the stat's minimum and maximum possible values respectively.
Normal Hard
| |||||||||||||||||||||||||||||||||||||||||||||||||||||||||||||||||||||||||||||||||||||||||||||||||||||||||||||||||||||||||||||||||||||||||||||||||||||||||||||||||||||||||||||||||||||||||||||||||||||||||||||||||||||||||||||||||||||||||||||||||||||||||||||||||||||||||||||||||||||||||||||||||||||||||||||||||||||||||||||||||||||||||||||||||||||||||||||||||||||||||||||||||||||||||||||||||||||||||||||||||||||||||||||||||||||||||||||||||||||||||||||||||||||||||||||||||||||||||||||||||||||||||||||||||||||||||||||||||||||||||||||||||||||||||||||||||||||||||||||||||||||||||||||||||||||||||||||||||||||||||||||||||||||||||||||||||||||||||||||||||||||||||||||||||||||||||||||||||||||||||||||||||||||||||||||||||||||||||||||
| |||||||||||||||||||||||||||||||||||||||||||||||||||||||||||||||||||||||||||||||||||||||||||||||||||||||||||||||||||||||||||||||||||||||||||||||||||||||||||||||||||||||||||||||||||||||||||||||||||||||||||||||||||||||||||||||||||||||||||||||||||||||||||||||||||||||||||||||||||||||||||||||||||||||||||||||||||||||||||||||||||||||||||||||||||||||||||||||||||||||||||||||||||||||||||||||||||||||||||||||||||||||||||||||||||||||||||||||||||||||||||||||||||||||||||||||||||||||||||||||||||||||||||||||||||||||||||||||||||||||||||||||||||||||||||||||||||||||||||||||||||||||||||||||||||||||||||||||||||||||||||||||||||||||||||||||||||||||||||||||||||||||||||||||||||||||||||||||||||||||||||||||||||||||||||||||||||||||||||||
| |||||||||||||||||||||||||||||||||||||||||||||||||||||||||||||||||||||||||||||||||||||||||||||||||||||||||||||||||||||||||||||||||||||||||||||||||||||||||||||||||||||||||||||||||||||||||||||||||||||||||||||||||||||||||||||||||||||||||||||||||||||||||||||||||||||||||||||||||||||||||||||||||||||||||||||||||||||||||||||||||||||||||||||||||||||||||||||||||||||||||||||||||||||||||||||||||||||||||||||||||||||||||||||||||||||||||||||||||||||||||||||||||||||||||||||||||||||||||||||||||||||||||||||||||||||||||||||||||||||||||||||||||||||||||||||||||||||||||||||||||||||||||||||||||||||||||||||||||||||||||||||||||||||||||||||||||||||||||||||||||||||||||||||||||||||||||||||||||||||||||||||||||||||||||||||||||||||||||||||
| |||||||||||||||||||||||||||||||||||||||||||||||||||||||||||||||||||||||||||||||||||||||||||||||||||||||||||||||||||||||||||||||||||||||||||||||||||||||||||||||||||||||||||||||||||||||||||||||||||||||||||||||||||||||||||||||||||||||||||||||||||||||||||||||||||||||||||||||||||||||||||||||||||||||||||||||||||||||||||||||||||||||||||||||||||||||||||||||||||||||||||||||||||||||||||||||||||||||||||||||||||||||||||||||||||||||||||||||||||||||||||||||||||||||||||||||||||||||||||||||||||||||||||||||||||||||||||||||||||||||||||||||||||||||||||||||||||||||||||||||||||||||||||||||||||||||||||||||||||||||||||||||||||||||||||||||||||||||||||||||||||||||||||||||||||||||||||||||||||||||||||||||||||||||||||||||||||||||||||||
On turn 25, if Windham is alive, all enemies begin moving unprovoked.
Reinforcements
- Enemy phase of turns 8 and 18
- Enemy phase of turns 10 and 20
Boss data
- Main article:
Windham - Stats with two figures separated by a ~ are presented as a range, representing stats that vary due to random growths. The figures to the left and right of the ~ are the stat's minimum and maximum possible values respectively.[1]
Normal Hard

Strategy
| This section details unofficial strategies that may help with completion of the chapter. This may not work for everybody. |
Consult the map above to see where beams might damage units at the conclusion of the enemy's turn. The frequency of these beams is random—there may be one, two, or none. When activated, these beams inflict 10 damage on any unit in their path, including enemy units. Ensure your units are positioned outside these areas to prevent unnecessary damage.
Avoid deploying units with low resistance, as they are vulnerable to the numerous magic-wielding enemies on this map. Instead, utilize units with good movement, like Pegasus Knights and Nomads. If you have a unit that can use a Longbow, target the Sage positioned at the center of the map.
The most formidable challenge is the boss, he is equipped with a Berserk staff that can cause your allies to turn against each other. He has a large casting range, covering 15 spaces from his stationary position on the throne, encompassing nearly the entire top section of the map. To counteract him, consider placing a unit with high resistance close by to deplete his staff or advance strategically, utilizing the Barrier staff or Pure Waters. Remember, units with lower resistance are more susceptible to staves, irrespective of their evasion abilities.
Equip at least two different units with Restore staves to dispel any status effects inflicted on your team. If you rely on a single Restore staff, you may find yourself in a vulnerable position.
Lastly, using Douglas is not recommended due to his susceptibility to significant damage. Ensure he remains out of the magic attack range and use him only as a defensive barrier.
Trivia

- The eighth floor of the Tower of Valni from Fire Emblem: The Sacred Stones has a very similar layout to this map and both maps feature Heavenly Arrow traps. The Alterspire from Fire Emblem: Shadow Dragon also has a similar layout, but does not have heavenly arrow traps.
Etymology and other languages
| Names, etymology, and in other regions | ||
|---|---|---|
| Language | Name | Definition, etymology, and notes |
| English |
Light of Supremacy |
Used in leftover text from the data transfer menu in the English version of Fire Emblem: The Blazing Blade. |
| English (unofficial) |
The Glorious Ascension |
-- |
| Japanese |
至高の光 |
Supreme light |
Gallery
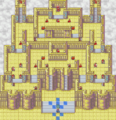
Map of the chapter
References
- ↑ The Glorious Ascension, triangleattack.com, Retrieved: December 24, 2020
| ← Storming the Capital • | The Glorious Ascension | • Ocean's Parting → • The Bishop's Teachings → |
|---|