| Site News |
|---|
| Warning: This wiki contains spoilers. Read at your own risk! Social media: If you would like, please join our Discord server, and/or follow us on Twitter (X) or Tumblr! |
The Elder Revelation: Difference between revisions
NewLight19 (talk | contribs) |
Thecornerman (talk | contribs) |
||
| Line 1,212: | Line 1,212: | ||
==Strategy== | ==Strategy== | ||
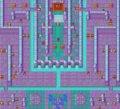
The map above shows the location of traps indicated by mine and spike icons: | The map above shows the location of traps indicated by mine and spike icons: | ||
* The '''mine icons''' signify fire traps. These inflict 10 damage upon activation. | * The '''mine icons''' signify fire traps. These inflict 10 damage upon activation. | ||
* '''Spikes''' behave similarly, but units with 10 or more | * '''Spikes''' behave similarly, but units with 10 or more defense are immune to their damage. | ||
These traps activate every time a unit | These traps activate every time a unit – ally or enemy – steps on them, and this can happen multiple times. To disable a trap permanently, simply place a thief on its tile. However, it is often simpler to just avoid them. Given the map's fog of war, it is vital to equip your thieves and staff users with a [[Torch (item)|Torch item]] or [[Torch (staff)|staff]] for better visibility. Bring your units, especially flying units, with high [[constitution]] to transport the others across the water. | ||
* Split your group in two at the onset, but if you | * Split your group in two at the onset, but if you are unsure about your unit's strength, proceed as a single group. | ||
* Position high-defense units at the front, keeping mages behind for support as the only magical foes are the [[Shaman]]s. | * Position high-defense units at the front, keeping mages behind for support as the only magical foes are the [[Shaman]]s. | ||
* Near the chest area, prepare your | * Near the chest area, prepare your ranged units to engage the [[Druid]]s from the opposite side of the wall. If deploying magic units, keep a [[Restore]] staff handy – Druid in the center wields a long-range [[Silence (staff)|Silence]] staff. | ||
* If you | * If you are going after the chests, know that they will randomly contain an [[Elixir]] or a [[Manakete]]. Be ready to confront a Manakete with at least three units. | ||
For the boss battle: | For the boss battle: | ||
* Beware of the [[Hero]] with the [[Brave Sword]]. Stay at least 8 spaces away as he | * Beware of the [[Hero]] with the [[Brave Sword]]. Stay at least 8 spaces away as he will not chase you. Then, when ready, strike him from a distance on your next move. | ||
* Against [[Pereth]], use units with high [[ | * Against [[Pereth]], use units with high [[speed]] and [[resistance]], and attack with physical weapons. Use the [[Barrier]] staff or [[Pure Water]] if needed. This will prevent the boss from regenerating a lot of HP via [[Nosferatu]]. If your units risk being killed, either rescue them or heal from a distance. | ||
==Etymology and other languages== | ==Etymology and other languages== | ||
Revision as of 19:28, 19 September 2023
| ||||||||||
|

| “ | We must defend this Divine Weapon. The Silencing Darkness, Apocalypse, must not fall into the enemy's hands! | ” | — Peres |
|---|
The Elder Revelation (Japanese: 黙示の闇 Darkness of Revelation) is chapter 21x of Fire Emblem: The Binding Blade. In order to play this chapter, the previous chapter must have been completed within 30 turns, and Melady and Zeiss must have been recruited and be alive.
Plot
- Main article:
The Elder Revelation/Script
This section has been marked as a stub. Please help improve the page by adding information.
Beginning log
Roy ventured deep inside the Shrine of Seals. Apparently, there was something else hidden there other than the Binding Blade. However, Peres, one of Murdock's best lieutenants, was already inside the temple and waiting to ambush Roy.
Chapter data
| ||||||
|
| |||||
| Victory: Seize the throne | Player | Enemy | ||||
|---|---|---|---|---|---|---|
| Defeat: Roy dies | 1–10 | 45+6 | ||||
| ||||||

This chapter features two types of hazards: mine traps and spike traps. Mine traps deal 10 damage to a player unit that waits on one; spike traps attack a player units that waits on one with 10 physical attack, but this is opposed by the unit's defense. Either trap will be disarmed before dealing damage when a Thief waits on one.
Mine traps are located at the following tiles:
- Column 7, row 7
- Column 8, row 9
- Column 7, row 11
- Column 8, row 14
- Column 7, row 16
- Column 8, row 18
- Column 25, row 7
- Column 24, row 9
- Column 25, row 11
- Column 24, row 14
- Column 25, row 17
- Column 24, row 18
Spike traps are located at the following tiles:
- Column 13, row 15
- Column 19, row 15
- Column 11, row 8
- Column 21, row 8
- Column 15, row 8
- Column 17, row 8
Character data
| Characters | |
|---|---|
New units
| |
| |
Required characters
| |
Available characters
| |
- At the end of the chapter, Roy will promote to Great Lord automatically.
Item Data
| ||||||||||||||||||
|
Enemy data
- Stats with two figures separated by a ~ are presented as a range, representing stats that vary due to random growths. The figures to the left and right of the ~ are the stat's minimum and maximum possible values respectively.
Normal Hard
| ||||||||||||||||||||||||||||||||||||||||||||||||||||||||||||||||||||||||||||||||||||||||||||||||||||||||||||||||||||||||||||||||||||||||||||||||||||||||||||||||||||||||||||||||||||||||||||||||||||||||||||||||||||||||||||||||||||||||||||||||||||||||||||||||||||||||||||||||||||||||||||||||||||||||||||||||||||||||||||||||||||||||||||||||||||||||||||||||||||||||||||||||||||||||||||||||||||||||||||||||||||||||||||||||||||||||||||||||||||||||||||||||||||||||||||||||||||||||||||||||||||||||||||||||||||||||||||||||||||||||||||||||||||||||||||||||||||||||||||||||||||||||||||||||||||||||||||||||||||||||||||||||||||||||||||||||||||||||||||||||||||||||||||||||||||||||||||||||||||||||||||||||||||||||||||||||||||||||||||||||||||||||||||||||||||||||||||||||||||||||||||||||||||||||||||||||||||||||||||||
| ||||||||||||||||||||||||||||||||||||||||||||||||||||||||||||||||||||||||||||||||||||||||||||||||||||||||||||||||||||||||||||||||||||||||||||||||||||||||||||||||||||||||||||||||||||||||||||||||||||||||||||||||||||||||||||||||||||||||||||||||||||||||||||||||||||||||||||||||||||||||||||||||||||||||||||||||||||||||||||||||||||||||||||||||||||||||||||||||||||||||||||||||||||||||||||||||||||||||||||||||||||||||||||||||||||||||||||||||||||||||||||||||||||||||||||||||||||||||||||||||||||||||||||||||||||||||||||||||||||||||||||||||||||||||||||||||||||||||||||||||||||||||||||||||||||||||||||||||||||||||||||||||||||||||||||||||||||||||||||||||||||||||||||||||||||||||||||||||||||||||||||||||||||||||||||||||||||||||||||||||||||||||||||||||||||||||||||||||||||||||||||||||||||||||||||||||||||||||||||||
| ||||||||||||||||||||||||||||||||||||||||||||||||||||||||||||||||||||||||||||||||||||||||||||||||||||||||||||||||||||||||||||||||||||||||||||||||||||||||||||||||||||||||||||||||||||||||||||||||||||||||||||||||||||||||||||||||||||||||||||||||||||||||||||||||||||||||||||||||||||||||||||||||||||||||||||||||||||||||||||||||||||||||||||||||||||||||||||||||||||||||||||||||||||||||||||||||||||||||||||||||||||||||||||||||||||||||||||||||||||||||||||||||||||||||||||||||||||||||||||||||||||||||||||||||||||||||||||||||||||||||||||||||||||||||||||||||||||||||||||||||||||||||||||||||||||||||||||||||||||||||||||||||||||||||||||||||||||||||||||||||||||||||||||||||||||||||||||||||||||||||||||||||||||||||||||||||||||||||||||||||||||||||||||||||||||||||||||||||||||||||||||||||||||||||||||||||||||||||||||||
| ||||||||||||||||||||||||||||||||||||||||||||||||||||||||||||||||||||||||||||||||||||||||||||||||||||||||||||||||||||||||||||||||||||||||||||||||||||||||||||||||||||||||||||||||||||||||||||||||||||||||||||||||||||||||||||||||||||||||||||||||||||||||||||||||||||||||||||||||||||||||||||||||||||||||||||||||||||||||||||||||||||||||||||||||||||||||||||||||||||||||||||||||||||||||||||||||||||||||||||||||||||||||||||||||||||||||||||||||||||||||||||||||||||||||||||||||||||||||||||||||||||||||||||||||||||||||||||||||||||||||||||||||||||||||||||||||||||||||||||||||||||||||||||||||||||||||||||||||||||||||||||||||||||||||||||||||||||||||||||||||||||||||||||||||||||||||||||||||||||||||||||||||||||||||||||||||||||||||||||||||||||||||||||||||||||||||||||||||||||||||||||||||||||||||||||||||||||||||||||||
Reinforcements
Boss data
- Main article:
Peres - Stats with two figures separated by a ~ are presented as a range, representing stats that vary due to random growths. The figures to the left and right of the ~ are the stat's minimum and maximum possible values respectively.[1]
Normal Hard

Strategy
The map above shows the location of traps indicated by mine and spike icons:
- The mine icons signify fire traps. These inflict 10 damage upon activation.
- Spikes behave similarly, but units with 10 or more defense are immune to their damage.
These traps activate every time a unit – ally or enemy – steps on them, and this can happen multiple times. To disable a trap permanently, simply place a thief on its tile. However, it is often simpler to just avoid them. Given the map's fog of war, it is vital to equip your thieves and staff users with a Torch item or staff for better visibility. Bring your units, especially flying units, with high constitution to transport the others across the water.
- Split your group in two at the onset, but if you are unsure about your unit's strength, proceed as a single group.
- Position high-defense units at the front, keeping mages behind for support as the only magical foes are the Shamans.
- Near the chest area, prepare your ranged units to engage the Druids from the opposite side of the wall. If deploying magic units, keep a Restore staff handy – Druid in the center wields a long-range Silence staff.
- If you are going after the chests, know that they will randomly contain an Elixir or a Manakete. Be ready to confront a Manakete with at least three units.
For the boss battle:
- Beware of the Hero with the Brave Sword. Stay at least 8 spaces away as he will not chase you. Then, when ready, strike him from a distance on your next move.
- Against Pereth, use units with high speed and resistance, and attack with physical weapons. Use the Barrier staff or Pure Water if needed. This will prevent the boss from regenerating a lot of HP via Nosferatu. If your units risk being killed, either rescue them or heal from a distance.
Etymology and other languages
| Names, etymology, and in other regions | ||
|---|---|---|
| Language | Name | Definition, etymology, and notes |
| English |
Darkness of Oblivion |
Used in leftover text from the data transfer menu in the English version of Fire Emblem: The Blazing Blade. |
| English (unofficial) |
The Elder Revelation |
-- |
| Japanese |
黙示の闇 |
Darkness of Revelation |
Gallery
Map of the chapter
References
- ↑ The Elder Revelation, triangleattack.com, Retrieved: December 24, 2020
| ← The Binding Blade • | The Elder Revelation | • Unattained Dream → |
|---|