| Site News |
|---|
| Warning: This wiki contains spoilers. Read at your own risk! Social media: If you would like, please join our Discord server, and/or follow us on Twitter (X) or Tumblr! |
The Binding Blade (chapter): Difference between revisions
RNGSOMEONE (talk | contribs) |
RNGSOMEONE (talk | contribs) |
||
| Line 1,224: | Line 1,224: | ||
For the Lv13 Wyvern Lords, arguably the biggest threat on the map, the benchmarks are much higher. 22 AS is needed to guarantee a double, though again, more often than not Wyvern Lords will not roll max-SPD. They are also much beefier, with 53-65 HP and 16-22 DEF, requiring 53 Physical Attack to 2HKO, which is so high that only the Silver Bow can realistically achieve this without an excessive amount of STR. Aircalibur still works fairly well, though, requiring just 15 MAG for a 2HKO, though this time OHKO'ing is basically impossible due to their high HP. These steep stat requirements are high enough that using a Legendary Weapon on the Wyvern Lords is generally acceptable for basically a guaranteed 2HKO; the sheer number of Wyvern Riders makes it impractical to use Legendary weapons on them as they will break. | For the Lv13 Wyvern Lords, arguably the biggest threat on the map, the benchmarks are much higher. 22 AS is needed to guarantee a double, though again, more often than not Wyvern Lords will not roll max-SPD. They are also much beefier, with 53-65 HP and 16-22 DEF, requiring 53 Physical Attack to 2HKO, which is so high that only the Silver Bow can realistically achieve this without an excessive amount of STR. Aircalibur still works fairly well, though, requiring just 15 MAG for a 2HKO, though this time OHKO'ing is basically impossible due to their high HP. These steep stat requirements are high enough that using a Legendary Weapon on the Wyvern Lords is generally acceptable for basically a guaranteed 2HKO; the sheer number of Wyvern Riders makes it impractical to use Legendary weapons on them as they will break. | ||
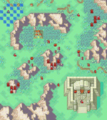
However, the other problem is that many of the reinforcements only spawn if the player enters certain regions. In conjunction with the three "lanes" in which they can approach the boss from, picking the right one matters as well. | |||
The top lane, going to the top right corner of the map and then down, faces only one reinforcement zone before reaching the shrine, though it encompasses enough space that the all three waves are basically guaranteed to spawn. However, this zone also spawns three Wyvern squads at once for three turns, two of which spawn very close to each other and as a result, slam into your lines together. This can be a somewhat high-risk high-reward approach. While this results in the player being swarmed by Wyverns, if they can withstand the assault and wipe them out, then few enemies stand between them and the Shrine. | |||
The middle lane, starting near the Sage and crossing the map south of the Village, is the safest in terms of how many enemies spawn. Entering the area near the Sage will trigger a squad of Wyverns and also a squad of Paladins. Though they approach from the same direction, terrain will cause the Paladin wave to be staggered behind the Wyverns, though this can also result in a wave of Paladins to reach you along with the ''next'' wave of Wyverns, which can also overwhelm you, especially as most anti-Wyvern units aren't the best anti-Paladin units due to not having good horse effectiveness. It is possible to rush through the box and perhaps only spawn 2/3 potential waves, however. | |||
The bottom lane, going to the very south of the map and approaching along the southern peaks, is arguably the worst option out of the three. Not only does it involve spawning the same reinforcements as the middle lane, it will also spawn additional Wyverns from the southern peaks as the player deviates from the middle lane. Trying to head south in the face of Wyvern and Paladin reinforcements is already difficult enough, as confronting them usually results in units staying in the reinforcement zone, causing more waves to spawn until they are exhausted, but the other reinforcement zone spawns a wave of Wyverns rather close to your units, and as they spawn on peaks, the player can't do much to fight them before they get the first hits in in the confined space. The safest way to deal with this is to only send competent units into the reinforcement zone to fight the Wyverns before they reach the rest of the army. | |||
Regardless, approaching the Shrine causes additional reinforcements to spawn. Unless the player took the bottom lane, in which [[Galle]]'s squad will spawn earlier than usual, both Galle's squad and an additional 2 Wyvern squads (one from the western peaks, another from the southern peaks) will spawn, and the latter 2 squads can spawn up to three times, which, again, will almost always trigger all three times as the player needs to go around to the south to enter the Shrine. As such, some strategies opt to instead [[Warp]] people directly into the Shrine, aiming to quickly kill the boss and then seize. Galle's squad spawns fairly far away, and won't be an issue unless you take too long in rushing the seize point. Galle himself is just a jacked up Wyvern Lord with 1-2 range; just nuke him with Legendary Weapons. | |||
That being said, the boss, [[Murdock]], is also not easy to bring down quickly. He caps STR ''even on Normal'' and has a [[Tomahawk]] for 1-2 range. Murdock hits hard and also has much higher SKL than many of the prior [[General]] bosses, 22-23 on Hard. This, along with the Tomahawk being fairly accurate by FE6 Axe standards, gives him a rather non-negligible chance to actually hit, and with his high ATK, pose a threat to most bosskillers with the firepower to bring him down quickly. Speaking of which, Murdock has decided that the concept of an HP cap doesn't apply to him; he has over 70 HP on Hard, as well as 30-32 DEF and 23-25 RES, making him so absurdly bulky that even Legendary Weapon users will take several rounds to bring him down. The amount of firepower needed to down him quickly is quite staggering, and the units that do, like [[Rutger]] or [[Lilina]], are getting 2HKO'd, and while Murdock's accuracy will still be shaky due to using an axe, warping them in for a boss kill can still easily go wrong with a stray Tomahawk hit putting them in kill range of a second hit from Murdock or the [[Bolting]] Sage. And remember; there's a 30-turn time limit to get the sidequest, so reaching Murdock, killing him and then getting Roy onto the throne all needs to be done in a timely manner. | |||
==Trivia== | ==Trivia== | ||
Revision as of 01:15, 4 June 2023
| ||||||||||||
|

| “ | We shall show them the power of Bern's main forces. Still...that general from the Lycian League Army made it this far. | ” | — Murdock to Galle |
|---|
The Binding Blade (Japanese: 封印の剣 Sword of seals) is the twenty-first chapter of Fire Emblem: The Binding Blade. In order to play the sidequest after, this chapter must be completed within 30 turns, and Melady and Zeiss must be recruited and alive.
Plot
- Main article:
The Binding Blade/Script
This section has been marked as a stub. Please help improve the page by adding information.
Beginning log
After surviving many hardships, Roy set foot on Bern's soil at last. Guinivere guided Roy toward the Shrine of Seals, but in their path stood Bern's main forces, the strongest army on the continent, led by Murdock, the leader of the Three Dragon Lords. Etruria and Bern, the two leading forces on the continent, clashing in all-out war. The longest and bloodiest day yet to be seen by Elibe was about to begin...
Chapter data
Normal Hard
| ||||||
|
| |||||
| Victory: Seize the throne | Player | Enemy | ||||
|---|---|---|---|---|---|---|
| Defeat: Roy dies | 1–18+1 | 35+96 | ||||
| ||||||


Character data
| Characters | |||||||||||
|---|---|---|---|---|---|---|---|---|---|---|---|
New units
| |||||||||||
| |||||||||||
Required characters
| |||||||||||
Available characters
| |||||||||||

- At the end of the chapter, if the requirements to enter Chapter 21x were not met, Roy will promote to Great Lord automatically.
Item data
| |||||||||||||||||||||||||||
|
Shop data
Swords Lances Axes Bows Anima Light Dark Staves Items Secret
| Name | Cost | |
|---|---|---|
| Silver Sword | 1,500 | |
| Silver Blade | 1,800 | |
| Armorslayer | 1,260 |
- The secret shop is located in the central right edge of the map, in the single grass tile in the middle of the mountain range.
Enemy data
- Stats with two figures separated by a ~ are presented as a range, representing stats that vary due to random growths. The figures to the left and right of the ~ are the stat's minimum and maximum possible values respectively.
Normal Hard
| |||||||||||||||||||||||||||||||||||||||||||||||||||||||||||||||||||||||||||||||||||||||||||||||||||||||||||||||||||||||||||||||||||||||||||||||||||||||||||||||||||||||||||||||||||||||||||||||||||||||||||||||||||||||||||||||||||||||||||||||||||||||||||||||||||||||||||||||||||||||||||||||||||||||||||||||||||||||||||||||||||||||||||||||||||||||||||||||||||||||||||||||||||||||||||||||||||||||||
| |||||||||||||||||||||||||||||||||||||||||||||||||||||||||||||||||||||||||||||||||||||||||||||||||||||||||||||||||||||||||||||||||||||||||||||||||||||||||||||||||||||||||||||||||||||||||||||||||||||||||||||||||||||||||||||||||||||||||||||||||||||||||||||||||||||||||||||||||||||||||||||||||||||||||||||||||||||||||||||||||||||||||||||||||||||||||||||||||||||||||||||||||||||||||||||||||||||||||
| |||||||||||||||||||||||||||||||||||||||||||||||||||||||||||||||||||||||||||||||||||||||||||||||||||||||||||||||||||||||||||||||||||||||||||||||||||||||||||||||||||||||||||||||||||||||||||||||||||||||||||||||||||||||||||||||||||||||||||||||||||||||||||||||||||||||||||||||||||||||||||||||||||||||||||||||||||||||||||||||||||||||||||||||||||||||||||||||||||||||||||||||||||||||||||||||||||||||||
| |||||||||||||||||||||||||||||||||||||||||||||||||||||||||||||||||||||||||||||||||||||||||||||||||||||||||||||||||||||||||||||||||||||||||||||||||||||||||||||||||||||||||||||||||||||||||||||||||||||||||||||||||||||||||||||||||||||||||||||||||||||||||||||||||||||||||||||||||||||||||||||||||||||||||||||||||||||||||||||||||||||||||||||||||||||||||||||||||||||||||||||||||||||||||||||||||||||||||
Reinforcements
- Enemy phase when any unit ends their turn north of the shrine (columns 13–32, rows 22–25)
- Galle and 4 Wyvern Riders—one with a Horseslayer, one an Axereaver, one a Javelin, and one a Steel Lance—from north of the village
- Enemy phase when any unit ends their turn near the shrine (columns 18–32, rows 22–36); repeatable up to three times.
- 3 Wyvern Riders with Steel Lances (two with Vulneraries) and 1 Wyvern Lord from the west peaks
- 1 Wyvern Lord and 3 Wyvern Riders—one with a Javelin, two with Steel Lances and Vulneraries—from the south edge of the map
- Enemy phase when any unit ends their turn southwest of the village (columns 1–9, rows 16–19); repeatable up to three times
- 4 Paladins—one with a Silver Lance, one a Javelin, and two with Steel Lances and Vulneraries—from north of the southern peaks
- 1 Wyvern Lord and 3 Wyvern Riders with Steel Lances (two with Vulneraries) from the southwest corner of the map
- Enemy phase when any unit ends their turn north of the southern peaks (columns 1–13, rows 25–28)
- 1 Wyvern Lord and 3 Wyvern Riders with Steel Lances (two with Vulneraries) from the southern peaks
- Enemy phase when any unit ends their turn in the northeast corner of the map (columns 22–31, rows 1–7); repeatable up to three times
- 1 Wyvern Lord and 3 Wyvern Riders with Steel Lances (two with Vulneraries) from the upper of the eastern peaks
- 1 Wyvern Lord and 3 Wyvern Riders—one with a Javelin, two with Steel Lances and Vulneraries—from the lower of the eastern peaks
- 1 Wyvern Lord and 3 Wyvern Riders with Steel Lances (two with Vulneraries) from the peaks west of the shrine
- Turn 31
Boss data
- Stats with two figures separated by a ~ are presented as a range, representing stats that vary due to random growths. The figures to the left and right of the ~ are the stat's minimum and maximum possible values respectively.[1][2]
- Main article:
Murdock
Normal Hard
|
|
| |||||||||||||||||||||||||||||||||||||||||||||||||

- Main article:
Peres
Normal Hard

Strategy
| This section details unofficial strategies that may help with completion of the chapter. This may not work for everybody. |
While previous chapters in The Binding Blade often featured a squad or two of Wyvern Riders, perhaps captained by a Wyvern Lord, this chapter blows it out of the water with how many Wyvern-riding units there are. As in, on Hard, Wyvern Riders/Lords compose over three quarters of the enemy roster (on Normal this is still about 73%). This chapter is all hands on deck for your Legendary Weapon, Bow and Aircalibur users as you will need all the Wyvern-killing capabilities you can muster.
Anna is also operating a secret shop on this map, and compared to the one in Chapter 16, she has ditched the Lockpicks for a full set of statboosters and siege tomes. Notably, this includes Boots, and they can be bought in bulk. As such, it is generally advisable to sell all unwanted equipment to buy as many Boots or siege tomes as possible. While on Normal selling can be done from battle preps, on Hard this generally necessitates Merlinus eat up a deployment slot so he can go through the convoy and sell stuff to the shops on the map.
As for the Wyverns, they are the main attraction of the map, and as a result, hitting OHKO, ORKO or 2HKO benchmarks will be highly important amongst your units.
For Lv20 Wyvern Riders, the most common enemy type on the map, 21 AS is needed to guarantee a double, though 20 AS (Dayan) is generally sufficient as few Wyvern Riders will roll max-SPD. 44 Physical Attack is needed for a consistent 2HKO against a HP/DEF capped roll, which can be done fairly consistently with a Silver Bow. As for Aircalibur, a mere 13 MAG secures a 2HKO, but more surprisingly, Lilina, who has a MAG cap of 30 and the growths to get there, can actually OHKO with Aircalibur if she caps MAG and then gets 3 points of damage from supports (usually A-support with Roy, due to how fast it is).
For the Lv13 Wyvern Lords, arguably the biggest threat on the map, the benchmarks are much higher. 22 AS is needed to guarantee a double, though again, more often than not Wyvern Lords will not roll max-SPD. They are also much beefier, with 53-65 HP and 16-22 DEF, requiring 53 Physical Attack to 2HKO, which is so high that only the Silver Bow can realistically achieve this without an excessive amount of STR. Aircalibur still works fairly well, though, requiring just 15 MAG for a 2HKO, though this time OHKO'ing is basically impossible due to their high HP. These steep stat requirements are high enough that using a Legendary Weapon on the Wyvern Lords is generally acceptable for basically a guaranteed 2HKO; the sheer number of Wyvern Riders makes it impractical to use Legendary weapons on them as they will break.
However, the other problem is that many of the reinforcements only spawn if the player enters certain regions. In conjunction with the three "lanes" in which they can approach the boss from, picking the right one matters as well.
The top lane, going to the top right corner of the map and then down, faces only one reinforcement zone before reaching the shrine, though it encompasses enough space that the all three waves are basically guaranteed to spawn. However, this zone also spawns three Wyvern squads at once for three turns, two of which spawn very close to each other and as a result, slam into your lines together. This can be a somewhat high-risk high-reward approach. While this results in the player being swarmed by Wyverns, if they can withstand the assault and wipe them out, then few enemies stand between them and the Shrine.
The middle lane, starting near the Sage and crossing the map south of the Village, is the safest in terms of how many enemies spawn. Entering the area near the Sage will trigger a squad of Wyverns and also a squad of Paladins. Though they approach from the same direction, terrain will cause the Paladin wave to be staggered behind the Wyverns, though this can also result in a wave of Paladins to reach you along with the next wave of Wyverns, which can also overwhelm you, especially as most anti-Wyvern units aren't the best anti-Paladin units due to not having good horse effectiveness. It is possible to rush through the box and perhaps only spawn 2/3 potential waves, however.
The bottom lane, going to the very south of the map and approaching along the southern peaks, is arguably the worst option out of the three. Not only does it involve spawning the same reinforcements as the middle lane, it will also spawn additional Wyverns from the southern peaks as the player deviates from the middle lane. Trying to head south in the face of Wyvern and Paladin reinforcements is already difficult enough, as confronting them usually results in units staying in the reinforcement zone, causing more waves to spawn until they are exhausted, but the other reinforcement zone spawns a wave of Wyverns rather close to your units, and as they spawn on peaks, the player can't do much to fight them before they get the first hits in in the confined space. The safest way to deal with this is to only send competent units into the reinforcement zone to fight the Wyverns before they reach the rest of the army.
Regardless, approaching the Shrine causes additional reinforcements to spawn. Unless the player took the bottom lane, in which Galle's squad will spawn earlier than usual, both Galle's squad and an additional 2 Wyvern squads (one from the western peaks, another from the southern peaks) will spawn, and the latter 2 squads can spawn up to three times, which, again, will almost always trigger all three times as the player needs to go around to the south to enter the Shrine. As such, some strategies opt to instead Warp people directly into the Shrine, aiming to quickly kill the boss and then seize. Galle's squad spawns fairly far away, and won't be an issue unless you take too long in rushing the seize point. Galle himself is just a jacked up Wyvern Lord with 1-2 range; just nuke him with Legendary Weapons.
That being said, the boss, Murdock, is also not easy to bring down quickly. He caps STR even on Normal and has a Tomahawk for 1-2 range. Murdock hits hard and also has much higher SKL than many of the prior General bosses, 22-23 on Hard. This, along with the Tomahawk being fairly accurate by FE6 Axe standards, gives him a rather non-negligible chance to actually hit, and with his high ATK, pose a threat to most bosskillers with the firepower to bring him down quickly. Speaking of which, Murdock has decided that the concept of an HP cap doesn't apply to him; he has over 70 HP on Hard, as well as 30-32 DEF and 23-25 RES, making him so absurdly bulky that even Legendary Weapon users will take several rounds to bring him down. The amount of firepower needed to down him quickly is quite staggering, and the units that do, like Rutger or Lilina, are getting 2HKO'd, and while Murdock's accuracy will still be shaky due to using an axe, warping them in for a boss kill can still easily go wrong with a stray Tomahawk hit putting them in kill range of a second hit from Murdock or the Bolting Sage. And remember; there's a 30-turn time limit to get the sidequest, so reaching Murdock, killing him and then getting Roy onto the throne all needs to be done in a timely manner.
Trivia

- Both this chapter and Chapter 27 in Eliwood's tale of Fire Emblem: The Blazing Blade feature the Shrine of Seals, and can be combined near-seamlessly.
- "Shock II" was intended to play partway in the scene where Roy and Yoder meet again, but due to an oversight, it instead plays after it, only to abruptly stop once the Player Phase begins.
Etymology and other languages
| Names, etymology, and in other regions | ||
|---|---|---|
| Language | Name | Definition, etymology, and notes |
| English |
Sword of Seals |
Used in leftover text from the data transfer menu in the English version of Fire Emblem: The Blazing Blade. |
| English (unofficial) |
The Binding Blade |
-- |
| Japanese |
封印の剣 |
Sword of seals, named after the game's subtitle |
Gallery
Map of the chapter
References
- ↑ The Binding Blade, triangleattack.com, Retrieved: December 24, 2020
- ↑ The Elder Revelation, trianglattack.com, Retrieved: December 24, 2020
| ← Ilia's Salvation • ← The Freezing Lance (sidequest) • ← The Silver Wolf • ← The Bow of Swift Wind (sidequest) • |
The Binding Blade | • Unattained Dream → • The Elder Revelation (sidequest) → |
|---|