| Site News |
|---|
| Warning: This wiki contains spoilers. Read at your own risk! Social media: If you would like, please join our Discord server, and/or follow us on Twitter (X) or Tumblr! |
Murder Holes: Difference between revisions
m (Text replacement - "|return25article=Robert (Thracia 776) " to "") |
Thecornerman (talk | contribs) m (Text replacement - "([Ll])evel (\d+)" to "$1evel $2") |
||
| (30 intermediate revisions by 7 users not shown) | |||
| Line 1: | Line 1: | ||
{{Chapter Infobox | {{Chapter Infobox | ||
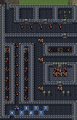
|image=[[File:Cm fe05 11x.png|200px]] | |image=[[File:Cm fe05 11x.png|200px]] | ||
|location=Dandrum | |location=Fort Dandrum dungeon | ||
|new units=[[Fred]], [[Olwen]] | |new units=[[Fred]], [[Olwen]] | ||
|boss=[[Oltoph]] | |boss=[[Oltoph]] | ||
|weather=[[Fog of War]] | |weather=[[Fog of War]] | ||
|previous=[[Dandrum | |previous=[[Fort Dandrum]] | ||
|next=[[The | |next=[[The Bandits of Dacia]] | ||
}} | }} | ||
{{quote|All you have to do is kill the enemy before they kill you. Of course, you'll have to be prepared for the worst...|[[Kempf]]'s advice to [[Oltoph]]}} | {{quote|All you have to do is kill the enemy before they kill you. Of course, you'll have to be prepared for the worst...|[[Kempf]]'s advice to [[Oltoph]]}} | ||
'''Murder | '''Murder Holes''' (Japanese: {{hl|マーダーホレス|Mādā horesu}}) is the [[side quest]] of the eleventh chapter of {{FE5}}. In order to play this chapter, the must have completed [[Fort Dandrum|the previous chapter]] in 30 turns or fewer, triggered the trap by allowing [[Leif]] to enter the central courtyard, and kept [[Fred]] alive. | ||
==Plot== | ==Plot== | ||
{{main|Murder | {{main|Murder Holes/Script}} | ||
[[August]], feeling that time is of the essence, instructs [[Leif]] to have their forces enter the fortress's dungeons to clear out any remaining troops and rescue any [[child hunts|child prisoners]] before they are executed. | [[August]], feeling that time is of the essence, instructs [[Leif]] to have their forces enter the fortress's dungeons to clear out any remaining troops and rescue any [[child hunts|child prisoners]] before they are executed. | ||
| Line 28: | Line 27: | ||
|victory=Seize the throne | |victory=Seize the throne | ||
|defeat=[[Leif]] dies | |defeat=[[Leif]] dies | ||
|ally=6–8{{h|+2|Upon Fred and Olwen being recruited}}{{h|+12|Returning units who were captured in Chapter 11}} | |ally=6–8{{h|+2|Upon Fred and Olwen being recruited}}{{h|+12|Returning units who were captured in Chapter 11}} | ||
|other=4{{h| | |other=4{{h|−1|Upon Olwen being recruited}} | ||
|enemy=36{{h|+18|Reinforcements}} | |enemy=36{{h|+18|Reinforcements}} | ||
|map=[[File:Cm fe05 11x.png]] | |map=[[File:Cm fe05 11x.png]] | ||
| Line 37: | Line 36: | ||
[[File:Cm fe05 11x prisoners.png|thumb|Placement of returning units captured in the previous chapter.]] | [[File:Cm fe05 11x prisoners.png|thumb|Placement of returning units captured in the previous chapter.]] | ||
Version 1.06 of the [[Fan translation#Fire Emblem: Thracia 776|Lil' Manster fan translation]] adjusted the positions of the first six captives, placing them in the middle cell rather than sharing Olwen's (shifting each of them four tiles west).<ref>{{Cite web|quote=In chapter 11x, if you had units captured and taken away in the previous map, they would mistakenly be sent to Olwen's cell, occupying the same tiles as its occupants and preventing your units from moving. They'll now be sent to the middle, empty cell.|author=Miacis|url=https://forums.serenesforest.net/index.php?/topic/90189-fe5-lil-manster-–-translation-and-quality-of-life-patch-for-thracia-776/page/4/&tab=comments#comment-5716397|title=comment on [FE5] Lil' Manster – Translation and Quality-of-life Patch for Thracia 776|site=Serenes Forest Forums|published=October 31, 2020|retrieved=April 26, 2022}}</ref> | Additionally, up to twelve units that were [[capture]]d in the previous chapter will return here as prisoners in the upper cells. They are positioned based on their place in deployment order in the previous chapter. If thirteen of the fourteen deployable units were captured, the unit last in deployment order will not be present; however, they will still be re-recruited at the end of the chapter. The second, fourth, fifth, and sixth prisoners will overlap with [[Olwen]] and the [[Civilian]]s; they cannot be interacted with until the NPC no longer shares the tile, either through movement on their turn, being [[rescue (command)|rescue]]d, or being killed. | ||
Version 1.06 of the [[Fan translation#Fire Emblem: Thracia 776|Lil' Manster fan translation]] adjusted the positions of the first six captives, placing them in the middle cell rather than sharing Olwen's (shifting each of them four tiles west).<ref>{{Cite web|quote=In chapter 11x, if you had units captured and taken away in the previous map, they would mistakenly be sent to Olwen's cell, occupying the same tiles as its occupants and preventing your units from moving. They'll now be sent to the middle, empty cell.|author=Miacis|url=https://forums.serenesforest.net/index.php?/topic/90189-fe5-lil-manster-–-translation-and-quality-of-life-patch-for-thracia-776/page/4/&tab=comments#comment-5716397|title=comment on [FE5] Lil' Manster – Translation and Quality-of-life Patch for Thracia 776|site=Serenes Forest Forums|published=October 31, 2020|retrieved=April 26, 2022}}</ref> | |||
{{clear}} | {{clear}} | ||
| Line 62: | Line 62: | ||
|recruitment method=NPC, talk to with [[Fred]] | |recruitment method=NPC, talk to with [[Fred]] | ||
}} | }} | ||
| | |forced1=leif | ||
| | |return1=lifis | ||
| | |return2=fergus | ||
| | |return3=karin | ||
| | |return4=brighton | ||
| | |return5=machyua | ||
| | |return6=lara | ||
| | |return7=dalsin | ||
| | |return8=asbel | ||
| | |return9=nanna | ||
| | |return10=hicks | ||
| | |return11=finn | ||
| | |return12=safy | ||
| | |return13=shiva | ||
| | |return14=osian | ||
| | |return15=halvan | ||
| | |return16=ronan | ||
| | |return17=carrion | ||
| | |return18=marty | ||
| | |return19=dagdar | ||
| | |return20=tanya | ||
| | |return21=selphina | ||
| | |return22=cain | ||
| | |return22article=Cain (Thracia 776) | ||
| | |return23=alva | ||
| | |return23article=Alva (Thracia 776) | ||
| | |return24=robert | ||
}} | }} | ||
Additionally, | |||
Additionally, any units that were captured in the previous chapter will return in this one. The first twelve who were captured will be present on the map, and will be recruited at the start of turn 1; if a thirteenth unit was captured, they will not be present, but will be recruited at the end of the chapter. | |||
===Enemy data=== | ===Enemy data=== | ||
| Line 97: | Line 98: | ||
{{ChapUnitCellFE5 | {{ChapUnitCellFE5 | ||
|name=Friege | |name=Friege | ||
|class= | |class=Archer | ||
|lv=9 | |||
|#=1 | |||
|hp=20~31 | |||
|str=3~14 | |||
|mag=0~11 | |||
|skill=0~11 | |||
|spd=0~11 | |||
|lck=0~11 | |||
|def=1~12 | |||
|con=6~17 | |||
|mov=5~6 | |||
|inventory={{Item|5|Short Bow}} | |||
|notes='''Authority:''' Oltoph | |||
}} | |||
{{ChapUnitCellFE5 | |||
|name=Friege | |||
|class=Mage | |||
|lv=8 | |||
|#=1 | |||
|hp=18~28 | |||
|str=0~10 | |||
|mag=2~12 | |||
|skill=2~12 | |||
|spd=3~13 | |||
|lck=0~10 | |||
|def=0~10 | |||
|con=4~14 | |||
|mov=6~7 | |||
|inventory={{Item|5|Thunder}} | |||
|notes='''Authority:''' Oltoph | |||
}} | |||
{{ChapUnitCellFE5 | |||
|name=Friege | |||
|class=Archer | |||
|lv=10 | |||
|#=2 | |||
|hp=20~32 | |||
|str=3~15 | |||
|mag=0~12 | |||
|skill=0~12 | |||
|spd=0~12 | |||
|lck=0~12 | |||
|def=1~13 | |||
|con=6~18 | |||
|mov=5~6 | |||
|inventory={{Item|5|Short Bow}} | |||
|notes='''Authority:''' Oltoph | |||
}} | |||
{{ChapUnitCellFE5 | |||
|name=Friege | |||
|class=Mage | |||
|lv=10 | |||
|#=2 | |||
|hp=18~30 | |||
|str=0~12 | |||
|mag=2~14 | |||
|skill=2~14 | |||
|spd=3~15 | |||
|lck=0~12 | |||
|def=0~12 | |||
|con=4~16 | |||
|mov=6~7 | |||
|inventory={{Item|5|Elfire}} | |||
|notes='''Authority:''' Oltoph | |||
}} | |||
{{ChapUnitCellFE5 | |||
|name=Friege | |||
|class=Mage | |||
|lv=7 | |||
|#=1 | |||
|hp=18~27 | |||
|str=0~9 | |||
|mag=2~11 | |||
|skill=2~11 | |||
|spd=3~12 | |||
|lck=0~9 | |||
|def=0~9 | |||
|con=4~13 | |||
|mov=6~7 | |||
|inventory={{Item|5|Thunder}} | |||
|notes='''Authority:''' Oltoph | |||
}} | |||
{{ChapUnitCellFE5 | |||
|name=Friege | |||
|class=Archer | |||
|lv=6 | |||
|#=1 | |||
|hp=20~28 | |||
|str=3~11 | |||
|mag=0~8 | |||
|skill=0~8 | |||
|spd=0~8 | |||
|lck=0~8 | |||
|def=1~9 | |||
|con=6~14 | |||
|mov=5~6 | |||
|inventory={{Item|5|Short Bow}} | |||
|notes='''Authority:''' Oltoph | |||
}} | |||
{{ChapUnitCellFE5 | |||
|name=Friege | |||
|class=Mage | |||
|lv=6 | |||
|#=1 | |||
|hp=18~26 | |||
|str=0~8 | |||
|mag=2~10 | |||
|skill=2~10 | |||
|spd=3~11 | |||
|lck=0~8 | |||
|def=0~8 | |||
|con=4~12 | |||
|mov=6~7 | |||
|inventory={{Item|5|Thunder}} | |||
|notes='''Authority:''' Oltoph | |||
}} | |||
{{ChapUnitCellFE5 | |||
|name=Friege | |||
|class=Archer | |||
|lv=10 | |||
|#=3 | |||
|hp=20~32 | |||
|str=3~15 | |||
|mag=0~12 | |||
|skill=0~12 | |||
|spd=0~12 | |||
|lck=0~12 | |||
|def=1~13 | |||
|con=6~18 | |||
|mov=5~6 | |||
|inventory={{Item|5|Poison Bow}} • {{Item|5|Antitoxin}} | |||
|notes='''Authority:''' Oltoph | |||
}} | |||
{{ChapUnitCellFE5 | |||
|name=[[Oltoph]] | |||
|class=Bishop | |||
|lv=8 | |||
|#=1 | |||
|hp=20~30 | |||
|str=0~10 | |||
|mag=5~15 | |||
|skill=2~12 | |||
|spd=2~12 | |||
|lck=0~10 | |||
|def=1~11 | |||
|con=4~14 | |||
|mov=5~6 | |||
|inventory={{Item|5|Bolting}} • {{Item|5|Meteor}} • {{Item|5|Physic}} • {{Item|5|Door Key}} | |||
|notes='''Authority:''' ★<br>• Starts on a [[Terrain/Super Famicom games#Fire Emblem: Thracia 776|throne]], the chapter's seize point.<br>• Does not move until turn 30, at which point he begins to ignore combat and move to escape via the southeast corridor. | |||
}} | |||
{{ChapUnitCellFE5 | |||
|name=Friege | |||
|class=Axe Armor | |||
|lv=8 | |lv=8 | ||
|#=3 | |#=3 | ||
| Line 144: | Line 298: | ||
|mov=5~6 | |mov=5~6 | ||
|inventory={{Item|5|Poison Bow}} | |inventory={{Item|5|Poison Bow}} | ||
|notes='''Authority:''' Oltoph | |notes='''Authority:''' Oltoph | ||
}} | }} | ||
| Line 177: | Line 314: | ||
|con=4~15 | |con=4~15 | ||
|mov=6~7 | |mov=6~7 | ||
|inventory={{Item|5|Thunder | |inventory={{Item|5|Thunder}} | ||
|notes='''Authority:''' Oltoph | |notes='''Authority:''' Oltoph | ||
}} | }} | ||
| Line 233: | Line 370: | ||
{{ChapUnitCellFE5 | {{ChapUnitCellFE5 | ||
|name=Friege | |name=Friege | ||
|class= | |class=Sword Armor | ||
|lv=6 | |lv=6 | ||
|#=4 | |#=4 | ||
| Line 262: | Line 399: | ||
|con=4~14 | |con=4~14 | ||
|mov=6~7 | |mov=6~7 | ||
|inventory={{Item|5|Wind | |inventory={{Item|5|Wind}} | ||
|notes='''Authority:''' Oltoph<br>Moves to attack units in range. | |notes='''Authority:''' Oltoph<br>Moves to attack units in range. | ||
|last=y | |last=y | ||
}} | }} | ||
| Line 512: | Line 513: | ||
*Turn 8 | *Turn 8 | ||
**Four level 6 [[Soldier]]s with [[Short Lance]]s from south of the cell containing the NPCs | **Four level 6 [[Soldier]]s with [[Short Lance]]s from south of the cell containing the NPCs | ||
**Two level 6 [[Soldier]]s with [[Javelin]]s from south of the cell containing the NPCs | **Two level 6 [[Soldier]]s with [[Javelin]]s from south of the cell containing the NPCs | ||
*Turn 10 | *Turn 10 | ||
**Four level 3 [[Soldier]]s with [[Short Lance]]s from the northwest corner of the map | **Four level 3 [[Soldier]]s with [[Short Lance]]s from the northwest corner of the map | ||
**Two level 3 [[Soldier]]s with [[Javelin]]s from the northwest corner of the map | **Two level 3 [[Soldier]]s with [[Javelin]]s from the northwest corner of the map | ||
*Turn 15 | *Turn 15 | ||
**Four level 11 [[Soldier]]s with [[Short Lance]]s from the northwest corner of the map | **Four level 11 [[Soldier]]s with [[Short Lance]]s from the northwest corner of the map | ||
**Two level 11 [[Soldier]]s with [[Javelin]]s from the northwest corner of the map | **Two level 11 [[Soldier]]s with [[Javelin]]s from the northwest corner of the map | ||
===NPC data=== | ===NPC data=== | ||
| Line 539: | Line 540: | ||
|con=5 | |con=5 | ||
|mov=5 | |mov=5 | ||
|notes=Moves to be next to [[Fred]]. | |notes='''Action:''' ★<br>Moves to be next to [[Fred]]. | ||
}} | }} | ||
{{ChapUnitCellFE5 | {{ChapUnitCellFE5 | ||
| Line 557: | Line 558: | ||
|con=2 | |con=2 | ||
|mov=4 | |mov=4 | ||
|notes=Moves to escape via the northwest. | |notes=Moves to escape via the northwest; allows the acquisition of a [[Silence (staff)|Silence Staff]] from a village in [[The Bandits of Dacia|Chapter 12]] if he escapes. | ||
}} | }} | ||
{{ChapUnitCellFE5 | {{ChapUnitCellFE5 | ||
| Line 575: | Line 576: | ||
|con=2 | |con=2 | ||
|mov=4 | |mov=4 | ||
|notes=Moves to escape via the northwest. | |notes=Moves to escape via the northwest; allows the acquisition of a [[Vulnerary]] or [[Magic Ring]] from a village in [[The Bandits of Dacia|Chapter 12]] if he escapes. | ||
}} | }} | ||
{{ChapUnitCellFE5 | {{ChapUnitCellFE5 | ||
| Line 593: | Line 594: | ||
|con=2 | |con=2 | ||
|mov=4 | |mov=4 | ||
|notes=Moves to escape via the northwest. | |notes=Moves to escape via the northwest; allows the acquisition of the [[Heim Scroll]] from a village in [[The Bandits of Dacia|Chapter 12]] if she escapes. | ||
|last=y | |last=y | ||
}} | }} | ||
| Line 626: | Line 627: | ||
==Strategy== | ==Strategy== | ||
{{strategy}} | {{strategy}} | ||
The main difficulty of this chapter comes not from fighting, but rather from avoiding fighting. Most of the enemies here have 2 range weapons that will chip at your units with lower bulk or avoid. This is a great chapter for units with strong 2 range, like [[Asbel]], [[Osian]], [[Selphina]], and [[Dagdar]]. Bring a door key or lockpick for [[Oltoph]]'s room, and feel free to capture him, since his lack of a weapon that can counter at 1 or 2 range means he is an automatic capture for anyone with more [[constitution]] than him. Siege tomes sell for a good profit. Another option is to simply [[Warp (staff)|warp]] to the boss and kill or capture him (the latter can only happen after killing an adjacent enemy) so that he doesn't cause any trouble with his siege tomes, though this requires the warped unit to survive all of the enemies in the throne room. | |||
The main difficulty of this chapter comes not from fighting, but | |||
On turn 30, Oltoph stops attacking and runs to escape, which also opens the door. If the player cannot open the door, they must wait for this event. If the player blocks the escape tile, he will be unable to escape. It is possible to abuse this to safely neutralize Oltoph when combined with a magically resistant unit, though this is not viable for an SSS rank run. | |||
[[Fred]] appears as a player unit on turn 2, and the main goal with him is to make a beeline for [[Olwen]]'s cell. It is best that he attacks the [[Soldier]]s at 2 range, as he will do magic damage. Due to the fact that Olwen is standing right next to the cell door and won't move, the Soldiers (who are armed with [[Javelin]]s) will continually attack and may kill her if Fred does not hurry. | [[Fred]] appears as a player unit on turn 2, and the main goal with him is to make a beeline for [[Olwen]]'s cell. It is best that he attacks the [[Soldier]]s at 2 range, as he will do magic damage. Due to the fact that Olwen is standing right next to the cell door and won't move, the Soldiers (who are armed with [[Javelin]]s) will continually attack and may kill her if Fred does not hurry. If the player fears her death, they can use Warp to send a unit up to protect her, though she can not be rescued with the [[Rescue (staff)|Rescue staff]] until she is recruited. [[Soldier]] reinforcement will appear as well, though fortunately the one adjacent to Olwen's door has a [[Short Lance]] and will block the Javelin Soldiers from attacking. The Short Lance Soldiers have strange AI, and will sometimes refuse to attack Fred and stay still<!--Needs more testing-->, so leaving them be is for the best. | ||
Also note that the cells in the northern part of the map have the purpose of containing the player's captured units if they were captured in the previous chapter. However, this is very unlikely to have happened due to the previous map having few enemies and only one place for them to escape with a captured player unit. | Also, note that the cells in the northern part of the map have the purpose of containing the player's captured units if they were captured in the previous chapter. However, this is very unlikely to have happened due to the previous map having few enemies and only one place for them to escape with a captured player unit. The player should use the [[Rescue (command)|Rescue mechanic]] to keep their units safe from the enemy Soldiers. | ||
==Trivia== | ==Trivia== | ||
*One of the | *One of the children's names, Sera, bears resemblance to [[Serra]]—a playable [[cleric]] in {{FE7}}, and [[Sara]]—another playable cleric from this game. | ||
* | *This chapter is referenced by [[Leif]] in {{FE17}}.<ref name=engage>{{Cite|Let me tell you of a battle which hinged on the efficacy of murder holes...|Leif|Engage}}</ref> | ||
==Etymology and other languages== | ==Etymology and other languages== | ||
{{Names | {{Names | ||
|eng-name=Murder Holes | |||
|eng-mean=Used in {{FE17}}.<ref name=engage/> | |||
|eng-fan-name=• Murder Hollace<br>• Desperate Ground | |eng-fan-name=• Murder Hollace<br>• Desperate Ground | ||
|eng-fan-mean=• Used in FireLizard's translation.<br>• Used in the Lil' Manster [[fan translation]] patch. | |eng-fan-mean=• Used in FireLizard's translation.<br>• Used in the Lil' Manster [[fan translation]] patch. | ||
| | |jpn-name={{h|マーダーホレス|Mādā horesu}} | ||
| | |jpn-mean=Literally translates to something like "Murder Hollace". A common theory is that it is intended to be "[[wikipedia:Murder-hole|murder holes]]", but "holes" was transcribed into Japanese literally as {{lang|ja|ホレス}} ''{{lang|ja-Latn|horesu}}'' instead of something like {{lang|ja|ホールズ}} ''{{lang|ja-Latn|hōruzu}}''. This is supported by Kempf's other dirty tactic being called "[[wikipedia:Portcullis|portcullis]]", another fortification in castles. | ||
}} | }} | ||
==Gallery== | ==Gallery== | ||
<gallery> | |||
Cm fe05 11x.png|Map of the chapter | |||
</gallery> | |||
{{refbar}} | {{refbar}} | ||
{{ChapterNav | {{ChapterNav | ||
|prechapter=Dandrum | |prechapter=Fort Dandrum | ||
|chapter=Murder | |chapter=Murder Holes | ||
|nextchapter=The | |nextchapter=The Bandits of Dacia | ||
}} | }} | ||
{{Nav5}} | {{Nav5}} | ||
[[Category:Chapters of Fire Emblem: Thracia 776]] | [[Category:Chapters of Fire Emblem: Thracia 776]] | ||
Latest revision as of 20:33, 28 March 2024
| ||||||||||||
|

| “ | All you have to do is kill the enemy before they kill you. Of course, you'll have to be prepared for the worst... | ” | — Kempf's advice to Oltoph |
|---|
Murder Holes (Japanese: マーダーホレス) is the side quest of the eleventh chapter of Fire Emblem: Thracia 776. In order to play this chapter, the must have completed the previous chapter in 30 turns or fewer, triggered the trap by allowing Leif to enter the central courtyard, and kept Fred alive.
Plot
- Main article:
Murder Holes/Script
August, feeling that time is of the essence, instructs Leif to have their forces enter the fortress's dungeons to clear out any remaining troops and rescue any child prisoners before they are executed.
Kempf is then seen ordering a begrudging Oltoph to stay behind and fight to the death to guarantee escape. Kempf also orders Oltoph to execute any remaining prisoners as an afterthought and makes his way to the exit.
Olwen, who is locked in one of the cells with some children, witnesses their terror and fully grasps what the child hunts really are. The children are initially angry at her due to being a soldier of the Empire but she reassures them that she will help them escape. She is freed by Leif's forces and her subordinate Fred during the fighting.
After Friege's forces are cleared out of the dungeon and the children escape, Olwen overhears August and Dryas discussing the honor of house Friege in light of the fact that Ishtar's romantic relationship with Julius and open participation in the child hunts makes the entire house followers of Loptous. Olwen is confused by this information and voices her objections to this; she then agrees to accompany Leif's forces to learn the truth of what the Empire, and her brother Reinhardt, have really been doing.
Chapter data
| ||||||
|
| |||||
| Victory: Seize the throne | Player | Other | Enemy | |||
|---|---|---|---|---|---|---|
| Defeat: Leif dies | 6–8+2+12 | 4−1 | 36+18 | |||
| ||||||
Units are arranged based on their position in deployment order after Leif.

Additionally, up to twelve units that were captured in the previous chapter will return here as prisoners in the upper cells. They are positioned based on their place in deployment order in the previous chapter. If thirteen of the fourteen deployable units were captured, the unit last in deployment order will not be present; however, they will still be re-recruited at the end of the chapter. The second, fourth, fifth, and sixth prisoners will overlap with Olwen and the Civilians; they cannot be interacted with until the NPC no longer shares the tile, either through movement on their turn, being rescued, or being killed.
Version 1.06 of the Lil' Manster fan translation adjusted the positions of the first six captives, placing them in the middle cell rather than sharing Olwen's (shifting each of them four tiles west).[1]
Character data
| Characters | ||||||||||||||||||||||
|---|---|---|---|---|---|---|---|---|---|---|---|---|---|---|---|---|---|---|---|---|---|---|
New units
| ||||||||||||||||||||||
| ||||||||||||||||||||||
Required characters
| ||||||||||||||||||||||
Available characters
| ||||||||||||||||||||||
Additionally, any units that were captured in the previous chapter will return in this one. The first twelve who were captured will be present on the map, and will be recruited at the start of turn 1; if a thirteenth unit was captured, they will not be present, but will be recruited at the end of the chapter.
Enemy data
- Stats with two figures separated by a ~ are presented as a range, representing stats that vary due to random growths. The figures to the left and right of the ~ are the stat's minimum and maximum possible values respectively.
| |||||||||||||||||||||||||||||||||||||||||||||||||||||||||||||||||||||||||||||||||||||||||||||||||||||||||||||||||||||||||||||||||||||||||||||||||||||||||||||||||||||||||||||||||||||||||||||||||||||||||||||||||||||||||||||||||||||||||||||||||||||||||||||||||||||||||||||||||||||||||||||||||||||||||||||||||||||||||||||||||||||||||||||||||||||||||||||||||||||||||||||||||||||||||||||||||||||||||||||||||||||||||||||||||||||||||||||||||||||||||||||||||||||||||||||||||||||||||||||||||||||||||||||||||||||
| |||||||||||||||||||||||||||||||||||||||||||||||||||||||||||||||||||||||||||||||||||||||||||||||||||||||||||||||||||||||||||||||||||||||||||||||||||||||||||||||||||||||||||||||||||||||||||||||||||||||||||||||||||||||||||||||||||||||||||||||||||||||||||||||||||||||||||||||||||||||||||||||||||||||||||||||||||||||||||||||||||||||||||||||||||||||||||||||||||||||||||||||||||||||||||||||||||||||||||||||||||||||||||||||||||||||||||||||||||||||||||||||||||||||||||||||||||||||||||||||||||||||||||||||||||||
| |||||||||||||||||||||||||||||||||||||||||||||||||||||||||||||||||||||||||||||||||||||||||||||||||||||||||||||||||||||||||||||||||||||||||||||||||||||||||||||||||||||||||||||||||||||||||||||||||||||||||||||||||||||||||||||||||||||||||||||||||||||||||||||||||||||||||||||||||||||||||||||||||||||||||||||||||||||||||||||||||||||||||||||||||||||||||||||||||||||||||||||||||||||||||||||||||||||||||||||||||||||||||||||||||||||||||||||||||||||||||||||||||||||||||||||||||||||||||||||||||||||||||||||||||||||
| |||||||||||||||||||||||||||||||||||||||||||||||||||||||||||||||||||||||||||||||||||||||||||||||||||||||||||||||||||||||||||||||||||||||||||||||||||||||||||||||||||||||||||||||||||||||||||||||||||||||||||||||||||||||||||||||||||||||||||||||||||||||||||||||||||||||||||||||||||||||||||||||||||||||||||||||||||||||||||||||||||||||||||||||||||||||||||||||||||||||||||||||||||||||||||||||||||||||||||||||||||||||||||||||||||||||||||||||||||||||||||||||||||||||||||||||||||||||||||||||||||||||||||||||||||||
Reinforcements
All reinforcements are halted upon Oltoph's defeat.
- Turn 8
- Four level 6 Soldiers with Short Lances from south of the cell containing the NPCs
- Two level 6 Soldiers with Javelins from south of the cell containing the NPCs
- Turn 10
- Four level 3 Soldiers with Short Lances from the northwest corner of the map
- Two level 3 Soldiers with Javelins from the northwest corner of the map
- Turn 15
- Four level 11 Soldiers with Short Lances from the northwest corner of the map
- Two level 11 Soldiers with Javelins from the northwest corner of the map
NPC data
| |||||||||||||||||||||||||||||||||||||||||||||||||||||||||||||||||||||||||||||||||||||||||||||||||||||||||||||||||||||||||||
| |||||||||||||||||||||||||||||||||||||||||||||||||||||||||||||||||||||||||||||||||||||||||||||||||||||||||||||||||||||||||||
Boss data
- Stats with two figures separated by a ~ are presented as a range, representing stats that vary due to random growths. The figures to the left and right of the ~ are the stat's minimum and maximum possible values respectively.
- Main article:
Oltoph
|
|
| ||||||||||||||||||||||||||||||||||||||||||||||||||||||||||||
Strategy
| This section details unofficial strategies that may help with completion of the chapter. This may not work for everybody. |
The main difficulty of this chapter comes not from fighting, but rather from avoiding fighting. Most of the enemies here have 2 range weapons that will chip at your units with lower bulk or avoid. This is a great chapter for units with strong 2 range, like Asbel, Osian, Selphina, and Dagdar. Bring a door key or lockpick for Oltoph's room, and feel free to capture him, since his lack of a weapon that can counter at 1 or 2 range means he is an automatic capture for anyone with more constitution than him. Siege tomes sell for a good profit. Another option is to simply warp to the boss and kill or capture him (the latter can only happen after killing an adjacent enemy) so that he doesn't cause any trouble with his siege tomes, though this requires the warped unit to survive all of the enemies in the throne room.
On turn 30, Oltoph stops attacking and runs to escape, which also opens the door. If the player cannot open the door, they must wait for this event. If the player blocks the escape tile, he will be unable to escape. It is possible to abuse this to safely neutralize Oltoph when combined with a magically resistant unit, though this is not viable for an SSS rank run.
Fred appears as a player unit on turn 2, and the main goal with him is to make a beeline for Olwen's cell. It is best that he attacks the Soldiers at 2 range, as he will do magic damage. Due to the fact that Olwen is standing right next to the cell door and won't move, the Soldiers (who are armed with Javelins) will continually attack and may kill her if Fred does not hurry. If the player fears her death, they can use Warp to send a unit up to protect her, though she can not be rescued with the Rescue staff until she is recruited. Soldier reinforcement will appear as well, though fortunately the one adjacent to Olwen's door has a Short Lance and will block the Javelin Soldiers from attacking. The Short Lance Soldiers have strange AI, and will sometimes refuse to attack Fred and stay still, so leaving them be is for the best.
Also, note that the cells in the northern part of the map have the purpose of containing the player's captured units if they were captured in the previous chapter. However, this is very unlikely to have happened due to the previous map having few enemies and only one place for them to escape with a captured player unit. The player should use the Rescue mechanic to keep their units safe from the enemy Soldiers.
Trivia
- One of the children's names, Sera, bears resemblance to Serra—a playable cleric in Fire Emblem: The Blazing Blade, and Sara—another playable cleric from this game.
- This chapter is referenced by Leif in Fire Emblem Engage.[2]
Etymology and other languages
| Names, etymology, and in other regions | ||
|---|---|---|
| Language | Name | Definition, etymology, and notes |
| English |
Murder Holes |
Used in Fire Emblem Engage.[2] |
| English (unofficial) |
• Murder Hollace |
• Used in FireLizard's translation. |
| Japanese |
マーダーホレス |
Literally translates to something like "Murder Hollace". A common theory is that it is intended to be "murder holes", but "holes" was transcribed into Japanese literally as ホレス horesu instead of something like ホールズ hōruzu. This is supported by Kempf's other dirty tactic being called "portcullis", another fortification in castles. |
Gallery
Map of the chapter
References
- ↑ "In chapter 11x, if you had units captured and taken away in the previous map, they would mistakenly be sent to Olwen's cell, occupying the same tiles as its occupants and preventing your units from moving. They'll now be sent to the middle, empty cell." — Miacis, comment on [FE5] Lil' Manster – Translation and Quality-of-life Patch for Thracia 776, Serenes Forest Forums, Published: October 31, 2020, Retrieved: April 26, 2022
- ↑ 2.0 2.1 "Let me tell you of a battle which hinged on the efficacy of murder holes..." — Leif, Fire Emblem Engage
| ← Fort Dandrum • | Murder Holes | • The Bandits of Dacia → |
|---|