| Site News |
|---|
| Warning: This wiki contains spoilers. Read at your own risk! Social media: If you would like, please join our Discord server, and/or follow us on Twitter (X) or Tumblr! |
Flight Toward Freedom: Difference between revisions
m (Correction) |
(→Plot) Tags: Mobile edit Mobile web edit |
||
| (18 intermediate revisions by 8 users not shown) | |||
| Line 1: | Line 1: | ||
{{Chapter Infobox | {{Chapter Infobox | ||
|image=[[File:Cm fe06 11B.png|200px]] | |image=[[File:Cm fe06 11B.png|200px]] | ||
| Line 11: | Line 10: | ||
{{Quote|More people escaped?! Where were the guards?!|[[Arcardo]]}} | {{Quote|More people escaped?! Where were the guards?!|[[Arcardo]]}} | ||
'''Flight Toward Freedom''' (Japanese: {{hl|自由への脱出|Jiyū e no dasshutsu}} ''Escape to freedom'') is | '''Flight Toward Freedom''' (Japanese: {{hl|自由への脱出|Jiyū e no dasshutsu}} ''Escape to freedom'') is Chapter 11B of {{FE6}}. In order to play this chapter, you must have visited the [[village]] which holds a [[Restore]] staff in [[The Misty Isles|Chapter 9]] and thus headed west toward Caldonia. | ||
==Plot== | ==Plot== | ||
{{main|Flight Toward Freedom/Script}} | {{main|Flight Toward Freedom/Script}} | ||
[[Roy]]'s forces arrive at Castle Eidyna on Caldonia, where workers are kept before being transported to the mines. [[Elffin]] has the castle infiltrated ahead of time, allowing several workers to escape, and the Lycian Army is to secure their safe retreat. [[Arcardo]], who is at Eidyna, orders [[Morgan (The Binding Blade)|Morgan]] to chase down the runaway workers while himself returning to Juteaux, the capital of the [[Western Isles]]. | |||
The battle begins, and during it, [[Geese]] joins the fray as Roy's ally, out for personal revenge over his ship crewmates being worked to death in the mines by the castle's lord. If Roy talks to him, Geese joins his army as a mercenary. After Geese, [[Bartre]] also arrives on the battlefield, with the intent of breaking out the castle's prisoners. If [[Fir]], his daughter, talks to him, Bartre joins the Lycian Army in order to protect her. If Roy talks to him instead, he also joins the army, because said army is fighting Etruria. | |||
After the battle ends, Roy's army heads to Juteaux, the heart of the corruption on the Western Isles, in order to liberate it from Etruria. Beforehand, however, Roy accurately guesses that Elffin is of high Etrurian nobility and is hiding his status for some reason. | |||
==Chapter data== | ==Chapter data== | ||
| Line 27: | Line 27: | ||
|victory=Seize the castle gate | |victory=Seize the castle gate | ||
|defeat=[[Roy]] dies | |defeat=[[Roy]] dies | ||
|ally= | |ally=1–13{{h|+3|Upon Elffin, Geese, and Bartre being recruited}} | ||
|other=4{{h|+4|Reinforcements}}{{h| | |other=4{{h|+4|Reinforcements}}{{h|−2|Upon Geese and Bartre being recruited}} | ||
|enemy=24{{h|+21|Reinforcements}} | |enemy=24{{h|+21|Reinforcements}} | ||
|map=[[File:Cm fe06 11B.png]] | |map=[[File:Cm fe06 11B.png]] | ||
| Line 35: | Line 35: | ||
|victory=Seize the castle gate | |victory=Seize the castle gate | ||
|defeat=[[Roy]] dies | |defeat=[[Roy]] dies | ||
|ally= | |ally=1–13{{h|+3|Upon Elffin, Geese, and Bartre being recruited}} | ||
|other=4{{h|+4|Reinforcements}}{{h| | |other=4{{h|+4|Reinforcements}}{{h|−2|Upon Geese and Bartre being recruited}} | ||
|enemy=24{{h|+27|Reinforcements}} | |enemy=24{{h|+27|Reinforcements}} | ||
|map=[[File:Cm fe06 11B.png]] | |map=[[File:Cm fe06 11B.png]] | ||
| Line 49: | Line 49: | ||
|portrait=[[File:portrait elffin fe06.png]] | |portrait=[[File:portrait elffin fe06.png]] | ||
|class=Bard | |class=Bard | ||
|classarticle=Bard (Elibe) | |||
|HP=15 | |HP=15 | ||
|lv=1 | |lv=1 | ||
| Line 72: | Line 73: | ||
|recruitment method=NPC, talk to with [[Roy]] or [[Fir]] | |recruitment method=NPC, talk to with [[Roy]] or [[Fir]] | ||
}} | }} | ||
| | |forced1=roy | ||
| | |return1=marcus | ||
| | |return2=alen | ||
| | |return3=bors | ||
| | |return4=wolt | ||
| | |return5=lance | ||
| | |return5article=Lance (character) | ||
|return7= | |return6=merlinus | ||
|return8= | |return7=elen | ||
| | |return8=ward | ||
| | |return8article=Ward (character) | ||
| | |return9=lot | ||
| | |return10=dieck | ||
| | |return11=shanna | ||
| | |return12=chad | ||
| | |return13=lugh | ||
| | |return14=clarine | ||
| | |return15=rutger | ||
| | |return16=saul | ||
| | |return17=dorothy | ||
| | |return18=sue | ||
| | |return19=zelot | ||
| | |return20=trec | ||
| | |return21=noah | ||
| | |return22=astolfo | ||
| | |return23=lilina | ||
| | |return24=gwendolyn | ||
| | |return25=barthe | ||
| | |return26=ogier | ||
| | |return27=fir | ||
| | |return28=sin | ||
| | |return29=gonzalez | ||
| | |return30=klein | ||
|return31=thea | |||
}} | }} | ||
| Line 121: | Line 123: | ||
{{ChapShop GBA | {{ChapShop GBA | ||
|anima1=Fire | |anima1=Fire | ||
|ancost1=420 | |ancost1=420 | ||
|anima2=Thunder | |anima2=Thunder | ||
|ancost2=500 | |ancost2=500 | ||
|light1=Lightning | |light1=Lightning | ||
| Line 515: | Line 515: | ||
}} | }} | ||
{{ChapUnitCellGBA | {{ChapUnitCellGBA | ||
|name= | |name=Western Thief | ||
|class=Pirate | |class=Pirate | ||
|lv=7 | |lv=7 | ||
| Line 532: | Line 532: | ||
}} | }} | ||
{{ChapUnitCellGBA | {{ChapUnitCellGBA | ||
|name= | |name=Western Thief | ||
|class=Pirate | |class=Pirate | ||
|lv=7 | |lv=7 | ||
| Line 967: | Line 967: | ||
}} | }} | ||
{{ChapUnitCellGBA | {{ChapUnitCellGBA | ||
|name= | |name=Western Thief | ||
|class=Pirate | |class=Pirate | ||
|lv=7 | |lv=7 | ||
| Line 984: | Line 984: | ||
}} | }} | ||
{{ChapUnitCellGBA | {{ChapUnitCellGBA | ||
|name= | |name=Western Thief | ||
|class=Pirate | |class=Pirate | ||
|lv=7 | |lv=7 | ||
| Line 1,054: | Line 1,054: | ||
====Reinforcements==== | ====Reinforcements==== | ||
*Enemy phase of turn 4 | *Enemy phase of turn 4 | ||
**1 [[Druid]], 1 level 14 [[Fighter]], and 1 [[Shaman]] from east of the gate | **1 [[Druid]], 1 level 14 [[Fighter]], and 1 [[Shaman]] from east of the gate | ||
*Enemy phase of turns 5–7 | *Enemy phase of turns 5–7 | ||
**1 [[Pirate]] with a [[Steel Axe]] from the upper southwest fort | **1 [[Pirate]] with a [[Steel Axe]] from the upper southwest fort | ||
| Line 1,062: | Line 1,062: | ||
*Enemy phase of turns 13, 16, and 19, if [[Morgan (The Binding Blade)|Morgan]] is alive each turn | *Enemy phase of turns 13, 16, and 19, if [[Morgan (The Binding Blade)|Morgan]] is alive each turn | ||
**1 [[Archer]] and 1 [[Mercenary]] from around the gate | **1 [[Archer]] and 1 [[Mercenary]] from around the gate | ||
*Enemy phase of turns 12, 15, and 18, if [[Morgan (The Binding Blade)|Morgan]] is alive each turn | *(Hard Mode only) Enemy phase of turns 12, 15, and 18, if [[Morgan (The Binding Blade)|Morgan]] is alive each turn | ||
**1 [[Mercenary]] and 1 level 14 [[Fighter]] from around the gate | **1 [[Mercenary]] and 1 level 14 [[Fighter]] from around the gate | ||
===NPC data=== | ===NPC data=== | ||
| Line 1,214: | Line 1,214: | ||
==Strategy== | ==Strategy== | ||
{{sectstub}} | {{sectstub}} | ||
[[Geese]] will appear as a green unit on turn 5, and [[Bartre]], along with two fighters, will appear on turn 8. To recruit them, have [[Roy]] talk to Geese and either [[Fir]] or Roy speak to Bartre. Bartre's allies will stay as green units, but their survival is inconsequential as they offer no rewards. However, keeping the green NPC villagers alive is important. Also, be mindful not to waste Bartre's unique weapon, the [[Brave Axe]]. | |||
-- | This map is relatively straightforward. Deploy your [[Cavalier]]s and other fast-moving units. Equipping them with [[lance]]s and [[sword]]s should suffice, as the enemies here only wield [[axe]]s and swords. Divide your forces into two teams: send one along the upper road and the other along the lower one. The first team should clear the upper road of enemies to allow the villagers to escape safely. Strangely, the [[Ballista (weapon)|Ballista]] won't target these villagers. The second team should reach the village before [[Pirate]] reinforcements destroy it. | ||
Avoid deploying low-HP units, or if you must, keep them out of the Ballista's range. You can deplete the Ballista's ammunition by placing a high-HP unit within its range and using vulneraries to heal any damage sustained. This tactic is advised because your healers are vulnerable to ballista fire. Also, don't forget that [[Elphin]] can refresh your units, granting them extra movement during your turn. The only tricky aspect of this chapter is the enemy reinforcements near the boss. However, as long as you know their spawn locations and timings, you can prepare adequately to deal with them. | |||
==Etymology and other languages== | ==Etymology and other languages== | ||
{{Names | {{Names | ||
| Line 1,222: | Line 1,225: | ||
|eng-mean=Used in [[Unused content in Fire Emblem: The Blazing Blade#The Binding Blade data transfer leftovers|leftover text from the data transfer menu]] in the English version of {{FE7}}. | |eng-mean=Used in [[Unused content in Fire Emblem: The Blazing Blade#The Binding Blade data transfer leftovers|leftover text from the data transfer menu]] in the English version of {{FE7}}. | ||
|eng-fan-name=Flight Toward Freedom | |eng-fan-name=Flight Toward Freedom | ||
| | |jpn-name={{h|自由への脱出|Jiyū e no dasshutsu}} | ||
| | |jpn-mean=Escape to freedom | ||
}} | }} | ||
==Gallery== | ==Gallery== | ||
<gallery> | |||
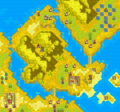
Cm fe06 11B.png|Map of the chapter | |||
</gallery> | |||
{{refbar}} | {{refbar}} | ||
Latest revision as of 03:06, 14 April 2024
| ||||||||||
|

| “ | More people escaped?! Where were the guards?! | ” | — Arcardo |
|---|
Flight Toward Freedom (Japanese: 自由への脱出 Escape to freedom) is Chapter 11B of Fire Emblem: The Binding Blade. In order to play this chapter, you must have visited the village which holds a Restore staff in Chapter 9 and thus headed west toward Caldonia.
Plot
- Main article:
Flight Toward Freedom/Script
Roy's forces arrive at Castle Eidyna on Caldonia, where workers are kept before being transported to the mines. Elffin has the castle infiltrated ahead of time, allowing several workers to escape, and the Lycian Army is to secure their safe retreat. Arcardo, who is at Eidyna, orders Morgan to chase down the runaway workers while himself returning to Juteaux, the capital of the Western Isles.
The battle begins, and during it, Geese joins the fray as Roy's ally, out for personal revenge over his ship crewmates being worked to death in the mines by the castle's lord. If Roy talks to him, Geese joins his army as a mercenary. After Geese, Bartre also arrives on the battlefield, with the intent of breaking out the castle's prisoners. If Fir, his daughter, talks to him, Bartre joins the Lycian Army in order to protect her. If Roy talks to him instead, he also joins the army, because said army is fighting Etruria.
After the battle ends, Roy's army heads to Juteaux, the heart of the corruption on the Western Isles, in order to liberate it from Etruria. Beforehand, however, Roy accurately guesses that Elffin is of high Etrurian nobility and is hiding his status for some reason.
Chapter data
Normal Hard
| ||||||
|
| |||||
| Victory: Seize the castle gate | Player | Other | Enemy | |||
|---|---|---|---|---|---|---|
| Defeat: Roy dies | 1–13+3 | 4+4−2 | 24+21 | |||
| ||||||
Character data
| Characters | |||||||||||||||||||||||||||||||||
|---|---|---|---|---|---|---|---|---|---|---|---|---|---|---|---|---|---|---|---|---|---|---|---|---|---|---|---|---|---|---|---|---|---|
New units
| |||||||||||||||||||||||||||||||||
| |||||||||||||||||||||||||||||||||
Required characters
| |||||||||||||||||||||||||||||||||
Available characters
| |||||||||||||||||||||||||||||||||


Item data
| ||||||||||||
|
Shop data
Swords Lances Axes Bows Anima Light Dark Staves Items Secret
None
Enemy data
- Stats with two figures separated by a ~ are presented as a range, representing stats that vary due to random growths. The figures to the left and right of the ~ are the stat's minimum and maximum possible values respectively.
Normal Hard
| ||||||||||||||||||||||||||||||||||||||||||||||||||||||||||||||||||||||||||||||||||||||||||||||||||||||||||||||||||||||||||||||||||||||||||||||||||||||||||||||||||||||||||||||||||||||||||||||||||||||||||||||||||||||||||||||||||||||||||||||||||||||||||||||||||||||||||||||||||||||||||||||||||||||||||||||||||||||||||||||||||||||||||||||||||||||||||||||||||||||||||||||||||||||||||||||||||||||||||||||||||||||||||||||||||||||||||||||||||||||||||||||||||||||||||||||||||||||||||||||||||||||||||||||||||||||||||||||||||||||||||||||||
| ||||||||||||||||||||||||||||||||||||||||||||||||||||||||||||||||||||||||||||||||||||||||||||||||||||||||||||||||||||||||||||||||||||||||||||||||||||||||||||||||||||||||||||||||||||||||||||||||||||||||||||||||||||||||||||||||||||||||||||||||||||||||||||||||||||||||||||||||||||||||||||||||||||||||||||||||||||||||||||||||||||||||||||||||||||||||||||||||||||||||||||||||||||||||||||||||||||||||||||||||||||||||||||||||||||||||||||||||||||||||||||||||||||||||||||||||||||||||||||||||||||||||||||||||||||||||||||||||||||||||||||||||
| ||||||||||||||||||||||||||||||||||||||||||||||||||||||||||||||||||||||||||||||||||||||||||||||||||||||||||||||||||||||||||||||||||||||||||||||||||||||||||||||||||||||||||||||||||||||||||||||||||||||||||||||||||||||||||||||||||||||||||||||||||||||||||||||||||||||||||||||||||||||||||||||||||||||||||||||||||||||||||||||||||||||||||||||||||||||||||||||||||||||||||||||||||||||||||||||||||||||||||||||||||||||||||||||||||||||||||||||||||||||||||||||||||||||||||||||||||||||||||||||||||||||||||||||||||||||||||||||||||||||||||||||||
| ||||||||||||||||||||||||||||||||||||||||||||||||||||||||||||||||||||||||||||||||||||||||||||||||||||||||||||||||||||||||||||||||||||||||||||||||||||||||||||||||||||||||||||||||||||||||||||||||||||||||||||||||||||||||||||||||||||||||||||||||||||||||||||||||||||||||||||||||||||||||||||||||||||||||||||||||||||||||||||||||||||||||||||||||||||||||||||||||||||||||||||||||||||||||||||||||||||||||||||||||||||||||||||||||||||||||||||||||||||||||||||||||||||||||||||||||||||||||||||||||||||||||||||||||||||||||||||||||||||||||||||||||
Reinforcements
- Enemy phase of turn 4
- Enemy phase of turns 5–7
- Enemy phase of turns 11, 14, and 17, if Morgan is alive each turn
- 2 Fighters—levels 15 and 14—from around the gate
- Enemy phase of turns 13, 16, and 19, if Morgan is alive each turn
- (Hard Mode only) Enemy phase of turns 12, 15, and 18, if Morgan is alive each turn
NPC data
- Stats with two figures separated by a ~ are presented as a range, representing stats that vary due to random growths. The figures to the left and right of the ~ are the stat's minimum and maximum possible values respectively.
| |||||||||||||||||||||||||||||||||||||||||||||||||||||||||||||||||||||||||||||||||||||||||||||||||||||||||||||||||||||||||||
| |||||||||||||||||||||||||||||||||||||||||||||||||||||||||||||||||||||||||||||||||||||||||||||||||||||||||||||||||||||||||||
| |||||||||||||||||||||||||||||||||||||||||||||||||||||||||||||||||||||||||||||||||||||||||||||||||||||||||||||||||||||||||||
| |||||||||||||||||||||||||||||||||||||||||||||||||||||||||||||||||||||||||||||||||||||||||||||||||||||||||||||||||||||||||||
Reinforcements
- Other phase of turn 5
- Geese from south of the village
- Other phase of turn 8
Boss data
- Main article:
Morgan - Stats with two figures separated by a ~ are presented as a range, representing stats that vary due to random growths. The figures to the left and right of the ~ are the stat's minimum and maximum possible values respectively.[1]
Normal Hard
|
|
| |||||||||||||||||||||||||||||||||||||||||||||||||

Strategy
This section has been marked as a stub. Please help improve the page by adding information.
Geese will appear as a green unit on turn 5, and Bartre, along with two fighters, will appear on turn 8. To recruit them, have Roy talk to Geese and either Fir or Roy speak to Bartre. Bartre's allies will stay as green units, but their survival is inconsequential as they offer no rewards. However, keeping the green NPC villagers alive is important. Also, be mindful not to waste Bartre's unique weapon, the Brave Axe.
This map is relatively straightforward. Deploy your Cavaliers and other fast-moving units. Equipping them with lances and swords should suffice, as the enemies here only wield axes and swords. Divide your forces into two teams: send one along the upper road and the other along the lower one. The first team should clear the upper road of enemies to allow the villagers to escape safely. Strangely, the Ballista won't target these villagers. The second team should reach the village before Pirate reinforcements destroy it.
Avoid deploying low-HP units, or if you must, keep them out of the Ballista's range. You can deplete the Ballista's ammunition by placing a high-HP unit within its range and using vulneraries to heal any damage sustained. This tactic is advised because your healers are vulnerable to ballista fire. Also, don't forget that Elphin can refresh your units, granting them extra movement during your turn. The only tricky aspect of this chapter is the enemy reinforcements near the boss. However, as long as you know their spawn locations and timings, you can prepare adequately to deal with them.
Etymology and other languages
| Names, etymology, and in other regions | ||
|---|---|---|
| Language | Name | Definition, etymology, and notes |
| English |
Escape to Freedom |
Used in leftover text from the data transfer menu in the English version of Fire Emblem: The Blazing Blade. |
| English (unofficial) |
Flight Toward Freedom |
-- |
| Japanese |
自由への脱出 |
Escape to freedom |
Gallery
Map of the chapter
References
- ↑ Flight Toward Freedom, triangleattack.com, Retrieved: December 24, 2020
| ← Amidst a Struggle • | Flight Toward Freedom | • The True Enemy → |
|---|