| Site News |
|---|
| Warning: This wiki contains spoilers. Read at your own risk! Social media: If you would like, please join our Discord server, and/or follow us on Twitter (X) or Tumblr! |
Fire Emblem (The Binding Blade chapter): Difference between revisions
Thecornerman (talk | contribs) m (→Plot) |
Thecornerman (talk | contribs) m (→Boss data) |
||
| (21 intermediate revisions by 8 users not shown) | |||
| Line 5: | Line 5: | ||
|location=[[Lycia]] | |location=[[Lycia]] | ||
|boss=[[Dory]] | |boss=[[Dory]] | ||
|previous=[[Crumbling League]] | |||
|next=[[Ensnared]] | |||
}} | }} | ||
| Line 13: | Line 15: | ||
==Plot== | ==Plot== | ||
{{main|/Script{{!}}Fire Emblem (''The Binding Blade'' chapter)/Script}} | {{main|/Script{{!}}Fire Emblem (''The Binding Blade'' chapter)/Script}} | ||
[[Roy]]'s forces reach a mountain pass that is infested by bandits under command of [[Dory]]. A local villager begs Roy to help, and even though [[Merlinus]] objects, Roy agrees to defeat the bandits. The battle then begins. | |||
At the start of the battle, in a nearby village, [[Dorothy]] searches for [[Saul]], who is busy womanizing. She eventually finds him and chastises him for his actions, then informs him that the Lycian Army is nearby. She also confirms that Princess [[Guinivere]] is with the army, and now knowing that, Saul wants to join Roy as quickly as possible. | |||
Once Roy defeats Dory, Saul requests an audience with him and Princess Guinivere. Roy accepts, and in the ensuing conversation, Saul asks Guinivere about the location of the [[Fire Emblem (item) | Fire Emblem]]. He explains that he was sent by the Elimine Church to investigate the Emblem's disappearance from the Shrine of Seals, and that he suspects Guinivere because she vanished at the same time. The princess admits she has the Emblem and that she stole it in order to stop his brother from invading, but it did not work. After Guinivere declares to Saul that she still wishes to end the war, Saul volunteers to join Roy's army, and Roy accepts him into the ranks. | |||
==Chapter data== | ==Chapter data== | ||
{{ChapData | {{Tab | ||
|tab1=Normal | |||
|tab2=Hard | |||
|content1={{ChapData | |||
|victory=Seize | |victory=Seize | ||
|defeat=[[Roy]] dies | |defeat=[[Roy]] dies | ||
|ally=16 | |ally=16 | ||
|enemy=23{{ | |enemy=23{{h|+8|Reinforcements}} | ||
|map=[[File:Cm fe06 5.png]] | |map=[[File:Cm fe06 5.png]] | ||
}} | |||
|content2={{ChapData | |||
|victory=Seize | |||
|defeat=[[Roy]] dies | |||
|ally=16 | |||
|enemy=23{{h|+32|Reinforcements}} | |||
|map=[[File:Cm fe06 5.png]] | |||
}} | |||
}} | }} | ||
Units are arranged based on their position in deployment order. If every unit is recruited and alive, the deployment order is: [[Roy]], [[Marcus]], [[Alen]], [[Bors]], [[Wolt]], [[Lance (character)|Lance]], [[Merlinus]], [[Elen]], [[Ward (character)|Ward]], [[Lot]], [[Dieck]], [[Shanna]], [[Chad]] [[Lugh]], [[Clarine]], and [[Rutger]]. | |||
When a unit makes any action on the tiles to the right of the southwest wall, the wall will open; on Hard Mode, reinforcements will appear as well. | |||
===Character data=== | ===Character data=== | ||
{{ChapChars | {{ChapChars | ||
|game#=06 | |game#=06 | ||
| | |forced1=roy | ||
|return1= | |return1=marcus | ||
|return2= | |return2=alen | ||
|return3= | |return3=bors | ||
|return4=lance | |return4=wolt | ||
| | |return5=lance | ||
| | |return5article=Lance (character) | ||
| | |return6=merlinus | ||
| | |return7=elen | ||
| | |return8=ward | ||
|return9= | |return8article=Ward (character) | ||
|return10= | |return9=lot | ||
|return11= | |return10=dieck | ||
|return12= | |return11=shanna | ||
|return13= | |return12=chad | ||
|return14= | |return13=lugh | ||
|return15 | |return14=clarine | ||
|return15=rutger | |||
}} | }} | ||
| Line 75: | Line 75: | ||
}} | }} | ||
===Shop data=== | ===Shop data=== | ||
{{ChapShop GBA | |||
|anima1=Fire | |||
|ancost1=560 | |||
|staff1=Heal | |||
|stcost1=600 | |||
|item1=Vulnerary | |||
|itcost1=300 | |||
|item2=Door Key | |||
|itcost2=50 | |||
}} | |||
===Enemy data=== | ===Enemy data=== | ||
{{ | :''Stats with two figures separated by a ~ are presented as a range, representing stats that vary due to random growths. The figures to the left and right of the ~ are the stat's minimum and maximum possible values respectively.'' | ||
|platform=gba | {{Tab | ||
| | |width=100% | ||
| | |tab1=Normal | ||
| | |tab2=Hard | ||
|#1=1 | |content1={{ChapUnitHdr|type=Enemy|platform=gba}} | ||
| | {{ChapUnitCellGBA | ||
|name=[[Dory]] | |||
| | |class=Brigand | ||
| | |lv=11 | ||
| | |#=1 | ||
|#2=1 | |hp=30 | ||
| | |str=13 | ||
| | |skill=4 | ||
| | |spd=8 | ||
| | |lck=2 | ||
| | |def=7 | ||
|#3=3 | |res=1 | ||
| | |con=11 | ||
|mov=5 | |||
| | |inventory={{Item|6|Killer Axe}} • {{Item|6|Hand Axe}} | ||
| | |notes=Does not move; stands on the [[Terrain/Game Boy Advance games#Fire Emblem: The Binding Blade|throne]], the chapter's seize point. | ||
| | }} | ||
|#4=3 | {{ChapUnitCellGBA | ||
| | |name=Bandit | ||
| | |class=Fighter | ||
| | |lv=4 | ||
| | |#=1 | ||
| | |hp=22~23 | ||
| | |str=6~7 | ||
| | |skill=2~4 | ||
| | |spd=4~6 | ||
| | |lck=0~1 | ||
| | |def=2~3 | ||
| | |res=0~1 | ||
|# | |con=11 | ||
| | |mov=5 | ||
| | |inventory={{Item|6|Iron Axe}} | ||
| | }} | ||
| | {{ChapUnitCellGBA | ||
| | |name=Bandit | ||
| | |class=Fighter | ||
| | |lv=4 | ||
|#=1 | |||
| | |hp=22~23 | ||
| | |str=6~7 | ||
| | |skill=2~4 | ||
| | |spd=4~6 | ||
| | |lck=0~1 | ||
| | |def=2~3 | ||
| | |res=0~1 | ||
| | |con=11 | ||
| | |mov=5 | ||
| | |inventory={{Item|6|Hand Axe}} | ||
| | |notes=Moves to attack units in range. | ||
| | }} | ||
| | {{ChapUnitCellGBA | ||
| | |name=Bandit | ||
| | |class=Fighter | ||
|# | |lv=5 | ||
| | |#=3 | ||
| | |hp=22~24 | ||
| | |str=6~8 | ||
| | |skill=3~4 | ||
| | |spd=5~6 | ||
|# | |lck=0~1 | ||
| | |def=2~3 | ||
| | |res=0~1 | ||
| | |con=11 | ||
| | |mov=5 | ||
| | |inventory={{Item|6|Steel Axe}} | ||
|#12=1 | }} | ||
| | {{ChapUnitCellGBA | ||
| | |name=Bandit | ||
| | |class=Fighter | ||
| | |lv=5 | ||
| | |#=3 | ||
| | |hp=22~24 | ||
| | |str=6~8 | ||
| | |skill=3~4 | ||
| | |spd=5~6 | ||
| | |lck=0~1 | ||
|# | |def=2~3 | ||
| | |res=0~1 | ||
| | |con=11 | ||
| | |mov=5 | ||
| | |inventory={{Item|6|Iron Axe}} • {{Item|6|Hand Axe}} | ||
| | |notes=The southernmost one moves to attack units in range. | ||
|# | }} | ||
| | {{ChapUnitCellGBA | ||
|name=Bandit | |||
|class=Mercenary | |||
|lv=3 | |||
|#=2 | |||
|hp=19~20 | |||
|str=4~5 | |||
|skill=8~9 | |||
|spd=8~9 | |||
|lck=0~1 | |||
|def=4~5 | |||
|res=0~1 | |||
|con=9 | |||
|mov=5 | |||
|inventory={{Item|6|Iron Sword}} | |||
|notes=Begins moving unprovoked when he can attack a unit within two turns. | |||
}} | |||
{{ChapUnitCellGBA | |||
|name=Bandit | |||
|class=Brigand | |||
|lv=6 | |||
|#=4 | |||
|hp=23~25 | |||
|str=7~8 | |||
|skill=2~3 | |||
|spd=5~7 | |||
|lck=0~1 | |||
|def=3~4 | |||
|res=0~1 | |||
|con=12 | |||
|mov=5 | |||
|inventory={{Item|6|Hand Axe}} | |||
|notes=The two left or right of [[Dory]] move to attack units in range. | |||
}} | |||
{{ChapUnitCellGBA | |||
|name=Bandit | |||
|class=Mercenary | |||
|lv=2 | |||
|#=1 | |||
|hp=18~19 | |||
|str=4~5 | |||
|skill=8~9 | |||
|spd=8~9 | |||
|lck=0~1 | |||
|def=4~5 | |||
|res=0~1 | |||
|con=9 | |||
|mov=5 | |||
|inventory={{Item|6|Iron Sword}} | |||
}} | |||
{{ChapUnitCellGBA | |||
|name=Bandit | |||
|class=Mercenary | |||
|lv=4 | |||
|#=2 | |||
|hp=20~21 | |||
|str=5~6 | |||
|skill=9~10 | |||
|spd=8~10 | |||
|lck=0~2 | |||
|def=4~5 | |||
|res=0~1 | |||
|con=9 | |||
|mov=5 | |||
|inventory={{Item|6|Steel Sword}} | |||
|notes=• The northern one does not move, except to heal.<br>• The southern one begins moving unprovoked when he can attack a unit within two turns. | |||
}} | |||
{{ChapUnitCellGBA | |||
|name=Bandit | |||
|class=Mercenary | |||
|lv=5 | |||
|#=1 | |||
|hp=20~22 | |||
|str=5~6 | |||
|skill=9~10 | |||
|spd=9~10 | |||
|lck=1~2 | |||
|def=4~5 | |||
|res=0~1 | |||
|con=9 | |||
|mov=5 | |||
|inventory={{Item|6|Steel Blade}} | |||
|notes=Begins moving unprovoked when he can attack a unit within two turns. | |||
}} | |||
{{ChapUnitCellGBA | |||
|name=Bandit | |||
|class=Nomad | |||
|lv=3 | |||
|#=2 | |||
|hp=17~18 | |||
|str=5~6 | |||
|skill=4~5 | |||
|spd=5~7 | |||
|lck=0~1 | |||
|def=4~5 | |||
|res=0~1 | |||
|con=7 | |||
|mov=7 | |||
|inventory={{Item|6|Iron Bow}} | |||
|notes=The east one moves to attack units in range. | |||
}} | |||
{{ChapUnitCellGBA | |||
|name=Bandit | |||
|class=Nomad | |||
|lv=4 | |||
|#=1 | |||
|hp=17~19 | |||
|str=5~7 | |||
|skill=5~6 | |||
|spd=6~7 | |||
|lck=0~2 | |||
|def=4~5 | |||
|res=0~1 | |||
|con=7 | |||
|mov=7 | |||
|inventory={{Item|6|Steel Bow}} | |||
}} | |||
{{ChapUnitCellGBA | |||
|name=Bandit | |||
|class=Mage | |||
|lv=5 | |||
|#=1 | |||
|hp=17~19 | |||
|str=2~4 | |||
|skill=3~4 | |||
|spd=4~5 | |||
|lck=0~1 | |||
|def=3~4 | |||
|res=4~5 | |||
|con=6 | |||
|mov=5 | |||
|inventory={{Item|6|Fire}} | |||
|notes=Begins moving unprovoked when he can attack a unit within two turns. | |||
|last=y | |||
}} | |||
{{ChapUnitReinf|type=Enemy|platform=gba}} | |||
{{ChapUnitCellGBA | |||
|name=Bandit | |||
|class=Brigand | |||
|lv=5 | |||
|#=4 | |||
|hp=22~24 | |||
|str=6~8 | |||
|skill=2~3 | |||
|spd=5~6 | |||
|lck=0~1 | |||
|def=3~4 | |||
|res=0~1 | |||
|con=12 | |||
|mov=5 | |||
|inventory={{Item|6|Hand Axe}} • {{Item|6|Iron Axe}} | |||
|notes=Moves to raid the [[village]], then moves to attack units unprovoked. | |||
}} | |||
{{ChapUnitCellGBA | |||
|name=Bandit | |||
|class=Brigand | |||
|lv=6 | |||
|#=4 | |||
|hp=23~25 | |||
|str=7~8 | |||
|skill=2~3 | |||
|spd=5~7 | |||
|lck=0~1 | |||
|def=3~4 | |||
|res=0~1 | |||
|con=12 | |||
|mov=5 | |||
|inventory={{Item|6|Steel Axe}} | |||
|notes=Moves to raid the [[village]], then moves to attack units unprovoked. | |||
|last=y | |||
}} | |||
{{ChapUnitFtr}} | |||
|content2={{ChapUnitHdr|type=Enemy|platform=gba}} | |||
{{ChapUnitCellGBA | |||
|name=[[Dory]] | |||
|class=Brigand | |||
|lv=11 | |||
|#=1 | |||
|hp=38~42 | |||
|str=17~20 | |||
|skill=6~10 | |||
|spd=10~12 | |||
|lck=2~6 | |||
|def=7~9 | |||
|res=1~3 | |||
|con=12 | |||
|mov=5 | |||
|inventory={{Item|6|Killer Axe}} • {{Item|6|Hand Axe}} | |||
|notes=Does not move; stands on the [[Terrain/Game Boy Advance games#Fire Emblem: The Binding Blade|throne]], the chapter's seize point. | |||
}} | |||
{{ChapUnitCellGBA | |||
|name=Bandit | |||
|class=Fighter | |||
|lv=4 | |||
|#=1 | |||
|hp=30~35 | |||
|str=10~15 | |||
|skill=4~10 | |||
|spd=6~12 | |||
|lck=0~5 | |||
|def=2~7 | |||
|res=0~3 | |||
|con=11 | |||
|mov=5 | |||
|inventory={{Item|6|Iron Axe}} | |||
}} | |||
{{ChapUnitCellGBA | |||
|name=Bandit | |||
|class=Fighter | |||
|lv=4 | |||
|#=1 | |||
|hp=30~35 | |||
|str=10~15 | |||
|skill=4~10 | |||
|spd=6~12 | |||
|lck=0~5 | |||
|def=2~7 | |||
|res=0~3 | |||
|con=11 | |||
|mov=5 | |||
|inventory={{Item|6|Hand Axe}} | |||
|notes=Moves to attack units in range. | |||
}} | |||
{{ChapUnitCellGBA | |||
|name=Bandit | |||
|class=Fighter | |||
|lv=5 | |||
|#=3 | |||
|hp=30~36 | |||
|str=10~16 | |||
|skill=5~10 | |||
|spd=7~12 | |||
|lck=0~5 | |||
|def=2~7 | |||
|res=0~3 | |||
|con=11 | |||
|mov=5 | |||
|inventory={{Item|6|Steel Axe}} | |||
}} | |||
{{ChapUnitCellGBA | |||
|name=Bandit | |||
|class=Fighter | |||
|lv=5 | |||
|#=3 | |||
|hp=30~36 | |||
|str=10~16 | |||
|skill=5~10 | |||
|spd=7~12 | |||
|lck=0~5 | |||
|def=2~7 | |||
|res=0~3 | |||
|con=11 | |||
|mov=5 | |||
|inventory={{Item|6|Iron Axe}} • {{Item|6|Hand Axe}} | |||
|notes=The southernmost one moves to attack units in range. | |||
}} | |||
{{ChapUnitCellGBA | |||
|name=Bandit | |||
|class=Mercenary | |||
|lv=3 | |||
|#=2 | |||
|hp=27~32 | |||
|str=8~11 | |||
|skill=12~15 | |||
|spd=10~15 | |||
|lck=2~7 | |||
|def=4~9 | |||
|res=0~5 | |||
|con=9 | |||
|mov=5 | |||
|inventory={{Item|6|Iron Sword}} | |||
|notes=Begins moving unprovoked when he can attack a unit within two turns. | |||
}} | |||
{{ChapUnitCellGBA | |||
|name=Bandit | |||
|class=Brigand | |||
|lv=6 | |||
|#=4 | |||
|hp=31~37 | |||
|str=11~16 | |||
|skill=4~9 | |||
|spd=7~11 | |||
|lck=0~5 | |||
|def=3~6 | |||
|res=0~3 | |||
|con=12 | |||
|mov=5 | |||
|inventory={{Item|6|Hand Axe}} | |||
|notes=The two left or right of [[Dory]] move to attack units in range. | |||
}} | |||
{{ChapUnitCellGBA | |||
|name=Bandit | |||
|class=Mercenary | |||
|lv=2 | |||
|#=1 | |||
|hp=26~31 | |||
|str=8~11 | |||
|skill=12~15 | |||
|spd=10~15 | |||
|lck=2~7 | |||
|def=4~9 | |||
|res=0~5 | |||
|con=9 | |||
|mov=5 | |||
|inventory={{Item|6|Iron Sword}} | |||
}} | |||
{{ChapUnitCellGBA | |||
|name=Bandit | |||
|class=Mercenary | |||
|lv=4 | |||
|#=2 | |||
|hp=28~33 | |||
|str=9~12 | |||
|skill=13~16 | |||
|spd=10~16 | |||
|lck=2~8 | |||
|def=4~9 | |||
|res=0~5 | |||
|con=9 | |||
|mov=5 | |||
|inventory={{Item|6|Steel Sword}} | |||
|notes=• The northern one does not move, except to heal.<br>• The southern one begins moving unprovoked when he can attack a unit within two turns. | |||
}} | |||
{{ChapUnitCellGBA | |||
|name=Bandit | |||
|class=Mercenary | |||
|lv=5 | |||
|#=1 | |||
|hp=28~34 | |||
|str=9~12 | |||
|skill=13~16 | |||
|spd=11~16 | |||
|lck=3~8 | |||
|def=4~9 | |||
|res=0~5 | |||
|con=9 | |||
|mov=5 | |||
|inventory={{Item|6|Steel Blade}} | |||
|notes=Begins moving unprovoked when he can attack a unit within two turns. | |||
}} | |||
{{ChapUnitCellGBA | |||
|name=Bandit | |||
|class=Nomad | |||
|lv=3 | |||
|#=2 | |||
|hp=23~28 | |||
|str=7~12 | |||
|skill=8~11 | |||
|spd=9~15 | |||
|lck=2~7 | |||
|def=4~7 | |||
|res=0~5 | |||
|con=7 | |||
|mov=7 | |||
|inventory={{Item|6|Iron Bow}} | |||
|notes=The east one moves to attack units in range. | |||
}} | |||
{{ChapUnitCellGBA | |||
|name=Bandit | |||
|class=Nomad | |||
|lv=4 | |||
|#=1 | |||
|hp=23~29 | |||
|str=7~13 | |||
|skill=9~12 | |||
|spd=10~15 | |||
|lck=2~8 | |||
|def=4~7 | |||
|res=0~5 | |||
|con=7 | |||
|mov=7 | |||
|inventory={{Item|6|Steel Bow}} | |||
}} | |||
{{ChapUnitCellGBA | |||
|name=Bandit | |||
|class=Mage | |||
|lv=5 | |||
|#=1 | |||
|hp=21~27 | |||
|str=6~12 | |||
|skill=7~10 | |||
|spd=6~11 | |||
|lck=2~5 | |||
|def=3~6 | |||
|res=6~11 | |||
|con=6 | |||
|mov=5 | |||
|inventory={{Item|6|Fire}} | |||
|notes=Begins moving unprovoked when he can attack a unit within two turns. | |||
|last=y | |||
}} | |||
{{ChapUnitReinf|type=Enemy|platform=gba}} | |||
{{ChapUnitCellGBA | |||
|name=Bandit | |||
|class=Brigand | |||
|lv=5 | |||
|#=13 | |||
|hp=26~30 | |||
|str=8~12 | |||
|skill=3~6 | |||
|spd=6~8 | |||
|lck=0~3 | |||
|def=3~5 | |||
|res=0~2 | |||
|con=12 | |||
|mov=5 | |||
|inventory={{Item|6|Hand Axe}} • {{Item|6|Iron Axe}} | |||
|notes=Moves to raid the [[village]], then moves to attack units unprovoked. | |||
}} | |||
{{ChapUnitCellGBA | |||
|name=Bandit | |||
|class=Brigand | |||
|lv=6 | |||
|#=13 | |||
|hp=27~31 | |||
|str=9~12 | |||
|skill=3~6 | |||
|spd=6~9 | |||
|lck=0~3 | |||
|def=3~5 | |||
|res=0~2 | |||
|con=12 | |||
|mov=5 | |||
|inventory={{Item|6|Steel Axe}} | |||
|notes=Moves to raid the [[village]], then moves to attack units unprovoked. | |||
}} | |||
{{ChapUnitCellGBA | |||
|name=Bandit | |||
|class=Mercenary | |||
|lv=4 | |||
|#=2 | |||
|hp=24~27 | |||
|str=7~9 | |||
|skill=11~13 | |||
|spd=9~13 | |||
|lck=1~5 | |||
|def=4~7 | |||
|res=0~3 | |||
|con=9 | |||
|mov=5 | |||
|inventory={{Item|6|Steel Sword}} | |||
}} | |||
{{ChapUnitCellGBA | |||
|name=Bandit | |||
|class=Nomad | |||
|lv=3 | |||
|#=1 | |||
|hp=20~23 | |||
|str=6~9 | |||
|skill=6~8 | |||
|spd=7~11 | |||
|lck=1~4 | |||
|def=4~6 | |||
|res=0~3 | |||
|con=7 | |||
|mov=7 | |||
|inventory={{Item|6|Iron Bow}} | |||
}} | |||
{{ChapUnitCellGBA | |||
|name=Bandit | |||
|class=Nomad | |||
|lv=4 | |||
|#=1 | |||
|hp=20~24 | |||
|str=6~10 | |||
|skill=7~9 | |||
|spd=8~11 | |||
|lck=1~5 | |||
|def=4~6 | |||
|res=0~3 | |||
|con=7 | |||
|mov=7 | |||
|inventory={{Item|6|Steel Bow}} | |||
|last=y | |||
}} | |||
{{ChapUnitFtr}} | |||
}} | }} | ||
====Reinforcements==== | |||
*Enemy phase turns 12 – 15 <small>(Normal Mode)</small>/18 <small>(Hard Mode)</small> | |||
**2 [[Brigand]]s—one with an [[Iron Axe]] and [[Hand Axe]], one with a [[Steel Axe]]—from the western two forts | |||
*Enemy phase turns 15–20 (Hard Mode only) | |||
**2 [[Brigand]]s—one with an [[Iron Axe]] and [[Hand Axe]], one with a [[Steel Axe]]—from the eastern two forts | |||
*Upon a unit acting to the right of the southwest wall (Hard Mode only) | |||
**2 [[Mercenary|Mercenaries]] and 2 [[Nomad]]s—one with an [[Iron Bow]], one with a [[Steel Bow]]—from west of the wall; and the wall opens | |||
===Boss data=== | ===Boss data=== | ||
{{Main|Dory}} | {{Main|Dory}} | ||
:''Stats with two figures separated by a ~ are presented as a range, representing stats that vary due to random growths. The figures to the left and right of the ~ are the stat's minimum and maximum possible values respectively.''<ref>https://fe6.triangleattack.com/chapters/fire_emblem</ref> | :''Stats with two figures separated by a ~ are presented as a range, representing stats that vary due to random growths. The figures to the left and right of the ~ are the stat's minimum and maximum possible values respectively.''<ref>{{cite web|url=https://fe6.triangleattack.com/chapters/fire_emblem|title=Fire Emblem|site=triangleattack.com|retrieved=December 24, 2020}}</ref> | ||
{{Tab | {{Tab | ||
|tab1=Normal | |tab1=Normal | ||
| Line 225: | Line 694: | ||
|lv=11 | |lv=11 | ||
|HP=38~42 | |HP=38~42 | ||
|str= | |str=17~20 | ||
|skill= | |skill=6~10 | ||
|spd=10~ | |spd=10~12 | ||
|luck= | |luck=2~6 | ||
|def= | |def=7~9 | ||
|res= | |res=1~3 | ||
|move=5 | |move=5 | ||
|con=12 | |con=12 | ||
| Line 241: | Line 710: | ||
==Strategy== | ==Strategy== | ||
{{Strategy}} | {{Strategy}} | ||
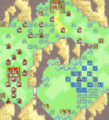
This time, the player is presented with two routes to the castle gate. The first and shortest path is to put [[Roy]] near the eastern gate, and villagers will open it. However, the player should try to deal with the surrounding enemies as fast as possible, so the bandits in the northern side of the map do not have enough time to reach the army. Since this can be somewhat difficult to achieve, the player should put some sturdy units on both sides of the castle and create a barrier. | This time, the player is presented with two routes to the castle gate. The first and shortest path is to put [[Roy]] near the eastern gate, and villagers will open it. However, the player should try to deal with the surrounding enemies as fast as possible, so the bandits in the northern side of the map do not have enough time to reach the army. Since this can be somewhat difficult to achieve, the player should put some sturdy units on both sides of the castle and create a barrier. | ||
The other way is to go north. If the player chooses this route, they should try to reach the forts near their party before the enemies do it. Once the first enemies have been dealt with, the player can take advantage of the forests to gain avoid points. Between turns 12 and 15, two bandits will appear from the forts in the upper left corner of the map per turn. They do not represent a real challenge. | The other way is to go north. If the player chooses this route, they should try to reach the forts near their party before the enemies do it. Once the first enemies have been dealt with, the player can take advantage of the forests to gain avoid points. Between turns 12 and 15, two bandits will appear from the forts in the upper left corner of the map per turn. They do not represent a real challenge. | ||
The only [[village]] in the map gives [[Gant's Lance]], which is a weaker version of a [[Silver Lance]], but with more uses and lower rank. It is also recommended to buy some [[Door Key|door key]]s in the [[ | The only [[village]] in the map gives [[Gant's Lance]], which is a weaker version of a [[Silver Lance]], but with more uses and lower rank. It is also recommended to buy some [[Door Key|door key]]s in the [[vendor]]; this will save time in the [[Ensnared|next chapter]]. | ||
The boss, [[Dory]], can pose a danger to the player's party, due to his [[Killer Axe]] giving him a high critical rate. It is recommended to force him to equip his [[Hand Axe]] by putting a unit two spaces away. The player can then attack him with sword users without too much worry. Once the boss has been defeated, [[Roy]] can seize the castle and the chapter will end. | The boss, [[Dory]], can pose a danger to the player's party, due to his [[Killer Axe]] giving him a high critical rate. It is recommended to force him to equip his [[Hand Axe]] by putting a unit two spaces away. The player can then attack him with sword users without too much worry. Once the boss has been defeated, [[Roy]] can seize the castle and the chapter will end. | ||
| Line 252: | Line 721: | ||
--> | --> | ||
==Etymology and other languages== | ==Etymology and other languages== | ||
{{Names | {{Names | ||
|eng-name=Flame Crest | |eng-name=Flame Crest | ||
| Line 258: | Line 727: | ||
|eng-fan-name=Fire Emblem | |eng-fan-name=Fire Emblem | ||
|eng-fan-mean=-- | |eng-fan-mean=-- | ||
| | |jpn-name={{hover|炎の紋章|Honō no monshō}} | ||
| | |jpn-mean=Fire Emblem | ||
}} | }} | ||
==Gallery== | ==Gallery== | ||
<gallery> | |||
Cm fe06 5.png|Map of the chapter | |||
</gallery> | |||
{{refbar}} | {{refbar}} | ||
| Line 274: | Line 745: | ||
{{Nav6}} | {{Nav6}} | ||
{{DEFAULTSORT:Fire Emblem (Binding Blade chapter)}} | |||
[[Category:Chapters of Fire Emblem: The Binding Blade]] | [[Category:Chapters of Fire Emblem: The Binding Blade]] | ||
Latest revision as of 20:45, 1 March 2024
| ||||||||
|

| “ | Merlinus! We're going to the castle to drive off the bandits! | ” | — Roy to Merlinus |
|---|
Fire Emblem (Japanese: 炎の紋章 Fire Emblem) is the fifth chapter of Fire Emblem: The Binding Blade. As the remains of the Lycian League Army travel to Ostia, terrified villagers ask them to stop the bandits looting the nearby villages.
Plot
- Main article:
Fire Emblem (The Binding Blade chapter)/Script
Roy's forces reach a mountain pass that is infested by bandits under command of Dory. A local villager begs Roy to help, and even though Merlinus objects, Roy agrees to defeat the bandits. The battle then begins.
At the start of the battle, in a nearby village, Dorothy searches for Saul, who is busy womanizing. She eventually finds him and chastises him for his actions, then informs him that the Lycian Army is nearby. She also confirms that Princess Guinivere is with the army, and now knowing that, Saul wants to join Roy as quickly as possible.
Once Roy defeats Dory, Saul requests an audience with him and Princess Guinivere. Roy accepts, and in the ensuing conversation, Saul asks Guinivere about the location of the Fire Emblem. He explains that he was sent by the Elimine Church to investigate the Emblem's disappearance from the Shrine of Seals, and that he suspects Guinivere because she vanished at the same time. The princess admits she has the Emblem and that she stole it in order to stop his brother from invading, but it did not work. After Guinivere declares to Saul that she still wishes to end the war, Saul volunteers to join Roy's army, and Roy accepts him into the ranks.
Chapter data
Normal Hard
| ||||||
|
| |||||
| Victory: Seize | Player | Enemy | ||||
|---|---|---|---|---|---|---|
| Defeat: Roy dies | 16 | 23+8 | ||||
| ||||||
Units are arranged based on their position in deployment order. If every unit is recruited and alive, the deployment order is: Roy, Marcus, Alen, Bors, Wolt, Lance, Merlinus, Elen, Ward, Lot, Dieck, Shanna, Chad Lugh, Clarine, and Rutger.
When a unit makes any action on the tiles to the right of the southwest wall, the wall will open; on Hard Mode, reinforcements will appear as well.
Character data
| Characters | |
|---|---|
New units
| |
| |
Required characters
| |
Available characters
| |
Item data
| ||||||
|
Shop data
Swords Lances Axes Bows Anima Light Dark Staves Items Secret
None
Enemy data
- Stats with two figures separated by a ~ are presented as a range, representing stats that vary due to random growths. The figures to the left and right of the ~ are the stat's minimum and maximum possible values respectively.
Normal Hard
| ||||||||||||||||||||||||||||||||||||||||||||||||||||||||||||||||||||||||||||||||||||||||||||||||||||||||||||||||||||||||||||||||||||||||||||||||||||||||||||||||||||||||||||||||||||||||||||||||||||||||||||||||||||||||||||||||||||||||||||||||||||||||||||||||||||||||||||||||||||||||||||||||||||||||||||||||||||||||||||||||||||||||||||||||||||||||||||||||||||||||||||||
| ||||||||||||||||||||||||||||||||||||||||||||||||||||||||||||||||||||||||||||||||||||||||||||||||||||||||||||||||||||||||||||||||||||||||||||||||||||||||||||||||||||||||||||||||||||||||||||||||||||||||||||||||||||||||||||||||||||||||||||||||||||||||||||||||||||||||||||||||||||||||||||||||||||||||||||||||||||||||||||||||||||||||||||||||||||||||||||||||||||||||||||||
| ||||||||||||||||||||||||||||||||||||||||||||||||||||||||||||||||||||||||||||||||||||||||||||||||||||||||||||||||||||||||||||||||||||||||||||||||||||||||||||||||||||||||||||||||||||||||||||||||||||||||||||||||||||||||||||||||||||||||||||||||||||||||||||||||||||||||||||||||||||||||||||||||||||||||||||||||||||||||||||||||||||||||||||||||||||||||||||||||||||||||||||||
| ||||||||||||||||||||||||||||||||||||||||||||||||||||||||||||||||||||||||||||||||||||||||||||||||||||||||||||||||||||||||||||||||||||||||||||||||||||||||||||||||||||||||||||||||||||||||||||||||||||||||||||||||||||||||||||||||||||||||||||||||||||||||||||||||||||||||||||||||||||||||||||||||||||||||||||||||||||||||||||||||||||||||||||||||||||||||||||||||||||||||||||||
Reinforcements
- Enemy phase turns 12 – 15 (Normal Mode)/18 (Hard Mode)
- Enemy phase turns 15–20 (Hard Mode only)
- Upon a unit acting to the right of the southwest wall (Hard Mode only)
- 2 Mercenaries and 2 Nomads—one with an Iron Bow, one with a Steel Bow—from west of the wall; and the wall opens
Boss data
- Main article:
Dory - Stats with two figures separated by a ~ are presented as a range, representing stats that vary due to random growths. The figures to the left and right of the ~ are the stat's minimum and maximum possible values respectively.[1]
Normal Hard
|
|
| |||||||||||||||||||||||||||||||||||||||||||||||||

Strategy
| This section details unofficial strategies that may help with completion of the chapter. This may not work for everybody. |
This time, the player is presented with two routes to the castle gate. The first and shortest path is to put Roy near the eastern gate, and villagers will open it. However, the player should try to deal with the surrounding enemies as fast as possible, so the bandits in the northern side of the map do not have enough time to reach the army. Since this can be somewhat difficult to achieve, the player should put some sturdy units on both sides of the castle and create a barrier.
The other way is to go north. If the player chooses this route, they should try to reach the forts near their party before the enemies do it. Once the first enemies have been dealt with, the player can take advantage of the forests to gain avoid points. Between turns 12 and 15, two bandits will appear from the forts in the upper left corner of the map per turn. They do not represent a real challenge.
The only village in the map gives Gant's Lance, which is a weaker version of a Silver Lance, but with more uses and lower rank. It is also recommended to buy some door keys in the vendor; this will save time in the next chapter.
The boss, Dory, can pose a danger to the player's party, due to his Killer Axe giving him a high critical rate. It is recommended to force him to equip his Hand Axe by putting a unit two spaces away. The player can then attack him with sword users without too much worry. Once the boss has been defeated, Roy can seize the castle and the chapter will end.
Etymology and other languages
| Names, etymology, and in other regions | ||
|---|---|---|
| Language | Name | Definition, etymology, and notes |
| English |
Flame Crest |
Used in leftover text from the data transfer menu in the English version of Fire Emblem: The Blazing Blade. |
| English (unofficial) |
Fire Emblem |
-- |
| Japanese |
炎の紋章 |
Fire Emblem |
Gallery
Map of the chapter
References
- ↑ Fire Emblem, triangleattack.com, Retrieved: December 24, 2020
| ← Crumbling League • | Fire Emblem | • Ensnared → |
|---|