| Site News |
|---|
| Warning: This wiki contains spoilers. Read at your own risk! Social media: If you would like, please join our Discord server, and/or follow us on Twitter (X) or Tumblr! |
Ensnared: Difference between revisions
Thecornerman (talk | contribs) m (Text replacement - "\[\[[Dd]ark \(magic\)\|([Dd]ark)\]\]" to "$1") |
Thecornerman (talk | contribs) m (Text replacement - "\[\[[Aa]nima \(magic\)\|([Aa]nima magic)\]\]" to "$1") |
||
| Line 1,272: | Line 1,272: | ||
If the player choose the middle way, they should put their sturdiest units in the front, as the enemies will attack en masse. After they have been dealt with, the chapter becomes quite easy. The other enemies can be picked one by one; the [[mage]]s in the boss' room will not move until someone is in their range of attack, while the [[knight]]s will not attack until the characters are one or two squares near them. | If the player choose the middle way, they should put their sturdiest units in the front, as the enemies will attack en masse. After they have been dealt with, the chapter becomes quite easy. The other enemies can be picked one by one; the [[mage]]s in the boss' room will not move until someone is in their range of attack, while the [[knight]]s will not attack until the characters are one or two squares near them. | ||
The boss, [[Wagner]], is a [[shaman]], which means danger for almost all units. As a [[shaman]], he wields [[dark]] [[tome]]s, which are the most inaccurate but the most powerful spells in the magic area. Also, [[Dark (magic)|dark magic]] has an advantage against [[ | The boss, [[Wagner]], is a [[shaman]], which means danger for almost all units. As a [[shaman]], he wields [[dark]] [[tome]]s, which are the most inaccurate but the most powerful spells in the magic area. Also, [[Dark (magic)|dark magic]] has an advantage against [[anima magic]]; because of this, [[Lugh]] is not recommended. The player should use their fastest and most accurate units to take [[Wagner]] down, as he is quite fast for a low-leveled [[shaman]]. Once the boss is defeated, [[Roy]] can seize the throne and the chapter will end. | ||
<!-- | <!-- | ||
==Trivia== | ==Trivia== | ||
Revision as of 15:42, 29 August 2023
| ||||||||||
|

| “ | You leave me no choice then! Guards! Attack! Kill them all, but leave Princess Guinevere alive! | ” | — Wagner |
|---|
Ensnared (Japanese: しかけられた罠 A Set Trap) is the sixth chapter in Fire Emblem: The Binding Blade. Roy and his army stop in Castle Thria to rest, where they are attacked by Marquess Thria's advisor.
Plot
- Main article:
Ensnared/Script
Roy's forces reach Thria, southeast of Ostia, a territory governed by Lord Orun, Hector's cousin. However, they do not get to meet Lord Orun – instead, they meet his advisor, Wagner, who welcomes them into the castle, but tells them that Lord Orun is too ill to receive his guests. Roy finds this suspicious, and then Dorothy informs him that they are being spied on. The spy reveals herself to be Cath, who tells Roy that Wagner plans to capture everyone and turn them over to Bern. Roy decides to spring the trap by pretending to leave – if Wagner tries to get them to stay, he is definitely plotting their capture. This is exactly what happens, and a battle begins between Roy and Wagner's troops.
In the midst of battle, Cath appears again, but this time, she is intent on stealing the castle's treasure. She runs into Roy and avoid conversing with him, then runs away. Roy also encounters Sue locked up in one of the castle's chambers, and she joins him while asking him to give her a bow so she can fight.
Once Wagner is defeated, Roy learns that Sue is the granddaughter of one of Sacae's chieftains, the Silver Wolf, who leads the Kutolah tribe. She tells Roy that after Bern invaded Sacae, her grandfather ordered the women and children to escape, but they were all ambushed on the way by the traitorous Djute clan that sided with Bern, and everyone became separated. Sue found herself in Thria, and Lord Orun took her in, but Wagner later assassinated him, took over the castle, and imprisoned Sue.
Merlinus then rushes in to inform Roy that he just learned about a rebellion breaking out in Ostia. Lilina has been taken hostage, and the rebels are fighting loyalist soldiers inside Castle Ostia.
Chapter data
Normal Hard
| ||||||
|
| |||||
| Victory: Seize the throne | Player | Other | Enemy | |||
|---|---|---|---|---|---|---|
| Defeat: Roy dies | 1–10+3 | 1−1 | 28+15 | |||
| ||||||
Character data
| Characters | |||||||||||||||||||||||||||||||||
|---|---|---|---|---|---|---|---|---|---|---|---|---|---|---|---|---|---|---|---|---|---|---|---|---|---|---|---|---|---|---|---|---|---|
New units
| |||||||||||||||||||||||||||||||||
| |||||||||||||||||||||||||||||||||
Required characters
| |||||||||||||||||||||||||||||||||
Available characters
| |||||||||||||||||||||||||||||||||


Item data
| ||||||||||||||||||||||||||||||||||||||||||||||||
|
Enemy data
- Stats with two figures separated by a ~ are presented as a range, representing stats that vary due to random growths. The figures to the left and right of the ~ are the stat's minimum and maximum possible values respectively.
Normal Hard
| ||||||||||||||||||||||||||||||||||||||||||||||||||||||||||||||||||||||||||||||||||||||||||||||||||||||||||||||||||||||||||||||||||||||||||||||||||||||||||||||||||||||||||||||||||||||||||||||||||||||||||||||||||||||||||||||||||||||||||||||||||||||||||||||||||||||||||||||||||||||||||||||||||||||||||||||||||||||||||||||||||||||||||||||||||||||||||||||||||||||||||||||||||||||||||||||||||||||||||||||||||||||||||||||||||||||||||||||||||||||||||||||||||||||||||||||||||||||||||||||||||||||||||||||||||||||||||||||||||||||||||||||||
| ||||||||||||||||||||||||||||||||||||||||||||||||||||||||||||||||||||||||||||||||||||||||||||||||||||||||||||||||||||||||||||||||||||||||||||||||||||||||||||||||||||||||||||||||||||||||||||||||||||||||||||||||||||||||||||||||||||||||||||||||||||||||||||||||||||||||||||||||||||||||||||||||||||||||||||||||||||||||||||||||||||||||||||||||||||||||||||||||||||||||||||||||||||||||||||||||||||||||||||||||||||||||||||||||||||||||||||||||||||||||||||||||||||||||||||||||||||||||||||||||||||||||||||||||||||||||||||||||||||||||||||||||
| ||||||||||||||||||||||||||||||||||||||||||||||||||||||||||||||||||||||||||||||||||||||||||||||||||||||||||||||||||||||||||||||||||||||||||||||||||||||||||||||||||||||||||||||||||||||||||||||||||||||||||||||||||||||||||||||||||||||||||||||||||||||||||||||||||||||||||||||||||||||||||||||||||||||||||||||||||||||||||||||||||||||||||||||||||||||||||||||||||||||||||||||||||||||||||||||||||||||||||||||||||||||||||||||||||||||||||||||||||||||||||||||||||||||||||||||||||||||||||||||||||||||||||||||||||||||||||||||||||||||||||||||||
| ||||||||||||||||||||||||||||||||||||||||||||||||||||||||||||||||||||||||||||||||||||||||||||||||||||||||||||||||||||||||||||||||||||||||||||||||||||||||||||||||||||||||||||||||||||||||||||||||||||||||||||||||||||||||||||||||||||||||||||||||||||||||||||||||||||||||||||||||||||||||||||||||||||||||||||||||||||||||||||||||||||||||||||||||||||||||||||||||||||||||||||||||||||||||||||||||||||||||||||||||||||||||||||||||||||||||||||||||||||||||||||||||||||||||||||||||||||||||||||||||||||||||||||||||||||||||||||||||||||||||||||||||
Reinforcements
- Turn 5 enemy phase
- Cath from the lower-right corner of the center-south clearing.
- Enemy phase two turns after the door to the southwest room is opened
- 1 Knight, 1 Archer, and 2 Soldiers—one with a Javelin, one with an Iron Lance—from the southwest room
- Enemy phase two turns after the door to the southeast room is opened
- 1 Knight, 1 Archer, and 2 Soldiers—one with a Javelin, one with an Iron Lance—from the southwest room
- The enemy phase after all player units are above row 15
- Turn 8 enemy phase (Hard Mode only)
- Turn 12 enemy phase (Hard Mode only)
- Turn 16 enemy phase (Hard Mode only)
- 2 Knights—both with Steel Lances, one with a Javelin—from west of the throne
- 2 Soldiers—one with a Javelin, one with an Iron Lance—from east of the throne
NPC data
| ||||||||||||||||||||||||||||||||||||||||||
| ||||||||||||||||||||||||||||||||||||||||||
Boss data
- Main article:
Wagner - Stats with two figures separated by a ~ are presented as a range, representing stats that vary due to random growths. The figures to the left and right of the ~ are the stat's minimum and maximum possible values respectively.[1]
Normal Hard

Strategy
| This section details unofficial strategies that may help with completion of the chapter. This may not work for everybody. |
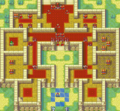
This is the first chapter in which the player can choose units and manage equipment. From now on, there is a limited number of characters per chapter, and Roy must be used in all of them. The options given by the preparation screen are "Pick Units", "Trade", "Save", "Map", and "Play Chapter." "Pick Units" is self-explanatory, as "Save" and "Play Chapter". "Map" allows the player to look at the battlefield, to change the starting positions of their characters, and to check enemy units. "Trade" has several suboptions: "Trade", "Discard", "Storage", "Item", and "Shop". "Trade" and "Discard" are exactly what they say. "Storage" is for depositing in and/or removing items from the convoy. In "Item", all items and weapons are listed together, allowing the character to take something from another person without using the option "Trade". If "Shop" is chosen, the character will have access to a small shop, where the most basic weapons (Iron Sword, Iron Axe, Iron Lance, Iron Bow, Fire, and Heal) are sold at a slightly higher price than in the maps.
Recommended characters for this chapter are Chad and any mounted unit, as there are several chests that are dispersed over the map. If the player bought door keys on last chapter, the process will be a lot faster. They will still need Chad, for he is the only one who can open chests. The mounted unit is for carrying Chad, as he should be left near the starting point. This is due to Cath arriving in turn 5 and opening the doors and chests. To avoid this, the player can either make Chad steal her lockpick, or kill her. Cath will not attack any playable unit.
If the player is interested in recruiting Cath, they can leave Roy behind too. Roy must talk to her three times before she will join. After talking to her, though, Roy has to be carried to the third room in the left side, where Sue has been imprisoned. If the player is interested in using her, Roy should take a bow with him for trading with her.
The two rooms that are near of the starting point are empty when open. However, after two turns, reinforcements will arrive. If the player is not that interested in gaining experience, they should not open them. The same goes for the two rooms near the boss, although one of them has a chest with an Unlock staff. Also, once ALL playable units have crossed a certain point of the map (at the level of the doors of the second room), six enemies will arrive from south.
If the player choose the middle way, they should put their sturdiest units in the front, as the enemies will attack en masse. After they have been dealt with, the chapter becomes quite easy. The other enemies can be picked one by one; the mages in the boss' room will not move until someone is in their range of attack, while the knights will not attack until the characters are one or two squares near them.
The boss, Wagner, is a shaman, which means danger for almost all units. As a shaman, he wields dark tomes, which are the most inaccurate but the most powerful spells in the magic area. Also, dark magic has an advantage against anima magic; because of this, Lugh is not recommended. The player should use their fastest and most accurate units to take Wagner down, as he is quite fast for a low-leveled shaman. Once the boss is defeated, Roy can seize the throne and the chapter will end.
Etymology and other languages
| Names, etymology, and in other regions | ||
|---|---|---|
| Language | Name | Definition, etymology, and notes |
| English |
The Trap Is Sprung |
Used in leftover text from the data transfer menu in the English version of Fire Emblem: The Blazing Blade. |
| English (unofficial) |
Ensnared |
-- |
| Japanese |
しかけられた罠 |
A Set Trap |
Gallery
Map of the chapter
References
| ← Fire Emblem • | Ensnared | • The Ostian Revolt → |
|---|