| Site News |
|---|
| Warning: This wiki contains spoilers. Read at your own risk! Social media: If you would like, please join our Discord server, and/or follow us on X (Twitter) or Tumblr! |
Battle in Bulgar: Difference between revisions
NewLight19 (talk | contribs) m (→Strategy) |
Anferensis (talk | contribs) m (→Strategy) |
||
| Line 1,227: | Line 1,227: | ||
==Strategy== | ==Strategy== | ||
{{strategy}} | |||
Avoid units with limited movement as they will likely fall behind the rest of your group. Your strategy should include equipping powerful weapons and dispatching two teams to the right and left flanks, or just focus on one side. Ensure each team has its own healer and bow-users specifically for the dragons. | Avoid units with limited movement as they will likely fall behind the rest of your group. Your strategy should include equipping powerful weapons and dispatching two teams to the right and left flanks, or just focus on one side. Ensure each team has its own healer and bow-users specifically for the dragons. | ||
Revision as of 21:59, 19 September 2023
| ||||||||
|

| “ | They're here...! And so quickly... Could they not have given me the time to at least set up a defense!? | ” | — Roartz |
|---|
Battle in Bulgar (Japanese: ブルガルの攻防 Offense and Defense of Bulgar) is chapter 19B of Fire Emblem: The Binding Blade.
Plot
- Main article:
Battle in Bulgar/Script
This section has been marked as a stub. Please help improve the page by adding information.
Beginning log
After defeating the Djute clan, Roy moved toward Bulgar, the largest city in Sacae. As a center of commerce between Etruria, Bern, and Ilia, Bulgar has had a history of being free city without a ruler. However, with Bern's invasion, Advisor Roartz now had control of the city under Bern's protection. Roy approached Bulgar to liberate it and to gain some useful information on invading Bern.
Chapter data
Normal Hard
| ||||||
|
| |||||
| Victory: Seize the castle gate | Player | Enemy | ||||
|---|---|---|---|---|---|---|
| Defeat: Roy dies | 1–15 | 44+24 | ||||
| ||||||
The central door cannot be opened by Door Keys or Lockpicks; it will open on the enemy phase of turn 12 if Kel is alive.
Character data
| Characters | |
|---|---|
New units
| |
| |
Required characters
| |
Available characters
| |
Item data
| ||||||||||||||||||||||||
|
Shop data
Swords Lances Axes Bows Anima Light Dark Staves Items Secret
| Name | Cost | |
|---|---|---|
| Iron Sword | 460 | |
| Steel Sword | 600 | |
| Silver Sword | 1,500 | |
| Iron Blade | 980 | |
| Steel Blade | 1,250 |
Enemy data
- Stats with two figures separated by a ~ are presented as a range, representing stats that vary due to random growths. The figures to the left and right of the ~ are the stat's minimum and maximum possible values respectively.
Normal Hard
| ||||||||||||||||||||||||||||||||||||||||||||||||||||||||||||||||||||||||||||||||||||||||||||||||||||||||||||||||||||||||||||||||||||||||||||||||||||||||||||||||||||||||||||||||||||||||||||||||||||||||||||||||||||||||||||||||||||||||||||||||||||||||||||||||||||||||||||||||||||||||||||||||||||||||||||||||||||||||||||||||||||||||||||||||||||||||||||||||||||||||||||||||||||||||||||||||||||||||||||||||||||||||||||||||||||||||||||||||||||||||||||||||||||||||||||||||||||||||||||||||||||||||||||||||||||||||||||||||||||||||||||||||||||||||||||||||||||||||||||||||||||||||||||||||||||||||||||||||||||||||||||||||||||||||||||||||||||||||||||||||||||||||||||||||||||||||||||||||||||||||||||||||||
| ||||||||||||||||||||||||||||||||||||||||||||||||||||||||||||||||||||||||||||||||||||||||||||||||||||||||||||||||||||||||||||||||||||||||||||||||||||||||||||||||||||||||||||||||||||||||||||||||||||||||||||||||||||||||||||||||||||||||||||||||||||||||||||||||||||||||||||||||||||||||||||||||||||||||||||||||||||||||||||||||||||||||||||||||||||||||||||||||||||||||||||||||||||||||||||||||||||||||||||||||||||||||||||||||||||||||||||||||||||||||||||||||||||||||||||||||||||||||||||||||||||||||||||||||||||||||||||||||||||||||||||||||||||||||||||||||||||||||||||||||||||||||||||||||||||||||||||||||||||||||||||||||||||||||||||||||||||||||||||||||||||||||||||||||||||||||||||||||||||||||||||||||||
| ||||||||||||||||||||||||||||||||||||||||||||||||||||||||||||||||||||||||||||||||||||||||||||||||||||||||||||||||||||||||||||||||||||||||||||||||||||||||||||||||||||||||||||||||||||||||||||||||||||||||||||||||||||||||||||||||||||||||||||||||||||||||||||||||||||||||||||||||||||||||||||||||||||||||||||||||||||||||||||||||||||||||||||||||||||||||||||||||||||||||||||||||||||||||||||||||||||||||||||||||||||||||||||||||||||||||||||||||||||||||||||||||||||||||||||||||||||||||||||||||||||||||||||||||||||||||||||||||||||||||||||||||||||||||||||||||||||||||||||||||||||||||||||||||||||||||||||||||||||||||||||||||||||||||||||||||||||||||||||||||||||||||||||||||||||||||||||||||||||||||||||||||||
| ||||||||||||||||||||||||||||||||||||||||||||||||||||||||||||||||||||||||||||||||||||||||||||||||||||||||||||||||||||||||||||||||||||||||||||||||||||||||||||||||||||||||||||||||||||||||||||||||||||||||||||||||||||||||||||||||||||||||||||||||||||||||||||||||||||||||||||||||||||||||||||||||||||||||||||||||||||||||||||||||||||||||||||||||||||||||||||||||||||||||||||||||||||||||||||||||||||||||||||||||||||||||||||||||||||||||||||||||||||||||||||||||||||||||||||||||||||||||||||||||||||||||||||||||||||||||||||||||||||||||||||||||||||||||||||||||||||||||||||||||||||||||||||||||||||||||||||||||||||||||||||||||||||||||||||||||||||||||||||||||||||||||||||||||||||||||||||||||||||||||||||||||||
Reinforcements
- Enemy phase of turn 8, if Kel is alive
- 4 Wyvern Riders from the east edge of the map
- 4 Nomads from the southwest corner of the map.
- Enemy phase of turns 8, 13, 18, and 23
- Enemy phase of turns 10, 15, and 20
- 2 Wyvern Riders from the east edge of the map
- Enemy phase of turn 15, and of turns 17–19 on Hard Mode, if Kel is alive
- 1 Myrmidon with an Armorslayer from north of the westernmost village
- 1 Myrmidon with a Lancereaver from east of the easternmost village
- 1 Myrmidon with a Steel Sword from between the second-west and middle villages
- 1 Myrmidon with a Steel Sword from south of the second-east village
Boss data
- Main article:
Kel - Stats with two figures separated by a ~ are presented as a range, representing stats that vary due to random growths. The figures to the left and right of the ~ are the stat's minimum and maximum possible values respectively.[1]
Normal Hard
|
|
| |||||||||||||||||||||||||||||||||||||||||||||||||

Strategy
| This section details unofficial strategies that may help with completion of the chapter. This may not work for everybody. |
Avoid units with limited movement as they will likely fall behind the rest of your group. Your strategy should include equipping powerful weapons and dispatching two teams to the right and left flanks, or just focus on one side. Ensure each team has its own healer and bow-users specifically for the dragons.
Near the northwest and northeast villages, there are breakable walls. Using the Eclipse magic on these walls ensures they will be reduced to a single hit point, and it is a guaranteed hit. Note that directly approaching through the center is not viable; the main door only unlocks on turn 12, and you cannot use items to speed it up. Instead, assault from both sides gradually or focus heavily on one side if you are capable of long-range attacks and rapid entry. This prevents a bottleneck in the center with enemies converging on you.
After breaching the walls, position your strongest units at the forefront; formidable foes await inside.
Here are some tips:
- Utilize Pure Waters to gain an edge, especially since one of the Sages wields a Sleep staff and another a Silence staff. Ensure you have Restore staves on both teams or multiple units to counteract these effects.
- Once inside, hold your position between walls. Do not rely on a single unit to vanquish all foes; the walls can be strategically used to manage enemy movements.
- Keep an eye on enemy equipment. Some wield Axereavers, Lancereavers, Aircalibur, or Killer Lances. Familiarize yourself with their gear to avoid unpleasant surprises.
Regarding the boss: his sword possesses ranged magical attacks. Counter him using ranged weapons or deploy a magic-user with high resistance.
Trivia
- Shanna and Thea have a conversation event in this chapter that can be triggered using the Talk-command when both are deployed. However, after loading the Background-image, the event ends without the characters talking. This is not just a case of the developers forgetting to set a conversation in the event, as there seem to be no fitting text strings in the games data.
Etymology and other languages
| Names, etymology, and in other regions | ||
|---|---|---|
| Language | Name | Definition, etymology, and notes |
| English |
Bulgar's Arms & Armor |
Used in leftover text from the data transfer menu in the English version of Fire Emblem: The Blazing Blade. |
| English (unofficial) |
Battle in Bulgar |
-- |
| Japanese |
ブルガルの攻防 |
Offense and Defense of Bulgar |
Gallery
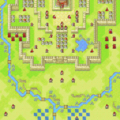
Map of the chapter
References
- ↑ Battle in Bulgard, triangleattack.com, Retrieved: December 24, 2020
| ← The Laws of Sacae • | Battle in Bulgar | • The Silver Wolf → |
|---|