| Site News |
|---|
| Warning: This wiki contains spoilers. Read at your own risk! Social media: If you would like, please join our Discord server, and/or follow us on X (Twitter) or Tumblr! |
Amidst a Struggle: Difference between revisions
SovietFarmer (talk | contribs) m (Fixed sentence structure of reinforcement spawns to make it less ambiguous) |
Thecornerman (talk | contribs) m (Text replacement - "([Ll])evel (\d+)" to "$1evel $2") |
||
| (2 intermediate revisions by 2 users not shown) | |||
| Line 10: | Line 10: | ||
{{quote|We haven't the time to await General Cecilia's reply... But I want to help the people. ...Even if it means opposing an Eturian noble.|[[Roy]] to [[Merlinus]]}} | {{quote|We haven't the time to await General Cecilia's reply... But I want to help the people. ...Even if it means opposing an Eturian noble.|[[Roy]] to [[Merlinus]]}} | ||
'''Amidst a Struggle''' (Japanese: {{hl|対立のはざまで|Tairitsu no hazama de}} ''Between conflicts'') is Chapter 10B of {{FE6}}; the player gets this for their tenth chapter if they visited the [[village]] that gives the player a [[Restore]] staff in the [[The Misty Isles|previous chapter]] and thus went west toward Caldonia. Otherwise, [[Western Resistance]] will be played instead, in which case Roy heads north toward [[Mount Eburacum]]. | '''Amidst a Struggle''' (Japanese: {{hl|対立のはざまで|Tairitsu no hazama de}} ''Between conflicts'') is Chapter 10B of {{FE6}}; the player gets this for their tenth chapter if they visited the [[village]] that gives the player a [[Restore]] staff in the [[The Misty Isles|previous chapter]] and thus went west toward Caldonia. Otherwise, [[Western Resistance]] will be played instead, in which case Roy heads north toward [[Mount Eburacum]]. | ||
==Plot== | ==Plot== | ||
| Line 538: | Line 538: | ||
|mov=6 | |mov=6 | ||
|inventory={{Item|6|Silver Bow}} • {{Item|6|White Gem}} | |inventory={{Item|6|Silver Bow}} • {{Item|6|White Gem}} | ||
|notes= | |notes=20% of the time, does not do anything. Otherwise, moves to attack units unprovoked. | ||
}} | }} | ||
{{ChapUnitCellGBA | {{ChapUnitCellGBA | ||
| Line 589: | Line 589: | ||
|mov=7 | |mov=7 | ||
|inventory={{Item|6|Slim Lance}} • {{Item|6|Javelin}} | |inventory={{Item|6|Slim Lance}} • {{Item|6|Javelin}} | ||
|notes=• | |notes=• 20% of the time, does not do anything. Otherwise, moves to attack units unprovoked.<br>• Becomes an NPC if Shanna talks to her after Klein is recruited but not before. | ||
}} | }} | ||
{{ChapUnitCellGBA | {{ChapUnitCellGBA | ||
| Line 1,076: | Line 1,076: | ||
|mov=6 | |mov=6 | ||
|inventory={{Item|6|Silver Bow}} • {{Item|6|White Gem}} | |inventory={{Item|6|Silver Bow}} • {{Item|6|White Gem}} | ||
|notes= | |notes=20% of the time, does not do anything. Otherwise, moves to attack units unprovoked. | ||
}} | }} | ||
{{ChapUnitCellGBA | {{ChapUnitCellGBA | ||
| Line 1,127: | Line 1,127: | ||
|mov=7 | |mov=7 | ||
|inventory={{Item|6|Slim Lance}} • {{Item|6|Javelin}} | |inventory={{Item|6|Slim Lance}} • {{Item|6|Javelin}} | ||
|notes=• | |notes=• 20% of the time, does not do anything. Otherwise, moves to attack units unprovoked.<br>• Becomes an NPC if Shanna talks to her after Klein is recruited but not before. | ||
}} | }} | ||
{{ChapUnitCellGBA | {{ChapUnitCellGBA | ||
| Line 1,269: | Line 1,269: | ||
**2 [[Brigand]]s—one with an [[Iron Axe]], one a [[Hand Axe]]—from the northwest corner of the map | **2 [[Brigand]]s—one with an [[Iron Axe]], one a [[Hand Axe]]—from the northwest corner of the map | ||
*Enemy phase of turn 8 | *Enemy phase of turn 8 | ||
**[[Klein]] and 4 [[Archer]]s—two at level 14, two at 15—from the southeast corner of the map | **[[Klein]] and 4 [[Archer]]s—two at level 14, two at 15—from the southeast corner of the map | ||
*Enemy phase of turn 10 | *Enemy phase of turn 10 | ||
**[[Thea]] and 4 [[Pegasus Knight]]s—two with [[Steel Lance]]s, two with [[Iron Lance]]s and [[Javelin]]s—from the middle northern edge of the map | **[[Thea]] and 4 [[Pegasus Knight]]s—two with [[Steel Lance]]s, two with [[Iron Lance]]s and [[Javelin]]s—from the middle northern edge of the map | ||
*Enemy phase of turn 10 if [[Zinque]] is alive | *Enemy phase of turn 10 if [[Zinque]] is alive | ||
**1 [[Cavalier]] with a Steel Lance and a [[Steel Sword]], 1 at level 13 with a Steel Lance, 1 with a Steel Lance and a [[Javelin]], 1 with a Steel Lance and an [[Iron Sword]], and 1 at level 12 with a Steel Lance from the southwest corner of the map | **1 [[Cavalier]] with a Steel Lance and a [[Steel Sword]], 1 at level 13 with a Steel Lance, 1 with a Steel Lance and a [[Javelin]], 1 with a Steel Lance and an [[Iron Sword]], and 1 at level 12 with a Steel Lance from the southwest corner of the map | ||
*(Hard Mode only) Enemy phase of turn 15 if [[Zinque]] is alive | *(Hard Mode only) Enemy phase of turn 15 if [[Zinque]] is alive | ||
**1 [[Paladin]] and 4 [[Cavalier]]s—one at level 13 with a [[Steel Lance]], one with a Steel Lance and a [[Javelin]], one with a Steel Lance and an [[Iron Sword]], and one at level 12 with a Steel Lance—from the southwest corner of the map | **1 [[Paladin]] and 4 [[Cavalier]]s—one at level 13 with a [[Steel Lance]], one with a Steel Lance and a [[Javelin]], one with a Steel Lance and an [[Iron Sword]], and one at level 12 with a Steel Lance—from the southwest corner of the map | ||
===NPC data=== | ===NPC data=== | ||
| Line 1,569: | Line 1,569: | ||
==Strategy== | ==Strategy== | ||
{{strategy}} | {{strategy}} | ||
This chapter closely resembles Chapter 11A, so you may find the basic tips for that chapter useful here as well. However, your strategies will need some adjustments. Firstly, prioritize visiting villages 6 and 7 as quickly as possible, preferably using sword-wielding units. You can have [[Cavalier]]s carry them if needed. Reinforcement bandits will destroy these villages in just two turns. Thankfully, you can take your time with the other villages. | This chapter closely resembles Chapter 11A, so you may find the basic tips for that chapter useful here as well. However, your strategies will need some adjustments. Firstly, prioritize visiting villages 6 and 7 as quickly as possible, preferably using sword-wielding units. You can have [[Cavalier]]s carry them if needed. Reinforcement bandits will destroy these villages in just two turns. Thankfully, you can take your time with the other villages. | ||
Take the main road and also send a small group through the broken wall beneath the first village. To recruit [[Gonzalez]], deploy [[Lilina]] so she can speak to him. Although he's weaker in this route compared to the A route, recruiting him is optional. Bring along multiple units capable of long-range attacks to quickly eliminate enemies, especially those behind walls. This will also help you recruit [[Klein]] and [[Thea]] more efficiently. | Take the main road and also send a small group through the broken wall beneath the first village. To recruit [[Gonzalez]], deploy [[Lilina]] so she can speak to him. Although he's weaker in this route compared to the A route, recruiting him is optional. Bring along multiple units capable of long-range attacks to quickly eliminate enemies, especially those behind walls. This will also help you recruit [[Klein]] and [[Thea]] more efficiently. | ||
| Line 1,589: | Line 1,589: | ||
<gallery> | <gallery> | ||
Cm fe06 10B.png|Map of the chapter | Cm fe06 10B.png|Map of the chapter | ||
Ss fe06 | Ss fe06 Chapter 10b 01.png | ||
Ss fe06 | Ss fe06 Chapter 10b 02.png | ||
Ss fe06 | Ss fe06 Chapter 10b 03.png | ||
Ss fe06 | Ss fe06 Chapter 10b 04.png | ||
Ss fe06 | Ss fe06 Chapter 10b 05.png | ||
</gallery> | </gallery> | ||
Latest revision as of 18:10, 28 March 2024
| ||||||||||
|

| “ | We haven't the time to await General Cecilia's reply... But I want to help the people. ...Even if it means opposing an Eturian noble. | ” | — Roy to Merlinus |
|---|
Amidst a Struggle (Japanese: 対立のはざまで Between conflicts) is Chapter 10B of Fire Emblem: The Binding Blade; the player gets this for their tenth chapter if they visited the village that gives the player a Restore staff in the previous chapter and thus went west toward Caldonia. Otherwise, Western Resistance will be played instead, in which case Roy heads north toward Mount Eburacum.
Plot
- Main article:
Amidst a Struggle/Script
Roy's army comes across a small village, where an Etrurian governor, Zinque, is trying to find and kill one of the resistance's members – Elffin. He initially sends a letter to Cecilia and does not want to start a conflict, but Zinque's attack on the village forces his hand, and the Lycian Army fights to defend the village. Before the battle begins, Melady and Galle briefly arrive to look for Princess Guinivere, but Zinque redirects them to Father Orlo in Eburacum, as he possesses no information himself.
During the battle, several additional forces appear, including Etrurian reinforcements from Lord Arcardo, contingents led by Commander Klein and Thea, bandits sent to burn down the village under Scollan, and Gonzalez, who accompanies the bandits. In the end, most of them turn over to Roy's side. Klein had been told by Arcardo that the Lycian Army is allied with the bandits, and once he learns from Roy or his sister Clarine that is not the case, he changes sides. Thea changes sides after Klein does, either through her sister Shanna talking to her or through Klein providing her with new orders. Gonzalez switches sides when talked to by Lilina and reassured that the Lycian Army will not view him as a monster or ask him to burn down villages. If Ward and Lot are deployed, they can also meet their sisters in the village – Mary and Mieu respectively.
Once the battle ends, Roy meets Elffin. Elffin tests him by telling him that Etruria may have lured his army away from Lycia in order for Bern to attack it. However, Roy does not make a hot-headed decision and instead chooses to stay on the Western Isles, as the people here have no other force to rely on while Lycia has Eliwood and Cecilia. This impresses Elffin, who then suggests that Roy head south, toward Castle Eidyna on Caldonia. Workers are kept there before being sent to the mines, and they must be freed.
Chapter data
Normal Hard
| ||||||
|
| |||||
| Victory: Seize the castle gate | Player | Other | Enemy | |||
|---|---|---|---|---|---|---|
| Defeat: Roy dies | 1–12+3 | 0+9−1 | 26+25−11 | |||
| ||||||
Character data
| Characters | |||||||||||||||||||||||||||||||||
|---|---|---|---|---|---|---|---|---|---|---|---|---|---|---|---|---|---|---|---|---|---|---|---|---|---|---|---|---|---|---|---|---|---|
New units
| |||||||||||||||||||||||||||||||||
| |||||||||||||||||||||||||||||||||
Required characters
| |||||||||||||||||||||||||||||||||
Available characters
| |||||||||||||||||||||||||||||||||


Item data
| |||||||||||||||||||||||||||||||||||||||||||||
|
Shop data
Swords Lances Axes Bows Anima Light Dark Staves Items Secret
None
Enemy data
- Stats with two figures separated by a ~ are presented as a range, representing stats that vary due to random growths. The figures to the left and right of the ~ are the stat's minimum and maximum possible values respectively.
Normal Hard
| ||||||||||||||||||||||||||||||||||||||||||||||||||||||||||||||||||||||||||||||||||||||||||||||||||||||||||||||||||||||||||||||||||||||||||||||||||||||||||||||||||||||||||||||||||||||||||||||||||||||||||||||||||||||||||||||||||||||||||||||||||||||||||||||||||||||||||||||||||||||||||||||||||||||||||||||||||||||||||||||||||||||||||||||||||||||||||||||||||||||||||||||||||||||||||||||||||||||||||||||||||||||||||||||||||||||||||||||||||||||||||||||||||||||||||||||||||||||||||
| ||||||||||||||||||||||||||||||||||||||||||||||||||||||||||||||||||||||||||||||||||||||||||||||||||||||||||||||||||||||||||||||||||||||||||||||||||||||||||||||||||||||||||||||||||||||||||||||||||||||||||||||||||||||||||||||||||||||||||||||||||||||||||||||||||||||||||||||||||||||||||||||||||||||||||||||||||||||||||||||||||||||||||||||||||||||||||||||||||||||||||||||||||||||||||||||||||||||||||||||||||||||||||||||||||||||||||||||||||||||||||||||||||||||||||||||||||||||||||
| ||||||||||||||||||||||||||||||||||||||||||||||||||||||||||||||||||||||||||||||||||||||||||||||||||||||||||||||||||||||||||||||||||||||||||||||||||||||||||||||||||||||||||||||||||||||||||||||||||||||||||||||||||||||||||||||||||||||||||||||||||||||||||||||||||||||||||||||||||||||||||||||||||||||||||||||||||||||||||||||||||||||||||||||||||||||||||||||||||||||||||||||||||||||||||||||||||||||||||||||||||||||||||||||||||||||||||||||||||||||||||||||||||||||||||||||||||||||||||
| ||||||||||||||||||||||||||||||||||||||||||||||||||||||||||||||||||||||||||||||||||||||||||||||||||||||||||||||||||||||||||||||||||||||||||||||||||||||||||||||||||||||||||||||||||||||||||||||||||||||||||||||||||||||||||||||||||||||||||||||||||||||||||||||||||||||||||||||||||||||||||||||||||||||||||||||||||||||||||||||||||||||||||||||||||||||||||||||||||||||||||||||||||||||||||||||||||||||||||||||||||||||||||||||||||||||||||||||||||||||||||||||||||||||||||||||||||||||||||
Reinforcements
- Enemy phase of turn 6
- Enemy phase of turns 6, 9, 11, and 13
- Enemy phase of turn 8
- Enemy phase of turn 10
- Thea and 4 Pegasus Knights—two with Steel Lances, two with Iron Lances and Javelins—from the middle northern edge of the map
- Enemy phase of turn 10 if Zinque is alive
- 1 Cavalier with a Steel Lance and a Steel Sword, 1 at level 13 with a Steel Lance, 1 with a Steel Lance and a Javelin, 1 with a Steel Lance and an Iron Sword, and 1 at level 12 with a Steel Lance from the southwest corner of the map
- (Hard Mode only) Enemy phase of turn 15 if Zinque is alive
- 1 Paladin and 4 Cavaliers—one at level 13 with a Steel Lance, one with a Steel Lance and a Javelin, one with a Steel Lance and an Iron Sword, and one at level 12 with a Steel Lance—from the southwest corner of the map
NPC data
- Stats with two figures separated by a ~ are presented as a range, representing stats that vary due to random growths. The figures to the left and right of the ~ are the stat's minimum and maximum possible values respectively.
Normal Hard
| ||||||||||||||||||||||||||||||||||||||||||||||||||||||||||||||||||||||||||||||||||||||||||||||||||||||||||||||||||||||||||||||||||||||||||||||||||||||
| ||||||||||||||||||||||||||||||||||||||||||||||||||||||||||||||||||||||||||||||||||||||||||||||||||||||||||||||||||||||||||||||||||||||||||||||||||||||
Reinforcements
- When Klein is recruited
- 4 Archers that arrive with Klein switch from enemies to NPCs
- When Shanna talks to Thea after Klein is recruited but not before
- Thea switches from an enemy to an NPC
- When Thea is recruited or becomes an NPC
- 4 Pegasus Knights that arrive with Thea switch from enemies to NPCs
Boss data
- Stats with two figures separated by a ~ are presented as a range, representing stats that vary due to random growths. The figures to the left and right of the ~ are the stat's minimum and maximum possible values respectively.[1]
- Main article:
Zinque
Normal Hard
|
|
| |||||||||||||||||||||||||||||||||||||||||||||||||

- Main article:
Scollan
Normal Hard

Strategy
| This section details unofficial strategies that may help with completion of the chapter. This may not work for everybody. |
This chapter closely resembles Chapter 11A, so you may find the basic tips for that chapter useful here as well. However, your strategies will need some adjustments. Firstly, prioritize visiting villages 6 and 7 as quickly as possible, preferably using sword-wielding units. You can have Cavaliers carry them if needed. Reinforcement bandits will destroy these villages in just two turns. Thankfully, you can take your time with the other villages.
Take the main road and also send a small group through the broken wall beneath the first village. To recruit Gonzalez, deploy Lilina so she can speak to him. Although he's weaker in this route compared to the A route, recruiting him is optional. Bring along multiple units capable of long-range attacks to quickly eliminate enemies, especially those behind walls. This will also help you recruit Klein and Thea more efficiently.
Position your units in the middle of the map to attract Klein's archers. You can talk to him with Clarine. If you're lucky, Klein will approach via the center road. If not, keep a high-defense unit nearby to lure them in. Do something similar to engage Thea's units, and then have Klein talk to her to add her to your team.
If you manage to recruit Klein and Thea, their respective squads will turn into green units, which won't attack you. Additionally, if all these green units survive the chapter, you'll receive a special item. To keep these green units alive, you'll need to eliminate the reinforcement bandits or block their path with your units. This applies to enemies near the boss as well. The main challenge in this chapter lies in preserving the green units. Because they are prone to reckless behavior, you should prioritize keeping them alive from the start. You may have to restart the chapter a few times to achieve this.
Etymology and other languages
| Names, etymology, and in other regions | ||
|---|---|---|
| Language | Name | Definition, etymology, and notes |
| English |
The Space Between |
Used in leftover text from the data transfer menu in the English version of Fire Emblem: The Blazing Blade. |
| English (unofficial) |
Amidst a Struggle |
-- |
| Japanese |
対立のはざまで |
Between conflicts |
Gallery
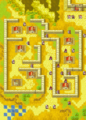
Map of the chapter
- Ss fe06 Chapter 10b 01.png
- Ss fe06 Chapter 10b 02.png
- Ss fe06 Chapter 10b 03.png
- Ss fe06 Chapter 10b 04.png
- Ss fe06 Chapter 10b 05.png
References
- ↑ Amidst a Struggle, triangleattack.com, Retrieved: December 24, 2020
| ← The Misty Isles • | Amidst a Struggle | • Flight Toward Freedom → |
|---|