| Site News |
|---|
| Warning: This wiki contains spoilers. Read at your own risk! Social media: If you would like, please join our Discord server, and/or follow us on X (Twitter) or Tumblr! |
The Freezing Lance: Difference between revisions
Thecornerman (talk | contribs) (Added previous and next chapters) |
Thecornerman (talk | contribs) m (Text replacement - "([Cc])hapter (\d+)" to "$1hapter $2") |
||
| (20 intermediate revisions by 8 users not shown) | |||
| Line 1: | Line 1: | ||
{{Chapter Infobox | {{Chapter Infobox | ||
|image=[[File:Cm fe06 20xA.png|200px]] | |image=[[File:Cm fe06 20xA.png|200px]] | ||
|location= | |location=Edessa Ruins | ||
|boss=[[Tick]] | |boss=[[Tick]] | ||
|previous=[[Ilia's Salvation]] | |previous=[[Ilia's Salvation]] | ||
| Line 10: | Line 9: | ||
{{Quote|These ruins are surrounded by thick walls. They won't be able to come in so easily.|[[Tick]]}} | {{Quote|These ruins are surrounded by thick walls. They won't be able to come in so easily.|[[Tick]]}} | ||
'''The Freezing Lance''' (Japanese: {{hl|氷雪の槍|Hyōsetsu no yari}} ''Spear of ice and snow'') is | '''The Freezing Lance''' (Japanese: {{hl|氷雪の槍|Hyōsetsu no yari}} ''Spear of ice and snow'') is Chapter 20Ax of {{FE6}}. In order to play this chapter, the [[Ilia's Salvation|previous chapter]] must have been completed within 25 turns and [[Juno]] and [[Zelot]] must have been recruited and be alive. | ||
==Plot== | ==Plot== | ||
{{main|The Freezing Lance/Script}} | {{main|The Freezing Lance/Script}} | ||
[[Roy]] heads inside Edessa's hidden ruins to retrieve a [[legendary weapons|legendary weapon]]. He learns from [[Elffin]] that the ruins house [[Maltet]], the Freezing Lance wielded by [[Barigan]] of the [[Eight Legends]]. Despite [[Bern]]'s soldiers under leadership of [[Tick]] sealing off the ruin's insides, the [[Etruria|Etrurian Army]] breaks through nonetheless, defeating Tick and retrieving Maltet. | |||
With his task done, Roy resumes his conversation with [[Guinivere]] from before the battle for Edessa. She tells him that [[Desmond|her father]] was jealous of [[Zephiel]]'s talents because he was so ordinary, and wished to prevent Zephiel's ascension, going so far as to promise Bern's throne to Guinivere's future husband. Yet the people of Bern wished for Zephiel to become king, motivating Desmond to attempt to murder his son. | |||
Desmond gave Zephiel a poisoned drink at a banquet. For ten days, Zephiel fell ill and only survived thanks to Murdock's aid. Somehow, Zephiel learned of Desmond's plans to murder anyone Zephiel held dear, including his mother and Murdock, so Zephiel faked his own demise. During the funeral, when Desmond went to view Zephiel's body, Zephiel jumped from the coffin with a sword in hand, killing his father. Since that moment, Zephiel never smiled again. Though Guinivere misses the kind brother she once knew, she asks Roy to put a stop to Zephiel's plans. Roy answers that he may need his sword to do so, which Guinivere accepts. | |||
==Chapter data== | ==Chapter data== | ||
| Line 23: | Line 24: | ||
|victory=Seize the throne | |victory=Seize the throne | ||
|defeat=[[Roy]] dies | |defeat=[[Roy]] dies | ||
|ally= | |ally=1–13 | ||
|enemy=40 | |enemy=40 | ||
|map=[[File:Cm fe06 20xA.png]] | |map=[[File:Cm fe06 20xA.png]] | ||
| Line 31: | Line 32: | ||
{{ChapChars | {{ChapChars | ||
|game#=06 | |game#=06 | ||
|return1= | |forced1=roy | ||
|return2= | |return1=marcus | ||
|return3= | |return2=alen | ||
|return4=lance | |return3=bors | ||
| | |return4=wolt | ||
| | |return5=lance | ||
| | |return5article=Lance (character) | ||
| | |return6=merlinus | ||
| | |return7=elen | ||
|return9= | |return8=ward | ||
|return10= | |return8article=Ward (character) | ||
|return11= | |return9=lot | ||
|return12= | |return10=dieck | ||
|return13= | |return11=shanna | ||
|return14= | |return12=chad | ||
|return15= | |return13=lugh | ||
|return16= | |return14=clarine | ||
|return17= | |return15=rutger | ||
|return18= | |return16=saul | ||
|return19= | |return17=dorothy | ||
|return20= | |return18=sue | ||
|return21= | |return19=zelot | ||
|return22= | |return20=trec | ||
|return23= | |return21=noah | ||
|return24= | |return22=astolfo | ||
|return25= | |return23=lilina | ||
|return26= | |return24=gwendolyn | ||
|return27= | |return25=barthe | ||
|return28= | |return26=ogier | ||
|return29= | |return27=fir | ||
|return30= | |return28=sin | ||
|return31= | |return29=gonzalez | ||
|return32= | |return30=klein | ||
|return33= | |return31=thea | ||
|return34= | |return32=larum | ||
|return35= | |return33=echidna | ||
|return36= | |return34=elffin | ||
|return37= | |return35=bartre | ||
|return38= | |return36=geese | ||
|return39= | |return37=raigh | ||
|return40= | |return38=cath | ||
|return41= | |return39=melady | ||
|return42= | |return40=perceval | ||
|return43= | |return41=cecilia | ||
|return44= | |return42=sophia | ||
|return45= | |return43=igrene | ||
|return46= | |return44=garret | ||
|return47= | |return45=fae | ||
|return48= | |return46=hugh | ||
|return49= | |return47=zeiss | ||
|return50 | |return48=douglas | ||
|return49=niime | |||
|return50=juno | |||
}} | }} | ||
| Line 107: | Line 109: | ||
:''Stats with two figures separated by a ~ are presented as a range, representing stats that vary due to random growths. The figures to the left and right of the ~ are the stat's minimum and maximum possible values respectively.'' | :''Stats with two figures separated by a ~ are presented as a range, representing stats that vary due to random growths. The figures to the left and right of the ~ are the stat's minimum and maximum possible values respectively.'' | ||
{{Tab | {{Tab | ||
|width=100% | |||
|tab1=Normal | |tab1=Normal | ||
|tab2=Hard | |tab2=Hard | ||
|content1={{ChapUnitHdr|type=Enemy|platform=gba}} | |content1={{ChapUnitHdr|type=Enemy|platform=gba}} | ||
{{ChapUnitCellGBA | |||
|name=[[Tick]] | |||
|class=General | |||
|lv=12 | |||
|#=1 | |||
|hp=47 | |||
|str=20 | |||
|skill=14 | |||
|spd=12 | |||
|lck=10 | |||
|def=17 | |||
|res=15 | |||
|con=15 | |||
|mov=5 | |||
|inventory={{Item|6|Silver Lance}} • {{Item|6|Spear|image=spear fe06}} | |||
|notes=Does not move; stands on the [[Terrain/Game Boy Advance games#Fire Emblem: The Binding Blade|throne]], the chapter's seize point. | |||
}} | |||
{{ChapUnitCellGBA | {{ChapUnitCellGBA | ||
|name=Bern | |name=Bern | ||
| Line 124: | Line 144: | ||
|con=6 | |con=6 | ||
|mov=6 | |mov=6 | ||
|inventory={{Item|6|Sleep|link=Sleep (staff)}} • {{Item|6|Physic}} • {{Item|6|Nosferatu}} | |inventory={{Item|6|Sleep|link=Sleep (staff)}} • {{Item|6|Physic}} • {{Item|6|Nosferatu|image=nosferatu fe06}} | ||
|notes=Begins moving unprovoked when he can attack a unit within two turns. | |notes=Begins moving unprovoked when he can attack a unit within two turns. | ||
}} | }} | ||
| Line 396: | Line 416: | ||
|con=6 | |con=6 | ||
|mov=6 | |mov=6 | ||
|inventory={{Item|6|Nosferatu}} • {{Item|6|Mend}} | |inventory={{Item|6|Nosferatu|image=nosferatu fe06}} • {{Item|6|Mend}} | ||
|notes=Begins moving unprovoked when he can attack a unit within two turns. | |notes=Begins moving unprovoked when he can attack a unit within two turns. | ||
}} | }} | ||
| Line 449: | Line 469: | ||
|inventory={{Item|6|Steel Bow}} | |inventory={{Item|6|Steel Bow}} | ||
|notes=Begins moving unprovoked when he can attack a unit within two turns. | |notes=Begins moving unprovoked when he can attack a unit within two turns. | ||
|last=y | |||
}} | }} | ||
{{ChapUnitFtr}} | |||
|content2={{ChapUnitHdr|type=Enemy|platform=gba}} | |||
{{ChapUnitCellGBA | {{ChapUnitCellGBA | ||
|name=[[Tick]] | |name=[[Tick]] | ||
| Line 455: | Line 478: | ||
|lv=12 | |lv=12 | ||
|#=1 | |#=1 | ||
|hp= | |hp=55~58 | ||
|str= | |str=23~25 | ||
|skill= | |skill=16~18 | ||
|spd= | |spd=13~14 | ||
|lck= | |lck=12~13 | ||
|def= | |def=19~21 | ||
|res= | |res=16~18 | ||
|con=15 | |con=15 | ||
|mov=5 | |mov=5 | ||
|inventory={{Item|6|Silver Lance}} • {{Item|6|Spear}} | |inventory={{Item|6|Silver Lance}} • {{Item|6|Spear|image=spear fe06}} | ||
|notes=Does not move; stands on the [[Terrain/Game Boy Advance games#Fire Emblem: The Binding Blade|throne]], the chapter's seize point. | |notes=Does not move; stands on the [[Terrain/Game Boy Advance games#Fire Emblem: The Binding Blade|throne]], the chapter's seize point. | ||
}} | }} | ||
{{ChapUnitCellGBA | {{ChapUnitCellGBA | ||
|name=Bern | |name=Bern | ||
| Line 484: | Line 504: | ||
|con=6 | |con=6 | ||
|mov=6 | |mov=6 | ||
|inventory={{Item|6|Sleep|link=Sleep (staff)}} • {{Item|6|Physic}} • {{Item|6|Nosferatu}} | |inventory={{Item|6|Sleep|link=Sleep (staff)}} • {{Item|6|Physic}} • {{Item|6|Nosferatu|image=nosferatu fe06}} | ||
|notes=Begins moving unprovoked when he can attack a unit within two turns. | |notes=Begins moving unprovoked when he can attack a unit within two turns. | ||
}} | }} | ||
| Line 756: | Line 776: | ||
|con=6 | |con=6 | ||
|mov=6 | |mov=6 | ||
|inventory={{Item|6|Nosferatu}} • {{Item|6|Mend}} | |inventory={{Item|6|Nosferatu|image=nosferatu fe06}} • {{Item|6|Mend}} | ||
|notes=Begins moving unprovoked when he can attack a unit within two turns. | |notes=Begins moving unprovoked when he can attack a unit within two turns. | ||
}} | }} | ||
| Line 809: | Line 829: | ||
|inventory={{Item|6|Steel Bow}} | |inventory={{Item|6|Steel Bow}} | ||
|notes=Begins moving unprovoked when he can attack a unit within two turns. | |notes=Begins moving unprovoked when he can attack a unit within two turns. | ||
|last=y | |last=y | ||
}} | }} | ||
| Line 852: | Line 855: | ||
|con=15 | |con=15 | ||
|aid=14 | |aid=14 | ||
|inventory={{Item|6|Silver Lance}}<br>{{Item|6|Spear}} | |inventory={{Item|6|Silver Lance}}<br>{{Item|6|Spear|image=spear fe06}} | ||
|la=y | |la=y | ||
|ax=y | |ax=y | ||
| Line 871: | Line 874: | ||
|con=15 | |con=15 | ||
|aid=14 | |aid=14 | ||
|inventory={{Item|6|Silver Lance}}<br>{{Item|6|Spear}} | |inventory={{Item|6|Silver Lance}}<br>{{Item|6|Spear|image=spear fe06}} | ||
|la=y | |la=y | ||
|ax=y | |ax=y | ||
| Line 878: | Line 881: | ||
==Strategy== | ==Strategy== | ||
{{ | {{strategy}} | ||
1. Weaponry and Unit Recommendations: | |||
* Bring units that use long-range attacks, like [[Sage]]s or [[Sniper]]s. These will expedite the process of breaking down cracked walls, which require 40 damage to destroy. | |||
-- | * Your army is split into three groups. The top two groups should contain your most formidable units, as they are isolated and hard to assist. Ensure each group has a healer or long-range healing capability. | ||
2. Navigating the Battlefield: | |||
* Consider paths with fewer enemies to minimize potential casualties. | |||
* Beware of [[Druid]]s near the boss. One wields a [[Sleep (staff)|Sleep]] staff and the other a [[Berserk (staff)|Berserk]] staff. Their mobility allows them to target most of the map. Counteract their effects by keeping a [[Restore]] staff user in each group and having a stash of [[Pure Water]]s. | |||
* Prioritize weakening walls, but if your current units cannot defeat the enemies behind them, delay your assault until the next turn when you can mobilize more units. Note: enemies wo not breach the walls, giving you time to plan. | |||
3. Key Enemies and Strategies: | |||
* [[Swordmaster]]s and [[Warrior]]s using Brave weapons pose a threat due to their ability to double hit and strike first. To counter them, split your team into two, breaking adjacent right and left walls. | |||
* After clearing the initial enemies, converge on the Swordmaster and Warrior, using long-range attacks or magic units. Especially against the Swordmaster, prioritize mobilizing units from the left with superior movement. | |||
* A Swordmaster near the boss holds a [[Killing Edge]] with high critical hit potential. Adopt a pincer strategy, attacking from both sides. If you are still facing resistance, employ long-range magic if available. | |||
4. Engaging the Boss: | |||
* Utilize magic units to attack the boss from a distance and then immediately rescue them post-attack. This prevents the boss from switching to his [[Spear]], rendering him unable to counter-attack from afar. | |||
* Avoid using [[axe]]-wielding characters against the boss to minimize the risk of significant damage. | |||
==Etymology and other languages== | ==Etymology and other languages== | ||
{{Names | {{Names | ||
|eng-name=Lance of Ice and snow | |eng-name=Lance of Ice and snow | ||
|eng-mean=Used in [[Unused content in Fire Emblem: The Blazing Blade#The Binding Blade data transfer leftovers|leftover text from the data transfer menu]] in the English version of {{FE7}}. Maltet's title was translated as the "freezing lance" in | |eng-mean=Used in [[Unused content in Fire Emblem: The Blazing Blade#The Binding Blade data transfer leftovers|leftover text from the data transfer menu]] in the English version of {{FE7}}. Maltet's title was translated as the "freezing lance" in {{FEH}}. | ||
|eng-fan-name=The Blizzard Spear | |eng-fan-name=The Blizzard Spear | ||
| | |jpn-name={{h|氷雪の槍|Hyōsetsu no yari}} | ||
| | |jpn-mean=Spear of ice and snow | ||
|span-name=La lanza de hielo | |||
|span-mean=The lance of ice; mentioned in ''Heroes''. | |||
|fren-name=La lance du blizzard | |||
|fren-mean=The lance of the blizzard; mentioned in ''Heroes''. | |||
|ger-name=Die Frostlanze | |||
|ger-mean=The Frost Lance; mentioned in ''Heroes''. | |||
|ital-name=La lancia del gelo | |||
|ital-mean=The lance of frost; mentioned in ''Heroes''. | |||
|por-name=A lança do gelo | |||
|por-mean=The lance of ice; mentioned in ''Heroes''. | |||
|ch-trad-name={{h|冰雪之槍|Bīngxuě zhī qiāng}} | |||
|ch-trad-mean=Lance of ice and snow; mentioned in ''Heroes''. | |||
}} | }} | ||
==Gallery== | ==Gallery== | ||
<gallery> | |||
Cm fe06 20xA.png|Map of the chapter | |||
</gallery> | |||
{{refbar}} | {{refbar}} | ||
| Line 902: | Line 934: | ||
{{Nav6}} | {{Nav6}} | ||
{{DEFAULTSORT:Freezing Lance, The}} | |||
[[Category:Chapters of Fire Emblem: The Binding Blade]] | [[Category:Chapters of Fire Emblem: The Binding Blade]] | ||
Latest revision as of 17:09, 28 March 2024
| ||||||||
|

| “ | These ruins are surrounded by thick walls. They won't be able to come in so easily. | ” | — Tick |
|---|
The Freezing Lance (Japanese: 氷雪の槍 Spear of ice and snow) is Chapter 20Ax of Fire Emblem: The Binding Blade. In order to play this chapter, the previous chapter must have been completed within 25 turns and Juno and Zelot must have been recruited and be alive.
Plot
- Main article:
The Freezing Lance/Script
Roy heads inside Edessa's hidden ruins to retrieve a legendary weapon. He learns from Elffin that the ruins house Maltet, the Freezing Lance wielded by Barigan of the Eight Legends. Despite Bern's soldiers under leadership of Tick sealing off the ruin's insides, the Etrurian Army breaks through nonetheless, defeating Tick and retrieving Maltet.
With his task done, Roy resumes his conversation with Guinivere from before the battle for Edessa. She tells him that her father was jealous of Zephiel's talents because he was so ordinary, and wished to prevent Zephiel's ascension, going so far as to promise Bern's throne to Guinivere's future husband. Yet the people of Bern wished for Zephiel to become king, motivating Desmond to attempt to murder his son.
Desmond gave Zephiel a poisoned drink at a banquet. For ten days, Zephiel fell ill and only survived thanks to Murdock's aid. Somehow, Zephiel learned of Desmond's plans to murder anyone Zephiel held dear, including his mother and Murdock, so Zephiel faked his own demise. During the funeral, when Desmond went to view Zephiel's body, Zephiel jumped from the coffin with a sword in hand, killing his father. Since that moment, Zephiel never smiled again. Though Guinivere misses the kind brother she once knew, she asks Roy to put a stop to Zephiel's plans. Roy answers that he may need his sword to do so, which Guinivere accepts.
Chapter data
| ||||||
|
| |||||
| Victory: Seize the throne | Player | Enemy | ||||
|---|---|---|---|---|---|---|
| Defeat: Roy dies | 1–13 | 40 | ||||
| ||||||
Character data
| Characters | |
|---|---|
New units
| |
| |
Required characters
| |
Available characters
| |
Item data
| ||||||||||||||||||||||||
|
Enemy data
- Stats with two figures separated by a ~ are presented as a range, representing stats that vary due to random growths. The figures to the left and right of the ~ are the stat's minimum and maximum possible values respectively.
Normal Hard
| ||||||||||||||||||||||||||||||||||||||||||||||||||||||||||||||||||||||||||||||||||||||||||||||||||||||||||||||||||||||||||||||||||||||||||||||||||||||||||||||||||||||||||||||||||||||||||||||||||||||||||||||||||||||||||||||||||||||||||||||||||||||||||||||||||||||||||||||||||||||||||||||||||||||||||||||||||||||||||||||||||||||||||||||||||||||||||||||||||||||||||||||||||||||||||||||||||||||||||||||||||||||||||||||||||||||||||||||||||||||||||||||||||||||||||||||||||||||||||||||||||||||||||||||||||||||||||||||||||||||||||||||||||||||||||||||||||||||||||||||||||||||||||||||||||||||
| ||||||||||||||||||||||||||||||||||||||||||||||||||||||||||||||||||||||||||||||||||||||||||||||||||||||||||||||||||||||||||||||||||||||||||||||||||||||||||||||||||||||||||||||||||||||||||||||||||||||||||||||||||||||||||||||||||||||||||||||||||||||||||||||||||||||||||||||||||||||||||||||||||||||||||||||||||||||||||||||||||||||||||||||||||||||||||||||||||||||||||||||||||||||||||||||||||||||||||||||||||||||||||||||||||||||||||||||||||||||||||||||||||||||||||||||||||||||||||||||||||||||||||||||||||||||||||||||||||||||||||||||||||||||||||||||||||||||||||||||||||||||||||||||||||||||
Boss data
- Main article:
Tick - Stats with two figures separated by a ~ are presented as a range, representing stats that vary due to random growths. The figures to the left and right of the ~ are the stat's minimum and maximum possible values respectively.[1]
Normal Hard
|
|
| |||||||||||||||||||||||||||||||||||||||||||||||||

Strategy
| This section details unofficial strategies that may help with completion of the chapter. This may not work for everybody. |
1. Weaponry and Unit Recommendations:
- Bring units that use long-range attacks, like Sages or Snipers. These will expedite the process of breaking down cracked walls, which require 40 damage to destroy.
- Your army is split into three groups. The top two groups should contain your most formidable units, as they are isolated and hard to assist. Ensure each group has a healer or long-range healing capability.
2. Navigating the Battlefield:
- Consider paths with fewer enemies to minimize potential casualties.
- Beware of Druids near the boss. One wields a Sleep staff and the other a Berserk staff. Their mobility allows them to target most of the map. Counteract their effects by keeping a Restore staff user in each group and having a stash of Pure Waters.
- Prioritize weakening walls, but if your current units cannot defeat the enemies behind them, delay your assault until the next turn when you can mobilize more units. Note: enemies wo not breach the walls, giving you time to plan.
3. Key Enemies and Strategies:
- Swordmasters and Warriors using Brave weapons pose a threat due to their ability to double hit and strike first. To counter them, split your team into two, breaking adjacent right and left walls.
- After clearing the initial enemies, converge on the Swordmaster and Warrior, using long-range attacks or magic units. Especially against the Swordmaster, prioritize mobilizing units from the left with superior movement.
- A Swordmaster near the boss holds a Killing Edge with high critical hit potential. Adopt a pincer strategy, attacking from both sides. If you are still facing resistance, employ long-range magic if available.
4. Engaging the Boss:
- Utilize magic units to attack the boss from a distance and then immediately rescue them post-attack. This prevents the boss from switching to his Spear, rendering him unable to counter-attack from afar.
- Avoid using axe-wielding characters against the boss to minimize the risk of significant damage.
Etymology and other languages
| Names, etymology, and in other regions | ||
|---|---|---|
| Language | Name | Definition, etymology, and notes |
| English |
Lance of Ice and snow |
Used in leftover text from the data transfer menu in the English version of Fire Emblem: The Blazing Blade. Maltet's title was translated as the "freezing lance" in Fire Emblem Heroes. |
| English (unofficial) |
The Blizzard Spear |
-- |
| Japanese |
氷雪の槍 |
Spear of ice and snow |
| Spanish |
La lanza de hielo |
The lance of ice; mentioned in Heroes. |
| French |
La lance du blizzard |
The lance of the blizzard; mentioned in Heroes. |
| German |
Die Frostlanze |
The Frost Lance; mentioned in Heroes. |
| Italian |
La lancia del gelo |
The lance of frost; mentioned in Heroes. |
| Portuguese |
A lança do gelo |
The lance of ice; mentioned in Heroes. |
| Traditional Chinese |
冰雪之槍 |
Lance of ice and snow; mentioned in Heroes. |
Gallery
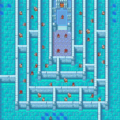
Map of the chapter
References
- ↑ The Freezing Lance, triangleattack.com, Retrieved: December 24, 2020
| ← Ilia's Salvation • | The Freezing Lance | • The Binding Blade → |
|---|