| Site News |
|---|
| Warning: This wiki contains spoilers. Read at your own risk! Social media: If you would like, please join our Discord server, and/or follow us on Twitter (X) or Tumblr! |
Saga:Subduing the Bandits: Difference between revisions
Thecornerman (talk | contribs) m (Text replacement - "([Cc])hapter (\d+)" to "$1hapter $2") |
|||
| (27 intermediate revisions by 10 users not shown) | |||
| Line 1: | Line 1: | ||
{{DISPLAYTITLE:Subduing the Bandits}} | {{DISPLAYTITLE:Subduing the Bandits}} | ||
{{Chapter Infobox | {{Chapter Infobox | ||
|image=[[File:Cm trs1 2.png|200px]] | |image=[[File:Cm trs1 2.png|200px]] | ||
|location={{ | |location={{Saga|Wellt|Taurus}} | ||
|new units={{ | |new units={{Saga|Lee}}, {{Saga|Ezekiel}}, {{Saga|Narron}}, {{Saga|Ruka}}, {{Saga|Esther}}, {{Saga|Raffin}}, {{Saga|Barts}}, {{Saga|Enteh}}, {{Saga|Julia}}, {{Saga|Plum}} | ||
|boss={{ | |boss={{Saga|Yazam}} | ||
|previous={{Saga|Arrival at Wellt}} | |||
|next={{Saga|The Encounter}} | |||
}} | }} | ||
{{quote|In that case, allow us to assist with your bandit problem. That way, we may focus our efforts on reclaiming Fort Wellt from {{ | {{quote|In that case, allow us to assist with your bandit problem. That way, we may focus our efforts on reclaiming Fort Wellt from {{Saga|Codha}}. Does that sound acceptable to you?|{{Saga|Runan}} making his proposal to {{Saga|Marlon}}.}} | ||
'''Subduing the Bandits''' (Japanese: {{ | '''Subduing the Bandits''' (Japanese: {{hl|山賊討伐|Sanzoku tōbatsu}} ''Subduing the Bandits'') is the second chapter in {{TRS1}}. | ||
==Plot== | ==Plot== | ||
{{main| | {{main|Saga:Subduing the Bandits/Script}} | ||
{{ | {{Saga|Runan}} arrives at Verje and is welcomed by {{Saga|Raffin}} and {{Saga|Marlon}}. Marlon explains he cannot currently provide aid to Reeve because bandits have been attacking Verje due to the loss of soldiers in the aftermath of the {{Saga|Battle of Balt}}. Runan offers to exterminate the bandits, and Marlon sends him out with Raffin, {{Saga|Esther}}, and one more soldier of Runan's choice. Runan heads to the mountain village of Taurus and does battle with the bandits. | ||
Meanwhile, the sister {{Saga|Enteh}} leaves her village to visit the bandit hideout, hearing that one of them is in need of healing. The man in need, {{Saga|Yazam}}, subsequently imprisons her afterwards. She is rescued by {{Saga|Barts}} as the battle begins and the two meet up with Runan's forces during the fighting. The swordswoman {{Saga|Julia}}, and Barts' sister {{Saga|Plum}} also join the group during the battle. | |||
Afterwards, {{ | Afterwards, {{Saga|Eugen}} tells Runan that Enteh requested an escort to the Temple of Mars and that he agreed to let her accompany them. He also points out that Enteh is the "most beautiful woman he has seen in sixty years of life" and notes that Runan will eventually be expected to take a wife, though Runan is mostly annoyed at this and reminds Eugen they have more pressing matters to attend to before departing on their return trip to Verje. | ||
==Chapter data== | ==Chapter data== | ||
{{ | {{ChapData | ||
|victory=Seize | |victory=Seize | ||
|defeat=Runan or Enteh dies | |defeat=Runan or Enteh dies | ||
|ally=7{{ | |ally=7{{h|+4|Recruitable units}} | ||
|other=0 | |other=0 | ||
|enemy=12{{ | |enemy=12{{h|+6|Reinforcements}} | ||
|map= | |map={{tab | ||
{{tab | |||
|tab1=Start | |tab1=Start | ||
|tab2=Reinforcements | |tab2=Reinforcements | ||
|content1=[[File:Cm trs1 2.png]] | |content1=<div>[[File:Cm trs1 2.png]]</div> | ||
|content2=[[File:Cm trs1 2 reinforcements.png]] | |content2=<div>[[File:Cm trs1 2 reinforcements.png]]</div> | ||
}} | }} | ||
}} | }} | ||
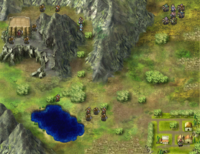
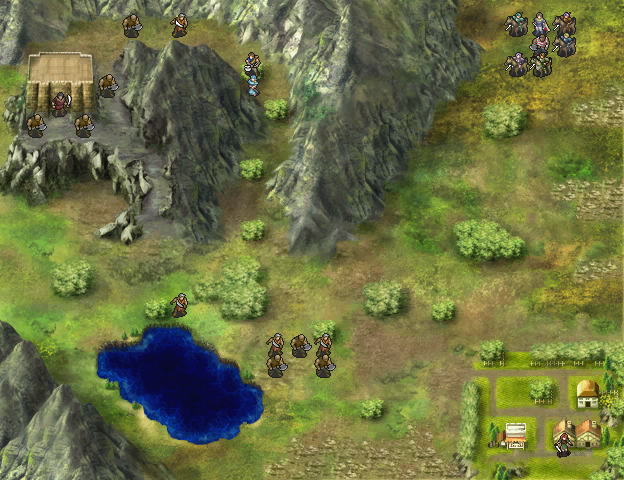
* <small>Note: The Map takes place on a world map location consisting of '''{{Saga|Mountain Fighter|Mountain}}''' terrain.</small> | |||
===Character data=== | ===Character data=== | ||
{{ | {{ChapChars | ||
|game#= | |game#=trs01 | ||
|newunit1={{NewUnitTRS1 | |||
|newunit1={{ | |||
|name=Lee | |name=Lee | ||
|portrait=[[File:Portrait lee trs01.png]] | |portrait=[[File:Portrait lee trs01.png|x100px]] | ||
|class=Bishop | |class=Bishop | ||
|HP=25 | |HP=25 | ||
|lv=15 | |lv=15 | ||
|recruitment method=Talk to him at Verje{{ | |inventory={{Item|ps1|Fire|link=Fire (spell)}}<br>{{Item|ps1|Distant Healing Staff}}<br>{{Item|ps1|Healing Staff}} | ||
|newunit2={{ | |recruitment method=Talk to him at Verje{{h|*|The player must choose between him, Ezekiel, Narron, and Ruka}} | ||
}} | |||
|newunit2={{NewUnitTRS1 | |||
|name=Ezekiel | |name=Ezekiel | ||
|portrait=[[File:Portrait ezekiel trs01.png]] | |portrait=[[File:Portrait ezekiel trs01.png|x100px]] | ||
|class=Axe Knight | |class=Axe Knight | ||
|HP=27 | |HP=27 | ||
|lv=5 | |lv=5 | ||
|recruitment method=Talk to him at Verje{{ | |inventory={{Item|ps1|Steel Axe}} | ||
|newunit3={{ | |recruitment method=Talk to him at Verje{{h|*|The player must choose between him, Lee, Narron, and Ruka}} | ||
}} | |||
|newunit3={{NewUnitTRS1 | |||
|name=Narron | |name=Narron | ||
|portrait=[[File:Portrait narron trs01.png]] | |portrait=[[File:Portrait narron trs01.png|x100px]] | ||
|class=Rook Knight | |class=Rook Knight | ||
|HP=22 | |HP=22 | ||
|lv=1 | |lv=1 | ||
|recruitment method=Talk to him at Verje{{ | |inventory={{Item|ps1|Iron Sword}} | ||
|newunit4={{ | |recruitment method=Talk to him at Verje{{h|*|The player must choose between him, Lee, Ezekiel, and Ruka}} | ||
}} | |||
|newunit4={{NewUnitTRS1 | |||
|name=Ruka | |name=Ruka | ||
|portrait=[[File:Portrait ruka trs01.png]] | |portrait=[[File:Portrait ruka trs01.png|x100px]] | ||
|class=Bow Fighter | |class=Bow Fighter | ||
|HP=19 | |HP=19 | ||
|lv=2 | |lv=2 | ||
|recruitment method=Talk to him at Verje{{ | |inventory={{Item|ps1|Hand Bow}} | ||
|newunit5={{ | |recruitment method=Talk to him at Verje{{h|*|The player must choose between him, Lee, Ezekiel, and Narron}} | ||
}} | |||
|newunit5={{NewUnitTRS1 | |||
|name=Esther | |name=Esther | ||
|portrait=[[File:Portrait esther trs01.png]] | |portrait=[[File:Portrait esther trs01.png|x100px]] | ||
|class=Rook Knight | |class=Rook Knight | ||
|HP=21 | |HP=21 | ||
|lv=2 | |lv=2 | ||
|recruitment method=Automatically upon leaving Verje}} | |inventory={{Item|ps1|Slim Spear}}<br>{{Item|ps1|Shortsword}} | ||
|newunit6={{ | |recruitment method=Automatically upon leaving Verje | ||
}} | |||
|newunit6={{NewUnitTRS1 | |||
|name=Raffin | |name=Raffin | ||
|portrait=[[File:Portrait raffin trs01.png]] | |portrait=[[File:Portrait raffin trs01.png|x100px]] | ||
|class=Commando Knight | |class=Commando Knight | ||
|HP=27 | |HP=27 | ||
|lv=6 | |lv=6 | ||
|recruitment method=Automatically upon leaving Verje}} | |inventory={{Item|ps1|Needle Spear}}<br>{{Item|ps1|Steel Sword}} | ||
|newunit7={{ | |recruitment method=Automatically upon leaving Verje | ||
}} | |||
|newunit7={{NewUnitTRS1 | |||
|name=Barts | |name=Barts | ||
|portrait=[[File:Portrait barts trs01.png]] | |portrait=[[File:Portrait barts trs01.png|x100px]] | ||
|class=Axe Fighter | |class=Axe Fighter | ||
|HP=28 | |HP=28 | ||
|lv=3 | |lv=3 | ||
|recruitment method=Automatically from turn 1}} | |inventory={{Item|ps1|Iron Axe}} | ||
|newunit8={{ | |recruitment method=Automatically from turn 1 | ||
}} | |||
|newunit8={{NewUnitTRS1 | |||
|name=Enteh | |name=Enteh | ||
|portrait=[[File:Portrait enteh trs01.png]] | |portrait=[[File:Portrait enteh trs01.png|x100px]] | ||
|class=Sister | |class=Sister | ||
|HP=15 | |HP=15 | ||
|lv=2 | |lv=2 | ||
|recruitment method=Automatically from turn 1}} | |inventory={{Item|ps1|Healing Staff}}<br>{{Item|ps1|Memory Staff}} | ||
|newunit9={{ | |recruitment method=Automatically from turn 1 | ||
}} | |||
|newunit9={{NewUnitTRS1 | |||
|name=Julia | |name=Julia | ||
|portrait=[[File:Portrait julia trs01.png]] | |portrait=[[File:Portrait julia trs01.png|x100px]] | ||
|class= | |class=Swordfighter | ||
|HP=22 | |HP=22 | ||
|lv=1 | |lv=1 | ||
|recruitment method=Automatically from turn 1}} | |inventory={{Item|ps1|Scimitar}}<br>{{Item|ps1|Kill Blade}} | ||
|newunit10={{ | |recruitment method=Automatically from turn 1 | ||
}} | |||
|newunit10={{NewUnitTRS1 | |||
|name=Plum | |name=Plum | ||
|portrait=[[File:Portrait plum trs01.png]] | |portrait=[[File:Portrait plum trs01.png|x100px]] | ||
|class=Priest | |class=Priest | ||
|HP=18 | |HP=18 | ||
|lv=1 | |lv=1 | ||
|recruitment method=Visit the bottom right house with Enteh}} | |inventory={{Item|ps1|Healing Staff}} | ||
| | |recruitment method=Visit the bottom right house with Enteh | ||
| | }} | ||
| | |forced1=runan | ||
| | |return1=kreiss | ||
|return2=arkis | |||
|return3=garo | |||
}} | }} | ||
| Line 121: | Line 141: | ||
|item1=Max HP Plus | |item1=Max HP Plus | ||
|item1image=mhp plus | |item1image=mhp plus | ||
|item1article= | |item1article=Saga:Max HP Plus | ||
|obtain1=Visit the top house. | |obtain1=Visit the top house. | ||
|item2=Gold Bag | |item2=Gold Bag | ||
|item2article= | |item2article=Saga:Gold Bag | ||
|obtain2=Visit the left house with Barts | |obtain2=Visit the left house with Barts before Plum visits it. | ||
|item3=Healing Fruit | |item3=Healing Fruit | ||
|item3article= | |item3article=Saga:Healing Fruit | ||
|obtain3=Visit the left house with | |obtain3=Visit the left house with Enteh before Plum visits it. | ||
|item4=Lan's Mirror | |item4=Lan's Mirror | ||
|item4article= | |item4article=Saga:Lan's Mirror | ||
|obtain4=Visit the left house with Plum. | |obtain4=Visit the left house with Plum. | ||
|item5=Poleax | |item5=Poleax | ||
|item5article= | |item5article=Saga:Poleax | ||
|obtain5=Visit the bottom right house with Barts. | |obtain5=Visit the bottom right house with Barts before Enteh visits it. | ||
|item6=Gold Bag | |item6=Gold Bag | ||
|item6article= | |item6article=Saga:Gold Bag | ||
|obtain6=Dropped by a Thief. | |obtain6=Dropped by a Thief. | ||
|itemlast=Defense Staff | |itemlast=Defense Staff | ||
|itemlastarticle= | |itemlastarticle=Saga:Defense Staff | ||
|obtainlast=Automatically at the end of the chapter if Lee and Plum were recruited.}} | |obtainlast=Automatically at the end of the chapter if Lee and Plum were recruited and Plum had visited the left house. | ||
}} | |||
===Shop data=== | ===Shop data=== | ||
{{ChapShop PS1 | {{ChapShop PS1 | ||
|axe1=Iron Axe | |axe1=Iron Axe | ||
|axe1article= | |axe1article=Saga:Iron Axe | ||
|axcost1=880 | |axcost1=880 | ||
|axe2=Hammer | |axe2=Hammer | ||
|axe2article= | |axe2article=Saga:Hammer | ||
|axcost2=1200 | |axcost2=1200 | ||
|bow1=Iron Bow | |bow1=Iron Bow | ||
|bow1article= | |bow1article=Saga:Iron Bow | ||
|bocost1=1200 | |bocost1=1200 | ||
}} | }} | ||
| Line 160: | Line 181: | ||
|name1=Taurus Bandit | |name1=Taurus Bandit | ||
|class1=Bandit | |class1=Bandit | ||
|class1article= | |class1article=Saga:Bandit | ||
|lv1=2 | |lv1=2 | ||
|#1=2 | |#1=2 | ||
|inventory1= | |inventory1={{Item|ps1|Iron Axe}} | ||
|- | |- | ||
|name2=Taurus Bandit | |name2=Taurus Bandit | ||
|class2=Bandit | |class2=Bandit | ||
|class2article= | |class2article=Saga:Bandit | ||
|lv2=1 | |lv2=1 | ||
|#2=2 | |#2=2 | ||
|inventory2= | |inventory2={{Item|ps1|Iron Axe}} | ||
|notes2=Upper left one pursues {{ | |notes2=Upper left one pursues {{Saga|Barts}} and {{Saga|Enteh}}. | ||
|- | |- | ||
|name3=Taurus Bandit | |name3=Taurus Bandit | ||
|class3=Bandit | |class3=Bandit | ||
|class3article= | |class3article=Saga:Bandit | ||
|lv3=3 | |lv3=3 | ||
|#3=2 | |#3=2 | ||
|inventory3= | |inventory3={{Item|ps1|Iron Axe}} | ||
|notes3=Stationary until enemy moves in range. | |notes3=Stationary until enemy moves in range. | ||
|- | |- | ||
|name4=Taurus Bandit | |name4=Taurus Bandit | ||
|class4=Bandit | |class4=Bandit | ||
|class4article= | |class4article=Saga:Bandit | ||
|lv4=2 | |lv4=2 | ||
|#4=1 | |#4=1 | ||
|inventory4= | |inventory4={{Item|ps1|Hand Axe}} | ||
|- | |- | ||
|name5=Taurus Bandit | |name5=Taurus Bandit | ||
|class5=Thief | |class5=Thief | ||
|class5article= | |class5article=Saga:Thief | ||
|lv5=1 | |lv5=1 | ||
|#5=1 | |#5=1 | ||
|inventory5= | |inventory5={{Item|ps1|Shortsword}} • {{Item|ps1|Gold Bag|type=drop}} | ||
|- | |- | ||
|name6=Taurus Bandit | |name6=Taurus Bandit | ||
|class6=Thief | |class6=Thief | ||
|class6article= | |class6article=Saga:Thief | ||
|lv6=2 | |lv6=2 | ||
|#6=1 | |#6=1 | ||
|inventory6= | |inventory6={{Item|ps1|Shortsword}} | ||
|- | |- | ||
|name7=Taurus Bandit | |name7=Taurus Bandit | ||
|class7=Thief | |class7=Thief | ||
|class7article= | |class7article=Saga:Thief | ||
|lv7=1 | |lv7=1 | ||
|#7=1 | |#7=1 | ||
|inventory7= | |inventory7={{Item|ps1|Shortsword}} | ||
|- | |- | ||
|name8=Taurus Bandit | |name8=Taurus Bandit | ||
|class8=Thief | |class8=Thief | ||
|class8article= | |class8article=Saga:Thief | ||
|lv8=1 | |lv8=1 | ||
|#8=1 | |#8=1 | ||
|inventory8= | |inventory8={{Item|ps1|Iron Sword}} | ||
|notes8=Pursues {{ | |notes8=Pursues {{Saga|Barts}} and {{Saga|Enteh}}. | ||
|- | |- | ||
|nameb={{ | |nameb={{Saga|Yazam}} | ||
|classb=Chief | |classb=Chief | ||
|classbarticle= | |classbarticle=Saga:Chief Thief | ||
|versionb=yazam | |versionb=yazam | ||
|lvb=3 | |lvb=3 | ||
|#b=1 | |#b=1 | ||
|inventoryb= | |inventoryb={{Item|ps1|Scimitar}} | ||
|- | |- | ||
|namer1=Taurus Bandit | |namer1=Taurus Bandit | ||
|classr1=Thief | |classr1=Thief | ||
|classr1article= | |classr1article=Saga:Thief | ||
|lvr1=2 | |lvr1=2 | ||
|#r1=2 | |#r1=2 | ||
|inventoryr1= | |inventoryr1={{Item|ps1|Iron Sword}} | ||
|- | |- | ||
|namer2=Taurus Bandit | |namer2=Taurus Bandit | ||
|classr2=Bandit | |classr2=Bandit | ||
|classr2article= | |classr2article=Saga:Bandit | ||
|lvr2=1 | |lvr2=1 | ||
|#r2=2 | |#r2=2 | ||
|inventoryr2= | |inventoryr2={{Item|ps1|Iron Axe}} | ||
|- | |- | ||
|namerl=Taurus Bandit | |namerl=Taurus Bandit | ||
|classrl=Bandit | |classrl=Bandit | ||
|classrlarticle= | |classrlarticle=Saga:Bandit | ||
|lvrl=2 | |lvrl=2 | ||
|#rl=2 | |#rl=2 | ||
|inventoryrl= | |inventoryrl={{Item|ps1|Iron Axe}} | ||
}} | }} | ||
| Line 252: | Line 273: | ||
===Boss data=== | ===Boss data=== | ||
{{main| | {{main|Saga:Yazam {{!}} Yazam}} | ||
{{BossStats TRS1 | {{BossStats TRS1 | ||
|portrait=[[File:Portrait yazam trs01.png]] | |portrait=[[File:Portrait yazam trs01.png]] | ||
|class | |class=Chief Thief | ||
|lv=3 | |lv=3 | ||
|move=4 | |move=4 | ||
| Line 268: | Line 288: | ||
|def=5 | |def=5 | ||
|wlv=3 | |wlv=3 | ||
|sw= | |sw=y | ||
|inventory= | |inventory={{Item|ps1|Scimitar}} | ||
}} | }} | ||
==Strategy== | ==Strategy== | ||
{{Strategy}} | {{Strategy}} | ||
During your trip to Verje, you must choose between one of four units. You will later have another chance to recruit one more of these units or {{ | ===Choosing your unit at Verje=== | ||
During your trip to Verje, you must choose between one of four units. At a glance these four characters, {{Saga|Lee}}, {{Saga|Narron}}, {{Saga|Ezekiel}}, and {{Saga|Ruka}} may feel relatively inconsequential, but the player's choice here can affect the availability of certain side-events in the future. You will later have another chance to recruit one more of these units or {{Saga|Lionel}}. | |||
* {{Saga|Lee}} the {{Saga|Bishop}} will net you the unique {{Saga|Defense Staff}} for {{Saga|Plum}} at the end of this chapter. He is also one of the few healers with offensive utility; the other possibly offensive healers are {{Saga|Mel}} and {{Saga|Katri}}. | |||
* {{Saga|Ezekiel}} is an {{Saga|Axe Knight}} who competes with {{Saga|Garo}} and {{Saga|Barts}} for the time being, but his presence is required to prevent {{Saga|Kreiss}} and {{Saga|Leteena}} from deserting you should you choose to recruit the latter. | |||
* {{Saga|Narron}} is unconnected to any side events and is another member of the over-saturated {{Saga|Rook Knight}} class. However, his {{Saga|Elite}} skill and promotion to the powerful {{Saga|Gold Knight}} class make him a high-investment, high-reward unit. | |||
* {{Saga|Ruka}} is a {{Saga|Bow Fighter}} who will be competing with {{Saga|Kate}}; recruiting him in Chapter 2 is required to make {{Saga|Raquel}} rescind her vow never to kill humans. | |||
Barts, the player {{ | ===General strategy=== | ||
Barts, the player {{Saga|Axe Fighter}} in the upper left, can very easily kill the {{Saga|Thief}} and {{Saga|Bandit}} chasing him. Have him and {{Saga|Enteh}} make their way down to the village in the bottom right of the map. In the meanwhile the player should have their forces make their way to aid {{Saga|Julia}} in defending the village. | |||
After killing the group of enemies approaching the village make sure to have Enteh (Enteh may have not gotten there yet due to her 4 movement) visit the bottom right house to recruit the {{ | After killing the group of enemies approaching the village make sure to have Enteh (Enteh may have not gotten there yet due to her 4 movement) visit the bottom right house to recruit the {{Saga|Priest}} girl named Plum. Have Plum, Enteh, and Barts then visit the bottom left house and each will receive a different item. The rest of your units should be making their way northwest to clean up any remaining stragglers and to defeat {{Saga|Yazam}}. Yazam packs quite a punch so be careful that he doesn't kill anyone on his turn if a weakened unit is left in front of him at the end of the player phase. Once Yazam is downed have Runan seize the entrance to the fortress to conclude the battle. | ||
==Trivia== | ==Trivia== | ||
*The start of the chapter, during the gameplay segment where {{ | *The start of the chapter, during the gameplay segment where {{Saga|Barts}} has to protect {{Saga|Enteh}} as they flee from the bandits, is very similar to [[Julian]]'s and [[Lena]]'s situation during [[A Brush in the Teeth|Chapter 3]] of {{FE1}} and {{FE11}}. | ||
==Etymology and other languages== | ==Etymology and other languages== | ||
| Line 288: | Line 313: | ||
|eng-fan-name=Subduing the Bandits | |eng-fan-name=Subduing the Bandits | ||
|eng-fan-mean=Used in various {{TRS1}} fan translations. | |eng-fan-mean=Used in various {{TRS1}} fan translations. | ||
| | |jpn-name={{h|山賊討伐|Sanzoku tōbatsu}} | ||
| | |jpn-mean=Subduing the Bandits | ||
}} | }} | ||
| Line 298: | Line 323: | ||
{{ChapterNav | {{ChapterNav | ||
|prechapter= | |prechapter=Saga:Arrival at Wellt{{!}}Arrival at Wellt | ||
|nextchapter=Saga:The Encounter{{!}}The Encounter | |||
|nextchapter= | |||
}} | }} | ||
{{NavTRS1}} | {{NavTRS1}} | ||
[[Category:Chapters of | [[Category:Chapters of TearRing Saga: Yutona Heroes War Chronicles]] | ||
Latest revision as of 16:49, 28 March 2024
| ||||||||||
|
| “ | In that case, allow us to assist with your bandit problem. That way, we may focus our efforts on reclaiming Fort Wellt from Codha. Does that sound acceptable to you? | ” | — Runan making his proposal to Marlon. |
|---|
Subduing the Bandits (Japanese: 山賊討伐 Subduing the Bandits) is the second chapter in TearRing Saga: Yutona Heroes War Chronicles.
Plot
- Main article:
Saga:Subduing the Bandits/Script
Runan arrives at Verje and is welcomed by Raffin and Marlon. Marlon explains he cannot currently provide aid to Reeve because bandits have been attacking Verje due to the loss of soldiers in the aftermath of the Battle of Balt. Runan offers to exterminate the bandits, and Marlon sends him out with Raffin, Esther, and one more soldier of Runan's choice. Runan heads to the mountain village of Taurus and does battle with the bandits.
Meanwhile, the sister Enteh leaves her village to visit the bandit hideout, hearing that one of them is in need of healing. The man in need, Yazam, subsequently imprisons her afterwards. She is rescued by Barts as the battle begins and the two meet up with Runan's forces during the fighting. The swordswoman Julia, and Barts' sister Plum also join the group during the battle.
Afterwards, Eugen tells Runan that Enteh requested an escort to the Temple of Mars and that he agreed to let her accompany them. He also points out that Enteh is the "most beautiful woman he has seen in sixty years of life" and notes that Runan will eventually be expected to take a wife, though Runan is mostly annoyed at this and reminds Eugen they have more pressing matters to attend to before departing on their return trip to Verje.
Chapter data
| ||||||
|
| |||||
| Victory: Seize | Player | Other | Enemy | |||
|---|---|---|---|---|---|---|
| Defeat: Runan or Enteh dies | 7+4 | 0 | 12+6 | |||
|
| ||||||
- Note: The Map takes place on a world map location consisting of Mountain terrain.
Character data
| Characters | ||||||||||||||||||||||||||||||||||||||||||||||||||||||||||||||||||||||||||||||||||||||||||||||||||||||||||||||
|---|---|---|---|---|---|---|---|---|---|---|---|---|---|---|---|---|---|---|---|---|---|---|---|---|---|---|---|---|---|---|---|---|---|---|---|---|---|---|---|---|---|---|---|---|---|---|---|---|---|---|---|---|---|---|---|---|---|---|---|---|---|---|---|---|---|---|---|---|---|---|---|---|---|---|---|---|---|---|---|---|---|---|---|---|---|---|---|---|---|---|---|---|---|---|---|---|---|---|---|---|---|---|---|---|---|---|---|---|---|---|
New units
| ||||||||||||||||||||||||||||||||||||||||||||||||||||||||||||||||||||||||||||||||||||||||||||||||||||||||||||||
| ||||||||||||||||||||||||||||||||||||||||||||||||||||||||||||||||||||||||||||||||||||||||||||||||||||||||||||||
Required characters
| ||||||||||||||||||||||||||||||||||||||||||||||||||||||||||||||||||||||||||||||||||||||||||||||||||||||||||||||

| ||||||||||||||||||||||||||||||||||||||||||||||||||||||||||||||||||||||||||||||||||||||||||||||||||||||||||||||
Available characters
| ||||||||||||||||||||||||||||||||||||||||||||||||||||||||||||||||||||||||||||||||||||||||||||||||||||||||||||||
  
| ||||||||||||||||||||||||||||||||||||||||||||||||||||||||||||||||||||||||||||||||||||||||||||||||||||||||||||||
Item data
| ||||||||||||||||||||||||
|
Shop data
Swords Spears Axes Bows Tomes Staves Items Secret
None
Enemy data
| ||||||||||||||||||||||||||||||||||||||||||||||||||||||||||||||||||||||
| ||||||||||||||||||||||||||||||||||||||||||||||||||||||||||||||||||||||
| ||||||||||||||||||||||||||||||||||||||||||||||||||||||||||||||||||||||
|
Reinforcements
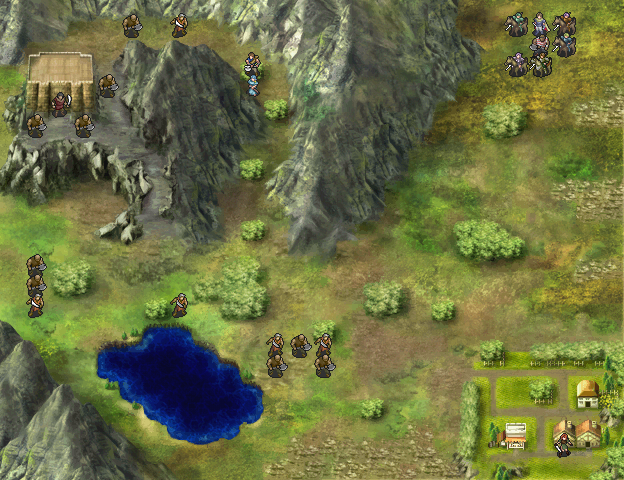
- End of Enemy Phases 4 and 5
- Two Bandits and a Thief appear from the west
Boss data
- Main article:
Yazam
|
|
| ||||||||||||||||||||||||||||||||||||||||||||||||||||||
Strategy
| This section details unofficial strategies that may help with completion of the chapter. This may not work for everybody. |
Choosing your unit at Verje
During your trip to Verje, you must choose between one of four units. At a glance these four characters, Lee, Narron, Ezekiel, and Ruka may feel relatively inconsequential, but the player's choice here can affect the availability of certain side-events in the future. You will later have another chance to recruit one more of these units or Lionel.
- Lee the Bishop will net you the unique Defense Staff for Plum at the end of this chapter. He is also one of the few healers with offensive utility; the other possibly offensive healers are Mel and Katri.
- Ezekiel is an Axe Knight who competes with Garo and Barts for the time being, but his presence is required to prevent Kreiss and Leteena from deserting you should you choose to recruit the latter.
- Narron is unconnected to any side events and is another member of the over-saturated Rook Knight class. However, his Elite skill and promotion to the powerful Gold Knight class make him a high-investment, high-reward unit.
- Ruka is a Bow Fighter who will be competing with Kate; recruiting him in Chapter 2 is required to make Raquel rescind her vow never to kill humans.
General strategy
Barts, the player Axe Fighter in the upper left, can very easily kill the Thief and Bandit chasing him. Have him and Enteh make their way down to the village in the bottom right of the map. In the meanwhile the player should have their forces make their way to aid Julia in defending the village.
After killing the group of enemies approaching the village make sure to have Enteh (Enteh may have not gotten there yet due to her 4 movement) visit the bottom right house to recruit the Priest girl named Plum. Have Plum, Enteh, and Barts then visit the bottom left house and each will receive a different item. The rest of your units should be making their way northwest to clean up any remaining stragglers and to defeat Yazam. Yazam packs quite a punch so be careful that he doesn't kill anyone on his turn if a weakened unit is left in front of him at the end of the player phase. Once Yazam is downed have Runan seize the entrance to the fortress to conclude the battle.
Trivia
- The start of the chapter, during the gameplay segment where Barts has to protect Enteh as they flee from the bandits, is very similar to Julian's and Lena's situation during Chapter 3 of Fire Emblem: Shadow Dragon & the Blade of Light and Fire Emblem: Shadow Dragon.
Etymology and other languages
| Names, etymology, and in other regions | ||
|---|---|---|
| Language | Name | Definition, etymology, and notes |
| English (unofficial) |
Subduing the Bandits |
Used in various TearRing Saga: Yutona Heroes War Chronicles fan translations. |
| Japanese |
山賊討伐 |
Subduing the Bandits |
Gallery
This section has been marked as a stub. Please help improve the page by adding information.
References
| ← Arrival at Wellt • | Subduing the Bandits | • The Encounter → |
|---|
