| Site News |
|---|
| Warning: This wiki contains spoilers. Read at your own risk! Social media: If you would like, please join our Discord server, and/or follow us on Twitter (X) or Tumblr! |
Saga:Across the River: Difference between revisions
Thecornerman (talk | contribs) m (→Character data) |
m (Text replacement - "|jap-" to "|jpn-") |
||
| (11 intermediate revisions by 4 users not shown) | |||
| Line 1: | Line 1: | ||
{{DISPLAYTITLE:Across the River}} | {{DISPLAYTITLE:Across the River}} | ||
{{Chapter Infobox | {{Chapter Infobox | ||
|image=[[File:Cm trs1 6.png|200px]] | |image=[[File:Cm trs1 6.png|200px]] | ||
|location={{ | |location={{Saga|Wellt|Great Bridge}} | ||
|boss={{ | |new units={{Saga|Mel}}, {{Saga|Norton}} | ||
|boss={{Saga|Dommes}} | |||
|previous={{Saga|Beyond the Legend}} | |||
|next={{Saga|Liberation of Wellt}} | |||
}} | }} | ||
'''Across the River''' is the sixth chapter in {{TRS1}}. | '''Across the River''' (Japanese: {{hl|渡河作戦|Toka sakusen}} ''River Crossing Strategy'') is the sixth chapter in {{TRS1}}. | ||
==Plot== | ==Plot== | ||
{{main| | {{main|Saga:Across the River/Script}} | ||
{{ | {{Saga|Runan}} returns to {{Saga|Marlon}} and informs him of {{Saga|Ezenbah}}'s death. Marlon informs him that {{Saga|Codha}} is marshaling his forces to defend the Great Bridge, but {{Saga|Eugen}} comes up with a plan to circumvent him. Meanwhile, {{Saga|Narsus}} meets Queen {{Saga|Liza}} and verifies her safety; she gives him a {{Saga|Pegasus Flute}} to deliver to {{Saga|Sasha}}. Narsus then breaks {{Saga|Mel}} out of prison. {{Saga|Zeek}}'s story comes under suspicion when {{Saga|Raffin}}, who grew up in {{Saga|Barge}}, does not recognize him as a former knight; Zeek claims that he never met Raffin and shows {{Saga|Kate}} horrific scars on his body, lending credence to his claims. Zeek recounts how he tried to protect one of his brothers, only to be brutally tortured with a barbed whip and then forced to watch the brother suffer the same fate; when they brought in his older sister, he broke and swore loyalty to {{Saga|Gerxel}}. | ||
Eugen sends some of Runan's soldiers to outflank the enemy and Runan leads the charge. Narsus escorts Mel to Runan's forces before fleeing again, while Sasha recruits a Welltese knight named {{ | Eugen sends some of Runan's soldiers to outflank the enemy and Runan leads the charge. Narsus escorts Mel to Runan's forces before fleeing again, while Sasha recruits a Welltese knight named {{Saga|Norton}} who is loyal to the crown. Runan slays General {{Saga|Dommes}} and emerges victorious once again. At Fort Wellt, Codha panics upon learning of Dommes' death; he orders General {{Saga|Berom}} to ensure that {{Saga|Roger}} does not learn of Mel's escape and execute his final plan. | ||
==Chapter data== | ==Chapter data== | ||
| Line 20: | Line 22: | ||
|defeat=Runan or Enteh dies | |defeat=Runan or Enteh dies | ||
|ally=12 | |ally=12 | ||
|enemy=23{{ | |enemy=23{{h|+7|Reinforcements}} | ||
|map=[[File:Cm trs1 6.png]] | |map=[[File:Cm trs1 6.png]] | ||
}} | }} | ||
* <small>Note: The Map takes place on a world map location consisting of '''{{ | * <small>Note: The Map takes place on a world map location consisting of '''{{Saga|Sea Fighter|Sea}}''' terrain.</small> | ||
===Character data=== | ===Character data=== | ||
{{ | {{ChapChars | ||
|game#= | |game#=trs01 | ||
|newunit1={{NewUnitTRS1 | |||
|newunit1={{ | |||
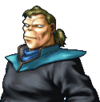
|name=Mel | |name=Mel | ||
|portrait=[[File:Portrait mel trs01.png|100px]] | |portrait=[[File:Portrait mel trs01.png|100px]] | ||
| Line 35: | Line 36: | ||
|HP=22 | |HP=22 | ||
|lv=3 | |lv=3 | ||
|recruitment method=Automatically from turn 2 if {{ | |inventory={{Item|ps1|Estoc}}<br>{{Item|ps1|Healing Staff}} | ||
|recruitment method=Automatically from turn 2 if {{Saga|Narsus}} was encountered in {{Saga|The Encounter|Map 3}} and she survived {{Saga|Tragic Soldiers|Map 4}} | |||
}} | }} | ||
|newunit2={{ | |newunit2={{NewUnitTRS1 | ||
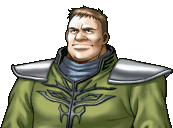
|name=Norton | |name=Norton | ||
|portrait=[[File:Portrait norton trs01.png|100px]] | |portrait=[[File:Portrait norton trs01.png|100px]] | ||
| Line 43: | Line 45: | ||
|HP=34 | |HP=34 | ||
|lv=4 | |lv=4 | ||
|inventory={{Item|ps1|Iron Sword}} | |||
|recruitment method=Enemy, talk with Sasha | |recruitment method=Enemy, talk with Sasha | ||
}} | }} | ||
| Line 72: | Line 75: | ||
|platform=ps1 | |platform=ps1 | ||
|item1=Pegasus Flute | |item1=Pegasus Flute | ||
|item1article= | |item1article=Saga:Pegasus Flute | ||
|obtain1=Have Mel talk to Sasha | |obtain1=Have Mel talk to Sasha | ||
|itemlast=Iron Bow | |itemlast=Iron Bow | ||
|itemlastarticle= | |itemlastarticle=Saga:Iron Bow | ||
|obtainlast=Dropped by an {{ | |obtainlast=Dropped by an {{Saga|Archer}} (reinforcement) | ||
}} | }} | ||
| Line 85: | Line 88: | ||
|name1=Gram Soldier | |name1=Gram Soldier | ||
|class1=Archer | |class1=Archer | ||
|class1article= | |class1article=Saga:Archer | ||
|lv1=2 | |lv1=2 | ||
|#1=1 | |#1=1 | ||
| Line 92: | Line 95: | ||
|name2=Gram Soldier | |name2=Gram Soldier | ||
|class2=Archer | |class2=Archer | ||
|class2article= | |class2article=Saga:Archer | ||
|lv2=3 | |lv2=3 | ||
|#2=1 | |#2=1 | ||
| Line 99: | Line 102: | ||
|name3=Gram Soldier | |name3=Gram Soldier | ||
|class3=Archer | |class3=Archer | ||
|class3article= | |class3article=Saga:Archer | ||
|lv3=3 | |lv3=3 | ||
|#3=1 | |#3=1 | ||
| Line 106: | Line 109: | ||
|name4=Gram Soldier | |name4=Gram Soldier | ||
|class4=Archer | |class4=Archer | ||
|class4article= | |class4article=Saga:Archer | ||
|lv4=3 | |lv4=3 | ||
|#4=1 | |#4=1 | ||
| Line 113: | Line 116: | ||
|name5=Gram Soldier | |name5=Gram Soldier | ||
|class5=Archer | |class5=Archer | ||
|class5article= | |class5article=Saga:Archer | ||
|lv5=3 | |lv5=3 | ||
|#5=5 | |#5=5 | ||
| Line 120: | Line 123: | ||
|name6=Gram Soldier | |name6=Gram Soldier | ||
|class6=Soldier | |class6=Soldier | ||
|class6article= | |class6article=Saga:Soldier | ||
|lv6=3 | |lv6=3 | ||
|#6=6 | |#6=6 | ||
| Line 127: | Line 130: | ||
|name7=Gram Soldier | |name7=Gram Soldier | ||
|class7=Armor Knight | |class7=Armor Knight | ||
|class7article= | |class7article=Saga:Armor Knight | ||
|lv7=4 | |lv7=4 | ||
|#7=1 | |#7=1 | ||
| Line 135: | Line 138: | ||
|name8=Gram Soldier | |name8=Gram Soldier | ||
|class8=Armor Knight | |class8=Armor Knight | ||
|class8article= | |class8article=Saga:Armor Knight | ||
|lv8=3 | |lv8=3 | ||
|#8=2 | |#8=2 | ||
| Line 142: | Line 145: | ||
|name9=Gram Soldier | |name9=Gram Soldier | ||
|class9=Mage | |class9=Mage | ||
|class9article= | |class9article=Saga:Mage | ||
|lv9=1 | |lv9=1 | ||
|#9=1 | |#9=1 | ||
| Line 149: | Line 152: | ||
|name10=Gram Soldier | |name10=Gram Soldier | ||
|class10=Bishop | |class10=Bishop | ||
|class10article= | |class10article=Saga:Bishop | ||
|lv10=1 | |lv10=1 | ||
|#10=1 | |#10=1 | ||
| Line 156: | Line 159: | ||
|name11=Gram Soldier | |name11=Gram Soldier | ||
|class11=Wood Shooter | |class11=Wood Shooter | ||
|class11article= | |class11article=Saga:Wood Shooter | ||
|lv11=1 | |lv11=1 | ||
|#11=1 | |#11=1 | ||
| Line 162: | Line 165: | ||
|- | |- | ||
|name12=Gram Soldier | |name12=Gram Soldier | ||
|class12= | |class12=Quincrane | ||
|class12article= | |class12article=Saga:Quincrane (class) | ||
|lv12=2 | |lv12=2 | ||
|#12=1 | |#12=1 | ||
|inventory12={{Item|ps1| | |inventory12={{Item|ps1|Quincrane|link=Quincrane (weapon)}} | ||
|- | |- | ||
|nameb={{ | |nameb={{Saga|Dommes}} | ||
|classb=General | |classb=General | ||
|classbarticle= | |classbarticle=Saga:General | ||
|versionb=dommes | |versionb=dommes | ||
|lvb=7 | |lvb=7 | ||
| Line 179: | Line 182: | ||
|namer1=Gram Soldier | |namer1=Gram Soldier | ||
|classr1=Archer | |classr1=Archer | ||
|classr1article= | |classr1article=Saga:Archer | ||
|lvr1=3 | |lvr1=3 | ||
|#r1=1 | |#r1=1 | ||
| Line 186: | Line 189: | ||
|namer2=Gram Soldier | |namer2=Gram Soldier | ||
|classr2=Archer | |classr2=Archer | ||
|classr2article= | |classr2article=Saga:Archer | ||
|lvr2=3 | |lvr2=3 | ||
|#r2=1 | |#r2=1 | ||
| Line 193: | Line 196: | ||
|namer3=Gram Soldier | |namer3=Gram Soldier | ||
|classr3=Archer | |classr3=Archer | ||
|classr3article= | |classr3article=Saga:Archer | ||
|lvr3=5 | |lvr3=5 | ||
|#r3=1 | |#r3=1 | ||
| Line 200: | Line 203: | ||
|namer4=Gram Soldier | |namer4=Gram Soldier | ||
|classr4=Soldier | |classr4=Soldier | ||
|classr4article= | |classr4article=Saga:Soldier | ||
|lvr4=4 | |lvr4=4 | ||
|#r4=1 | |#r4=1 | ||
| Line 207: | Line 210: | ||
|namer5=Gram Soldier | |namer5=Gram Soldier | ||
|classr5=Soldier | |classr5=Soldier | ||
|classr5article= | |classr5article=Saga:Soldier | ||
|lvr5=5 | |lvr5=5 | ||
|#r5=1 | |#r5=1 | ||
| Line 214: | Line 217: | ||
|namer6=Gram Soldier | |namer6=Gram Soldier | ||
|classr6=Soldier | |classr6=Soldier | ||
|classr6article= | |classr6article=Saga:Soldier | ||
|lvr6=6 | |lvr6=6 | ||
|#r6=1 | |#r6=1 | ||
|inventoryr6={{Item|ps1|Iron Spear}} | |inventoryr6={{Item|ps1|Iron Spear}} | ||
|- | |- | ||
|namerl={{ | |namerl={{Saga|Norton}} | ||
|classrl=Armor Knight | |classrl=Armor Knight | ||
|classrlarticle= | |classrlarticle=Saga:Armor Knight | ||
|versionrl=norton | |versionrl=norton | ||
|lvrl=4 | |lvrl=4 | ||
| Line 230: | Line 233: | ||
====Reinforcements==== | ====Reinforcements==== | ||
* End of Enemy Phase 2 | * End of Enemy Phase 2 | ||
** {{ | ** {{Saga|Norton}}, three {{Saga|Soldier}}s, and three {{Saga|Archer}}s appear from the northeast | ||
===Boss data=== | ===Boss data=== | ||
{{main| | {{main|Saga:Dommes{{!}}Dommes}} | ||
{{BossStats TRS1 | {{BossStats TRS1 | ||
|portrait=[[File:Portrait dommes trs01.png]] | |portrait=[[File:Portrait dommes trs01.png]] | ||
|class | |class=General | ||
|lv=7 | |lv=7 | ||
|move=4 | |move=4 | ||
| Line 248: | Line 250: | ||
|def=15 | |def=15 | ||
|wlv=16 | |wlv=16 | ||
|sw= | |sw=y | ||
|inventory={{Item|ps1|Iron Great Sword}} | |inventory={{Item|ps1|Iron Great Sword}} | ||
}} | }} | ||
| Line 255: | Line 257: | ||
{{Strategy}} | {{Strategy}} | ||
{{sectstub}} | {{sectstub}} | ||
<!-- | |||
==Trivia== | ==Trivia== | ||
--> | |||
==Etymology and other languages== | ==Etymology and other languages== | ||
{{Names | {{Names | ||
|eng-fan-name=Across the River | |eng-fan-name=Across the River | ||
|eng-fan-mean=Used in various {{TRS1}} fan translations. | |eng-fan-mean=Used in various {{TRS1}} fan translations. | ||
| | |jpn-name={{h|渡河作戦|Toka sakusen}} | ||
| | |jpn-mean=River Crossing Strategy | ||
}} | }} | ||
<!-- | |||
==Gallery== | ==Gallery== | ||
<gallery> | <gallery> | ||
</gallery> | </gallery> | ||
--> | |||
{{ref}} | {{ref}} | ||
{{ChapterNav | {{ChapterNav | ||
|prechapter= | |prechapter=Saga:Beyond the Legend{{!}}Beyond the Legend | ||
|nextchapter=Saga:Liberation of Wellt{{!}}Liberation of Wellt | |||
|nextchapter= | |||
}} | }} | ||
{{NavTRS1}} | {{NavTRS1}} | ||
[[Category:Chapters of | [[Category:Chapters of TearRing Saga: Yutona Heroes War Chronicles]] | ||
Latest revision as of 00:01, 23 October 2022
| ||||||||||
|
Across the River (Japanese: 渡河作戦 River Crossing Strategy) is the sixth chapter in TearRing Saga: Yutona Heroes War Chronicles.
Plot
- Main article:
Saga:Across the River/Script
Runan returns to Marlon and informs him of Ezenbah's death. Marlon informs him that Codha is marshaling his forces to defend the Great Bridge, but Eugen comes up with a plan to circumvent him. Meanwhile, Narsus meets Queen Liza and verifies her safety; she gives him a Pegasus Flute to deliver to Sasha. Narsus then breaks Mel out of prison. Zeek's story comes under suspicion when Raffin, who grew up in Barge, does not recognize him as a former knight; Zeek claims that he never met Raffin and shows Kate horrific scars on his body, lending credence to his claims. Zeek recounts how he tried to protect one of his brothers, only to be brutally tortured with a barbed whip and then forced to watch the brother suffer the same fate; when they brought in his older sister, he broke and swore loyalty to Gerxel.
Eugen sends some of Runan's soldiers to outflank the enemy and Runan leads the charge. Narsus escorts Mel to Runan's forces before fleeing again, while Sasha recruits a Welltese knight named Norton who is loyal to the crown. Runan slays General Dommes and emerges victorious once again. At Fort Wellt, Codha panics upon learning of Dommes' death; he orders General Berom to ensure that Roger does not learn of Mel's escape and execute his final plan.
Chapter data
| ||||||
|
| |||||
| Victory: Defeat Boss | Player | Enemy | ||||
|---|---|---|---|---|---|---|
| Defeat: Runan or Enteh dies | 12 | 23+7 | ||||
| ||||||
- Note: The Map takes place on a world map location consisting of Sea terrain.
Character data
| Characters | ||||||||||||||||||||||
|---|---|---|---|---|---|---|---|---|---|---|---|---|---|---|---|---|---|---|---|---|---|---|
New units
| ||||||||||||||||||||||
| ||||||||||||||||||||||
Available characters
| ||||||||||||||||||||||
                    
| ||||||||||||||||||||||
Item data
| |||||||||
|
Enemy data
This section has been marked as a stub. Please help improve the page by adding information.
| ||||||||||||||||||||||||||||||||||||||||||||||||||||||||||||||||||||||||||||||||||||||||||||||||||
| ||||||||||||||||||||||||||||||||||||||||||||||||||||||||||||||||||||||||||||||||||||||||||||||||||
| ||||||||||||||||||||||||||||||||||||||||||||||||||||||||||||||||||||||||||||||||||||||||||||||||||
|
Reinforcements
Boss data
- Main article:
Dommes
|
|
| ||||||||||||||||||||||||||||||||||||||||||||||||||||||
Strategy
| This section details unofficial strategies that may help with completion of the chapter. This may not work for everybody. |
This section has been marked as a stub. Please help improve the page by adding information.
Etymology and other languages
| Names, etymology, and in other regions | ||
|---|---|---|
| Language | Name | Definition, etymology, and notes |
| English (unofficial) |
Across the River |
Used in various TearRing Saga: Yutona Heroes War Chronicles fan translations. |
| Japanese |
渡河作戦 |
River Crossing Strategy |
References
| ← Beyond the Legend • | Across the River | • Liberation of Wellt → |
|---|


