| Site News |
|---|
| Warning: This wiki contains spoilers. Read at your own risk! Social media: If you would like, please join our Discord server, and/or follow us on Twitter (X) or Tumblr! |
Path to War: Difference between revisions
m (→Chapter data) |
|||
| Line 35: | Line 35: | ||
|ally=5–9 | |ally=5–9 | ||
|enemy=23{{h|+9|Reinforcements}} | |enemy=23{{h|+9|Reinforcements}} | ||
|map=[[File:Cm fe17fx 3.png]] | |map=[[File:Cm fe17fx 3.png|200px]] | ||
|col=19 | |col=19 | ||
|row=24 | |row=24 | ||
| Line 44: | Line 44: | ||
|ally=5–9 | |ally=5–9 | ||
|enemy=34{{h|+19|Reinforcements}} | |enemy=34{{h|+19|Reinforcements}} | ||
|map=[[File:Cm fe17fx 3 h.png]] | |map=[[File:Cm fe17fx 3 h.png|200px]] | ||
|col=19 | |col=19 | ||
|row=24 | |row=24 | ||
| Line 53: | Line 53: | ||
|ally=5–9 | |ally=5–9 | ||
|enemy=53{{h|+37|Reinforcements}} | |enemy=53{{h|+37|Reinforcements}} | ||
|map=[[File:Cm fe17fx 3 m.png]] | |map=[[File:Cm fe17fx 3 m.png|200px]] | ||
|col=19 | |col=19 | ||
|row=24 | |row=24 | ||
Revision as of 16:29, 16 April 2024

|
It has been requested that image(s) be placed in this page or section. Please submit images to help improve this page and talk on this page's talk page about what images are needed. Remove this when this has been fixed. |
| ||||||||
|
Path to War is the third chapter of the Fire Emblem Engage expansion Fell Xenologue. In this chapter, Alear, Nel, and Nil battle parallel Diamant and Alcryst in hopes of defending their own Emblem Bracelets, and to retrieve Emblem Veronica from Brodia.
Plot
- Main article:
Path to War/Script
Alear, Nel, Nil, and Zelestia arrive in the parallel world's Brodia, which supposedly detests war and has intense border security. Despite this, the group entered its borders already, and Alear chastises Nel for not informing them sooner. Suddenly, the group meets with Gregory, another member of Zelestia's Four Winds, who devoted themselves to protecting Nel and Nil. He deduces that Alear is not the one from his world, reasoning that their "essence" is different. After the two introduce themselves to each other, Alear asks Nel where the remaining Winds are, and she responds that they are scouting Elusia and Solm.
The group then spots the Brodian army, who followed Gregory's trail, and Gregory leads the group to hide elsewhere. He and Nil explain that their group has only survived so long by fleeing from most battles, and that the Four Winds are relatively weak compared to other knightly orders. Gregory then reports that Brodia has begun sending soldiers outside, likely to take the Emblem Bracelets for themselves. Nel and Nil tell how having all seven when they are asleep will effectively render one invincible. Nil then theorizes that Brodia sent the assassins to Lythos Castle. Suddenly, the group is ambushed by Alcryst and Diamant, the latter wielding a bracelet. Soon, Diamant orders his forces to capture Nel and kill all others.
Alear and their army defeat the Brodians and secure their Emblem Bracelet. Alcryst hastily demands a rematch, but without a plan, he quickly changes his mind. Diamant tells them that Brodia will stay out of the conflict, and urges them to return peace to the world. After the two leave, Nel and Nil send the bracelet's Emblem, Veronica, back to slumber. The group then discuss how all of them have become accustomed to fleeing; Zelestia fled to Lythos when Sombron attempted to subjugate the Mage Dragons, leaving her the last of her kind, unnoticed because of her low power. Gregory tells that he used to be a follower of Sombron in Elusia, but fled when he could not bear the pain Sombron desired, later coming to Zelestia's aid in battle. Nil reiterates his perceived uselessness, but Nel refuses to allow him to feel so. She then states that she previously failed to stop the four nations from taking their bracelets, fearful that she would have to fight them in Lythos, and blames herself for the current state of Elyos; Nil and the Winds attempt to reassure her. The group then thank Alear for their assistance, and head westward to Elusia.
Sometime in the past, a young Nel overhears her Fell siblings praise her abilities while mocking Nil and suggesting to kill him. Nel becomes enraged at their suggestion, then lashes out at her siblings, killing them. Sombron arrives behind her and praises her for killing his children, and calls her a "suitable heir".
In the present, Nel returns to Brodia to confront Diamant and Alcryst, having killed the guards on the way to the two. She demands to know if they ordered the attack on Lythos Castle, which they deny, suggesting that Elusia did instead. In response, Nel murders both of them, then moves to return to Alear's army while musing about how weak Alfred and Céline were as well.
Beginning log
After sending Firene's Emblem into slumber, the party heads to Brodia to seek out more bracelets.
Chapter data
Normal Hard Maddening


Character data
| Characters | |||||||||||
|---|---|---|---|---|---|---|---|---|---|---|---|
New units
| |||||||||||
| |||||||||||
Required characters
| |||||||||||
Available characters
| |||||||||||

Emblem Ring data
| Characters | |
|---|---|
New units
| |
| |
Required characters
| |
Available characters
| |
Additionally, Emblem Energy appears in the following locations:
- Column 2, row 16: On the western tower, adjacent to a Mage Cannoneer
- Column 11, row 16: Just north of the southeastern palisade
- Column 12, row 8: East of the protection tile that Alcryst starts on
- Column 15, row 12: Just east of the northeastern statue
Enemy data
- Every enemy is
 weak to attacks that are effective against Corrupted units.
Normal Hard Maddening
| ||||||||||||||||||||||||||||||||||||||||||||||||||||||||||||||||||||||||||||||||||||||||||||||||||||||||||||||||||||||||||||||||||||||||||||||||||||||||||||||||||||||||||||||||||||||||||||||||||||||||||||||||||||||||||||||||||||||||||||||||||||||||||||||||||||||||||||||||||||||||||||||||||||||||||||||||||||||||||||||||||||||||||||||||||||||||||||||||||||||||||||||||||||||||||||||||||||||||||||||||||||||||||||||||||||||||||||||||||||||||||||||||||||||||||||||||||||||||||||||||||||||||||||||||||||||||||||||||||||||||||||||||||||||||||||||||||||||||||||||||||||||
| ||||||||||||||||||||||||||||||||||||||||||||||||||||||||||||||||||||||||||||||||||||||||||||||||||||||||||||||||||||||||||||||||||||||||||||||||||||||||||||||||||||||||||||||||||||||||||||||||||||||||||||||||||||||||||||||||||||||||||||||||||||||||||||||||||||||||||||||||||||||||||||||||||||||||||||||||||||||||||||||||||||||||||||||||||||||||||||||||||||||||||||||||||||||||||||||||||||||||||||||||||||||||||||||||||||||||||||||||||||||||||||||||||||||||||||||||||||||||||||||||||||||||||||||||||||||||||||||||||||||||||||||||||||||||||||||||||||||||||||||||||||||
| ||||||||||||||||||||||||||||||||||||||||||||||||||||||||||||||||||||||||||||||||||||||||||||||||||||||||||||||||||||||||||||||||||||||||||||||||||||||||||||||||||||||||||||||||||||||||||||||||||||||||||||||||||||||||||||||||||||||||||||||||||||||||||||||||||||||||||||||||||||||||||||||||||||||||||||||||||||||||||||||||||||||||||||||||||||||||||||||||||||||||||||||||||||||||||||||||||||||||||||||||||||||||||||||||||||||||||||||||||||||||||||||||||||||||||||||||||||||||||||||||||||||||||||||||||||||||||||||||||||||||||||||||||||||||||||||||||||||||||||||||||||||
| ||||||||||||||||||||||||||||||||||||||||||||||||||||||||||||||||||||||||||||||||||||||||||||||||||||||||||||||||||||||||||||||||||||||||||||||||||||||||||||||||||||||||||||||||||||||||||||||||||||||||||||||||||||||||||||||||||||||||||||||||||||||||||||||||||||||||||||||||||||||||||||||||||||||||||||||||||||||||||||||||||||||||||||||||||||||||||||||||||||||||||||||||||||||||||||||||||||||||||||||||||||||||||||||||||||||||||||||||||||||||||||||||||||||||||||||||||||||||||||||||||||||||||||||||||||||||||||||||||||||||||||||||||||||||||||||||||||||||||||||||||||||
Reinforcements
- The next even-numbered turn (Normal/Hard)/two even-numbered turns (Maddening) after a unit enters the area south of the southern central palisade (rows 14–24)
- 1 (Normal)/2 (Hard/Maddening) Wyvern Knight(s) with Steel Sword(s) from near the southwest corner of the map
- 1 Wyvern Knight with a Tomahawk from near the southwest corner of the map (Maddening only)
- The next odd-numbered turn (Normal/Hard)/two odd-numbered turns (Maddening) after a unit enters the area below the (rows 14–24)
- 1 (Normal)/2 (Hard/Maddening) Griffin Knight(s) with Steel Sword(s) from near the southeast corner of the map
- 1 Griffin Knight with a Spear from near the southeast corner of the map (Maddening only)
- The next odd-numbered turn (Normal/Hard)/two odd-numbered turns (Maddening) after a unit enters the area between the two central palisades (rows 9–15)
- 1 (Normal)/2 (Hard/Maddening) Wyvern Knight(s) with Steel Axe(s) from north of the western tower
- 1 Wyvern Knight with a Tomahawk from north of the western tower (Maddening only)
- The next even-numbered turn (Normal/Hard)/two even-numbered turns (Maddening) after a unit enters the area between the two central palisades (rows 9–15)
- 1 (Normal)/2 (Hard/Maddening) Griffin Knight(s) with Steel Sword(s) from north of the eastern tower
- 1 Griffin Knight with a Spear from north of the eastern tower (Hard/Maddening only)
- For two turns after a unit enters the area north of the two northern central palisade (columns 6–14, rows 1–8)
- 1 (Normal)/2 (Hard/Maddening) Griffin Knight(s) with Steel Sword(s) from near ally starting positions
- 1 (Normal)/2 (Hard/Maddening) Wyvern Knight(s) with Steel Axe(s) from near ally starting positions
- 1 Wyvern Knight with a Spear from near ally starting positions (Maddening only)
- After Diamant is provoked
Boss data
- Main article:
Diamant
Normal Hard Maddening
|
| |||||||||||||||||||||||||||||||||||||||||||||||||||||||||||
- Main article:
Alcryst
Normal Hard Maddening
Strategy
| This section details unofficial strategies that may help with completion of the chapter. This may not work for everybody. |
This section has been marked as a stub. Please help improve the page by adding information.
Etymology and other languages
This section has been marked as a stub. Please help improve the page by adding information.
| Names, etymology, and in other regions | ||
|---|---|---|
| Language | Name | Definition, etymology, and notes |
| English |
Path to War |
-- |
Gallery
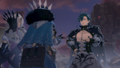
Gregory informs Nil and Nel of his scouting results.
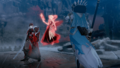
Nel battling against Corrupted Diamant.


References
| ← Seeds of Unrest • | Path to War | • Clash of Queens → |
|---|