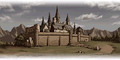
Marth makes his way into Aurelis Castle, where many treasures lie, although a thief would be required to liberate them. When the enemy general Emereus learns of Marth's presence, he immediately attempts to flee, but Marth and his comrades are able to oust Macedon's forces, cut down Emereus, and reclaim the castle. Afterwards, Princess Nyna of Archanea arrives to congratulate Marth for a job well done. She presents him with the Fire Emblem, a sacred treasure to be bestowed upon a champion who will save the world.
Chapter data
Shadow Dragon & the Blade of LightMystery of the EmblemShadow Dragon
Moves to open a specific chest, then moves to escape via the northwest stairs; ignores combat, except to attack player units blocking the escape point. • The left-most southern one moves to open the easternmost chest. • The middle southern one moves to open the northwest chest. • The northeast one moves to open the northernmost chest. • the right-most southern one moves to open the west-center chest.
Moves to open a specific chest, then moves to escape via the northwest stairs; ignores combat, except to attack player units blocking the escape point. • The left-most southern one moves to open the easternmost chest. • The middle southern one moves to open the northwest chest. • The northeast one moves to open the northernmost chest. • the right-most southern one moves to open the west-center chest.
Moves to open a specific chest, then moves to escape via the northwest stairs; ignores combat, except to attack player units blocking the escape point. • The left-most southern one moves to open the easternmost chest. • The middle southern one moves to open the northwest chest. • The northeast one moves to open the northernmost chest. • the right-most southern one moves to open the west-center chest.
Moves to open a specific chest, then moves to escape via the northwest stairs; ignores combat, except to attack player units blocking the escape point. • The left-most southern one moves to open the easternmost chest. • The middle southern one moves to open the northwest chest. • The northeast one moves to open the northernmost chest. • the right-most southern one moves to open the west-center chest.
Moves to open a specific chest, then moves to escape via the northwest stairs; ignores combat, except to attack player units blocking the escape point. • The left-most southern one moves to open the easternmost chest. • The middle southern one moves to open the northwest chest. • The northeast one moves to open the northernmost chest. • the right-most southern one moves to open the west-center chest.
Moves to open a specific chest, then moves to escape via the northwest stairs; ignores combat, except to attack player units blocking the escape point. • The left-most southern one moves to open the easternmost chest. • The middle southern one moves to open the northwest chest. • The northeast one moves to open the northernmost chest. • the right-most southern one moves to open the west-center chest.
This section details unofficial strategies that may help with completion of the chapter. This may not work for everybody.
In this chapter, you get Rickard, a Thief who is generally inferior to Julian and should only be used if Julian falls in battle. If you want to use Wolf and/or Sedgar, they should be reclassed immediately. Sedgar does very well as a Hero, where his growth rates in HP, Strength, Skill, Speed, and Defense all reach 80%, and as a General, where his growth rates in HP, Skill, and Defense all reach 100%. Wolf also makes a good General, with HP, Strength, Skill, and Defense growths above 90%.
Rickard should be swiftly recruited and sent to grab the first chest. Send your units to kill the first enemy Knight on turn 2. When the initial wave hits on turn 3, plug up the corridor with Draug and/or General Wolf/Sedgar. Watch out for the Cavalier with the Silver Lance; he is powerful enough to easily kill an unsuspecting unit and force an early restart. Make good use of Marth's Rapier, Caeda's Wing Spear, and your Ridersbane to kill the first wave and block the northern doorway with a meatshield on turn 4. In order to prevent the Thieves from making off with your treasure, you're probably going to need to use Lena's Warp staff to send one of your meatshields to the top right corner of the map to block off their escape route. Once you've beaten the initial charge, the battle is won. Simply pull out the remaining enemies one at a time and have Merric kill Emereus. If you have 15 or less units alive at the end of the chapter, you're heading to Chapter 6x. The Seraph Robe obtained in this chapter should be given to Marth, as he really needs the bulk and cannot reach 60 HP without using at least two of them. He absolutely needs 21 Defense to survive combat with Medeus, which is unlikely without serious Dracoshield investment, so further Seraph Robes and Dracoshields are probably best saved for Tiki.
Etymology and other languages
Names, etymology, and in other regions
Language
Name
Definition, etymology, and notes
English
Fire Emblem
--
Japanese
ファイアーエムブレム
Fire Emblem
Spanish
El Emblema de Fuego
The Emblem of Fire
French
L'Emblème du Feu
The Emblem of the Fire
German
Fire Emblem
--
Italian
L'Emblema di Fuoco
The Emblem of Fire
Gallery
This section has been marked as a stub. Please help improve the page by adding information.
CG image displayed during the intro for Shadow Dragon