| Site News |
|---|
| Warning: This wiki contains spoilers. Read at your own risk! Social media: If you would like, please join our Discord server, and/or follow us on Twitter (X) or Tumblr! |
Fire Emblem (Shadow Dragon chapter): Difference between revisions
Thecornerman (talk | contribs) mNo edit summary |
Thecornerman (talk | contribs) m (Text replacement - "([Cc])hapter (\d+)" to "$1hapter $2") |
||
| (3 intermediate revisions by one other user not shown) | |||
| Line 309: | Line 309: | ||
}} | }} | ||
}} | }} | ||
:Note: ''Mystery of the Emblem'' | :Note: There is no ''Mystery of the Emblem''. | ||
===Enemy data=== | ===Enemy data=== | ||
| Line 799: | Line 799: | ||
|mov=7 | |mov=7 | ||
|inventory={{Item|ds|Iron Sword}} | |inventory={{Item|ds|Iron Sword}} | ||
|notes=Moves to open a specific [[chest]], then moves to escape | |notes=Moves to open a specific [[chest]], then moves to the northeast to escape; ignores combat, except to attack player units blocking the escape point.<br>• The left-most southern one moves to open the easternmost chest.<br>• The middle southern one moves to open the northwest chest.<br>• The northeast one moves to open the northernmost chest.<br>• The right-most southern one moves to open the west-center chest. | ||
}} | }} | ||
{{ChapUnitCellFE11 | {{ChapUnitCellFE11 | ||
| Line 1,039: | Line 1,039: | ||
|mov=7 | |mov=7 | ||
|inventory={{Item|ds|Iron Sword}} | |inventory={{Item|ds|Iron Sword}} | ||
|notes=Moves to open a specific [[chest]], then moves to escape | |notes=Moves to open a specific [[chest]], then moves to the northeast to escape; ignores combat, except to attack player units blocking the escape point.<br>• The left-most southern one moves to open the easternmost chest.<br>• The middle southern one moves to open the northwest chest.<br>• The northeast one moves to open the northernmost chest.<br>• The right-most southern one moves to open the west-center chest. | ||
}} | }} | ||
{{ChapUnitCellFE11 | {{ChapUnitCellFE11 | ||
| Line 1,279: | Line 1,279: | ||
|mov=7 | |mov=7 | ||
|inventory={{Item|ds|Iron Sword}} | |inventory={{Item|ds|Iron Sword}} | ||
|notes=Moves to open a specific [[chest]], then moves to escape | |notes=Moves to open a specific [[chest]], then moves to the northeast to escape; ignores combat, except to attack player units blocking the escape point.<br>• The left-most southern one moves to open the easternmost chest.<br>• The middle southern one moves to open the northwest chest.<br>• The northeast one moves to open the northernmost chest.<br>• The right-most southern one moves to open the west-center chest. | ||
}} | }} | ||
{{ChapUnitCellFE11 | {{ChapUnitCellFE11 | ||
| Line 1,519: | Line 1,519: | ||
|mov=7 | |mov=7 | ||
|inventory={{Item|ds|Iron Sword}} | |inventory={{Item|ds|Iron Sword}} | ||
|notes=Moves to open a specific [[chest]], then moves to escape | |notes=Moves to open a specific [[chest]], then moves to the northeast to escape; ignores combat, except to attack player units blocking the escape point.<br>• The left-most southern one moves to open the easternmost chest.<br>• The middle southern one moves to open the northwest chest.<br>• The northeast one moves to open the northernmost chest.<br>• The right-most southern one moves to open the west-center chest. | ||
}} | }} | ||
{{ChapUnitCellFE11 | {{ChapUnitCellFE11 | ||
| Line 1,759: | Line 1,759: | ||
|mov=7 | |mov=7 | ||
|inventory={{Item|ds|Iron Sword}} | |inventory={{Item|ds|Iron Sword}} | ||
|notes=Moves to open a specific [[chest]], then moves to escape | |notes=Moves to open a specific [[chest]], then moves to the northeast to escape; ignores combat, except to attack player units blocking the escape point.<br>• The left-most southern one moves to open the easternmost chest.<br>• The middle southern one moves to open the northwest chest.<br>• The northeast one moves to open the northernmost chest.<br>• The right-most southern one moves to open the west-center chest. | ||
}} | }} | ||
{{ChapUnitCellFE11 | {{ChapUnitCellFE11 | ||
| Line 1,999: | Line 1,999: | ||
|mov=7 | |mov=7 | ||
|inventory={{Item|ds|Steel Sword}} | |inventory={{Item|ds|Steel Sword}} | ||
|notes=Moves to open a specific [[chest]], then moves to escape | |notes=Moves to open a specific [[chest]], then moves to the northeast to escape; ignores combat, except to attack player units blocking the escape point.<br>• The left-most southern one moves to open the easternmost chest.<br>• The middle southern one moves to open the northwest chest.<br>• The northeast one moves to open the northernmost chest.<br>• The right-most southern one moves to open the west-center chest. | ||
}} | }} | ||
{{ChapUnitCellFE11 | {{ChapUnitCellFE11 | ||
| Line 2,336: | Line 2,336: | ||
==Strategy== | ==Strategy== | ||
{{Strategy}} | {{Strategy}} | ||
'''General Points:''' | '''General Points:''' | ||
* '''Recruitment:''' [[Rickard]], a [[Thief]], is available but is inferior to [[Julian]]. Use only if Julian is unavailable. | * '''Recruitment:''' [[Rickard]], a [[Thief]], is available but is inferior to [[Julian]]. Use only if Julian is unavailable. | ||
* '''[[Wolf]] and [[Sedgar]]:''' If you decide to use them, reclass them immediately. Sedgar is optimal as a [[Hero]] or [[General]], while Wolf excels as a General. | * '''[[Wolf]] and [[Sedgar]]:''' If you decide to use them, reclass them immediately. Sedgar is optimal as a [[Hero]] or [[General]], while Wolf excels as a General. | ||
| Line 2,345: | Line 2,345: | ||
'''Turn-by-Turn Strategy:''' | '''Turn-by-Turn Strategy:''' | ||
* Turn 1: Recruit Rickard quickly and send him to open the first chest. Prepare units to engage the first enemy [[Knight]]. | * Turn 1: Recruit Rickard quickly and send him to open the first chest. Prepare units to engage the first enemy [[Knight]]. | ||
* Turn 2: Defeat the first enemy Knight. | * Turn 2: Defeat the first enemy Knight. | ||
| Line 2,353: | Line 2,352: | ||
'''Additional Notes:''' | '''Additional Notes:''' | ||
* If you have 15 or fewer units alive at the chapter's end, you'll proceed to [[In_War%27s_Grip|Chapter 6x]]. | |||
* If you have 15 or fewer units alive at the chapter's end, you'll proceed to [[In_War%27s_Grip|Chapter 6x]]. | |||
* Marth requires a significant boost in defense to face [[Medeus]] and it's not likely to happen without a lot of [[Dracoshield]]s. For that reason, save Dracoshields and additional Seraph Robes for [[Tiki]]. | * Marth requires a significant boost in defense to face [[Medeus]] and it's not likely to happen without a lot of [[Dracoshield]]s. For that reason, save Dracoshields and additional Seraph Robes for [[Tiki]]. | ||
'''Boss Strategy:''' Attack Emereus from a distance using units like Merric or [[Barst]]. Make sure healers like Lena or [[Wrys]] are nearby for support. | '''Boss Strategy:''' | ||
* Attack Emereus from a distance using units like Merric or [[Barst]]. Make sure healers like Lena or [[Wrys]] are nearby for support. | |||
'''Strategy for Merciless Mode:''' | |||
* Make sure you have plenty of [[Javelin]]s. If not, purchase some immediately. | * Make sure you have plenty of [[Javelin]]s. If not, purchase some immediately. | ||
* Focus on units strong against Knights, Generals, and Cavaliers like Barst, Merric, Caeda, and Marth. | * Focus on units strong against Knights, Generals, and Cavaliers like Barst, Merric, Caeda, and Marth. | ||
| Line 2,365: | Line 2,364: | ||
* Lure enemies from the boss room one by one. Use Draug or a defensive unit to withstand their attacks. If needed, use the Seraph Robe on this unit to increase its survivability. | * Lure enemies from the boss room one by one. Use Draug or a defensive unit to withstand their attacks. If needed, use the Seraph Robe on this unit to increase its survivability. | ||
* For Emereus, use characters with Armorslayer, such as [[Ogma]] or ranged attackers like Merric. | * For Emereus, use characters with Armorslayer, such as [[Ogma]] or ranged attackers like Merric. | ||
<!-- | <!-- | ||
==Trivia== | ==Trivia== | ||
Revision as of 14:51, 28 March 2024
| ||||||||||
|

Fire Emblem (Japanese: ファイアーエムブレム Fire Emblem) is the sixth chapter in Fire Emblem: Shadow Dragon & the Blade of Light and Fire Emblem: Shadow Dragon and the fifth chapter in Book I of Fire Emblem: Mystery of the Emblem.
Plot
- Main article:
Fire Emblem (Shadow Dragon chapter)/Script
Marth makes his way into Aurelis Castle, where many treasures lie, although a thief would be required to liberate them. When the enemy general Emereus learns of Marth's presence, he immediately attempts to flee, but Marth and his comrades are able to oust Macedon's forces, cut down Emereus, and reclaim the castle. Afterwards, Princess Nyna of Archanea arrives to congratulate Marth for a job well done. She presents him with the Fire Emblem, a sacred treasure to be bestowed upon a champion who will save the world.
Chapter data
Shadow Dragon & the Blade of Light Mystery of the Emblem Shadow Dragon


| ||||||
|
| |||||
| Victory: Seize | Player | Enemy | ||||
|---|---|---|---|---|---|---|
| Defeat: Marth dies | 1–14+1 | 25−1 | ||||
| ||||||
| Map dimensions: 30 columns by 21 rows | ||||||
Character data
Shadow Dragon & the Blade of Light Mystery of the Emblem Shadow Dragon
| Characters | |||||||||||
|---|---|---|---|---|---|---|---|---|---|---|---|
New units
| |||||||||||
| |||||||||||
Required characters
| |||||||||||

| |||||||||||
Available characters
| |||||||||||
                         
| |||||||||||

Item data
Shadow Dragon & the Blade of Light Mystery of the Emblem Shadow Dragon
| |||||||||||||||||||||||||||
|
Shop data
Shadow Dragon & the Blade of Light Shadow Dragon
Swords Lances Axes Bows Tomes Staves Items Secret
| Name | Cost | |
|---|---|---|
| Iron Sword | 400 | |
| Steel Sword | 875 |
- Note: There is no Mystery of the Emblem.
Enemy data
Shadow Dragon & the Blade of Light Mystery of the Emblem Shadow Dragon
- Stats with a decimal can vary randomly; the decimal represents the chance for the stat to increase to the nearest integer, or otherwise be truncated.
Normal Hard-1 Hard-2 Hard-3 Hard-4 Hard-5
| |||||||||||||||||||||||||||||||||||||||||||||||||||||||||||||||||||||||||||||||||||||||||||||||||||||||||||||||||||||||||||||||||||||||||||||||||||||||||||||||||||||||||||||||||||||||||||||||||||||||||||||||||||||||||||||||||||||||||||||||||||||||||||||||||||||||||||||||||||||||||||||||||||||||||||||||||||||||||||||||||||||||||||||||||||||||||||||||||||||||||||||||||||||||||||||||||||||||||
| |||||||||||||||||||||||||||||||||||||||||||||||||||||||||||||||||||||||||||||||||||||||||||||||||||||||||||||||||||||||||||||||||||||||||||||||||||||||||||||||||||||||||||||||||||||||||||||||||||||||||||||||||||||||||||||||||||||||||||||||||||||||||||||||||||||||||||||||||||||||||||||||||||||||||||||||||||||||||||||||||||||||||||||||||||||||||||||||||||||||||||||||||||||||||||||||||||||||||
Boss data
- Main article:
Emereus
Shadow Dragon & the Blade of Light Mystery of the Emblem Shadow Dragon
- Stats with a decimal can vary randomly; the decimal represents the chance for the stat to increase to the nearest integer, or otherwise be truncated.
Normal Hard-1 Hard-2 Hard-3 Hard-4 Hard-5
|
|
| |||||||||||||||||||||||||||||||||||||||||||

Strategy
| This section details unofficial strategies that may help with completion of the chapter. This may not work for everybody. |
General Points:
- Recruitment: Rickard, a Thief, is available but is inferior to Julian. Use only if Julian is unavailable.
- Wolf and Sedgar: If you decide to use them, reclass them immediately. Sedgar is optimal as a Hero or General, while Wolf excels as a General.
- Treasures: Protect chests from thieves. In this game, thieves drop stolen items upon defeat, but you have to be quick to prevent their escape.
- Seraph Robe: Acquired in this chapter, best used on Marth to increase his survivability.
- Objective: Defeat all enemies and the boss, Emereus.
Turn-by-Turn Strategy:
- Turn 1: Recruit Rickard quickly and send him to open the first chest. Prepare units to engage the first enemy Knight.
- Turn 2: Defeat the first enemy Knight.
- Turn 3: Block the corridor using Draug or General Wolf/Sedgar. Be wary of the Silver Lance-wielding Cavalier. Use Marth's Rapier, Caeda's Wing Spear, and your Ridersbane.
- Turn 4: Use high defense units to block off the northern doorway and use Lena's Warp staff to block thieves' escape route in the top right corner.
- Following Turns: Eliminate enemies one by one. Use Merric to defeat Emereus. Protect chests from any remaining thieves.
Additional Notes:
- If you have 15 or fewer units alive at the chapter's end, you'll proceed to Chapter 6x.
- Marth requires a significant boost in defense to face Medeus and it's not likely to happen without a lot of Dracoshields. For that reason, save Dracoshields and additional Seraph Robes for Tiki.
Boss Strategy:
- Attack Emereus from a distance using units like Merric or Barst. Make sure healers like Lena or Wrys are nearby for support.
Strategy for Merciless Mode:
- Make sure you have plenty of Javelins. If not, purchase some immediately.
- Focus on units strong against Knights, Generals, and Cavaliers like Barst, Merric, Caeda, and Marth.
- For the thief in the top left, use Sedgar and Wolf as Horsemen for interception.
- Lure enemies from the boss room one by one. Use Draug or a defensive unit to withstand their attacks. If needed, use the Seraph Robe on this unit to increase its survivability.
- For Emereus, use characters with Armorslayer, such as Ogma or ranged attackers like Merric.
Etymology and other languages
| Names, etymology, and in other regions | ||
|---|---|---|
| Language | Name | Definition, etymology, and notes |
| English |
Fire Emblem |
-- |
| Japanese |
ファイアーエムブレム |
Fire Emblem |
| Spanish |
El Emblema de Fuego |
The Emblem of Fire |
| French |
L'Emblème du Feu |
The Emblem of the Fire |
| German |
Fire Emblem |
-- |
| Italian |
L'Emblema di Fuoco |
The Emblem of Fire |
Gallery
This section has been marked as a stub. Please help improve the page by adding information.
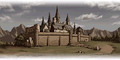
CG image displayed during the intro for Shadow Dragon

Notes
- ↑ Only in Mystery of the Emblem.
References
| ← Champions of Aurelis • | Fire Emblem | • Lefcandith Gauntlet → • In War's Grip (side quest, Shadow Dragon only) → |
|---|
| Fire Emblem: Mystery of the Emblem | ||||||||||||||||||||||||||||||||||||||
|---|---|---|---|---|---|---|---|---|---|---|---|---|---|---|---|---|---|---|---|---|---|---|---|---|---|---|---|---|---|---|---|---|---|---|---|---|---|---|
| ||||||||||||||||||||||||||||||||||||||
| Fire Emblem: Shadow Dragon | ||||||||||||||||||||
|---|---|---|---|---|---|---|---|---|---|---|---|---|---|---|---|---|---|---|---|---|
|