| Taking Fort Merceus
|
|
|
|
|
|
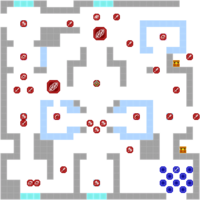
Taking Fort Merceus (Japanese: メリセウス攻防戦 Meriseus battle) is the main battle map of the seventeenth chapter on the Silver Snow route in Fire Emblem: Three Houses. In this map, Byleth and the Resistance Army lead an sneak attack against Fort Merceus.
Beginning log
Fort Merceus, said to be impregnable, lies between you and Enbarr, the Imperial Capital. Seizing the sturdy fortress will require a carefully devised strategy.
Map data
|
|
|
|
|
| Victory: Defeat the Death Knight or rout the enemy if he escapes
|
Player
|
Partner
|
Other
|
Enemy
|
Third
|
| Defeat: Byleth dies* or the player's army is routed*
|
10
|
{{{partner}}}
|
{{{other}}}
|
30+∞
|
{{{third}}}
|
|
|
|
|
|
|
|
|
|
| Victory: Defeat the Death Knight or rout the enemy if he escapes
|
Player
|
Partner
|
Other
|
Enemy
|
Third
|
| Defeat: Byleth dies* or the player's army is routed*
|
10
|
{{{partner}}}
|
{{{other}}}
|
37+∞
|
{{{third}}}
|
|
|
|
|
Character data
Item data
Enemy data
Reinforcements
- Each of the following will appear in a given pattern, each starting turn 1; if a reinforcement is blocked by an enemy or there are three of the particular reinforcement present, they will appear on the next turn and the pattern will resume from there (e.g. if an Armored Knight is blocked from arriving on turn 3 but not turn 4, it will appear on turn 4 and the next on turn 6)
- 1 Paladin from the northwest corner of the map every third turn.
- 1 Armored Knight from the northern border of the map every second turn.
- 1 Dark Mage from the southwest corner of the map every second turn.
- 1 Fortress Knight from the southern border of the map every turn.
- Note: Reinforcements are halted if a player unit reaches the spaces where they come from.
Boss data
- Main article: Death Knight
|
|
|
|
|
| Combat arts
|
Spells
|
Battalion
|
| --
|
--
|
--
|
|
Skill Levels

|

|

|

|

|

|

|

|

|

|

|

|
| B
|
A
|
C+
|
D
|
C+
|
D
|
E
|
C
|
E
|
A
|
E
|

|
|
|
|
|
|
|
|
|
|
Skill Levels
|
|
|
|
|
|
|
|
|
|
|
|
|
| B
|
A
|
C+
|
D
|
C+
|
D
|
E
|
C
|
E
|
A
|
E
|
|
|
|
|
|
|
|
|
|
|
Skill Levels
|
|
|
|
|
|
|
|
|
|
|
|
|
| B
|
A
|
C+
|
D
|
C+
|
D
|
E
|
C
|
E
|
A
|
E
|
|
|
|
Sub-bosses
- Note: The sub-bosses become mandatory fights should the Death Knight escape.
- Imperial General Bishop
|
|
|
|
|
|
|
Skill Levels
|
|
|
|
|
|
|
|
|
|
|
|

|
| E
|
E
|
E
|
E
|
E
|
E
|
A
|
B
|
E
|
E
|
E
|
|
|
|
|
|
|
|
|
|
|
Skill Levels
|
|
|
|
|
|
|
|
|
|
|
|
|
| E
|
E
|
E
|
E
|
E
|
E
|
A
|
B
|
E
|
E
|
E
|
|
|
|
|
|
|
|
|
|
|
Skill Levels
|
|
|
|
|
|
|
|
|
|
|
|
|
| E
|
E
|
E
|
E
|
E
|
E
|
A
|
B
|
E
|
E
|
E
|
|
|
|
- Imperial General Warrior
|
|
|
|
|
|
|
Skill Levels
|
|
|
|
|
|
|
|
|
|
|
|

|
| E
|
E
|
A
|
E
|
E
|
E
|
E
|
B
|
E
|
E
|
E
|
|
|
|
|
|
|
|
|
|
|
Skill Levels
|
|
|
|
|
|
|
|
|
|
|
|
|
| E
|
E
|
A
|
E
|
E
|
E
|
E
|
B
|
E
|
E
|
E
|
|
|
|
|
|
|
|
|
|
|
Skill Levels
|
|
|
|
|
|
|
|
|
|
|
|
|
| E
|
E
|
A
|
E
|
E
|
E
|
E
|
B
|
E
|
E
|
E
|
|
|
|
Strategy
| This section details unofficial strategies that may help with completion of the chapter. This may not work for everybody.
|
This section has been marked as a stub. Please help improve the page by adding information.
Trivia
- Unused data suggests both Caspar and Linhardt were planned to potentially defect in Silver Snow if they had previously fallen in battle during Part I in Classic Mode and be fought here, replacing the Imperial General Warlock and Bishop respectively.[1]
Etymology and other languages
| Names, etymology, and in other regions
|
| Language
|
Name
|
Definition, etymology, and notes
|
| English
|
Taking Fort Merceus
|
--
|
| Spanish
|
La toma de Fuerte Merceus
|
The taking of Fort Merceus
|
| French
|
L'inexpugnable fort Merceus
|
The impregnable fort Merceus
|
| German
|
Eroberung von Merceus
|
Conquest of Merceus
|
| Italian
|
La presa del forte Merceus
|
The taking of fort Merceus
|
| Korean
|
메리세우스 공방전
|
Battle for Merceus
|
| Simplified Chinese
|
梅利赛乌斯攻防战
|
Merceus siege battle
|
| Traditional Chinese
|
梅利賽烏斯攻防戰
|
Merceus siege battle
|
|
|
Gallery
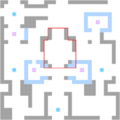
Entering the area outlined in red will trigger the Death Knight's movement.