| End of the Holy War
|
|
|
|
| Location
|
Grannvale
|
| New units
|
Julia
|
| Boss(es)
|
Roberto, Boyce, Rodan, Juphiel, Fisher, Dagon, Brian, Baran, Hilda, Scipio, Arion, Manfroy, Ishtar, Meng, the Deadlords, Julius
|
|
End of the Holy War (Japanese: 最後の聖戦 The Final Holy War) is the Endgame of Fire Emblem: Genealogy of the Holy War and, by extension, the final chapter of the second generation.
Plot
- Main article: End of the Holy War/Script
This section has been marked as a stub. Please help improve the page by adding information.
Chapter data
| Chapter Data
|
| Conditions
|
Unit Data
|
Victory: Seize Belhalla
Defeat: Seliph dies or Chalphy is seized
|
Player:
23+1
|
Partner:
0+6
|
Other:
0
|
Enemy:
47+115-7+∞
|
|
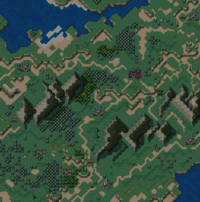
| Chapter Map
|

|
|
Map dimensions:
62 columns by 62 rows
|
| Combatants and castles
|
| Army
|
Commander
|
Affiliation
|
Units
|
Castles
|
Guardian
|
Notes
|
| Seliph's
|
Seliph
|
Player
|
23+1
|
Chalphy
|
--
|
Home castle
|
| Edda
|
Juphiel
|
Enemy
|
39+∞
|
Edda
|
Juphiel
|
The ramparts northwest of Chalphy and Edda castles are lowered upon seizing Edda.
|
| Dozel
|
Brian
|
Enemy
|
8+29 +∞
|
Dozel
|
Dagon
|
• The Dozel army appears once Edda has been seized.
• The rampart south of Friege is lowered upon seizing Dozel
|
| Friege
|
Hilda
|
Enemy
|
19
|
Friege
|
Baran
|
• The Friege army appears once Dozel has been seized.
• The two ramparts east of Friege Castle are lowered once Friege is seized.
|
| Yngvi
|
Scipio
|
Enemy
|
18
|
--
|
--
|
• The Yngvi army emerges once a unit crosses the pass to Friege enters the range of a Friege unit.
• The Yngvi army is tied to the Friege castle, and will disappear when it is siezed.
|
| Thracia
|
Arion
|
Enemy
|
6
|
--
|
--
|
• The Thracian army arrives one turn after Friege is seized.
• The Thracian army becomes a partner once Altena talks to Arion.
|
| Partner
|
| Velthomer
|
Manfroy
|
Enemy
|
7
|
Velthomer
|
Manfroy
|
The Velthomer army emerges once Friege is seized.
|
| Belhalla
|
Julius
|
Enemy
|
6+30+∞
|
Belhalla
|
Julis
|
The Loptrians emerge once Dozel has been seized; the Belhalla army emerges once Friege is seized.
|
Character data
- Julia will have whatever stats she had when she left Seliph's army, including a possible promotion.
Item data
|
|
|
|
Name
|
Obtainment Method
|

|
Naga
|
Event: Enter Velthomer Castle with Julia
|
|
In addition, two villages are present on the map, which can be visited to obtain up to 5,000 gold each.
Castle data
- The armory will sell anything not bought in the previous chapters.
Event data
|
|
| Initiator
|
Recipient
|
Criteria
|
Reward
|
| Arthur/Amid
|
Tine/Linda
|
Neither has a lover
|
+1 Lck for Tine
|
| Patty
|
Seliph, Lester, or Shannan
|
The pair are lovers and Julius is alive
|
+3 HP and +3 Spd for Seliph, Lester, or Shannan
|
| Daisy
|
Deimne
|
The pair are lovers
|
+5 HP for Deimne
|
| Tine/Linda
|
Seliph, Leif, or Ced/Hawk
|
The pair are lovers and Julius is alive
|
+3 Mag for Seliph, Leif, or Ced/Hawk
|
| Muirne
|
Asaello
|
Edda seized and the pair are lovers
|
+5 HP for Asaello
|
| Nanna/Jeanne
|
Seliph
|
Edda seized and the pair are lovers
|
+3 HP for Seliph
|
| Nanna
|
Leif or Ares
|
Edda seized, Julius is alive, and the pair are lovers
|
+3 Def for Leif or Ares
|
| Jeanne
|
Leif
|
Edda seized and the pair are lovers
|
+5 HP for Leif
|
| Larcei/Creidne
|
Seliph, Iucharba, Iuchar, or Shannan
|
Dozel seized, Julius is alive, and the pair are lovers
|
+3 Str for Seliph, Iucharba, Iuchar, or Shannan
|
| Lana/Muirne
|
Seliph or Scáthach/Dalvin
|
Dozel seized, Julius is alive, and the pair are lovers
|
+3 Res for Seliph or Scáthach/Dalvin
|
| Lana
|
Febail
|
Dozel seized, Julius is alive, and the pair are lovers
|
+3 Res for Febail
|
| Altena
|
Arion
|
Friege seized
|
Arion becomes a partner
|
| Fee/Hermina
|
Seliph or Arthur/Amid
|
Friege seized, Julius is alive, and the pair are lovers
|
+3 Skl for Seliph or Arthur/Amid
|
| Fee
|
Oifey
|
Friege seized, Julius is alive, and the pair are lovers
|
+3 Skl for Oifey
|
| Seliph
|
Julia
|
Velthomer seized
|
Julia joins
|
| Julia
|
--
|
Julia enters Velthomer Castle
|
Naga for Julia
|
|
Unit data
Edda
The Edda army is present from the start of the chapter.
Reinforcements
- One turn after Roberto reaches Edda Castle
Dozel
The Loptrians are present from the start of the chapter. The Dozel army appears once Edda has been seized.
Reinforcements
- One turn after Fisher reaches Dozel Castle
- Up to 9 Axe Knights, replacing those lost under Fisher's authority, and Fisher emerge from the castle.
- One turn after Brian reaches Dozel Castle
- Up to 14 Axe Knights and 3 Troubadours, replacing those lost under Dozel's authority, and Dozel emerge from the castle.
Friege
The Friege army emerges once Dozel has been seized.
|
|
|
|
|
|
|
|
Name
|
Class
|
Lv
|
#
|
Inventory and Skills
|
Notes
|
|
Yngvi
The Yngvi army emerges once a unit crosses mountain pass to Friege or enters the range of any Friege unit. The Yngvi army will disappear when the Friege castle is siezed.
|
|
|
|
|
|
|
|
Name
|
Class
|
Lv
|
#
|
Inventory and Skills
|
Notes
|
|
Thracia
The enemy Thracian army arrives one turn after Friege has been seized. The partner army emerges once Altena talks to Arion.
|
|
|
|
|
|
|
|
Name
|
Class
|
Lv
|
#
|
Inventory and Skills
|
Notes
|
|
|
|
|
|
|
|
|
|
Name
|
Class
|
Lv
|
#
|
Inventory and Skills
|
Notes
|
|
Velthomer
The Velthomer army emerges once Friege has been seized.
|
|
|
|
|
|
|
|
Name
|
Class
|
Lv
|
#
|
Inventory and Skills
|
Notes
|
|
Belhalla
The Loptrians emerge once Dozel has been seized. The Belhalla army emerges once Friege is sezied.
Reinforcements
- One turn after Ishtar reaches Belhalla Castle
Major units
Edda
- Main article: Roberto
- Roberto is a sub-boss affiliated with Edda.
- Main article: Boyce
- Boyce is a sub-boss affiliated with Edda.
- Main article: Rodan
- Rodan is a sub-boss affiliated with Edda.
- Main article: Juphiel
- Juphiel is the guardian of Edda Castle and the boss of Edda.
Dozel
- Main article: Fisher
- Fisher is a sub-boss affiliated with Dozel. He and the Dozel army emerge once Edda has been seized.
- Main article: Dagon
- Dagon is a sub-boss affiliated with Dozel and the guardian of Dozel Castle. He and the Dozel army emerge once Edda has been seized.
- Main article: Brian
- Brian is the boss of Dozel. He and the Dozel army emerge once Edda has been seized.
Friege
- Main article: Baran
- Baran is a sub-boss affiliated with Friege and the guardian of Friege Castle. He and the Friege army emerge once Dozel is seized.
- Main article: Hilda
- Hilda is the boss of Friege. She and the Friege army emerge once Dozel is seized.
Yngvi
- Main article: Scipio
- Scipio is the boss of Yngvi. He and the Yngvi army arrive once a unit crosses the pass to Friege or enters the range of any Friege unit.
Thracia
- Main article: Arion
- Arion is the boss of Thracia. He and the Thracian army arrive one turn after Friege is seized.
Velthomer
- Main article: Manfroy
- Manfroy is the guardian of Velthomer Castle and the boss of Velthomer. He and the Velthomer army emerge once Friege is seized.
Belhalla
- Main article: Ishtar
- Ishtar is a sub-boss affiliated with Belhalla. She and the Belhalla army emerge once Friege is seized.
- Main article: Meng
- Meng is a sub-boss affiliated with Belhalla. She and the Belhalla army emerge once Friege is seized.
- Main article: Deadlords
Mus Bovis Tigris Lepus Draco Anguilla Equus Ovis Simia Gallus Canis Porcus
- The Deadlords are sub-bosses affiliated with Belhalla. They emerge alongside the Belhalla army when Friege is seied.
- Main article: Julius
- Julius is the guardian of Belhalla Castle and the boss of Belhalla. He and the Belhalla army emerge once Friege is seized.
Strategy
| This section details unofficial strategies that may help with completion of the chapter. This may not work for everybody.
|
The Final Holy War is upon us. This is the last map of the game, and it's a doozy.
Castle Edda
After completing the Arena and any necessary preparations, your first task is to engage Roberto's squad - the cavalry unit that has been ordered to attack Chalphy immediately. Roberto's squad itself isn't too difficult - just some cavalry with silver weapons and Elfires. Be careful around Roberto himself when using units without Holy Weapons - he has Follow-Up, Accost and a Brave Sword, which can potentially become very disastrous if taken lightly. If necessary, bait him from the edge of his range to force him to use his weaker and much heavier Javelin. Otherwise, he isn't much harder than Ridale.
The two Dark Mage squads should also be taken care of. Fenrir is quite nasty when the majority of your units have very little resistance to it, and Silence will keep your magic users disabled. Most of the Dark Mages can be killed with physical 2-range easily, but some are too far away to do so. Fee can deal with them without much issue, as Falcon Knights have good resistance, though Altena will need healing, or be danced forward with the Gae Bolg to keep damage off of her.
Next, split your army. Your cavalry is tasked with taking Edda, while your infantry will be left behind at Chalphy, to fend off a later assault from the direction of Dozel. Your infantry will have at least 2-3 turns to set up a defensive formation, and there are a few ways to go about it.
The first option is to have your infantry advance to the rampart south of Dozel, and place your dodgiest units in the road, such as Shannan, Larcei or a Forseti carrier. Another unit should stand in the mountain tile immediately adjacent to the roadway to stop enemies from trying to go around.
The other option is to have all your infantry pull back inside Chalphy castle and station your dodgiest unit on top of Chalphy itself. This unit should have at least a spare weapon, as this strategy will be slower and the unit won't be able to duck back inside the castle to replenish weapons.
Now, the your cavalry unit now needs to take Edda castle. Edda itself is guarded by the infamous "Great Wall of Edda" - a full line of mercenary troops, a full line and two flanks of siege tome bishops, another line of sleep staff high priests, two bosses in the field and another on top of the castle.
These powerful enemies combined makes it either very suicidal or very foolhardy to leave a unit in their combined attack ranges, and since the enemies don't start attacking unless you stand in their range, it can become very difficult to defeat them in detail. However, the bigger problem are the Sleep staves. Anyone who gets put to sleep becomes immobile, leaving them open to a barrage of Boltings and Meteors, as well as being boxed in by the mercenaries. Getting a Restore to them (if they somehow survive) becomes difficult as Restore can only be carried by footlocked units or Leif (unless Claud was paired with someone that comes at the expense of the Valkyrie). However, no Sleep staff user has more than 18 Magic (Rodan), so anyone with 19 or more Res is only under threat of Meteor/Bolting chip and mercenaries swarming them. The only units that can reach this threshold reliably and not get immediately torn apart by the mercenaries' combined physical damage are Seliph with the Tyrfing from last chapter and Ares with the Mystletainn (and a Barrier Ring if he got unlucky with resistance level-ups), and the safest way to dispatch the Wall is to just get Seliph through the enemy lines so he can kill Juphiel and seize the castle. Be careful, as Seliph and Ares can still die even with Holy Weapons equipped if swarmed by Boyce's squad, and especially if Boyce procs his Adept (or, even worse, Critical on Ares). To get Seliph through quickly, make use of the Rescue Staff on Leif, Lene/Laylea (especially with the Leg Ring), Ares to clear out enemies to make a hole in the enemy formation and just ignore all the other enemies as they will despawn if Edda is seized.
Castle Dozel
Upon the seizure of Edda, the Dozel army will emerge. Fisher will take a squad of Steel/Hand Axe Knights and attack Edda through the mountain pass, while Brian will take the Grauritter, Great Knights with Silver Axes and charge Chalphy.
Fisher's squad isn't dangerous at all. Fisher's squad is somehow still umpromoted and carry axes, which are extremely heavy, while Seliph and Ares are probably in the vicinity of Edda. There even is a 1-tile wide pass where the rampart used to stand, and a dodgy sword cavalry unit can easily plug the gap and kill them as they come.
Brian's Grauenritter is a different story, however. Silver Axes hit quite hard, and Brian has a holy weapon. While it is fairly easy to dodge them all, most of the fighting will be on Road terrain, which penalizes avoid, so some hits might be taken. The Grauenritter also all somehow have Follow-Up as personal skills, though the extreme weight of a Silver Axe means that anyone with 5 or more AS won't get doubled.
Brian himself, however is a huge threat. He's the first boss of this chapter with a holy weapon, being Helswath. He also has several stats capped or near-capped, and with Helswath, is insanely difficult to kill through his 47 DEF and 27 RES. While he thankfully lacks the crit-nulling Nihil, non-crit non-holy weapon physical attacks will pretty much always deal a measly 1 damage (that he will heal off with his Renewal Band easily), while mages seeking to hit his 27 RES will need to survive a 57 damage Helswath to the face and the risk of Accost activating in return. Brian is also rather fast, at 26 SPD, though thankfully the Helswath weighs him down to 6 - low enough that you can easily double him, but as mentioned before, Brian's Accost is the bigger threat, since his insane defenses will help keep his HP high to trigger it. The Balmung or Forseti carrier is your best bet, since Seliph and Ares will probably be off at Edda now. Alternatively, you can just retreat to Chalphy, stall Brian and his troops and have Seliph advance to Dozel and seize it to make Brian and his troops disappear.
Dozel castle itself is guarded by Dagon AKA Juphiel with a different name and portrait. He poses little threat to Seliph.
Castle Friege
Upon the seizure of Dozel, the Friege army will emerge, though it will not attack until you approach. Use this time to have your units move up, resupply using Dozel castle, heal and have your infantry catch up. You're not under attack until you provoke the next group of enemies, so use the time here wisely.
Hilda commands the Gelbenritter, an army of Barons that as much as the plot implies specialize in Thoron magic, happen to specialize in Silver Lances instead. To a strong unit positioned on a mountain or forest, they're a nuisance and not a threat. They have about 10 magic and 20 strength, so they only have 30/40 Phys/Mag attack, which makes it rather easy to deal with them. They, however, have the obnoxious Pavise skill and a 25% chance to trigger it, which on top of 4 Fortify users and a narrow chokepoint, makes them tedious to fight. The Forseti carrier should have no problem solo-ing them all, as will Seliph with his Tyrfing. Do, however, beware of weapon durability, as if the battle drags on it can become an issue.
Hilda herself is actually easier to deal with compared to her battle last chapter. She's thrown out her Speed Ring and also got off of her castle, but has gained zero stats in compensation. While she can Fortify, there are also 3 Friege Barons who can, and it's a mostly redundant ability since the enemy will full-heal all of its non-lethally injured units anyways. Hilda has capped her Magic, which along with a Bolganone, has her hit for 50. However, most of your units will have enough HP to soak the hit, and since that Speed Ring is gone now, she can't double anything with 12 or more AS, turning Follow-Up from marginally threatening to Lance users to non-threatening to literally anyone that doesn't use an axe.
Scipio leads the Beigenritter, which shows up from the south border once a Friege unit is engaged in battle or if a unit nears the mountain pass south of Friege castle. If you play fast and have Seliph rush Friege castle and seize, then Scipio might as well not exist, since he and his troops will despawn if Friege is seized. If you take it slower, however, which is fairly likely as Hilda's troops will be frequently triggering their Pavise, then you will have to deal with Scipio. Scipio's troops, along with himself, are all locked to 2-range, making it fairly easy for Faval to sit in a forest and enemy phase them all with the Yewfelle. A fast mage like the Forseti carrier or Leif with the Tornado can also deal with them easily, even though the Beigenritter have Brave Bows.
Scipio, however, is a huge threat compared to his troops. He has a Killer Bow, which means he gets a 22% chance to kill your unit with a crit. The Killer Bow is also extremely accurate, at 100 hit, letting him pose a risk of an OHKO even if you bait him from a forest. He's also capable of doubling you, thanks to having 20 AS due to the Killer Bow having only 3 weight, and Accost will also be working off of his high AS and higher HP pool. Larcei, and to a lesser extent Scathach, have Nihil by default and also can reasonably reach the threshold to not get doubled, and hence can safely bait Scipio out on a forest, then follow up by having 4 units exploit his lack of 1-range by boxing him in. Alternatively, you can take the risk and bait him out with the aforementioned Faval and Forseti carrier.
Baran is another Juphiel clone. Kill him with Seliph as always.
Etymology and other languages
| Names, etymology, and in other regions
|
| Language
|
Name
|
Definition, etymology, and notes
|
| English
|
End of the Holy War
|
From the title of the player phase theme "End of the Holy War (Arranged)" in Fire Emblem Heroes. Heroes also localizes this chapter's name as Holy War's End in the name of a skill, potentially due to limited space.
|
English
(unofficial)
|
The Final Holy War
|
Used in the Project Naga fan translation
|
| Spanish
|
El fin de la Cruzada
|
The End of the Crusade; the skill in Heroes is Fin de la Cruzada.
|
| French
|
Fin de la guerre sainte
|
End of the Holy War; the skill in Heroes is Fin guerre sainte.
|
| German
|
Ende des Heiligen Krieges
|
End of the Holy War; the skill in Heroes is Ende des Krieges
|
| Italian
|
Fine della Guerra Sacra
|
End of the Holy War; the skill in Heroes is Fine Guerra Sacra.
|
Portuguese
(Brazil)
|
Fim da guerra sagrada
|
End of the Holy War; the skill in Heroes is Final da guerra.
|
| Traditional Chinese
|
最後的聖戰
|
The Final Holy War; the skill in Heroes is 最後的聖戰.
|
|
|
Gallery
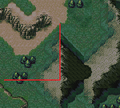
If any unit ends his or her turn in the red area, the Yngvi army will arrive. The area north is within the range of Friege units, which also causes Yngvi to emerge.
References


