The Binding Blade (chapter)
| ||||||||||||
|

| “ | We shall show them the power of Bern's main forces. Still...that general from the Lycian League Army made it this far. | ” | — Murdock to Galle |
|---|
The Binding Blade (Japanese: 封印の剣 Sword of seals) is the twenty-first chapter of Fire Emblem: The Binding Blade. In order to play the side quest after, this chapter must be completed within 30 turns, and Melady and Zeiss must be recruited and alive.
Plot
- Main article:
The Binding Blade (chapter)/Script
The Etrurian Army has at last reached Bern. Guinivere leads the group to the Shrine of Seals, the resting place of the Binding Blade. However, the shrine is protected by the Wyvern Generals Murdock and Galle.
Yoder returns to the Etrurian Army because he received Roy’s letter detailing what he learned about dragons from Niime. Like Roy, he has concluded that Bern resurrected the Demon Dragon, who now hides in Bern’s army in human form. He suspects that she may be the Dark Priestess often seen at King Zephiel’s side. Additionally, Yoder brought two legendary weapon to support the cause. These weapons are the Staff of the Saint, as well as whichever of Mulagir and Maltet Roy did not have the opportunity to acquire for himself.
Though both Zeiss and Melady, Galle's former subordinate and lover respectively, can confront Galle on the battlefield, Galle cannot be swayed from his loyalty to Bern and dies during the conflict. Roy also succeeds in slaying Murdock, thus conquering the Shrine of Seals.
If the shrine is taken sufficiently quickly and both Melady and Zeiss survive until this point, Elffin will discover a secret passage inside the shrine leading to the holding place of an additional legendary weapon besides the Binding Blade.
If the battle drags on for too long, the druid Peres will dispose of the weapon instead and join the fray on Murdock's side. Once beaten, Roy, Elffin and Merlinus proceed to the altar of the Binding Blade. After Merlinus tries and fails to draw the blade, Roy inserts the Fire Emblem into the blade's hilt like Guinivere instructed him. Immediately, Roy sees a vision of the Dragon Sanctuary with an unveiled Idunn inside, and speculates that this is Hartmut's memory contained within the Binding Blade. When the vision fades, the Binding Blade glows. Though Roy doubts that he is fit to wield Hartmut's weapon, Elffin reassures him that the Binding Blade chose him. With renewed confidence, Roy leads the Etrurian Army toward the final clash against Zephiel.
Chapter data
Normal Hard
| ||||||
|
| |||||
| Victory: Seize the throne | Player | Enemy | ||||
|---|---|---|---|---|---|---|
| Defeat: Roy dies | 1–18+1 | 35+96 | ||||
| ||||||


Character data
| Characters | |||||||||||
|---|---|---|---|---|---|---|---|---|---|---|---|
New units
| |||||||||||
| |||||||||||
Required characters
| |||||||||||
Available characters
| |||||||||||

- At the end of the chapter, if the requirements to enter Chapter 21x were not met, Roy will promote to Great Lord automatically.
Item data
| |||||||||||||||||||||||||||
|
Shop data
Swords Lances Axes Bows Anima Light Dark Staves Items Secret
| Name | Cost | |
|---|---|---|
| Silver Sword | 1,500 | |
| Silver Blade | 1,800 | |
| Armorslayer | 1,260 |
- The secret shop is located in the central right edge of the map, in the single grass tile in the middle of the mountain range.
Enemy data
- Stats with two figures separated by a ~ are presented as a range, representing stats that vary due to random growths. The figures to the left and right of the ~ are the stat's minimum and maximum possible values respectively.
Normal Hard
| |||||||||||||||||||||||||||||||||||||||||||||||||||||||||||||||||||||||||||||||||||||||||||||||||||||||||||||||||||||||||||||||||||||||||||||||||||||||||||||||||||||||||||||||||||||||||||||||||||||||||||||||||||||||||||||||||||||||||||||||||||||||||||||||||||||||||||||||||||||||||||||||||||||||||||||||||||||||||||||||||||||||||||||||||||||||||||||||||||||||||||||||||||||||||||||||||||||||||
| |||||||||||||||||||||||||||||||||||||||||||||||||||||||||||||||||||||||||||||||||||||||||||||||||||||||||||||||||||||||||||||||||||||||||||||||||||||||||||||||||||||||||||||||||||||||||||||||||||||||||||||||||||||||||||||||||||||||||||||||||||||||||||||||||||||||||||||||||||||||||||||||||||||||||||||||||||||||||||||||||||||||||||||||||||||||||||||||||||||||||||||||||||||||||||||||||||||||||
| |||||||||||||||||||||||||||||||||||||||||||||||||||||||||||||||||||||||||||||||||||||||||||||||||||||||||||||||||||||||||||||||||||||||||||||||||||||||||||||||||||||||||||||||||||||||||||||||||||||||||||||||||||||||||||||||||||||||||||||||||||||||||||||||||||||||||||||||||||||||||||||||||||||||||||||||||||||||||||||||||||||||||||||||||||||||||||||||||||||||||||||||||||||||||||||||||||||||||
| |||||||||||||||||||||||||||||||||||||||||||||||||||||||||||||||||||||||||||||||||||||||||||||||||||||||||||||||||||||||||||||||||||||||||||||||||||||||||||||||||||||||||||||||||||||||||||||||||||||||||||||||||||||||||||||||||||||||||||||||||||||||||||||||||||||||||||||||||||||||||||||||||||||||||||||||||||||||||||||||||||||||||||||||||||||||||||||||||||||||||||||||||||||||||||||||||||||||||
Reinforcements
- Enemy phase when any unit ends their turn north of the shrine (columns 13–32, rows 22–25)
- Galle and 4 Wyvern Riders—one with a Horseslayer, one an Axereaver, one a Javelin, and one a Steel Lance—from north of the village
- Enemy phase when any unit ends their turn near the shrine (columns 18–32, rows 22–36); repeatable up to three times.
- 3 Wyvern Riders with Steel Lances (two with Vulneraries) and 1 Wyvern Lord from the west peaks
- 1 Wyvern Lord and 3 Wyvern Riders—one with a Javelin, two with Steel Lances and Vulneraries—from the south edge of the map
- Enemy phase when any unit ends their turn southwest of the village (columns 1–9, rows 16–19); repeatable up to three times
- 4 Paladins—one with a Silver Lance, one a Javelin, and two with Steel Lances and Vulneraries—from north of the southern peaks
- 1 Wyvern Lord and 3 Wyvern Riders with Steel Lances (two with Vulneraries) from the southwest corner of the map
- Enemy phase when any unit ends their turn north of the southern peaks (columns 1–13, rows 25–28)
- 1 Wyvern Lord and 3 Wyvern Riders with Steel Lances (two with Vulneraries) from the southern peaks
- Enemy phase when any unit ends their turn in the northeast corner of the map (columns 22–31, rows 1–7); repeatable up to three times
- 1 Wyvern Lord and 3 Wyvern Riders with Steel Lances (two with Vulneraries) from the upper of the eastern peaks
- 1 Wyvern Lord and 3 Wyvern Riders—one with a Javelin, two with Steel Lances and Vulneraries—from the lower of the eastern peaks
- 1 Wyvern Lord and 3 Wyvern Riders with Steel Lances (two with Vulneraries) from the peaks west of the shrine
- Turn 31
Boss data
- Stats with two figures separated by a ~ are presented as a range, representing stats that vary due to random growths. The figures to the left and right of the ~ are the stat's minimum and maximum possible values respectively.[1][2]
- Main article:
Murdock
Normal Hard
|
|
| |||||||||||||||||||||||||||||||||||||||||||||||||

- Main article:
Peres
Normal Hard

Strategy
| This section details unofficial strategies that may help with completion of the chapter. This may not work for everybody. |
The secret shop sells every class-change item, every stat-booster, and siege tomes; notably, this includes Boots. It is generally advised to sell all unwanted equipment to buy as many Boots as possible. While items can be sold at the battle preparations shop on Normal, the shop is not available in Hard, so accessing the convoy to sell items requires deploying Merlinus.
While previous chapters in The Binding Blade often featured a few Wyvern Riders and a Wyvern Lord, this chapter features 15 on Normal, with more appearing as reinforcements and even more present on Hard. Some relevant stat thresholds for fighting these enemies on Hard are:
| Enemy | Threshold (average stats / maximum stats) | ||||
|---|---|---|---|---|---|
| One-shot physical attack | One-shot magical attack | Two-shot physical attack | Two-shot magical attack | Doubling attack speed | |
| Level 20 Wyvern Rider | 63/69 | 50/56 | 40/44 | 27/31 | 19/21 |
| Level 10 Wyvern Lord | 75/84 | 61/68 | 47/53 | 33/37 | 20/23 |
| Level 13 Wyvern Lord | 78/87 | 63/71 | 49/55 | 34/39 | 20/23 |
Weapons that deal bonus damage to wyvern units will likely be required to reach one- or two-shot thresholds; some such weapons include:
- Aircalibur deals magical damage and has 24 effective might.
- A Killer Bow deals physical damage and has 27 effective might; critical hits may allow units that do not meet a threshold to one- or two-shot.
- A Silver Bow deals physical damage and has 39 effective might.
- Durandal deals physical damage and has 51 effective might.
- Forblaze deals magical damage and has 42 effective might.
Many of the reinforcements only spawn if the player enters certain regions, so they can be avoided rather than fought. The map has three "lanes" that encounter different enemies and may trigger different reinforcement sets.
- The top lane, going to the top right corner of the map and then down, faces only one reinforcement zone before reaching the shrine; however, this zone triggers three squads at once for three turns, two of which appear very close to the trigger zone.
- The middle lane, starting near the Sage and crossing the map south of the Village, triggers the fewest reinforcements. Entering the area near the Sage will trigger a squad of Wyverns and also a squad of Paladins; they approach from the same direction, but the Paladins will be slowed by terrain, potentially causing them to reach the player at the same time as the next wave of Wyverns.
- The bottom lane, going to the very south of the map and approaching along the southern peaks, triggers the same reinforcements as the middle lane in addition to more wyverns closer to the player from the southern peaks as the player deviates from the middle lane.
These reinforcement zones can be circumvented with fliers or mounted units, who have enough movement to pass from one end of a zone to the other without waiting inside it or simply moving around it, potentially carrying another unit.
Approaching the Shrine triggers additional reinforcements: Galle's squad and two other Wyvern squads (one from the western peaks, another from the southern peaks) will spawn; Galle's squad may be triggered earlier by using the bottom lane, and the latter two squads can spawn up to three times, which will almost always trigger all three times as the player needs to go around to the south to enter the Shrine. Alternately, the player may Warp units directly into the Shrine to quickly defeat the boss and then seize. Galle's squad spawns far from the shrine, and does not pose an immediate threat.
The boss, Murdock, is not easy to defeat quickly. He has capped strength and has a Tomahawk for 1–2 range. Murdock has 40 attack, and has much higher skill than many of the prior General bosses (22–23 on Hard); he also has incredible bulk: including bonuses from the throne, he has over 70 HP, 30–32 defense, and 23–25 resistance on Hard. Most of the units that could quickly defeat Murdock are frail, and warping them to Murdock may result in them dying on retaliation or to another nearby enemy; conversely, many of the units with the bulk to withstand Murdock's attacks struggle to deal significant damage to him or are magically frail and susceptible to the nearby Sage.
Trivia

- Both this chapter and Chapter 27 in Eliwood's tale of Fire Emblem: The Blazing Blade feature the Shrine of Seals, and can be combined near-seamlessly.
- "Shock II" was intended to play partway in the scene where Roy and Yoder meet again, but due to an oversight, it instead plays after it, only to abruptly stop once the Player Phase begins.
- This is one of the only three chapters in The Binding Blade to have additional enemies on turn 1 in hard mode, the others being Chapter 7 and Chapter 22.
Etymology and other languages
| Names, etymology, and in other regions | ||
|---|---|---|
| Language | Name | Definition, etymology, and notes |
| English |
Sword of Seals |
Used in leftover text from the data transfer menu in the English version of Fire Emblem: The Blazing Blade. |
| English (unofficial) |
The Binding Blade |
-- |
| Japanese |
封印の剣 |
Sword of seals, named after the game's subtitle |
Gallery
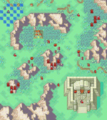
Map of the chapter
References
- ↑ The Binding Blade, triangleattack.com, Retrieved: December 24, 2020
- ↑ The Elder Revelation, trianglattack.com, Retrieved: December 24, 2020
| ← Ilia's Salvation • ← The Freezing Lance (side quest) • ← The Silver Wolf • ← The Bow of Swift Wind (side quest) • |
The Binding Blade | • Unattained Dream → • The Elder Revelation (side quest) → |
|---|